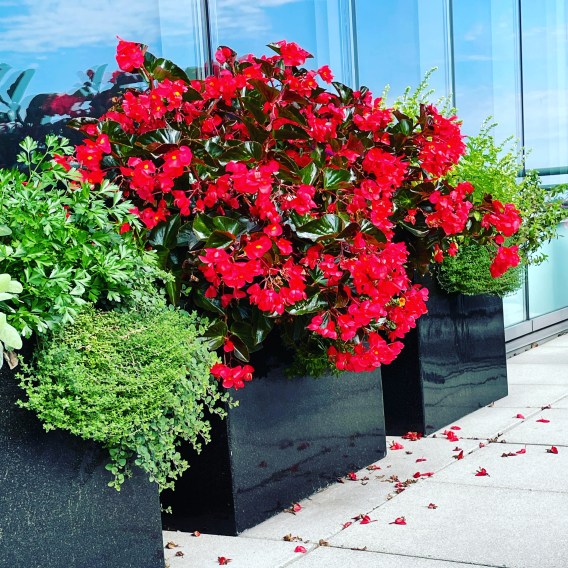
Last year (2022), I decided to try out a new begonia plant in a planter on a balcony overlooking the city with an impressive view. Each season, I change up the “filler plants” in the large planters at this site and I must consider environmental factors such as extreme winds, strong full sun half the day, potential lack of watering, and flowers staying on the plant (not being blown away by the winds which are intense from time to time).
When I returned in the early autumn season, I was very impressed with the massive size and performance of this cultivar. It grew from a small starter size plant to this massive, impressive size and the color intensity of the blooms was very vivid and bright along with its darker colored glossy foliage. I definitely gasped in awe of how beautiful it looked when I walked out onto this high-rise balcony.
On each side of the planter with the begonia plant, I planted various herbs, which as you can see, grow quite well in this location. Each planter is filled with soil mix and receives a good amount of growing space below. The owners of this site are very good at watering the plants as needed as well. In addition, begonias are tropical or subtropical plants, so they do well in hot locations and bloom throughout the summer here in Connecticut, but because they are not hardy to our planting zone, they must be taken down or overwintered before frost hits them during the autumn season.
These clients like color on their balcony, and this begonia did not fail. Its growth habit is mounding, and its shiny leaves are a bronze color (another bonus); I love when plants offer darker tones to serve as contrasting colors in mixed arrangements in container gardens or planters, patio pots, etc. The flowers look a little orange toned here in my photo, but they are a vibrant red color. The other bonus about begonias, in general, is that they can take sun or partly shady sites. This site receives full sun in the mornings followed by shade in the afternoons once the sun is hidden by the tall building. The overall height of the begonia reached was about 24″. That is a whopper of a begonia, and that is the name of this one: Begonia ‘Whopper Red with Bronze Leaf’.
Photo by Cathy Testa of Container Crazy CT. Begonia with herb planters on each side.
Photo by Cathy Testa of Container Crazy CT. Begonia ‘Whopper Red with Bronze Leaf’
Another added benefit of the size of this begonia was it was visible from within the home. Nothing like seeing color when you are enjoying the expansive views from the large windows of your living spaces.
A COLOR PROVIDER?
YES – VIBRANT AND INTENSE!
FULL SUN EXPOSURE?
YES – HANDLED HOT SUN TILL NOON, THEN SHADE
TOLERATES STRONG INTENSE WINDS?
SURE DID – THE WALL PROBABLY HELPS HOWEVER
HANDLES SUMMER TROPICAL HEAT
YUP! IT’S TROPICAL! THIS PLANTS LIKES HEAT.
IMPRESSIVE SIZE
ABSOLUTELY – IF YOU WANT BIG, GET THIS BEGONIA
HANDLES PERIODS OF DROUGHT
IT DID – LAST YEAR WAS A DROUGHTY YEAR TOO IN CT
DOESN’T DROP FLOWERS
IT DID BUT NOT TOO MANY – BEARABLE
PROVIDES CONTRAST COLOR
BRONZE SHINY LEAVES
EASY CLEAN UP AFTER SEASON
IT IS NOT TOO DIFFICULT TO REMOVE, STEMS BREAK THOUGH
EASY TO GROW
ABSOLUTELY
What I like about this plant above! The fleshy stems can break when you remove it however, but that was fine as I was taking it down at the end of summer or very early fall to prepare for an autumn planting.
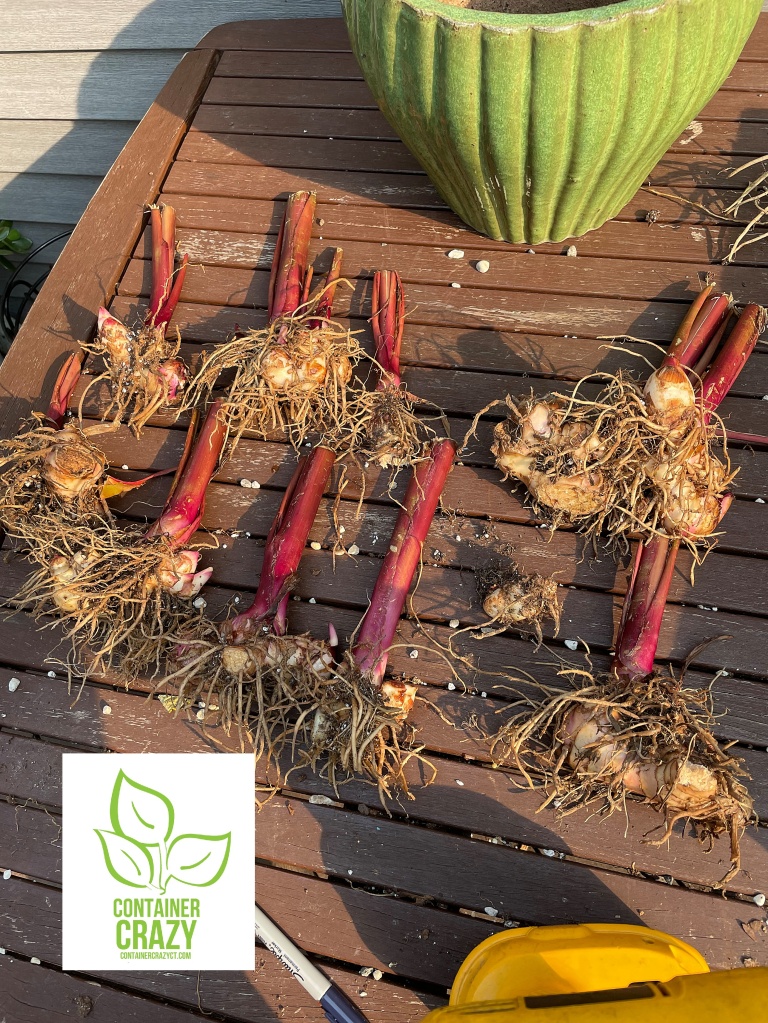
About two weeks ago, I decided to check on my stored corms and tubers of my Alocasia plants. They are stored in my basement in cardboard boxes over the winter months from about October until April.
I stored them differently this fall because last year, the corms/tubers had some rot spots on them when I took them out in springtime to replant them. The new storing process I used in the fall of 2022 was documented in my prior post below on this blog site.
Post from October 2022 of how I stored my Alocasia corms and tubers for winter above.
Mid-Winter
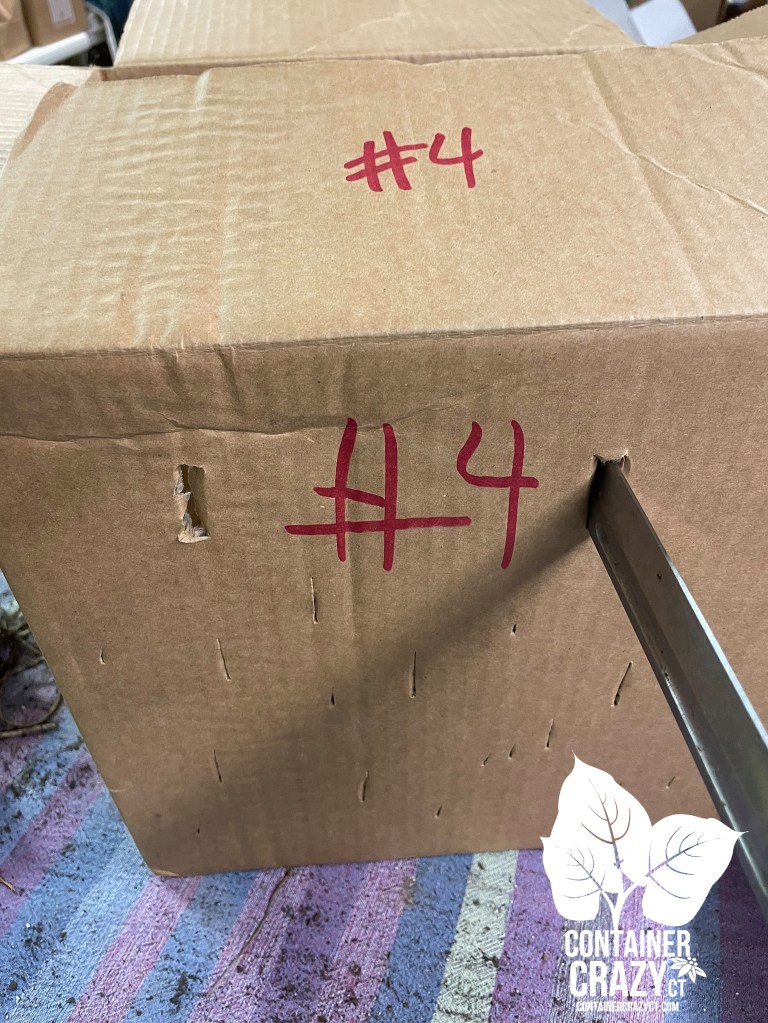
In late February, of this year, 2023, I decided to check in on the stored tubers and corms. And I’m happy to report that they are doing well. No rot spots. The change I made was to not use peat, use newspaper, and use mesh bags to insert the corms/tubers into individually and put in a cardboard box (instead of a plastic bin). I also cut air holes into the sides of the cardboard boxes.
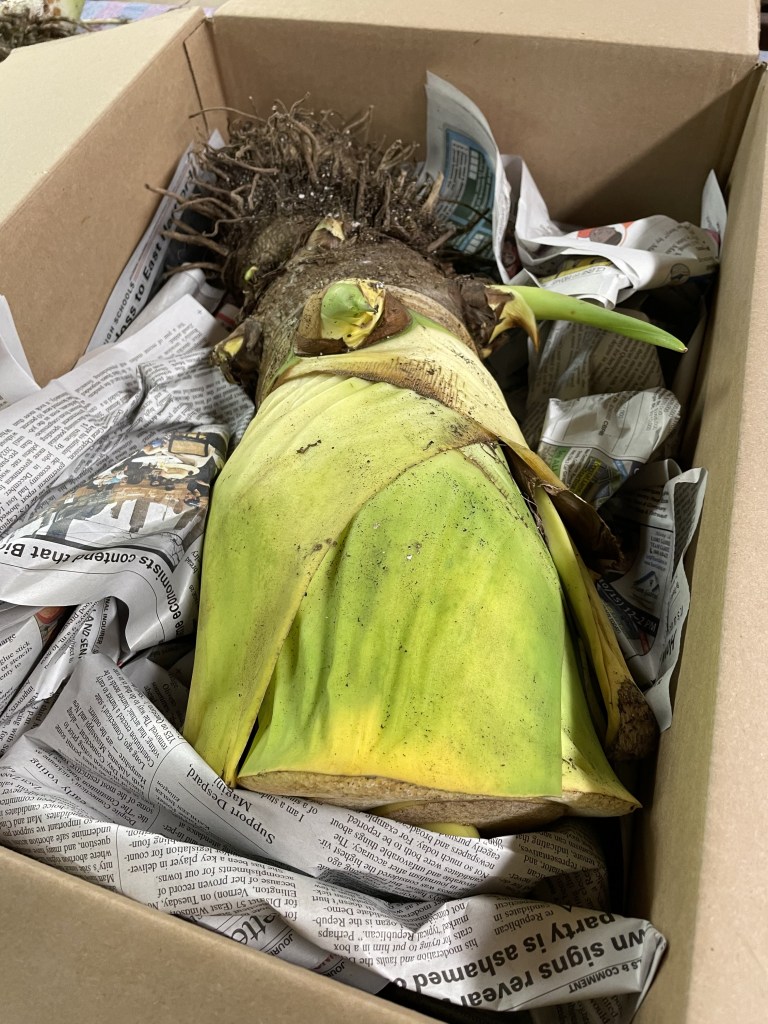
Largest one – when I stored it in October (photo above).
The cardboard box used.
Appearance of the largest Alocasia tuber in February 2023 (5 months since storing).
As you can see from the photos above, the tuber of my largest Alocasia now has a papery covering. There are no rot spots and there is a bit of green, showing signs of life – it is doing well. This one, due to its size, would not fit into a mesh bag, so I just laid it on top of the newspaper. You will also notice when comparing the photo from October and the photo from February, the whole tuber shrunk a bit as it dried out, which is fine and normal.
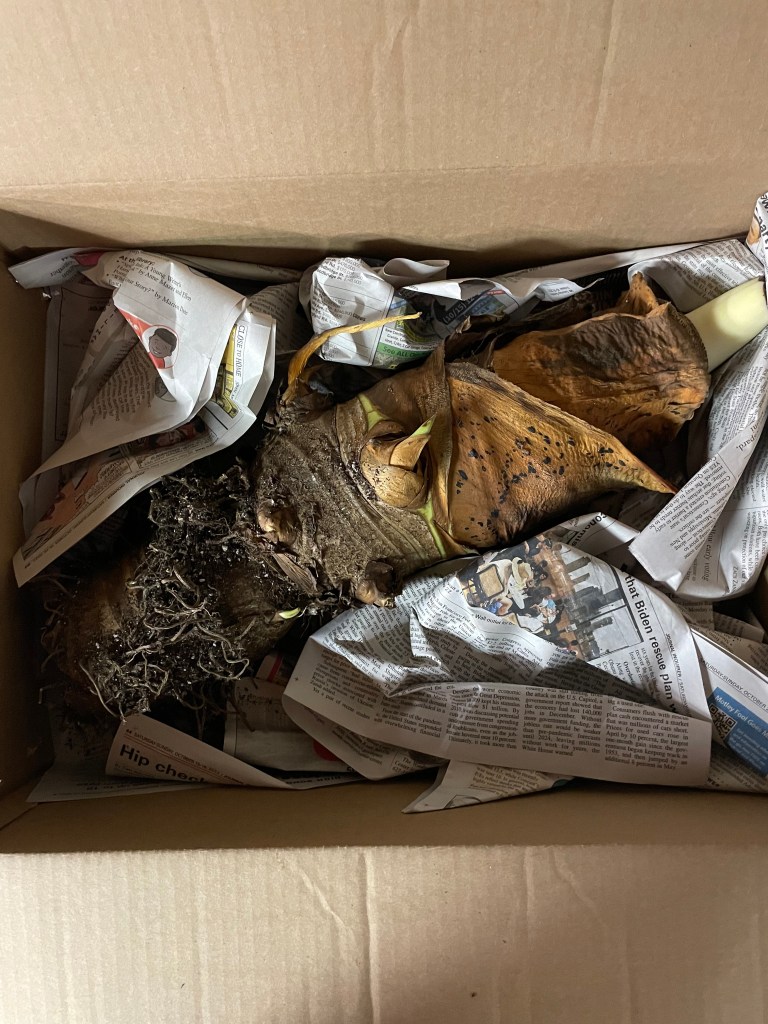
Close Up Photo (Feb 2023)Smaller tubers (October 2022)
The photo above is of smaller tubers and corms which I had dug up in the fall. These are still green, and I laid them out for about a week to dry out more in the fall, removed all the soil debris, and inserted those which would fit into mesh air hole like bags, and then placed them in a smaller box, with newspaper padding around, and loosely closing the box to allow air circulation, in addition to making some air slits in the side of the boxes.
Smaller tubers in this boxMesh bags shown on the right in this photo
I’m happy all looks fine so far. The place where I stored them is in my unheated basement that does not go below freezing but is cold during the winters. This year, we have had a mild winter thus far. Thus, the basement may be a little warmer than usual. I’ll look forward to when I can take these out in April or maybe May to get started in small pots to induce growth and then transition them yet again to my containers in late May to enjoy all summer.
Inserted into Mesh Bags, then placed in cardboard boxes in the fall season.
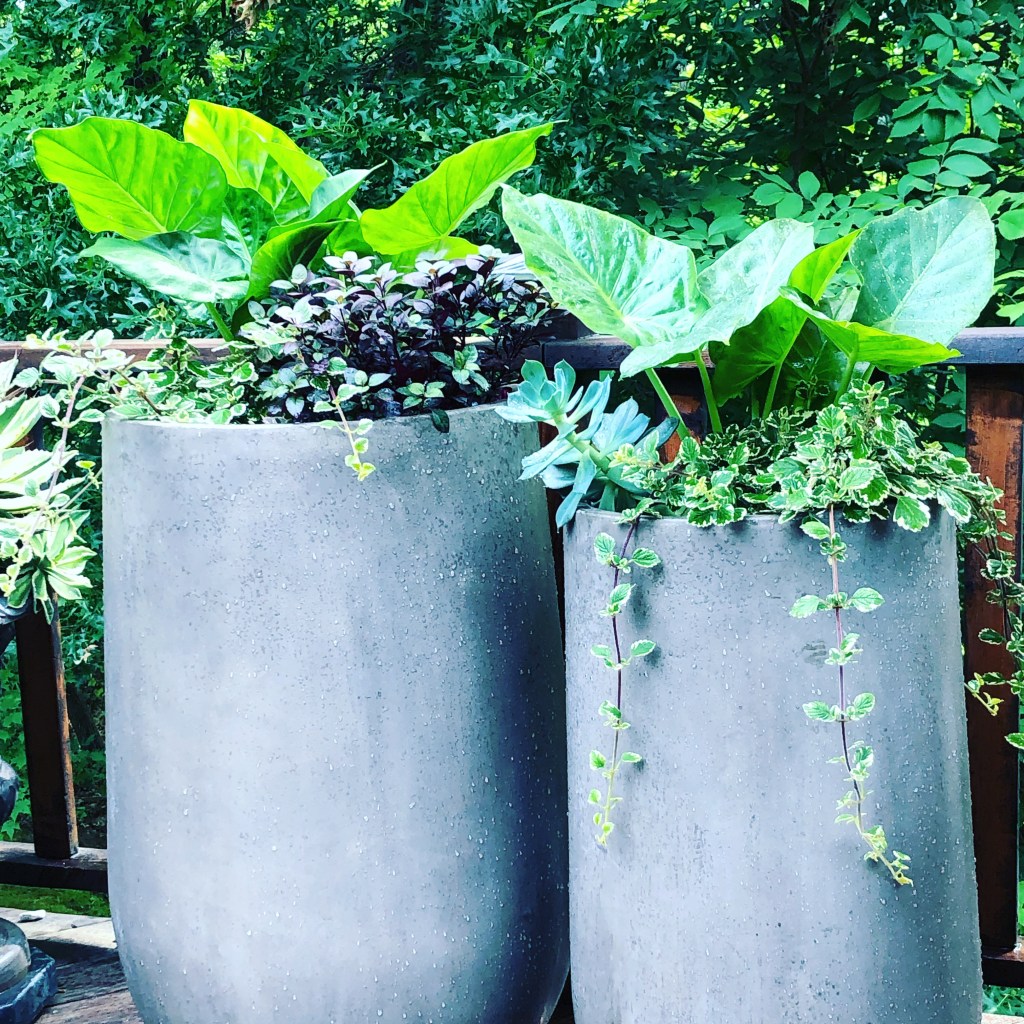
How it Grows
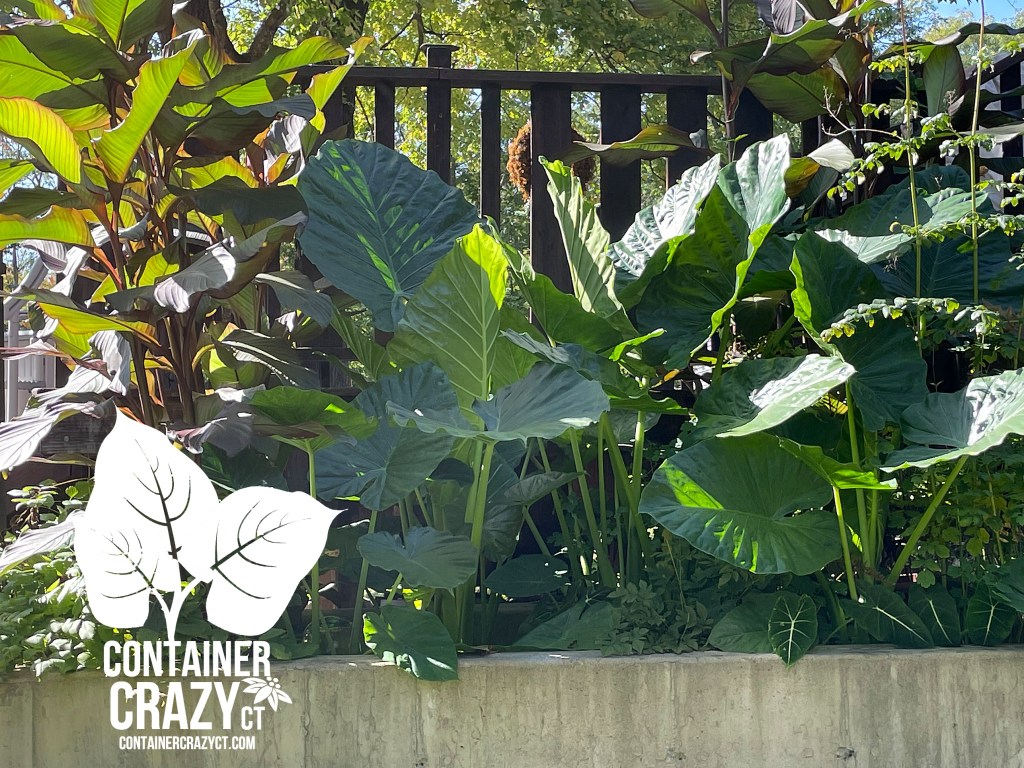
This photo shows a few years back. The plants are starting to grow and gives you an idea of the Alocasia’s form. This one grows upright and is a jumbo variety.
In the first couple years, the size of the plants did not grow as large as later as the tuber/corm grew larger and larger. As you can see in the next photo, the height of the leaves are taller.
Every summer season, I use different fillers plants. This particular jumbo Alocasia is so worth saving and regrowing. It seems to become more dramatic every year.
The stalks of the leaves are usually about 3 feet long along with the leaves growing 3 feet too.
The plant usually looks like this in the fall season, when I’m getting ready to cut it down and dig it out. I’ve documented the process many times.
Shown above are various posts as I overwintered the tubers and corms of my Alocasia plant (and plants as a result of more tubers over time). The process I used before, with peat and bins, had worked perfectly for other plants such as Canna Lily rhizomes and Red Banana Plant bases, but for this type of Alocasia plant, it seems better to store them more in a dry state, the way I showed above in the paper and in cardboard boxes, etc.
I hope this helps anyone out there who stores their tubers and corms over the winter. I’m in CT planting zone 6b. Our winters are becoming warmer due to global warming here in CT, and this year has been particularly mild. We got a snow fall this week but we haven’t plowed our driveway once yet – its been warm enough some days to work outside and other days, a bit chilly. We have not snow showed yet and it is March!
Upright Jumbo Alocasia
I purchased my first tubers of this type of plant in 2018 or 2019. These types of elephant ear plants love sun and do fine in partial shade as well. They are dug out in fall and replanted in my container gardens every spring (after spring frost), as soon as it is warm enough outdoors – usually around Memorial Day. I start them in small nursery pots inside to get started and it easy to keep them growing well each season. Because this plant is tropical, it can’t be left outdoors through our winters or freezing temperatures. In the fall, you can let frost hit the tops or cut them down before fall frost. It turns out storing them in paper has worked better to keep them dry and safe. This plant grows up to 72 to 92 inches tall. I plant the tubers about 4-5″ deep and enjoy their dark green glossy upright leaves all summer. They are a real showstopper if someone hasn’t seen them before. I think the mistake I made was I treated these the same as my Canna Lily rhizomes and red banana plant bases, but it is handled somewhat differently. Live and learn – that’s the life of plant enthusiasts!
This year I’m trying a new method for storing my Alocasia corms (sometimes referred to as bulbs or tubers, but they are not true bulbs). I have seen Alocasia corms referred to as “tubers” in many garden reference and technical books, but for the purposes of this post, I’ll stick with corms as the term used for these Alocasia plants I am putting away for the winter months in Connecticut.
Bins Years Prior Used
For years, I stored the bases of underground parts from my elephant’s ears and canna lily plants in plastic bins with covers (air holes drilled in the covers) with peat. When I say “parts”, I’m referring to corms for the elephant’s ear (Alocasia and Colocasia) and rhizomes for the Canna Lily plants).
The peat (only a small amount below; used almost like a bed below the corms/rhizomes, and some peat lightly sprinkled over the tops of the corms and rhizomes) helped maintain a bit of moisture but kept the tubers in a dry but not too dry or too moist state.
However last year, some of my Alocasia corms had rot areas on them when I went to take them out in the spring to start growing again. They were too damp. Plastic bins will hold onto some moisture (versus a dry cardboard type box) but this problem of rot really had never occurred before. Since I want to make sure I am able to save these dramatic large Alocasia plants’ corms, I’m trying this new method this year.
Dug Up about a Week or few days prior
In last week’s post, I showed how I dug up the Alocasia plants from a huge cement planter, cutting off the foliage about 4-6″ from the top of the corm area, and laid them out in the sun for one day. Then I moved them to my basement in laundry baskets.
I also dug up a very large Alocasia plant prior to these, from a big tall patio planter, and laid out a huge corm with top part of the plant (stump like stem area) in a bin about a week before these above.
The ones in the laundry basket were still too damp when looking them over yesterday, so I laid them out on a table in my basement, and spread each corm on the table so they are not touching, and decided I will wait a few days longer before packing those up into boxes. I will leave these on a table another few days to air dry in my unheated basement.
However, I decided to pack up the others that were dug up prior from my gray patio planters. One of them is super large and heavy. It isn’t draining out any more water or moisture now, feels like it has dried enough, and there are no rot or damp areas on the corm area. It was placed in a bin in my basement about one week prior to those dug up from my cement planter so it and its side shoots have been drying longer.
In doing a bit of research, I’ve read Alocasia corms may be stored in newspaper and put in a cardboard box with air vents. I happen to have some boxes available and used a large sharp knife to make slits in the boxes around the perimeter of the cardboard boxes for the air vents.
Making air vents
I placed crumbled up newspaper sheets in the base of the cardboard box and used the original plastic mesh bags, which were around each corm when they were originally shipped to me. I placed individual corms into these mesh bags for those that would fit. My largest “stump” shown top right of this photo below is too large for any of the mesh bags I kept on hand.
Mesh Bag with Corm inside
I loosely wrapped a couple sheets of newspaper around this mesh bag once the corm was inside and put it in the box. I am careful to not have them stacked or touching too much with other corms handled the same method because if anything is damp, that moisture will transfer to any touching corms. However, these were all fairly dry and not moist. The idea is to not overpack any boxes and keep air around each.
Now for the larger Alocasia stump. I keep calling it that because it is so much larger, it is more like a stump size! This one I had to find a larger long box and I have no mesh bag for it. It also has a large green area (the top part of where it grew) still attached which is not wet at all when I decided to lay it into the long cardboard box. Again, I crumpled up newspaper below in the box, and then I used a paper bag to cover it like a blanket and close up the box. I did not tape the box closed, as air circulation is important. I just overlapped the covers and I also put vents in the sides like with the other cardboard box prior to laying it in there.
Largest Alocasia “stump”
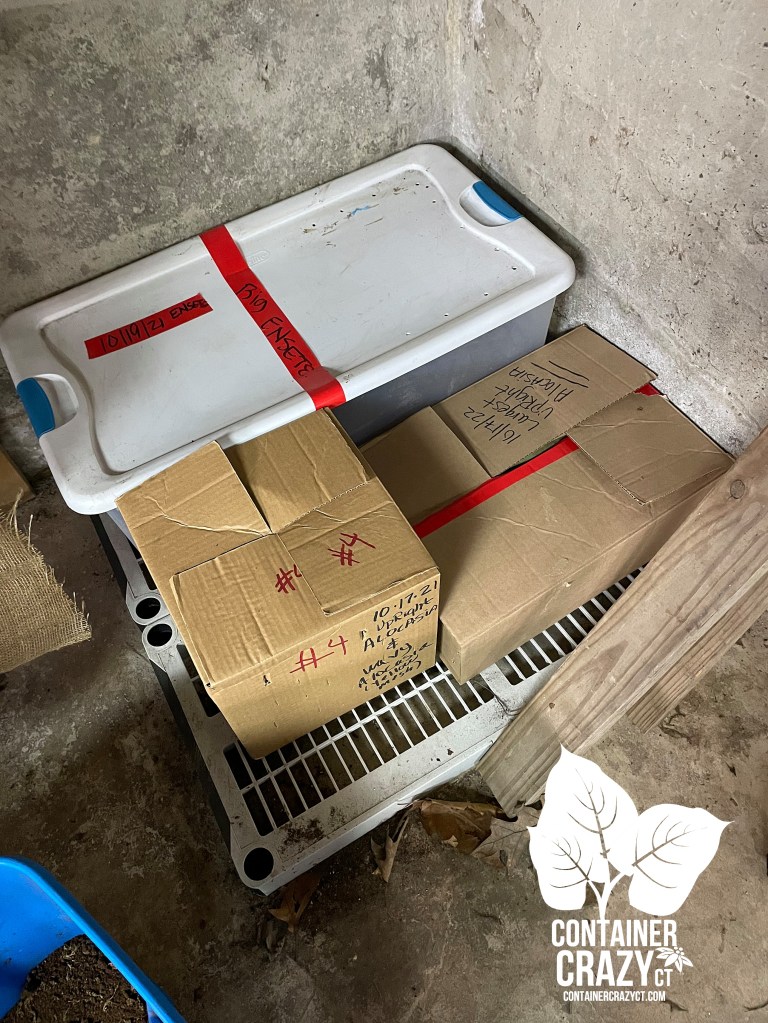
The root area is dry with dry soil a bit still on it, the corm area is dry, and there is still green life on the top part but there is no dripping water coming out of it – it seems like it is dry enough. I labeled all the cardboard boxes with date and placed it in the usual corner of my unheated basement (by the door where it is like tucked in a corner, stays cool, dark, dry and it does not go below freezing here.)
Box Top DatePaper bag serving as a blanket
I have read the optimum temperature for storing Alocasia corms is 40-45 degrees F. Again, my basement is unheated. The only time it may get warm in there is when we use a woodstove at the opposite end of our basement, which is only occasionally. It does not go below freezing (32 degrees F) so they will not freeze. They are kept in a consistent cool 50 degree range or a bit below that for the whole winter. I will check on these in one month by making a note on my calendar to go look at the corms in these cardboard boxes and seeing if they look good (no rot, no moisture, no wet newspaper).
Again, this is the first time I’m trying the cardboard box method for these. I also wish to note, canna lily rhizomes tend to not survive if they completely dry and wither up, so I don’t think I’ll use this method for those plants, only for my precious upright huge Alocasia plants’ corms. I’ve read more about how these are okay more on the dry side. Makes sense because when I purchased the corms about 3-4 years ago, they showed up in a card boad box, with the white mesh bag, shown above, and only the brownish corm with no plant at all attached.
Label the boxes
Corner in Basement
You see the big plastic bin near these two cardboard boxes, that was the bin I last used for my big red banana plant (stump), the Ensete, I had for over 10 years. It failed this year, so there’s nothing in that box right now. I also put a plastic shelf section below the boxes so it is not directly on the concrete floor which may lead to dampness on the bottom of the boxes.
Pic of corm inside a mesh bag
I just hope this works well this year and will keep you posted. Next up will be to dig up my canna lily plants from containers outdoors. Sometimes I don’t bother anymore with those as they may be easily grown from new plants next season, but it is always a great feeling to reuse and regrow plants to save money on purchasing new ones, but sometimes I run out of energy to keep digging up these things. Each year, I seem to do less storing because of the effort. Sunny days help!
Thank you for visiting,
Cathy Testa Connecticut Planting Zone 6b Date of Post: 10/18/2022
P.S. I also want to note, many references will indicate to let the plants get hit by frost first before storing underground parts like the corms or rhizomes, etc. because the freeze will induce dormancy to the plants, however, I often do this process just before a hard frost. The weathermen indicated frost may be happening this week. Wednesday’s forecast indicates about 34 degrees F overnight – so that is chilly!
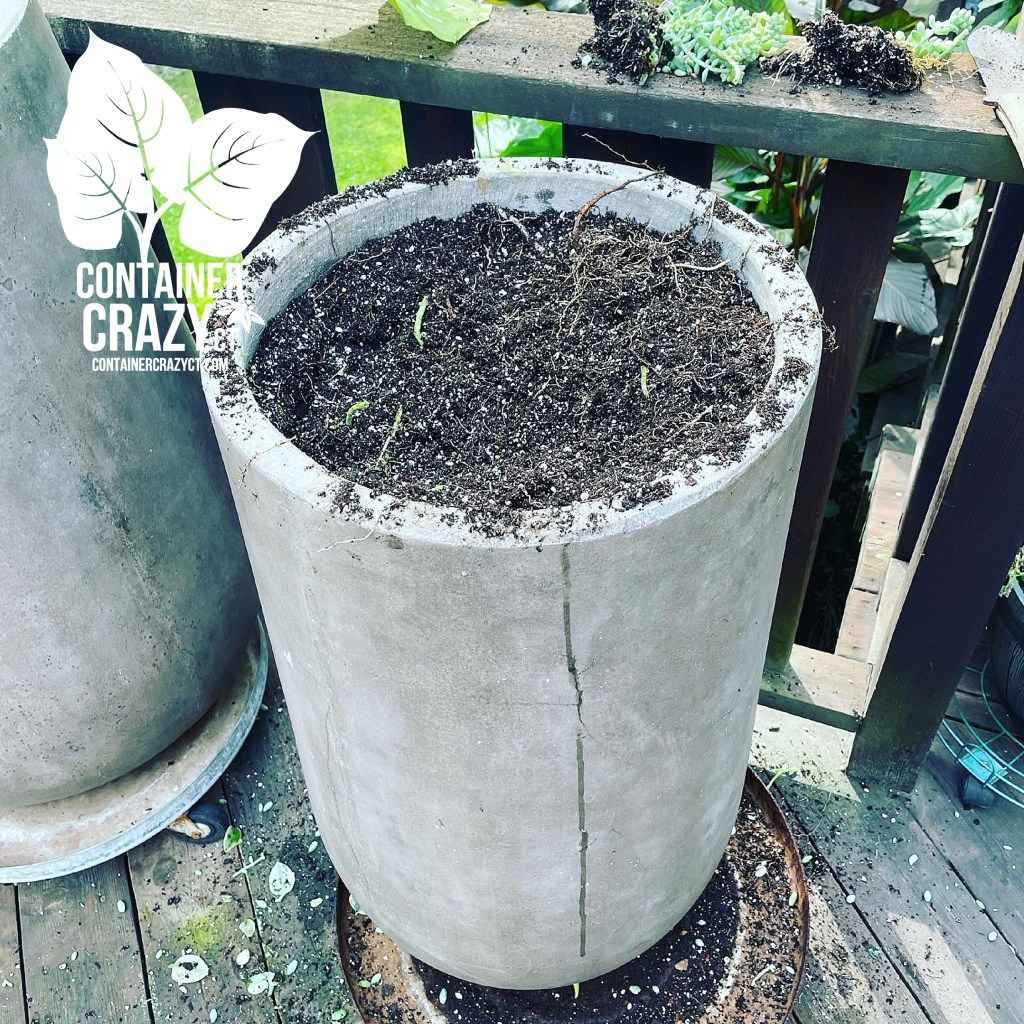
Overwintering Alocasia (al-oh-KAY-see-uh) plants, dug up from a large cement planter in my yard yesterday 10/11/22.
Since this plant is not hardy in my Connecticut planting zone (6b), they must either be dug up and stored (tubers) in a cool, dry place. Alternative options, if the plants are small enough, is overwintering them as houseplants in small pots where you have a sunny room. Or just moving the pots with the plant in tact into an unheated basement and letting them go dormant, but check to add moisture to the pot’s soil from time to time, and check for any insects on the foliage if moved in the pot. In this case, I dug up the plants, removed the foliage, and air dried the tubers yesterday outdoors.
The Planter – Cement
Because yesterday was sunny and warm, I wanted to get to the elephant’s ears in this planter. I was already tired from being on my feet all day, so I rushed getting these out. Luckily for me, the soil is super soft in this big cement planter due to worms and just great healthy soil. Rather than cut all the foliage off first, like I typically do, I dug around the tuber areas in the soil to break free some roots and just pulled them out one by one from the plant stems.
10/12/22 Before Removing the Elephant’s Ears plants
The soil and exposure
The soil in this planter stays relatively moist and receives the east morning sun, so it primarily gets partial sun or dappled sun, it doesn’t get too hot in this area. I do not fertilize – literally – I do not in this cement planter. Over the years, I’ve added recycled soil (from other pots), maybe some compost, but not often, and it is possible some wood ash from the woodstove in our basement, that is used only occasionally, was tossed in there by my husband, but I asked him not to do that after a while (wood ash changes the pH of soils). It is apparent when I dig in the soil, it has worm castings and the soil is very soft and easy to dig into. This is why I was able to pull out the tubers with the plant on the top rather easily after I broke the roots around the base with a trowel. I didn’t even use a shovel.
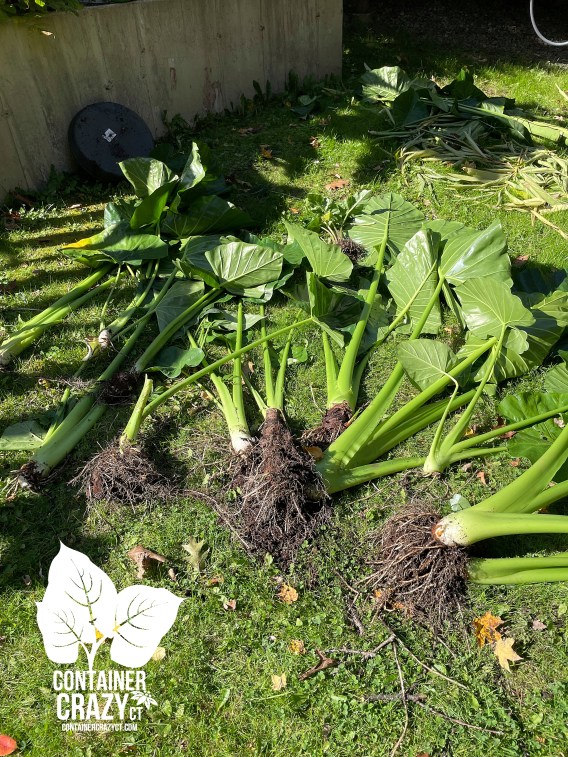
Laying the plants on the ground after digging them out
I do, however, water this planter by using a garden hose from above and showering it every time I was out there watering my other patio pots above on my deck. We had a very dry season this summer here in Connecticut so I’m sure the tropical plants in this cement planter enjoyed the moisture I gave them. These tropical like plants like moist soils, part shade or some full sun. After getting them out, I laid them on the ground and got my machete, which I finally found where I had stored it!
Chop off the foliage, then lay in the sun
It was super easy to chop off the foliage and stems with my machete. One whack and it was done! Then I put them in a laundry basket to sit in the sun for the rest of the afternoon, later, I moved the laundry basket to my basement. It will sit there drying a while before I move them to bins or paper bags for the winter. Some references will say to wait until the foliage dies back or wait till the foliage is hit by frost to dig and store the tubers, however, I like to work on nice days and yesterday was it – sunny and warm. I store mine in the basement, in a corner by the door, which is an unheated basement but it does not go below freezing in winters. We have a woodstove at the other end of the basement, but it is only used on stormy winter days when we feel like it. We do not use the woodstove to heat the house, only to warm it up sometimes. This means those tubers in the corner stay cold, but they never freeze there. It must be cold, but not freezing, and not too warm either. If warm, they may get soggy or start growing.
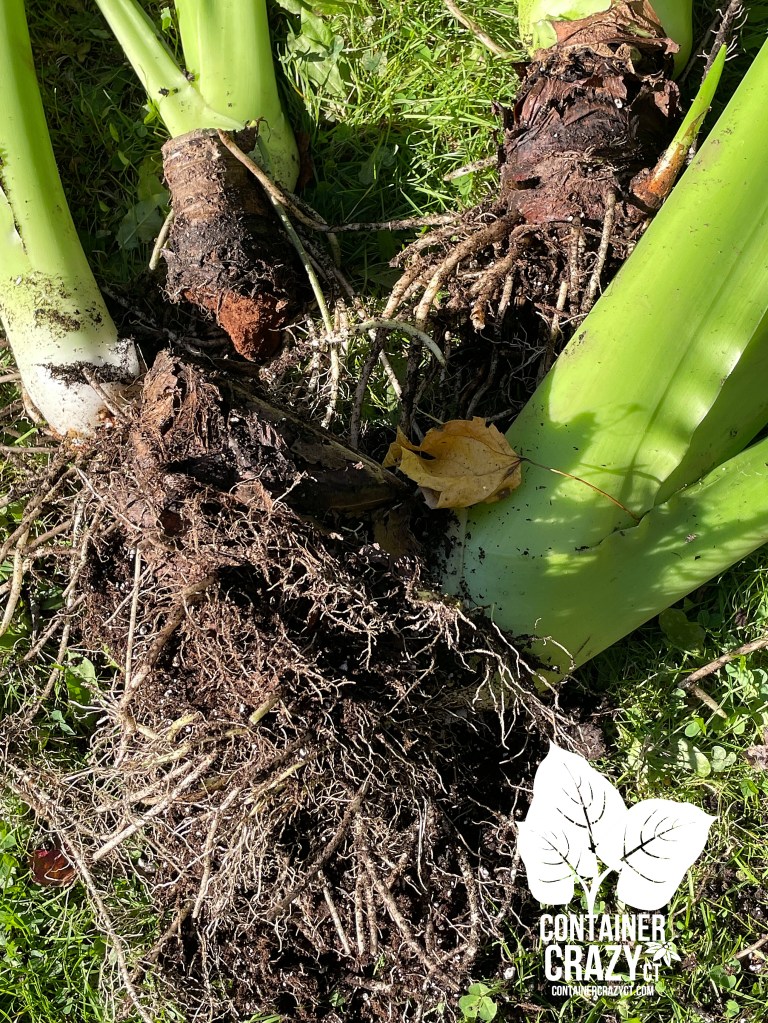
Side Shoot on Right
Notice my logo on the left side of this photo above; do you see the brown original tuber? The plant this season grew from the side of this tuber (a side shoot) which is attached on the right. Sometimes there are smaller side shoots which you may pull apart to create separate plants and replant those side shoots. Also the green parts above the brownish tuber is this year’s plant and I cut it about 4-5″ above the brown tuber in most cases when I remove them. I usually leave the green plant (like a stump or root base) on there but I am not absolutely sure that is required, because when I received the tubers, there was just the brown dry tuber to plant.
After Photo
It probably took me only a half-hour to get those elephant’s ears (in this case, Alocasia macrorrhiza, known as giant elephant’s ear or giant taro) out of the cement planter. I was lucky I think it was easy. I know rain is coming tonight and some parts of Connecticut got hit by a quick light frost already, but no hard frost here yet in East Windsor, CT. When it is a true frost, all the foliage will blacken and flops over. Next is to get to those tall Canna lily plants on the ends of this planter dug out and store the rhizomes or the whole root base.
Note: A. macrorrhiza is hardy in zones 8-10 from what I’ve read, but here in Connecticut (zone 6b for me), they are not hardy (will not survive in the ground over the winter months). Also, when I dug these out – there was no rot on any of the tubers, which is good news. Sometimes, if I wait too long to dig these out, there may be rot spots on the tubers because of cold, wet soils later in October. This is another reason why I like digging them out now. I don’t want any soft rotten spots on the tubers, rot only leads to storage problems as the rot may continue on the tuber, which is what you don’t want.
Sit to dry out a bit more before storing
Because these plants get huge and are gorgeous, I had to take the time to save them. I will let those tubers sit in a bin, spaced out for air, probably for another five days before I store them. I have always typically stored them in peat in bins with air holes in the lids, but last year, as noted on prior posts, they rotted a little. I am going to try storing them in paper bags in cardboard boxes this year with air holes. Plastic bins can trap moisture and for some reason, it just seemed they were too wet last year (maybe I was rushing too much last year, and stored them too wet). I have found when my rhizomes for Canna Lily were too dry stored, they didn’t make it. I have always balanced a bit of moisture from the peat and air, but I believe the Alocasias prefer more on the dry side. Everyone has different techniques for storing from what I’ve seen and read over the years.
Prior was making pumpkins
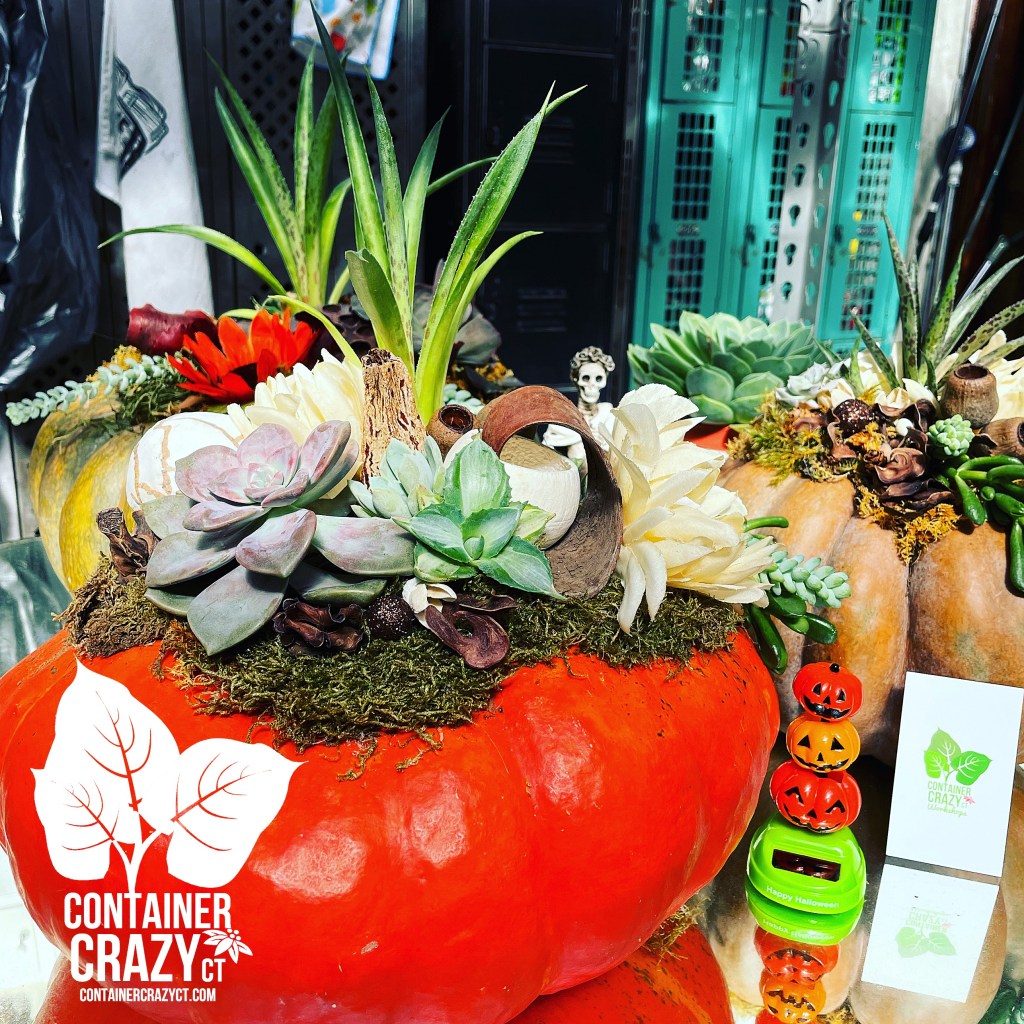
Prior to doing all of this quickly yesterday afternoon, I made a few more orders of my centerpiece succulent topped pumpkins. They were so fun to make and took me a few hours – and my feet give me a hard time, now that I’m getting a little older, standing for hours can be rough. I even put foam on the floor – below my feet, but I felt it later. I tend to make these centerpiece arrangements standing up, and anyhow, these are what I made for some requests. It was a perfect day to do them – sunny in the greenhouse. It’s that time of year when I’m making pumpkin centerpieces and still putting away plants and supplies.
Succulent Topped Pumpkin Centerpieces by Cathy Testa of Container Crazy CT
If interested in a custom pumpkin, now is the time to order since it is pumpkin season. They last for months!
This is part one – showing my process of disassembling my largest elephant’s ear plants from containers or planters. I purchased the tubers in 2019 for this Alocasia, which I refer to as an “upright elephant’s ear” because the leaves point upwards towards the sky. It is often referred to as a Giant Elephant’s Ear, Giant Taro, or Upright Jumbo). Official name is A. macrorrhiza. They grow from 71 to 96 inches (6-8 feet tall) from summer to frost and prefer partial shade. The leaves are very dark green, glossy, and impressive! It prefers partial shade but will do well in more sun with appropriate moisture. In my zone, it must be stored, but warmer zones, I suspect you may keep them outdoors or protected somehow.
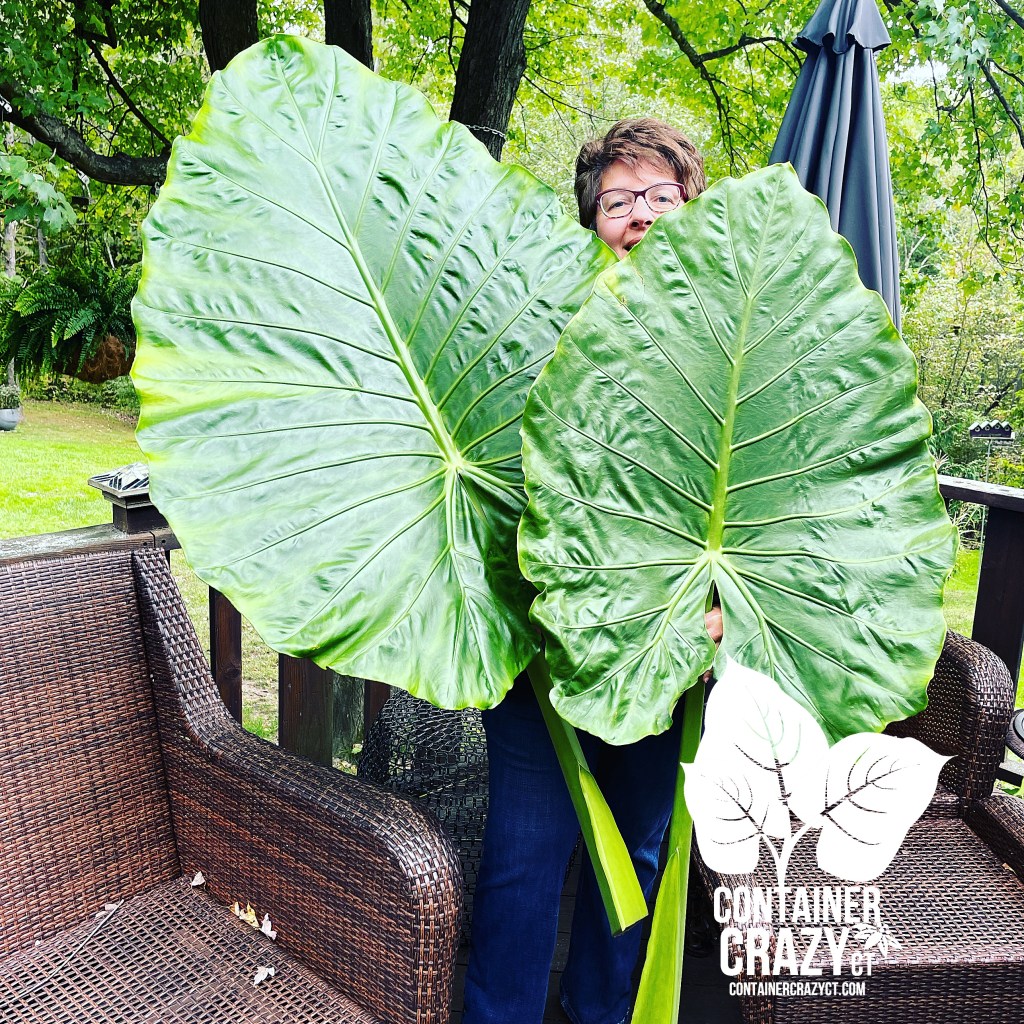
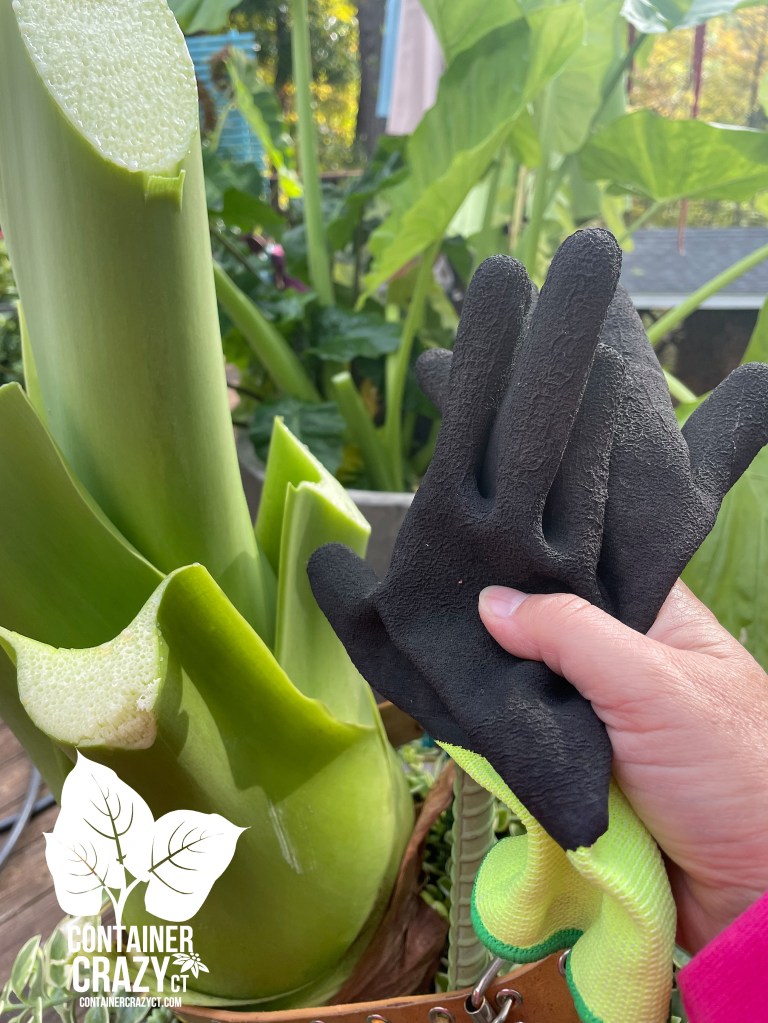
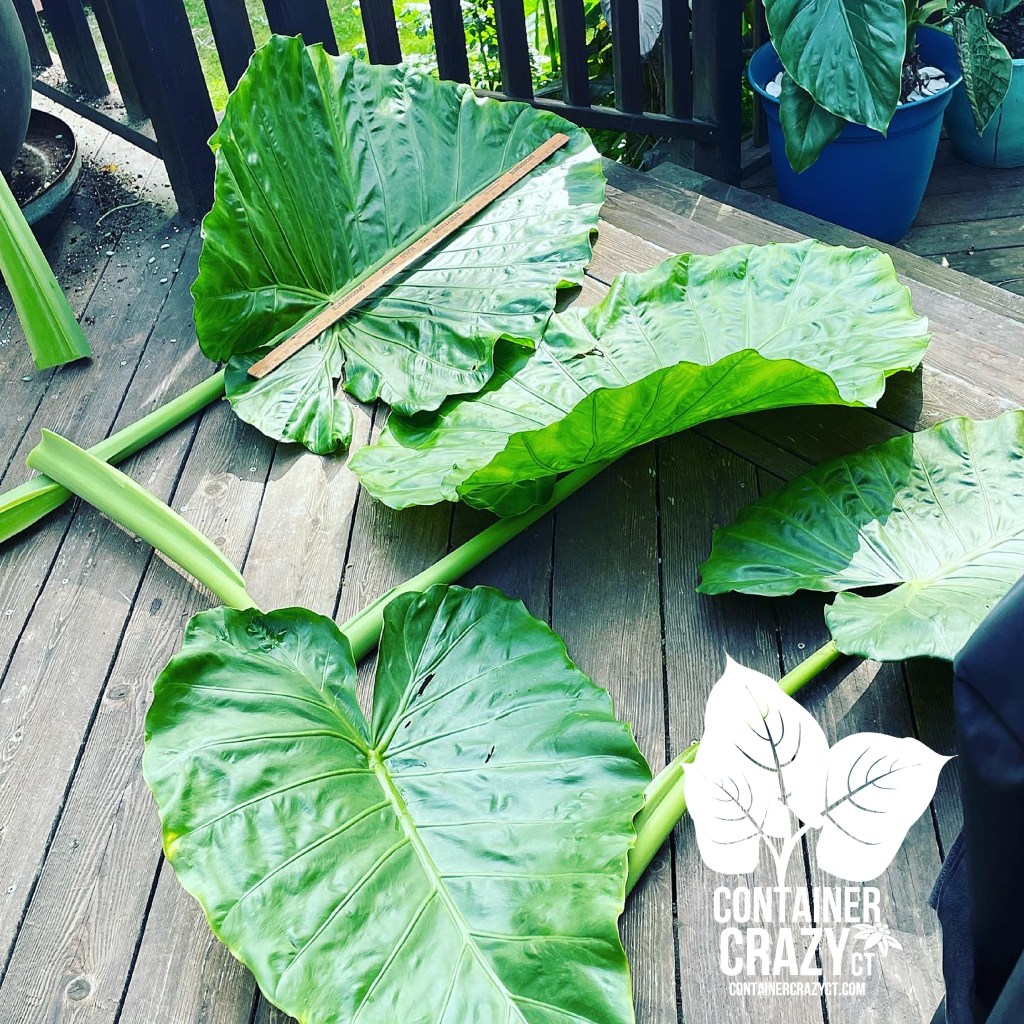
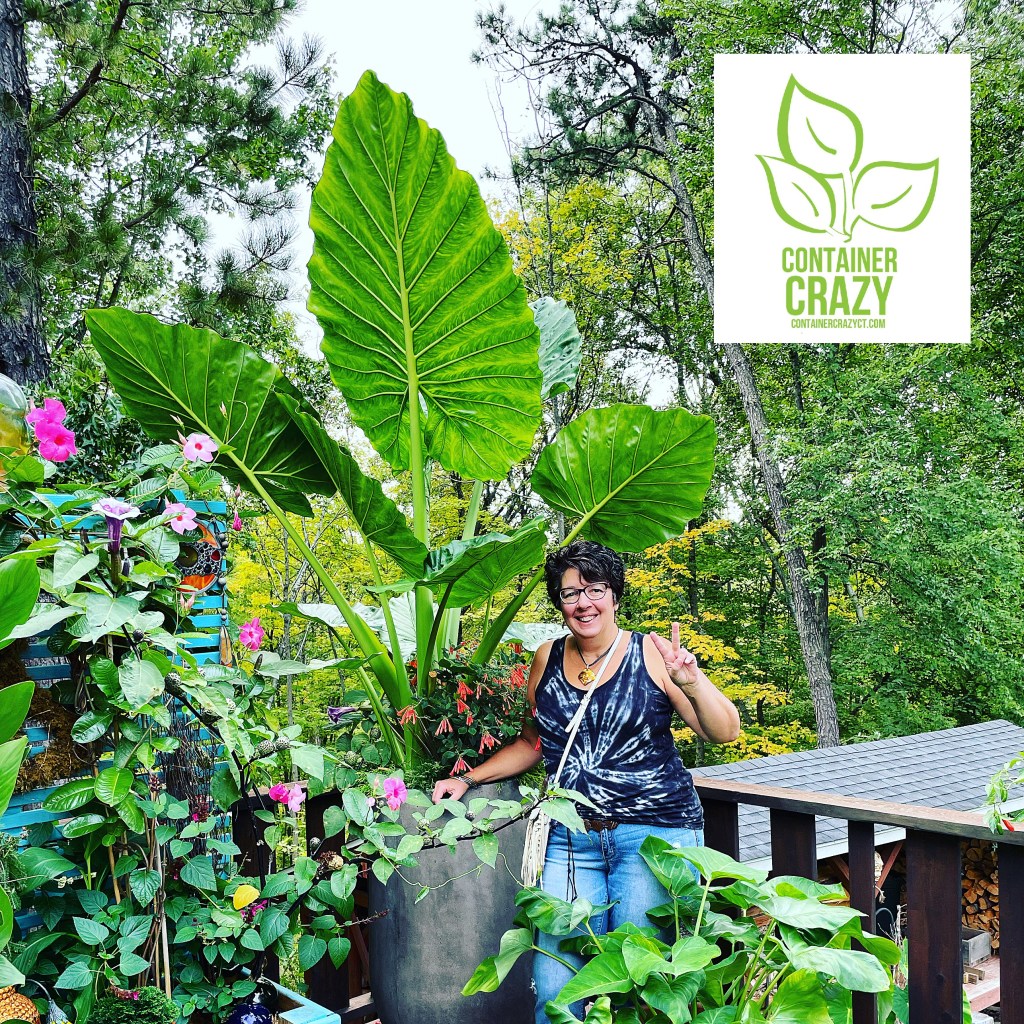
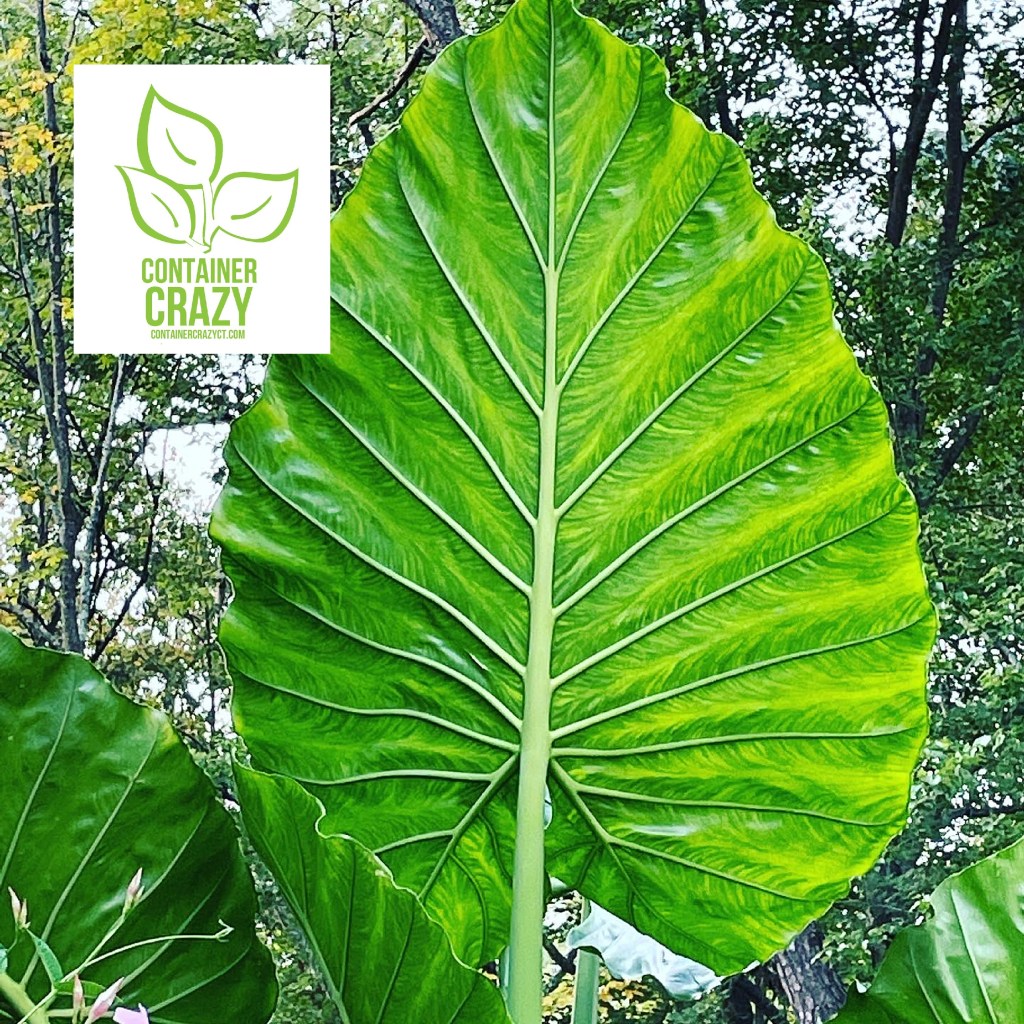
2022Cathy Testa holding two of the leaves
As you see here, I’m peaking behind two of the leaves. The leaves are at least 3 feet long with the stem an additional 3 feet as well. They tower above me in my planters and put on quite the big tropical show in summer. Now, on to how I disassemble them in preparation for our Connecticut winter months:
Definitely Wear Gloves
TOOLS
Gloves: Definitely wear garden gloves. These plants release a sap that will make your hands itchy – believe me, I regret when I don’t wear them. Even digging around the soil, I found my hands will itch later.
Hori hori knife: I really like this tool, heavy duty, serrated edge, perfect for cutting the roots in the soil around the base of the plant to release it. I find this to be one of my most useful overwintering tools.
Bin: A clean bin to put all the tubers and root bases in to let dry outside if it is pleasant weather, or inside if it is rainy.
A Large Kitchen Knife or Machete: I couldn’t find my machete, so a long, clean, sharp knife is a great back up.
Clean Up Tools: A leaf blower works to blow away dirt that will fall everywhere.
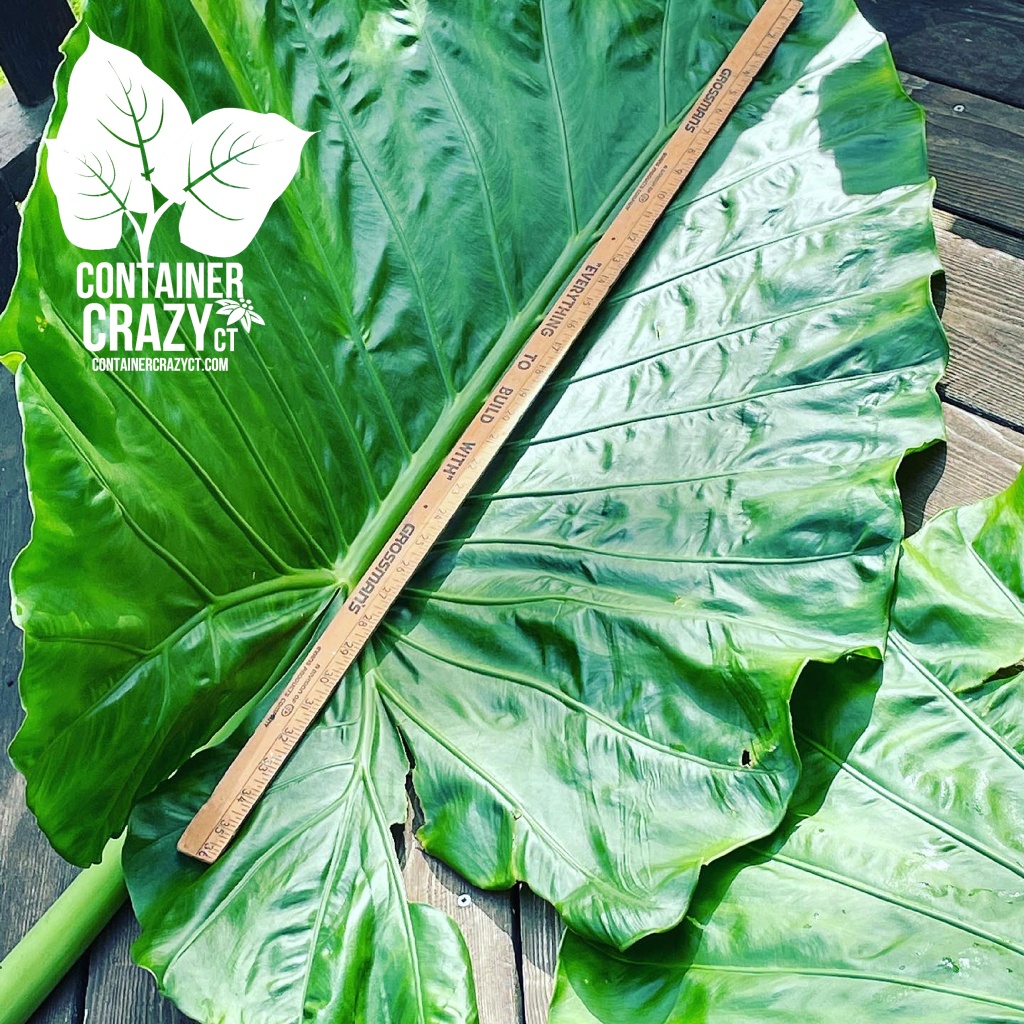
Ruler: Yes, measure those babies!
Large Knife
Cut away all the foliage by using the knife to slice each stalk off individually at the base of the plant. The main thing is to cut away from the plant so the angle of the slices are able to drain away excess moisture. At least that is how I do it. I’m also very careful to not nick surfaces with my knife tip – always avoid any damage while I work.
Slicing off each leaf at the base of the stalk (petiole) – stem – whatever you wish to call it!
As you slice off each petiole at the base, be sure to do a clean cut, avoid tears or anything which would allow entrance of mold or insects later on. A clean cut is recommended. If you mess it up, cut it again below where you just cut it.
Measure the leaves cause it is impressive!
I always measure so a ruler is handy, or measuring tape, and then take photos. Because sharing is caring – LOL. Everyone loves to see how massive these leaves get. It is fun to Instagram the photos!
Here are two of the biggest leaves above. It is too bad I am not set up to make leaf castings of these babies, they would make impressive art for the garden!
Close up of Slice
As you can see, the slice is downwards and away from the center of the plant. I slice each stalk individually and pile the leaves to the side.
All leaves removed
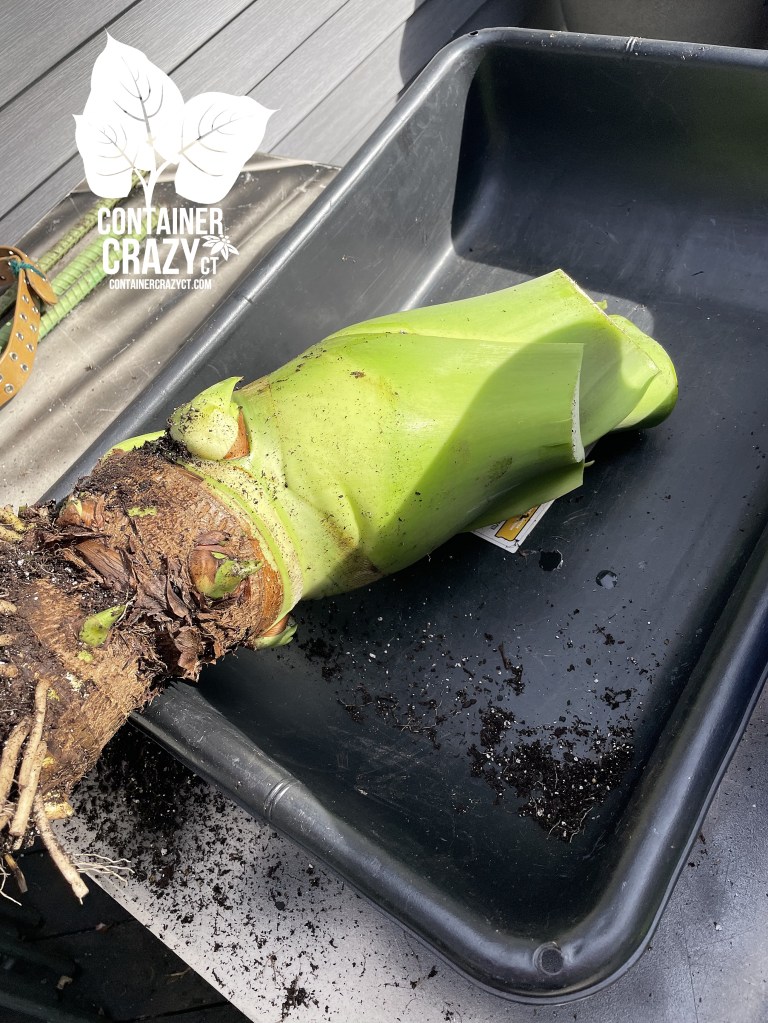
After removing each stalk, I use my Hori hori knife to cut around the base of the “stump” in the soil. As I push the knife around in the soil, I hear the crack of the roots being cut. Then I will push on the stump back and forth to help loosen it. Once I feel it is ready to be “delivered” from the soil, I start to pull it out – It always makes me feel like I’m a doctor delivering a baby – hahahaha. I have quite the imagination at times!
Cutting a circle around the base of the plant to cut the roots belowOut with more top sliced off
I will put it in the clean bin and trim the roots with clean sharp pruners or cutters, and slice the top off a bit if it still too big to fit into the bin. Leaning it upside down, or on the side to help drain excess moisture is helpful as well. Some folks may recommend not trimming the roots but I always have. New roots grow when it is replanted. My theory was less “fleshy” material the better. Fleshy material has the tendency to rot sometimes over the winter months.
After I got the massive big base out and laying out to dry, I worked on the planter next to it which had more off sets from the same type of Alocasia. I then let this dry in the house for about 6 days. Oh, I also removed as much soil as possible from the tuber areas. I used my gloved hands and kind of just rubbed or pushed off the soil. You may use a garden hose with water blast but that will only make the tuber wetter, so I didn’t do that. In the past, I have used a soft painters type brush to get soil off.
TIMING
In Connecticut (my planting zone is 6b) you may do this process either before or after we get a fall frost which could happen anytime now, but sometimes I like to start this while things are dry and temperatures are not too difficult to work in, so I started on these two planters last Thursday (9/29/22). It was a cool, breezy, day with little sunshine but that would be better than the rainy cold days expected the days following. The date if this post is 10/4/22 and no frost yet, but there are some talks it could happen this weekend, I hope not, cause I have lots more to do!
I placed the bin in the house for a few days and then moved it to a table in my basement. The next phase is storing them. For years, I stored all my tubers, rhizomes, corms in peat in bins with air holes drilled on the tops. But this past spring, I had rot on portions of my tubers. This year, I plan to store them dry in paper bags for some at least. I will most likely test the paper bag process and see the results. I will post photos of this soon. I also saved some mesh netting bags (like those used for Avocado’s in grocery stores) to put some tubers in.
Oh, when I took these apart last week from the gray planters, they had NO ROT anywhere on the tuber areas (brown area at the base) which is good news. No rot means they won’t have rot as they dry for a few more days. When I store the tubers, I will share it here as well.
The tubers need to be sored in a cool, dry place. I use my basement which does not drop below freezing but is unheated so it stays cool. It is recommended that you do not store them in plastic bags which would only trap moisture. If stored in a paper bag, make sure it has holes for vents. Again, for years, I stored them in peat moss in bins, but had rot issues this year in spring, and I didn’t want to loose these tubers of this super big Alocasias, now that I’ve regrown these plants each year. These particular tubers were from 2019 so it has been replanted 4 times now. A definite pay back from the investiment!
PLANT IN SPRING
Next year, after all danger of spring frosts, I will replant these Upright Elephant’s Ear tubers to grow again. Many tropical loving plants may be handled this way, such as Canna Lilies. For years, I stored my big red banana plant, Ensete, the same way as shown above. In fact, here is the link to the Ensete post if you are searching for it on my blog site: https://containercrazyct.com/2013/10/31/storing-my-big-red-banana-plant/. Unfortunately, I lost my big red banana plant this year in 2022. It was the first time it rotted too much.
NEXT OVERWINTERING PROJECT
Ack, I have to dig all of these up soon – anyone want to come help me?!
Canna Lily on ends with Upright Alocasias in the centers
Cathy Testa Connecticut A Container Garden Designer Also make custom orders, grow tomatoes in spring time, make succulent pumpkins now in fall season, wreaths during the holidays! Thank you for visiting and your support.
DIASSEMBLY ALOCASIA QUICK STEPS:
Get your tools ready (knife, gloves, bin, hori hori knife, cleanup tools, etc.). Cut away each leaf stalk at base cleanly. Cut around base of plant in the soil area to break free roots with hori hori knife. Pull out stump (base with the tuber) out of the planter, and let dry for several days to a week. Store in an unheated, dry, cool area that does not go below freezing in winters.
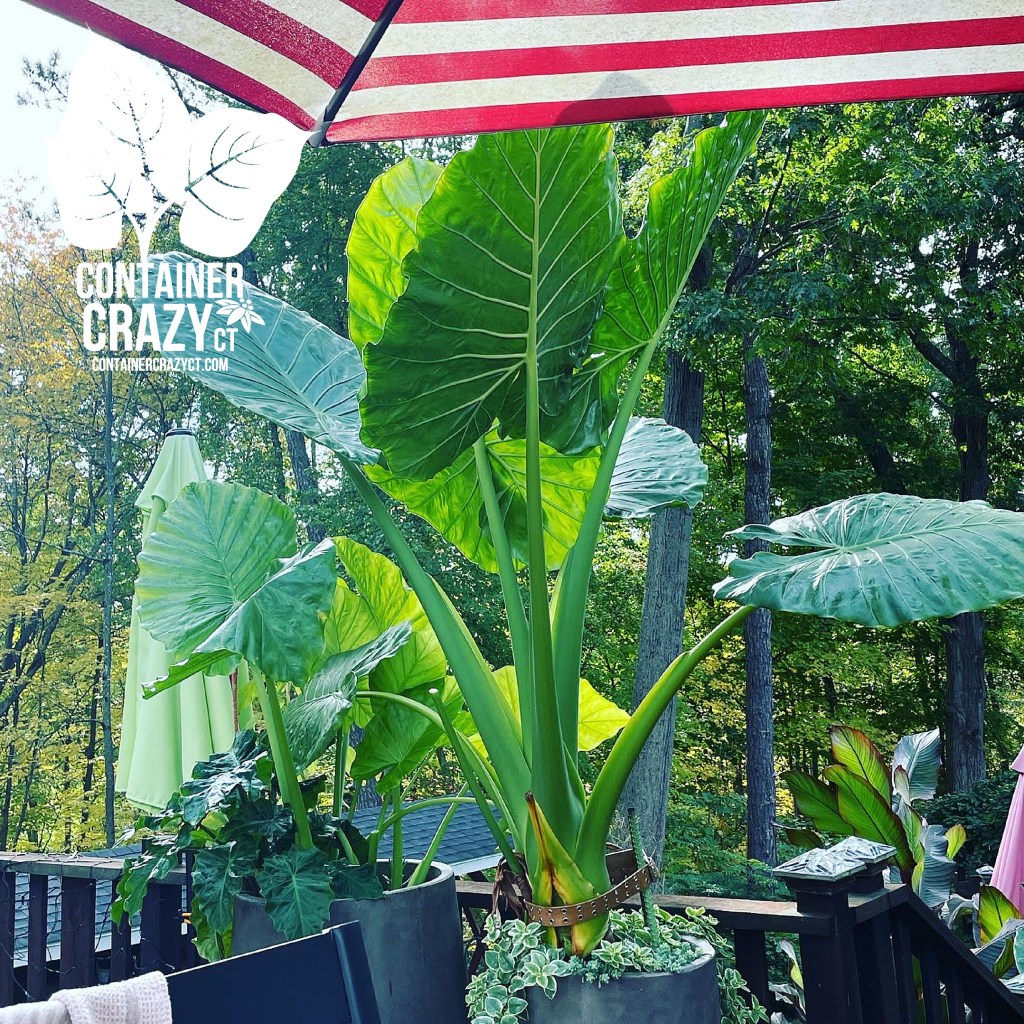
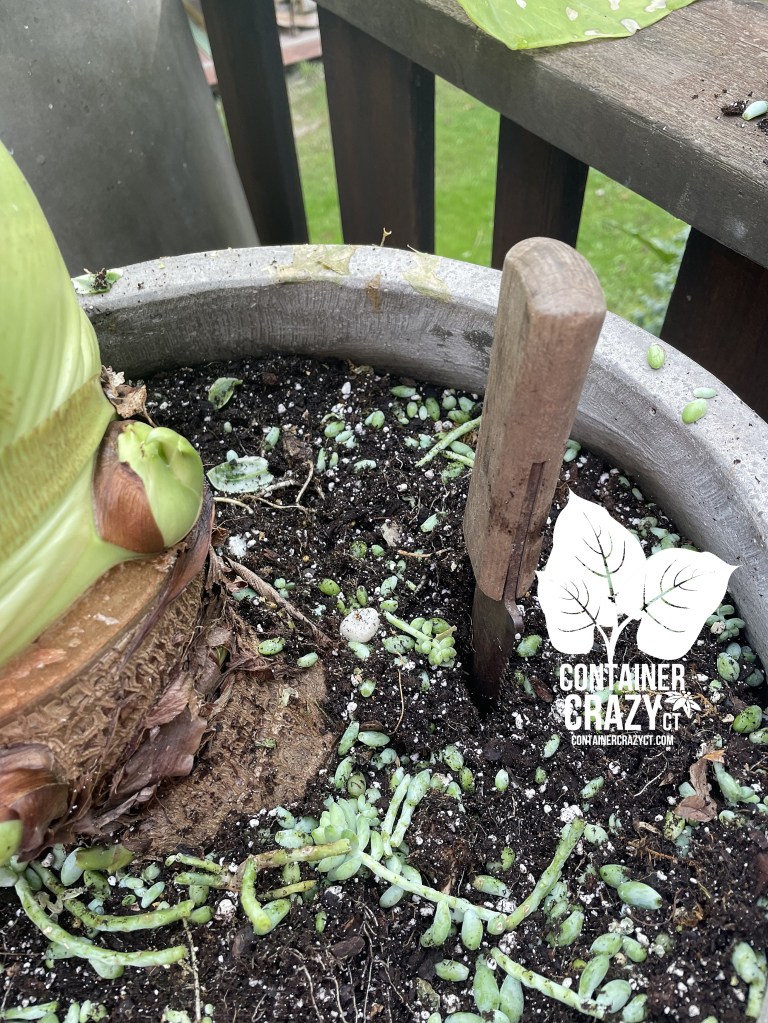
When I saw that my biggest of my upright elephant ear plants was leaning to the side, I was very concerned because of a strong windy rainstorm predicted to arrive in Connecticut last Friday (8/26/22).
I decided to water the soil deeply in the planter even though we were expecting lots of rain with this storm because I felt the wet soil would stabilize the planter better and help to prevent it from toppling over. Then I kept my fingers crossed.
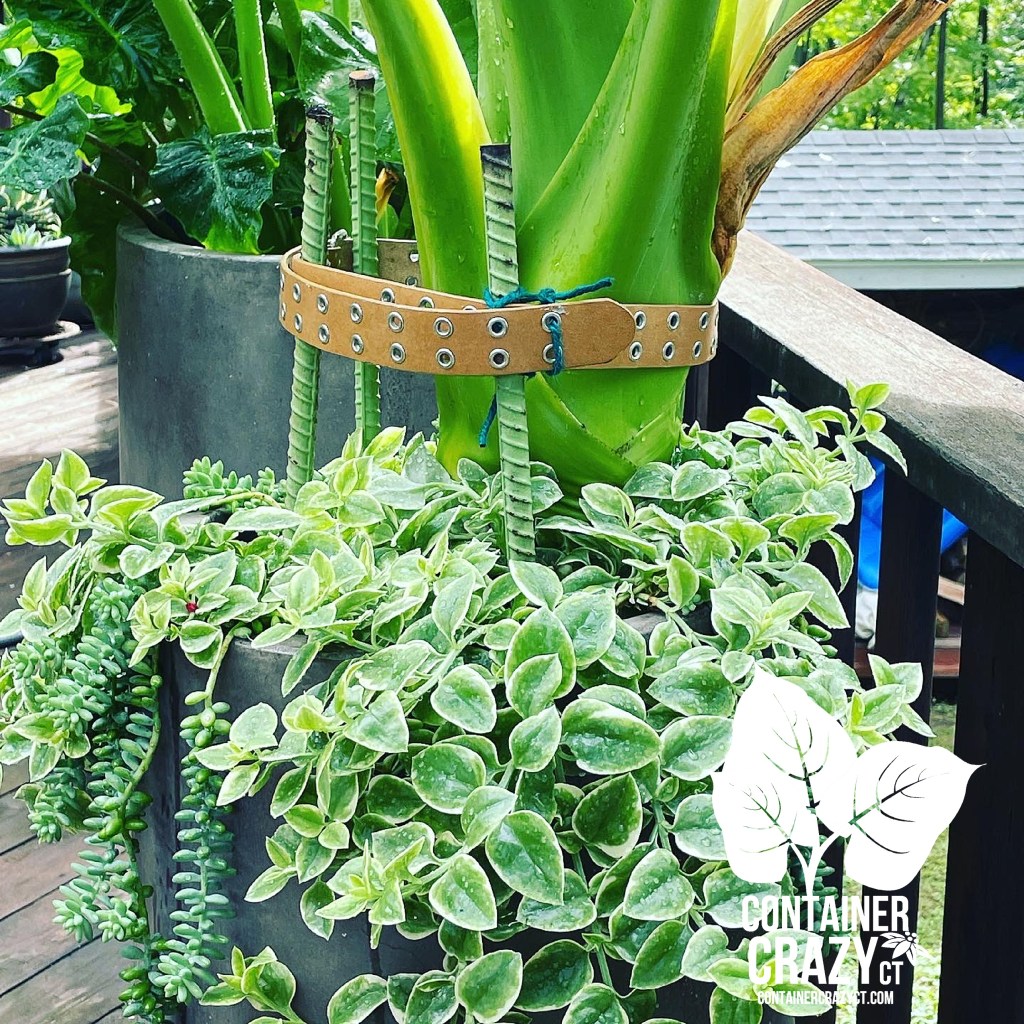
The day after the rainstorm, I looked it over and it was fine. It did not topple over but it was still leaning quite a bit and I had to think of a plan to stabilize it and help it grow upright. This was the first time I ever had to do this with an Upright Alocasia elephant ear plant, but luckily an old belt came to mind and I had some rebar available. This is what I did.
Helping an Upright Elephant Ear Plant Stay Upright
I’m not sure why I decided to plant the largest of my tubers in the smaller planter anyhow. I think maybe I was considering that it will grow very tall in smaller planter, and the taller planter would look nice with the huge elephant ear leaves sitting on top of their long stalks next to the lower planter to the side of it. Next year, I will make a note to plant it in the larger of the two planters I typically use each season for these Upright elephant ear plants. The rebar and belt seems to be working as a splint of sorts. As you can see from this above photo, the base of the plant is super thick and becoming heavy. I also remember, I probably didn’t plant the tuber deep enough. I was concerned about some rot experienced when I took them out of storage this spring.
Taking Out the Tubers From Winter Storage
Every year, in spring, I take out my elephant ear bulbs/tubers from the basement where I overwinter them in plastic bins (with drilled air holes in the bin covers) in peat. But this year, some tubers were damp and even parts were starting to rot. This has never happened before in the 10 plus years I’ve stored the tubers, bulbs, rhizomes, etc. of various tropical plants (Canna Lily, Elephant Ears, Red Banana plants, etc.) over the winter months here in CT. The basement stays above freezing but it does not have any heat so it stays cold enough usually to keep all the tubers in a dormant state.
Why did they go soft this time? I don’t get it – is it climate change, did the basement stay warmer than usual, it is because I stacked the plastic bins on top of each other (in the past, there was a shelf there and I stacked the bins on shelves), or was it the peat I used, which was a different brand? Maybe it was COVID. I decided COVID must have changed the whole pace of life? Did someone steal my green thumb?
Anyhow, I found the tubers of some of my upright elephant ears (the largest of the elephant ear type plants I replant every season) which were plastic bins inside plastic mesh bags (similar to what you may see in a grocery store) and laid “on top” of the peat (rather than in or buried in peat), did better. Maybe these types of elephant ear tubers are better stored dry? But some of those even had rots spots but not enough to not use them. I decided to cut off some rot spots and go for it.
Timing of Over Wintering Tubers
In thinking about it this morning, I remembered now, I decided to dig up and store the tubers from the plants on my deck a little earlier than normal, around mid to late September, in order to get a head-start on my various plant related tasks and work. Maybe I stored them too early? It is often recommended to wait till the plants get touched by frost and then take them down to store. This usually means the tubers will sense the cold temps and cooler soil, and go into a dormant state. Thus, this year, I will wait till October to pull the plants from the planters, chop the foliage off the top, and store the tubers. And I also will keep them more on the dry side for this particular type of elephant ear plant, as I wish not to risk loosing them again.
2022 Photo
Precious and exotic large lush plants
If you were to ask me when I started to fall in love with big plants, I am not sure I can remember when – it was years ago. In fact, when I went on my honeymoon over 31 years ago, I was fascinated by the big lush foliage of the tropical like areas of the Hawaiian island(s). We even ventured off a long, dirt road once and found a tremendously large elephant ear plant and people accused me of photoshopping the image. I stood next to it and was in awe, not afraid of snakes or whatever might be lurking below my feet!
2020 Photo
Reusable Year after Year
Another wonderful feature of using tropical plants (not hardy to CT and must be stored in winter), is the fact they are used year after year. With having good luck with my storage technique for so many years, it baffled me as to why I had some back luck with storing them this year (i.e., the rot spots). Anyhow, the photo above was when I planted the same bulbs/tubers in 2020. I think I had purchased the tubers of these in 2019 or 2018. They are also super easy to care for once they start growing in the planters outdoors, with relatively no problems, and with this year’s tropical heat all summer, they loved it. They tend to get the most full and larger by this time of year and into the fall season. Another bonus to growing them is they last all the way till end of October. BTW, they do get flowers and I successfully grew one plant from seed I collected last year. I made a baby from the seed of this plant for the first time ever. I’ll write about that some other time.
Taking Care of Them In-Season
I pretty much do nothing more than consistently water the elephant ear plants in their patio pots and containers, as they do appreciate good moisture. I also will cut off any bad leaves (because I don’t care for ratty looking leaves), and I might do a water soluble fertilizer application once or twice a season, but often times, it is not needed. I put slow-release fertilizer into the potting soil mix in the spring upon planting as well. In most planters, I use fresh potting mix for planters, but in really big planters, I usually remove the top of the soil portion and add fresh soil. I also fill the base of the planters with foam sometimes to reduce soil usage if it is a super large planter. This also helps reduce the weight of the planter if you wish to move it around. And most importantly, I admired the plants often which I think they notice.
Where to Place ThemOutdoors
One side bar, be aware if you plant these big leaves next to any pointy tipped plants, such as agaves or cacti, as I did once, realize that as the leaves of the elephant ear plants move around in the winds, they may bang against the agave leaf tips, causing holes and damage to the elephant ear plant’s leaves. But other than that, you want them placed where they are showy, do not lean like mine did this season, and anywhere there is dappled sun or part-shade. They can also take full sun but more watering is required. Some days, during the heat waves this 2022 season, I opened a shade umbrella next to the planters to offer some relief of the late day sun, however, even that became an issue because the leaves got so large and tall, the umbrella was hitting the leaves as I opened the umbrella. A larger planter is best because of the shear size of the plants. My planters are hip height and the plants are towering over my head now at probably 6 feet tall with 3 feet wide leaves. It is magnificent.
Years prior – Stunning Photo taken by a Pro Photographer
Storing Technique for Winter
As I’ve written about several times on this blog, I typically store my bulbs, tubers, rhizomes for various tropical plants in low-level bins with peat slightly covering them, but I will adjust my process for these Upright Elephant Ear plants. The bulbs get larger over time and the bigger the bulb, the bigger the plant. Often, you will find side shoots forming, as I showed in a prior post when I separated them before. Here’s a photo from last year when I took the plants apart. Unfortunately, I lost some of these due to the rot situation I noted above. I document the whole process every year, so you may use the search bar on the right side of this site to locate past writings of how I store them.
I look forward to using these plants every season. I wish I could plant them on the high-rise balconies I service but they would bounce around too much in the wind up there, and require lots of water, especially during hot drought seasons, so they are not feasible there. If I could I would totally surround my yard with these big leaved showy exotic looking plants, I would. They make me think of escaping to another place, another world, and don’t we all enjoy that from time to time? Plus my cat loves to sit under the shade cast by the big, sometimes huge, showy leaves of these upright elephant ear plants. Cute thing – my 5 year old nephew told me he could see the leaves growing on them when they were moving in the winds, which I thought was so adorable. Maybe he will become a plant lover like me!
Well, that’s all for now. I hope you find this post amusing. When I take these plants down for the winter, later in October, I will be sure to show my process as I always do. And hopefully I won’t have any scares next spring like I did this spring. I actually lost the largest of my red banana plants this season. It was too rotted to plant and I had to bow my head and think, “Whelp, you gave me many years of happiness. Guess this year was just one of those gardening learning experiences, yet again!”
It’s always interesting to see new ideas in the plant world, and of course, one caught my eye recently. It is a planter preassembled with elephant’s ear tubers, boxed up for easy handling, and ready for the consumer to just water and wait for growth.
How I’ve Stored Tubers andGrow Them:
I’ve grown elephant’s ears from tubers over the years. I typically store them (the tubers only) over the winter in my unheated basement in bins with some peat to wait out winter until spring time. Because the plants are not hardy here in our winter planting zone (CT Zone 6b), I can not leave them in the ground or in pots outdoors over the winter. I dig them out of my planters (the tubers that is), clean off the soil from the tubers, and store them. Usually I am successful with opening the box in spring time to find them in tact. I’ve blogged about my process many times, search the word “overwintering” for more on that.
When I’ve Started Them:
I typically start them indoors around end of April or early May as spring is approaching. For years, I started them in my house by planting the tubers in pots with potting mix and setting them by my kitchen glass slider door. It was sufficient to get them started. Within a few weeks or so, a growing tip would appear above the soil and start to grow. When all chance of frost passed, out they went into larger planters and containers in my yard or on my deck, etc. These plants reach huge sizes (4 to 6 to 8 feet tall), so larger pots are always my aim to show them off in the right places.
Tried to Start Them Earlier:
However, last year, I wanted to try to start them earlier. I attempted to start some in March in my greenhouse (years ago, I didn’t have a greenhouse). It didn’t really work out as I had planned. My greenhouse is heated only to about 45-50 degrees F in the winter (to over winter other plants). It is a low temp because heat is a huge expense (especially this year), and elephant’s ears (Colocasia) require warmer soil temperatures (65 degrees F or warmer). They didn’t take off any faster than they would in my home, in fact, it was probably a bit slower going. They weren’t popping out of the soil and when I inspected them under the soil, some rot had started as well on part of the tubers (or bulbs if you prefer that wording). I learned a lesson, the soil needs to be warmer. I somehow overlooked a fact I knew due to being anxious to start them.
I considered maybe it was too soon to even attempt growing them earlier. What ended up happening is the potting soil remained too cold (because it was too cold in the greenhouse) and too wet because the tubers weren’t actively growing yet. Cold temps + damp soils leads to rot of the tubers. In fact, storing them is usually at a temp of 40-45 degrees F so the whole situation was it was just too cold still in my greenhouse, despite those rapid warm ups during winter days when the sun is out – the evenings were still a bit chilly.
How they Do This in the UK:
I’ve seen posts by people in the UK (via the wonderful sharing of posts on various tropical pages) usually start their elephant’s ear tubers in what they refer to as a propagator or cupboard. Terms we don’t use here in CT. From what I can tell, many of them put the tubers in plastic bags and place them in a warm spot (a cupboard or propagator) until they see some growth coming from the tuber – and then they put them into soil mix – or the ground perhaps (I’m not sure). Makes sense, they give them a head start but don’t subject them to cold wet soils. I remember asking someone one day via a comment on a post about this, what is a cupboard? If I recall, it is like a warm cabinet you have in your home somewhere to serve as a place to start tubers, or perhaps some seeds. I have some places like these (over the fridge I have a small cabinet that stays warm) or a cabinet in a corner near our heat source, which actually, I did use that cabinet to start sprouts years ago and that was one of my things then – starting and eating sprouts. Maybe this will be a location to kick start the tubers first – I may give this a try this year.)
Anyhow, I think the message here is if you start them too early in the wrong conditions, it could lead to issues, which was the case for me last year. Thus, when I saw those pre-planted tuber pots at the local big box store (just yesterday), I had some initial thoughts. I like the idea but I also know of what could go wrong with them, but I’m not saying it would go wrong (see disclaimers below!). And I also thought about what was right about these pre-planted tuber pots.
Pre-Planted Pots with Tubers
I have always been somewhat addicted to elephant’s ears because of their large showy heart shaped leaves which point down (or up as in the case with many Alocasias). They give a wonderful vibe to a space and I have used them everywhere in planters. I even hired a photographer a few years back to take photos (check her out at jmsartandphoto.com).
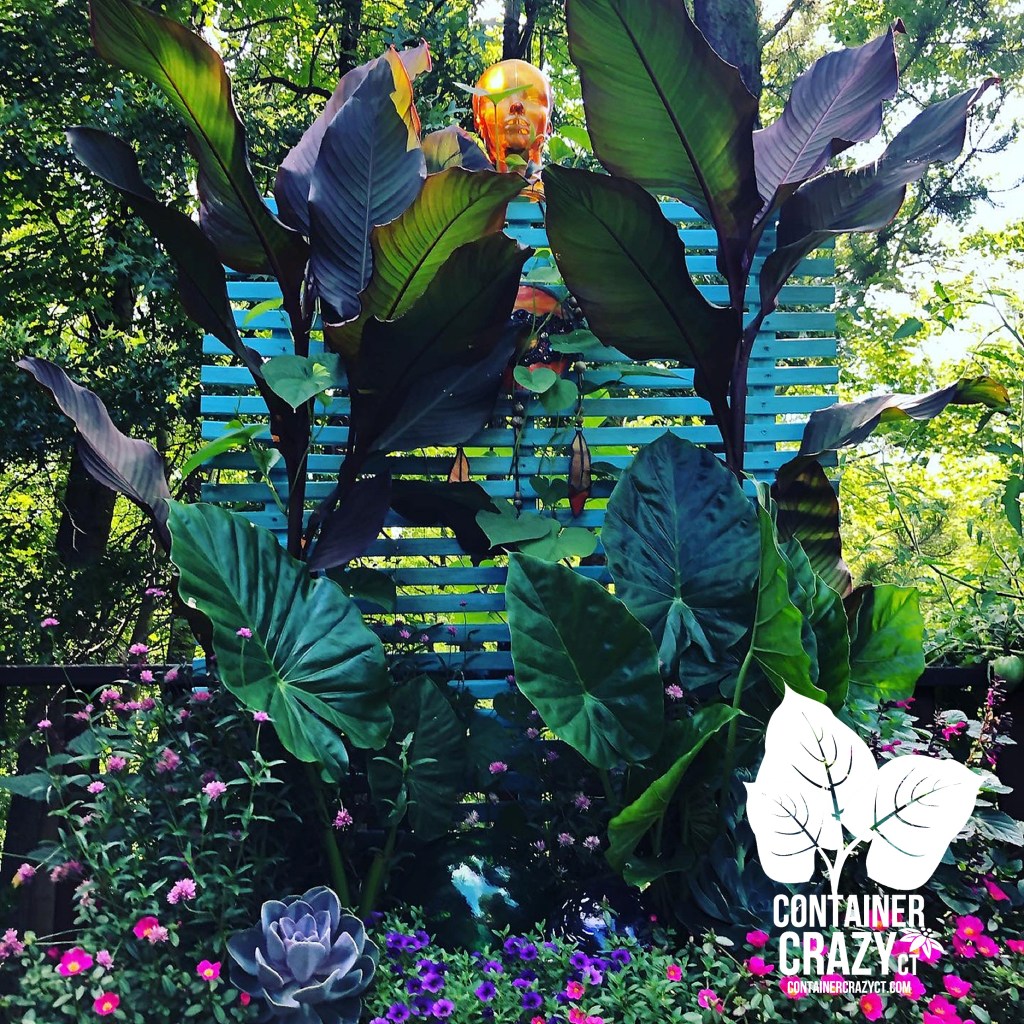
One year when I got into skulls, LOL! Note: The Human One is not REAL! LOL!
Elephant’s ears are just so very cool. And grow large and tall. The wave around in the wind, they create shade for plants below them, and they look good from the tops or bottoms and are relatively easy care. I just have to share another photo here of them. I typically plant some around my big red banana plant (Ensete) as well in this massive concrete planter at my home. Over time, it becomes lush and dramatic looking. I find they work in sun or shade, if more sun, more watering is required. They also make excellent thriller type plants in pots. They can even be grown in water – they are versatile plants for a tropical look and you may propagate them too.
Cathy Testa’s Large Cement Planter with a Mix of Elephant’s Ears and Other Tropical Plants
Digging them up for storing them is a fall gardening chore, but re-growing them in spring time is not so much of a chore, but I did take notice of those pre-planted tubers in pots with soil at the big box store yesterday. I didn’t see a price tag on them, and believe they were freshly delivered to display and sell so the price was not on there yet, I was curious about how much they cost.
My Take On the Pre-Planted Pots Seen Just Yesterday – Just my opinion!
Pluses: Talk about convenience. All was so well packaged and boxed up, it would be very easy to plop into your store cart and go. The pot size was good; usually I start my tubers in a one-gallon nursery pots. These black pots were bigger and nice enough to use for the summer as your planter, basic black color. The plant care information on the side of the packaging was decent, indicating they should not be planted outdoors until frost has passed (true), and to “water sparingly” and to keep the mixture “moist, not wet.” But they didn’t say why on the moisture, nor was there any botanical information on the packaging. Since I could not see the inside, not sure if more details are provided. They do not give Latin names for example, but did indicate there are 2 plants (bulbs) inside pre-planted, or that is the impression I got.
The Minuses: What are you getting inside? The top of the pot is closed off with more cardboard, and I wondered, hmmm, how big are the tubers in there? How much soil, is it half full or filled all the way, are the tubers in the soil or do you have to plant them, what does the soil look like but I bet the soil is perfectly fine as they are produced by bulb or plant producers, most likely but I kind of wished I could peek inside. And the price tag wasn’t on them yet, and I’m curious on that part as well. How much does this whole package cost?
The Timing: It depends what you have for getting these started? If you have a warm home with some place to set them down where the soil will be warm enough (see noted above), you could start to water them and see them pop up over time. But it is still February, so you would be maintaining them perhaps as a house plant all the way until the end of May when all chances of frost outdoors are passed. I did consider the “what if” you just moved them as is (don’t unpack the box, don’t water them) and keep them in your basement. Will they be okay? They probably put the tubers in there with dry soil, so nothing will happen until moisture is provided, usually. I guess I pondered that because what if you just wanted to get it but not start them just yet.
Another plus, you don’t have to go buy a whole bag of potting mix soil if you want to grow these from these planters. Everything is all set for you. Another minus, what if they get wet at the store while they sit there waiting for the purchaser? They shouldn’t but if they did, then the soil gets wet and they may start to grow, or if the soil gets wet, it could lead to soil problems, if they are not in the right temperature conditions. And another minus, it is not technically supporting the local small businesses, but we all go to these big box places from time to time, don’t we? In fact, I feel like anytime someone creative comes up with a cool plant idea, these big box places are very quick to copy it – which is good or bad, depending on who you are supporting, a local small business or plant passions overall – I won’t go there, but any how, perhaps a minus is buying this is not supporting a local grower who takes the time to grow it themselves to a proportion and health readily available at the right time. It is just a matter of opinion, give or take. A matter of timing. A matter of preference, but anyhow, innovations and new ideas are cool overall. Maybe this is not a new idea either. It was the first time I saw it though.
Anyhow, I’m sharing it cause I spotted it, and thought I’d give my thoughts! What do you think??
Cathy Testa Owner of Container Crazy CT A Container Gardener Location: Broad Brook, CT Zone 6b
DISCLAIMER INFORMATION BELOW:
1. Copyright Policy
Unless otherwise noted, Cathy Testa and Container Crazy CT are the legal copyright holder of all material on this blog and others cannot use it to reprint or publish without our written consent. If interested in sharing a post written specifically by Container Crazy CT authors, do not hesitate to contact us to inquire on more details. Note: Reblogged posts from other fellow bloggers are done if the blogger automatically allows this feature on their blog, but they are the legal owner of their written materials unless otherwise noted by the author of the featured blog.
2. Hold Harmless
All the information provided on our blog is for entertainment purposes only and we are not providing medical, legal or other professional advice. You are reading and/or using any of the information from Container Crazy CT’s blog at your own risk. Most posts are totally harmless, but do not for example, eat a poisonous plant featured on this blog, for you will be doing so at your own risk.
3. Privacy Statement
We will not sell any of your personal or contact information to another company. Will not put your information on spam lists. We are not responsible for the privacy practices of any of your advertisers or blog commenters.
4. Reserve Rights
Container Crazy CT reserves the right to change the focus on this blog, to shut it down, sell it or to change the terms of use at our own discretion. However, we highly doubt we will do so, as we enjoy writing and sharing the information of this blog to our fellow followers.
5. Advertisers and Sponsors
Container Crazy CT has recently added WordAds, yet, we are not responsible for the actions of our advertisers or sponsors. For example, when our readers buy a product of service based upon a link from this blog, you must take action with that exact company to resolve any issues, not with us at Container Crazy CT.
6. Letters to the Editor
Any letters, messages, tweets or e-mails that readers of this blog send to Container Crazy CT are shared as needed when applicable to a post, such as a “comment” entered in the Contact Form below a post or when you comment via the red icon comment box at the top right of an individual blog post. If you wish to keep your comment confidential, we will do so upon your request.
Beautiful Photo – Really Captures the Beauty below the Elephant’s Ear foliage – Cathy Testa’s Planter
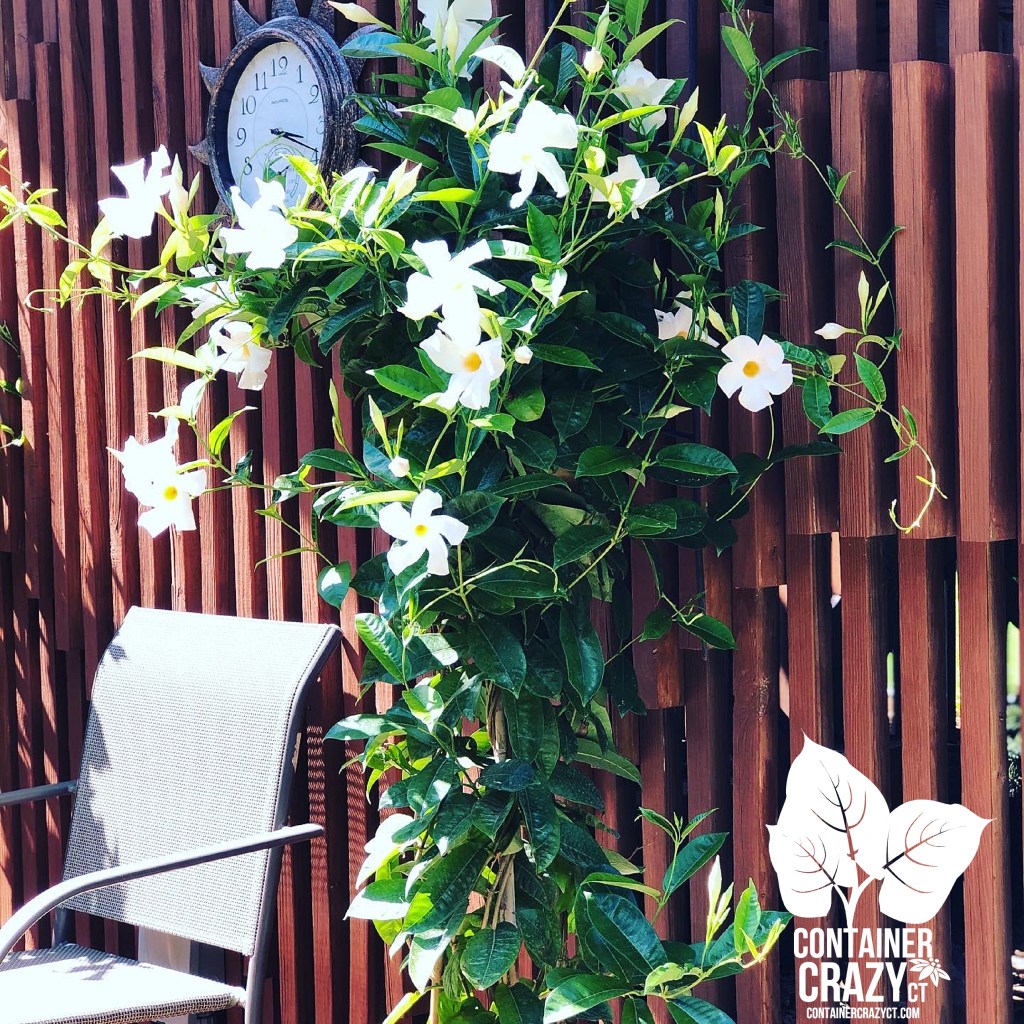
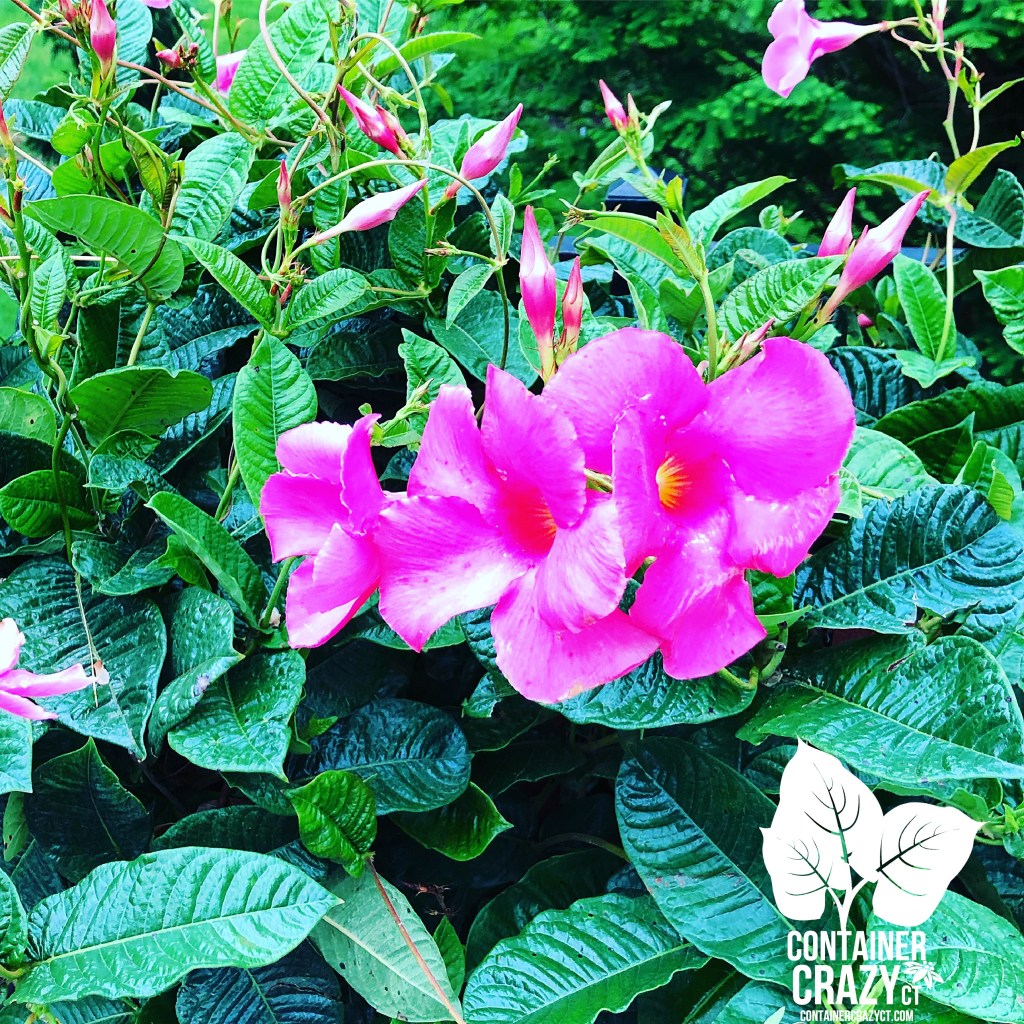
Mandevillas are amazing flowering tropical plants for full sun locations in the summer in container gardens and planters, and I always enjoyed looking at them, but for some reason, I didn’t plant them very much at my own home location, until a couple years ago, when a clients’ needs to cover a wall with flowers lead me to paying attention more to mandevillas.
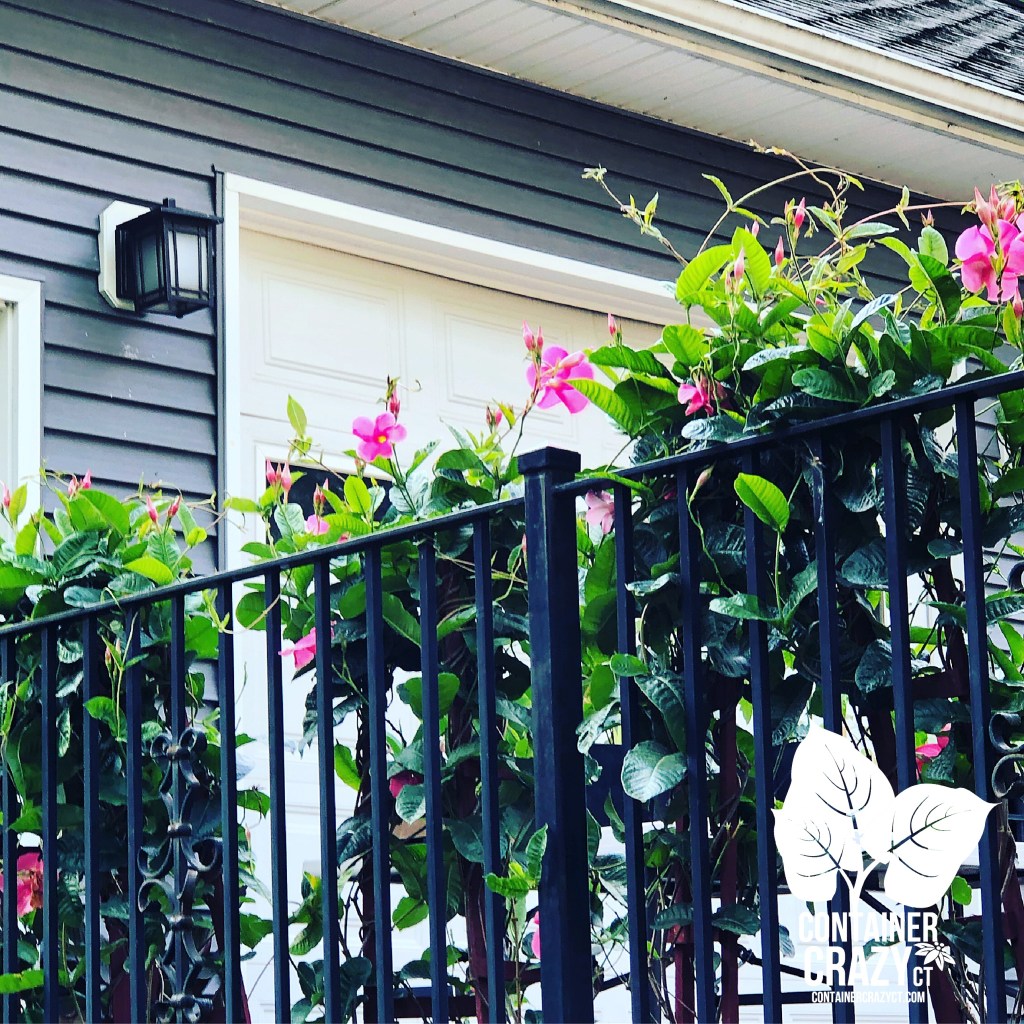
Perfect for walls, trellises, arbors and more…
If you have an area to grow a beautiful flowering plant upwards, such as a wall, trellis, lamp post, arbor, stair railing, fence, mailbox, or in a pot with a support trellis, these plants are perfect candidates. In Connecticut, mandevillas will bloom profusely on upward growing vines with big dark greens leaves when provided enough sun and heat, and appropriate growing conditions. They work very well in containers, planters, patio pots, and don’t even require super huge pots to thrive.
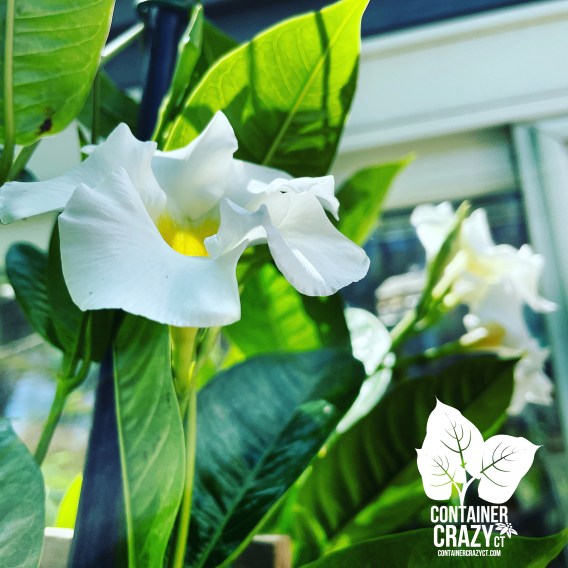
Mandevilla at a Client’s Home
Above is an example of a wall located below an upper deck. The white blooming mandevilla vines were very lush and full, growing from a planter about 24″ diameter and just as deep. It was facing the sun most of the day, and it looked absolutely fabulous, reaching the top of their deck that year. These plants will twine fairly quickly onto supports with many funnel formed flowers opening over the course of the summer to fall season in Connecticut. They must be taken in before fall frosts or overwintered immediately after being touched by frost. See my “Overwintering” posts for more information on that aspect.
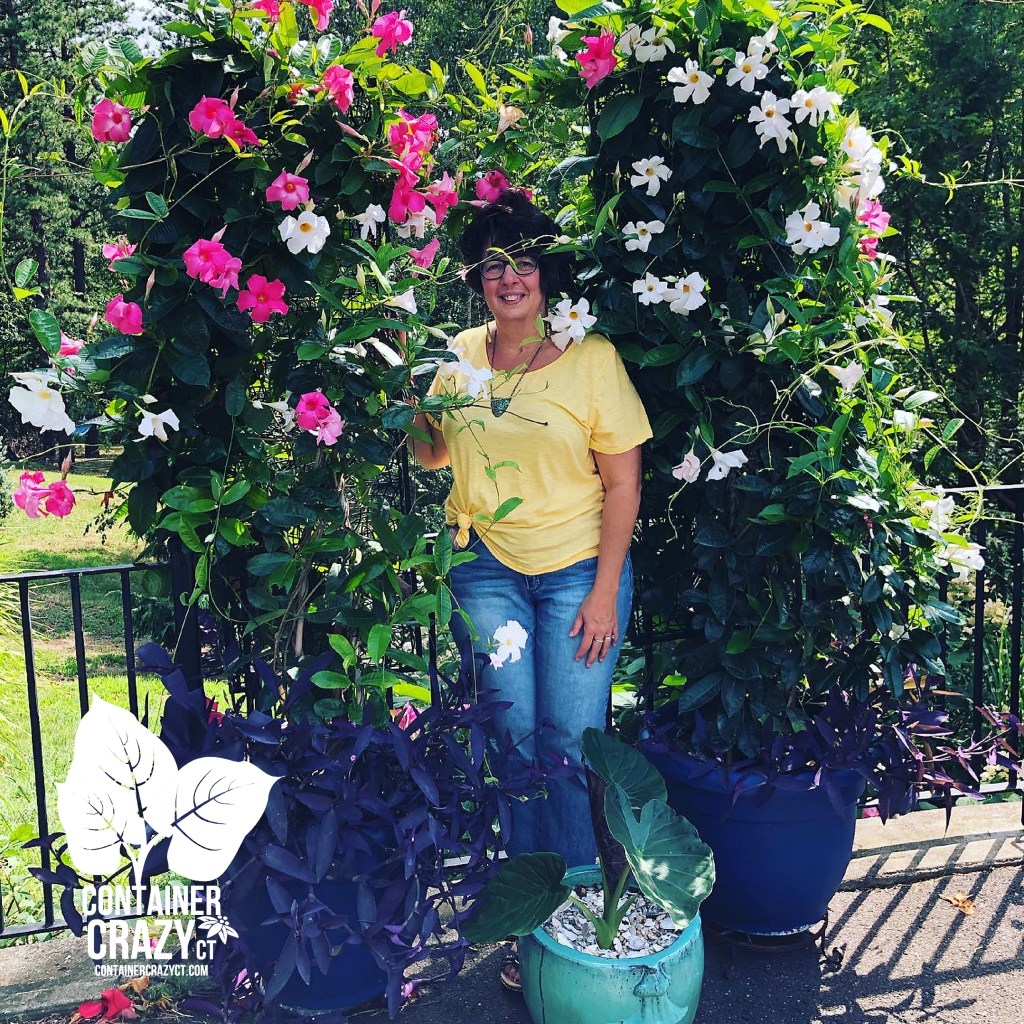
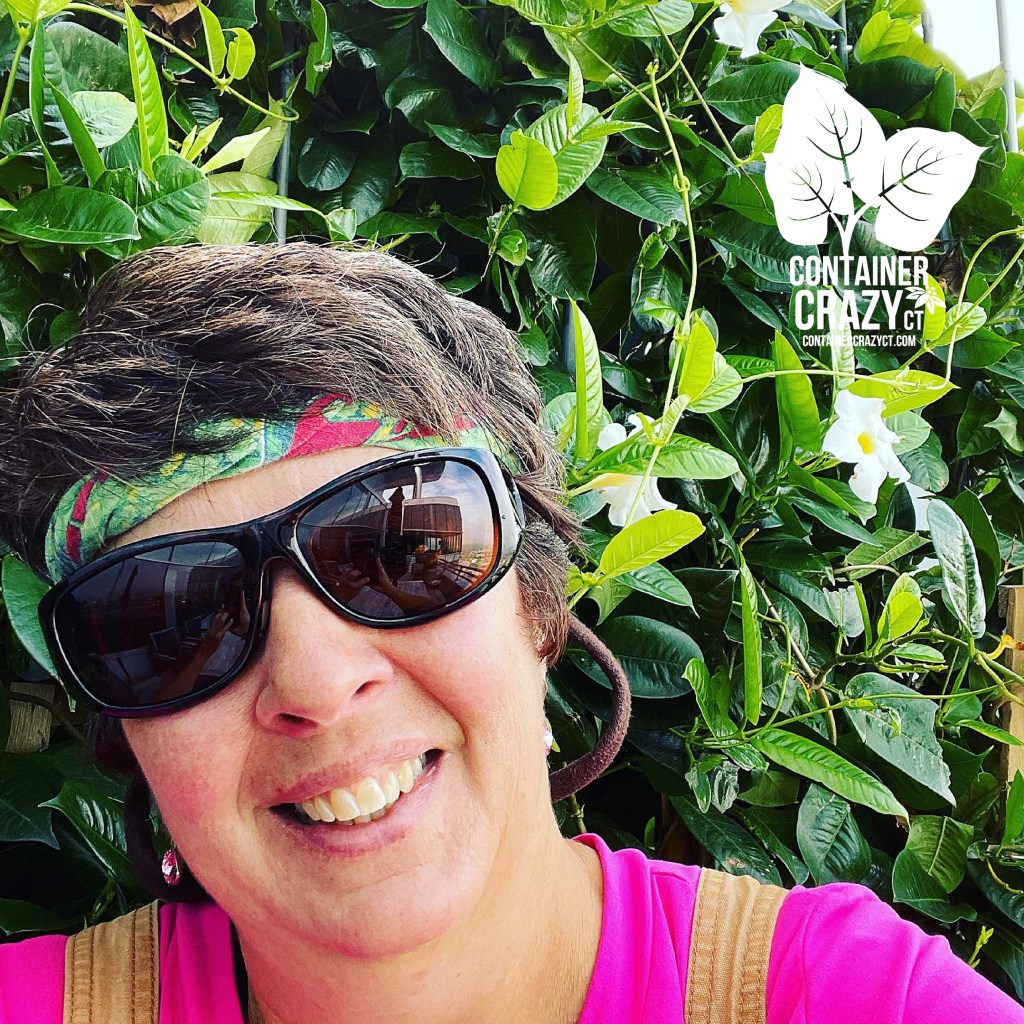
Cathy Testa with two Mandevillas at her home in Broad Brook
In the next photo, here I am in between two plants in blue pots at my home. The base plants (serving as fillers) are Tradescantia pallida ‘Purple Queen’ (annuals in CT). I put really tall trellises in each pot along this wrought iron fence, which is on the driveway where the plants got full sun all day and my watering hose was easily accessed. You will see they were growing taller than me and if the trellises were higher, they would keep growing up and up and up.
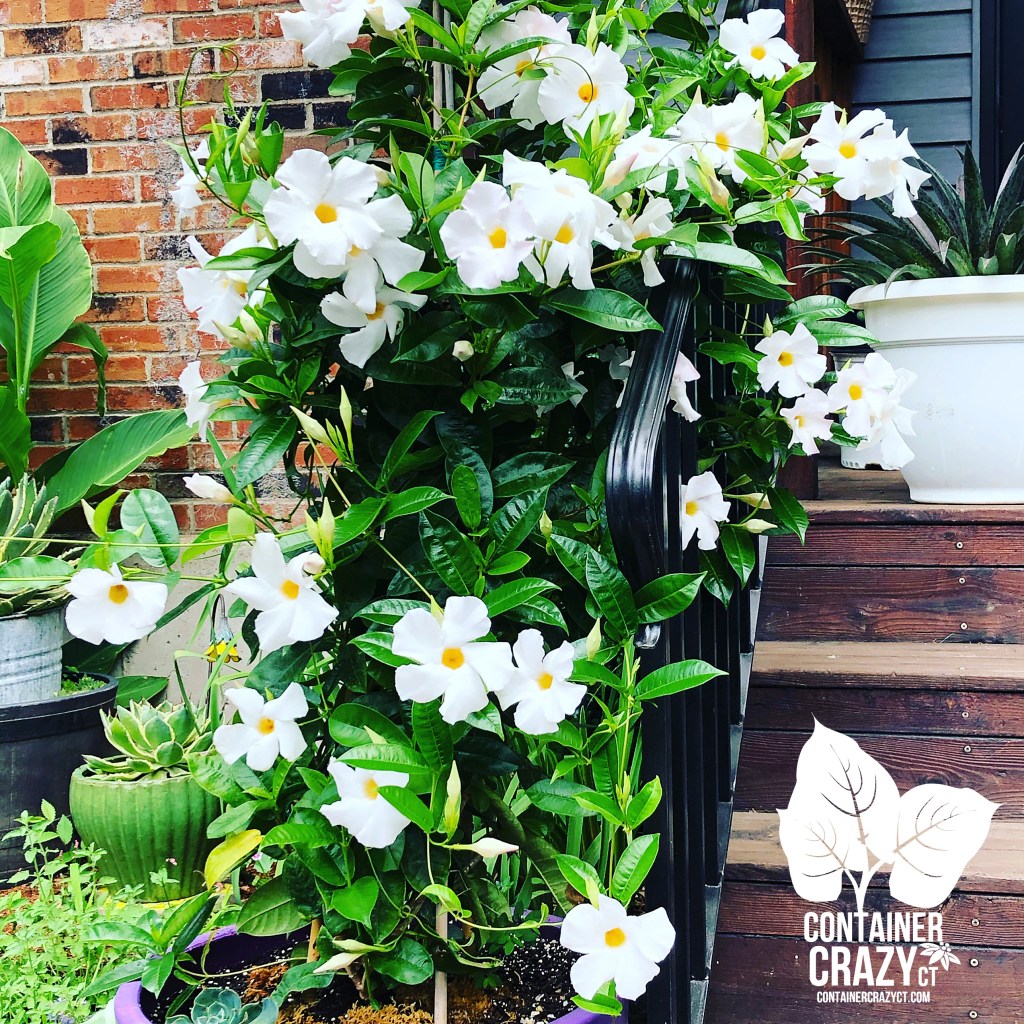
In a Pot Growing Up a Staircase Railing
And I wanted to grow one up my stair case railing to reach the overhead arch, it almost made it to the top. It helps to use garden twine to guide it along and give the vines something to reach and attach to as it twines up. The purple pot below used for it is probably about 2 feet deep, but you may grow these plants in even smaller pots. More on that later.
Side View on the DrivewayCathy Testa standing in front of a Wall Planted with Mandevilla Plants
And here is a photo of me with the mask on, primarily because I wanted to show the timing of this photo, of a wall I just planted. It wouldn’t be long for the plants to produce more blooms. It does help if you start with taller plants if you are looking to gain the affect of covering up something like the wall in this city photo. They will grow as high as the support system they can attach to. If I had a higher wall here, it would keep growing up all summer. They don’t grow as fast as morning glories, as an example. The growing pace is moderate, so if you want to get one to really show off, get the taller specimens to start with. They may be a pricy but so worth the display and enjoyment you will get by using one or more in your outdoors spaces.
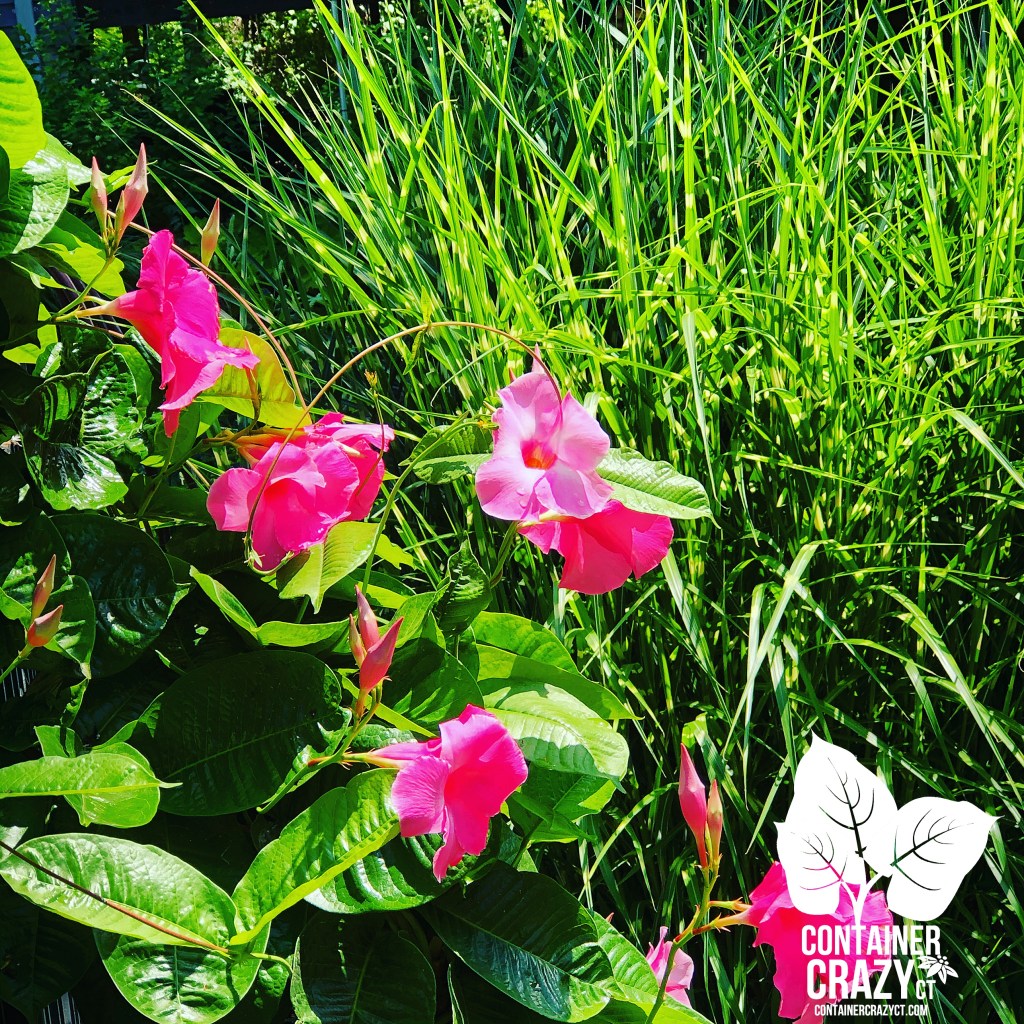
Reaching for the Heavens Gorgeous Pink Blooms against dense foliageStunning Against Blue Skies!
Moderateclimbers that keep on growing up…
Mandevilla vines will reach to the heavens, if you allow them to – they seem to never stop wanting to reach up into the skies. If you are able to acquire taller specimens to begin with, it is worth it in my book. They come in white, pinks, and reds for bloom colors. I haven’t grown the red ones yet, maybe this year will be the year.
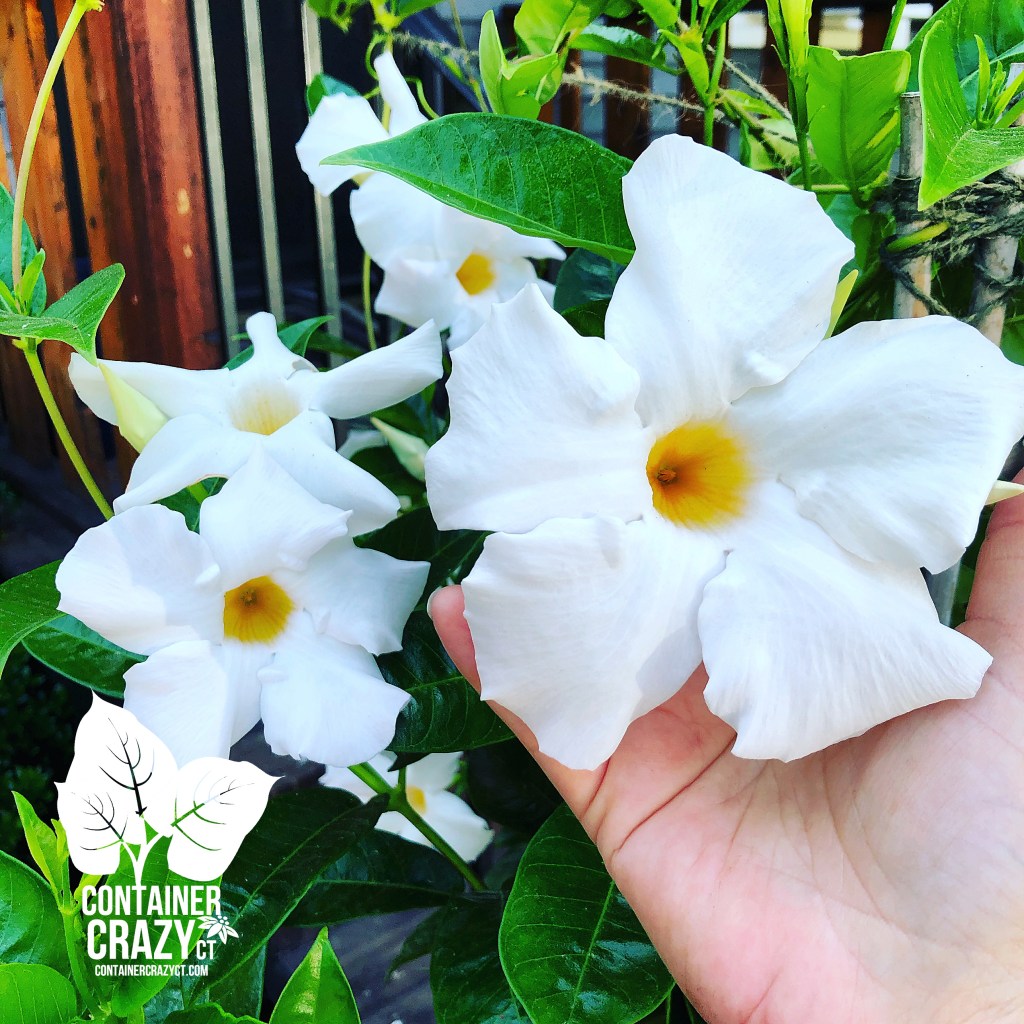
Funnel Shaped FlowersMasses of Pink Blooms
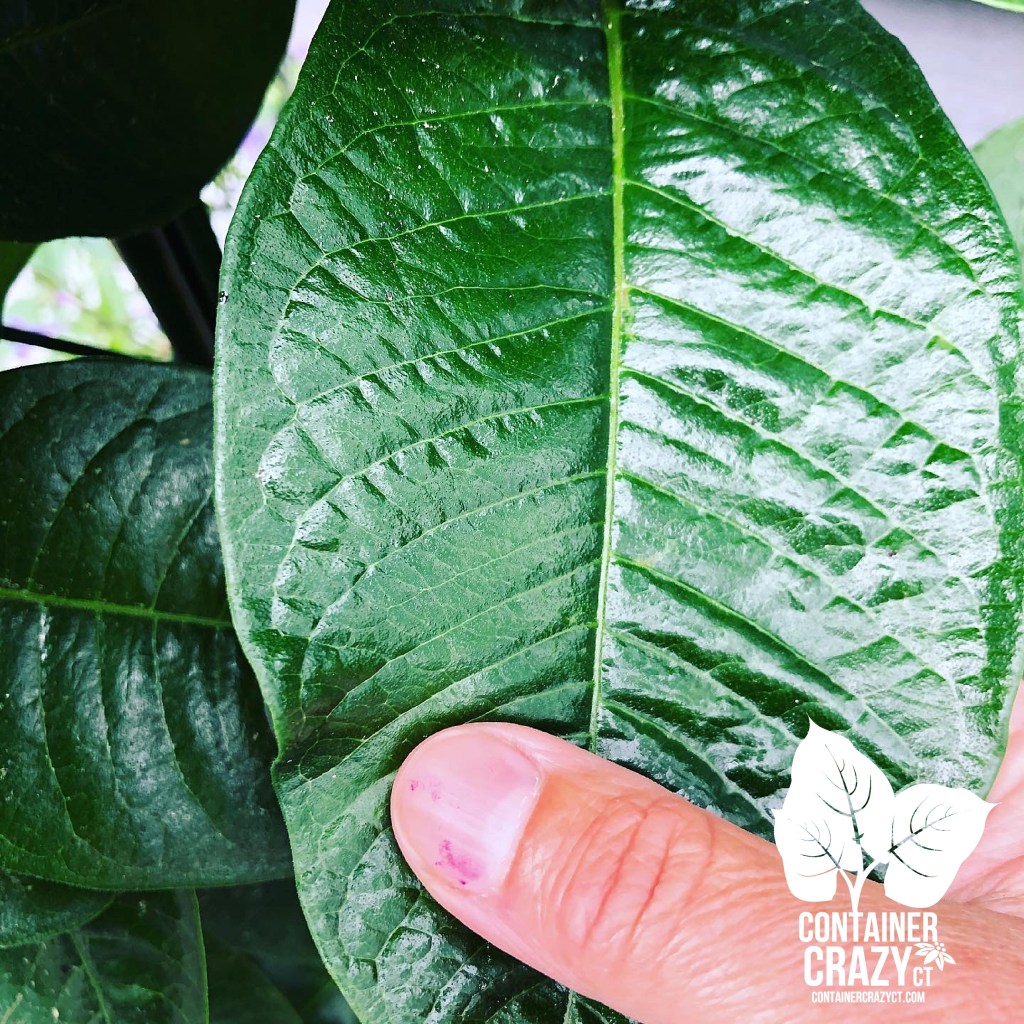
Inspecting the leaves
Some of the varieties have glossier leaves than others. The leaves on the white blooming one, in my photos, were about 4-6″ long. A good tip is to inspect the foliage when you are looking for one during out Connecticut container gardening growing season, and although you might experienced a stressed leaf or two based on when they arrived in Connecticut (cause most of them are shipped here from warmer states), they usually bounce back quickly when potted up and provided the right soil environment and sunny conditions in your planters. It is not to say they don’t suffer some minor issues, but a good tip, again, is to inspect your plants. See a healthy tall one – don’t hesitate to grab it.
Now that is a HEALTHY A** LEAF!
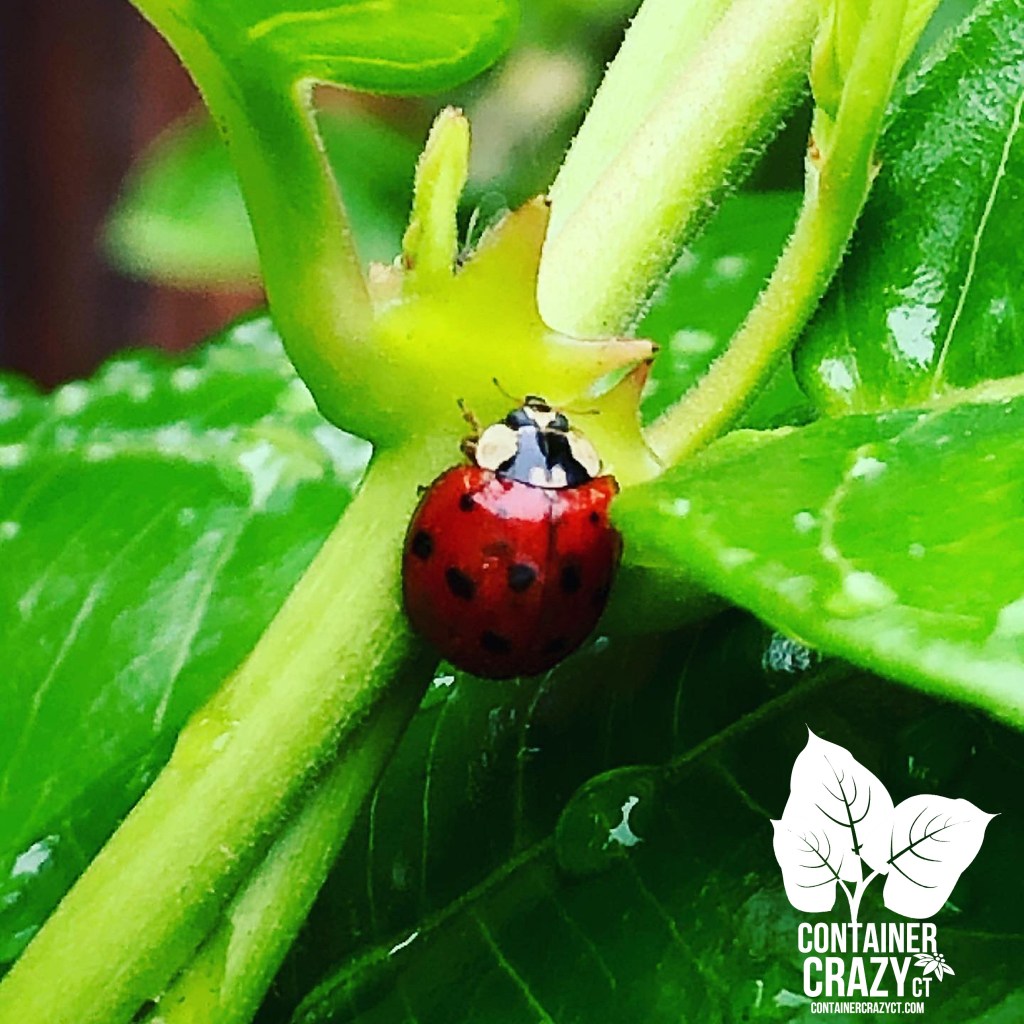
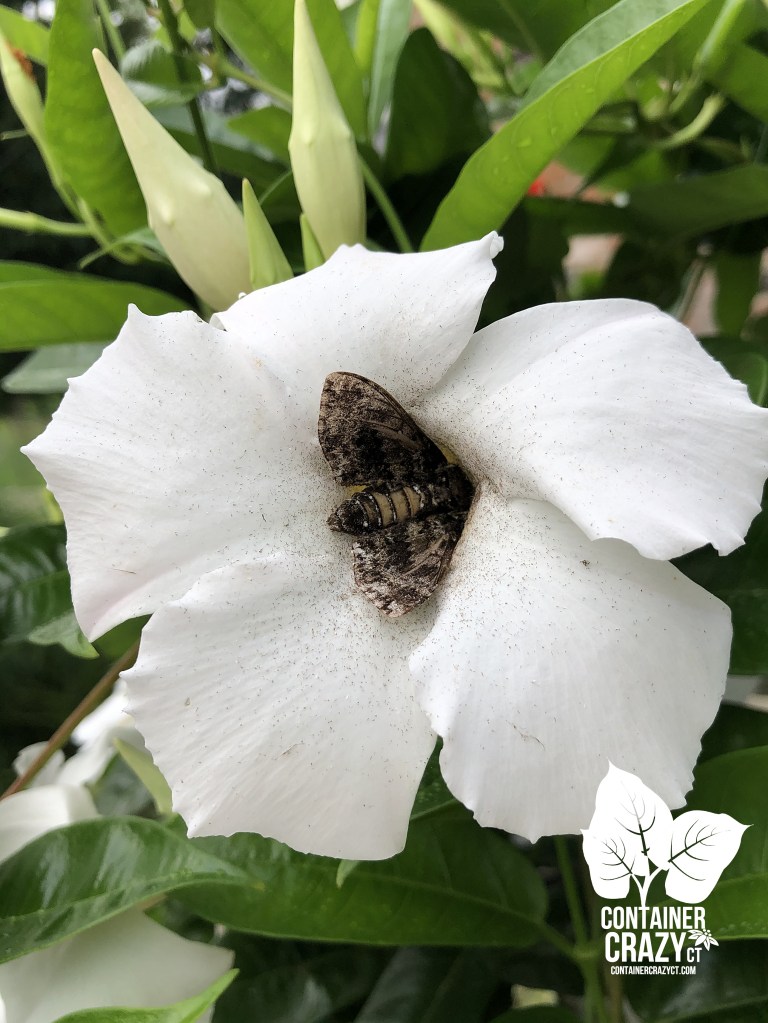
Sometimes I admire foliage of plants more than flowers, especially when they look almost perfect. Not always achievable because we are not plant Gods, but the leaves on this plant that year, wow, so shiny and healthy. To achieve good results, be sure to have well draining soil, use pots with drain holes (see my 5-Must Do’s for Container Gardening), and inspect the plant from time to time. Sometimes, during inspections, I may discover nice insect visitors, like bees, lady bugs, butterflies, and moths.
A very WELCOMED visitor – Lady Bugs are great for eating any bad bugs! Bumble Bee Heading in for a LandingBee Deep in the Tunnel Funnel Moth – Awakening from His Night Visit
Not damaged by serious pests, but bothered if conditions are not right…
So far, I have not encountered serious pest (bag bug) problems on mandevilla plants, but I do think they don’t like “inappropriate environmental stress” and things like too cold of temps, or too much wind, or neglect from not watering regularly. Those aspects will weaken them, and you should also avoid areas with high salt (maybe road side). Do not plant them in containers or your patio pots in Connecticut outdoors till well after all chances of spring frosts. So, you would plant them around the same time as you put out your warm season vegetables, like tomato plants.
Heat, sun, and well-draining soils…
The plants want heat and sun, well-draining soils, and appropriate watering. These are tropical vining plants and they don’t like the cold, so remember that on your timing in spring time. They want warmer temps at night so even if the an early spring day feels okay, the cold temps at night are not good for them in early spring before frosts. Also, for more blooms, get some bloom booster liquid or water soluble fertilizer and fertilize a couple times a month in the summer after the plants are established if you feel there are not enough blooms being produced on your plant. It is a good idea, like most tropical plants or plants indoors over the winter, to acclimate them to outdoor summer conditions.
Acclimating a Stock on My DrivewayThe In and Out Year
One year, I had to pick up my mandevillas orders earlier than normal, so I literally moved them in and out of my greenhouse during the later part of April into mid-May before planting them at a location. I didn’t want to subject the plants to cold temperatures of the evenings, but I also wanted to give them natural sunlight during the days (on good early spring days). It was a “Mandevilla Workout!” As noted above, do not plant them until around Memorial Day in our area of Connecticut (Zone 6b). They are from areas of warmth, sunshine, and moisture – so remember these 3 environmental conditions for your mandevilla plants. If temperatures drop or if you put them out too early, your plant will experience stress, leaf drop, and potential diseases later, so be sure to protect them from the cold in early spring before frosts if you pick any up early in the container gardening season in Connecticut. An occasional drop in temps in the summer is fine however if we get some freak cold (like we did last year in 2021 on Memorial Day weekend!), they should bounce back from the heat of summer, which mine did that year.
Pretty with the Ornamental Grass nearby
Of course, you may plant them into the ground but I typically do not do that. In this photo above, the pink mandevilla is in a pot below my driveway climbing up and an ornamental grass is in the background, which I thought looked lovely together as a combination.
Cathy Testa of Container Crazy CT
As you can see, mandevillas make me happy. I love planting them and watching them grow all summer long. They turned into a plant I barely gave a second glance to, to one I can’t stop admiring now. I hope you will admire them too.
Pots don’t have to be really big…
And I noted you really don’t need big pots. Sources will say keeping them in smaller pots will force the plant into growing the top part of the plant more rather than focusing on growing roots for Mandevilla. In my experiences, I’ve done both, repotting into a 22″-24″ diameter planter or inserted the nursery pots into a larger planter, but be sure to allow draining in either scenario from the base of the pots. And the soil is best on a organic side. I have amended the soil with aged compost in pots with potting mix. I tend to space them right next to each other when creating walls in big planters. However, in gardens, it is recommended to space them apart by 8″. Probably the best maintenance tip is to water them regularly and not let them dry out too much. They have thick chunky root systems, so if the pots is smaller, you may see the nursery growing pot expand as the roots are trying to move around, pushing against the sides. In those cases, I’ve used a razor knife to cut the pot off the root base before planting them.
Cathy Testa Container Garden Designer Broad Brook, CT Zone 6b All photos are taken by Cathy Testa See also: www.WorkshopsCT.com www.ContainerGardensCT.com P.S. I plan to get more mandevillas this year, if local, e-me!
Are you new to Connecticut and have no idea what flowering plants you should grow in containers or patio pots on your deck this summer?
I saw this question asked by a CT newbie on a gardening group on Facebook recently, and thought, hmmm, that is a GREAT question.
So to start to answer the question above, I will share some of my suggestions. Let’s start with tropical plants:
Flowering Tropical Plants
If you are new to Connecticut, you may not be aware of the wonderful tropical style plants which showcase beautiful flowers and are perfect to grow in container gardens and patio pots on your deck this summer. The key thing to know about tropical plants is that you should not put them outdoors until after frost in the spring here in CT (known as the last frost date) because tropical plants can not tolerate frost conditions. Thus, the key timing is to put them out around Memorial Day as a guide. Frost usually occurs around mid-May and it changes slightly year to year but mid-May is a good all around watching point, check the weather forecasts, etc. Once we are past frost, many tropical plants do wonderfully during our summers here in Connecticut in pots, planters, and container gardens.
Blooms all summer
Another cool thing about using tropical plants is many tend to bloom all summer into the fall season, usually into September and October, without fading or wearing out as with other annuals type plants. They usually showcase long lasting flowers. And just as with spring timing, you have to take them in before the frost which occurs in the fall in Connecticut. I blog a lot about storing underground tubers, rhizomes, corms, etc. here on this site which you may search for in the fall on this blog by using the search word “overwintering” for more details on when you should take them in and steps to store them over the winter to reuse each season.
Hot Pink Canna Lily Flowers
Canna Lily Plants
Canna lily plants are not hardy in Connecticut, at least they used to not be hardy, but if grown in the ground, they sometimes come back (due to global warming). That’s another story, as the focus of my blog site and this post is about growing them in pots.
In pots, you may plant them using plants you would pick up from a local nursery (or from me if local to my area – see below). Or you may start them by purchasing the rhizomes and planting them in one gallon size nursery pots indoors with potting mix to give them an early start, in March. They will start to grow from the rhizomes inside the house, and then you may transplant them outdoors after our spring frost in Connecticut by the end of May typically.
Love full sun, grow really tall, not a lot of problems
Canna lily plants love full sun but they are also okay in part sun or even part-shade. Many grow really tall and others species or cultivars are dwarf sized. Anywhere from 4 feet to 8 feet or taller. Their flowers attract hummingbirds and the plants are easy care. Flowers are pink, red, yellows, peach, orange, and some have dark burgundy colored leaves.
Speckled with red on yellow flowers
I usually do not encounter insect problems with Canna lily plants, other than the Japanese beetles that come out one time a year in the summer, they may eat some of the leaves and you may see some holes, but the beetles don’t stay out all summer so I usually just cut the damaged leaves off and tolerate them for a month. This occurs in July or August on one or two plants. Sometimes they only bother one of my plants and leave the rest alone, so I don’t find them to be a nuisance.
How to plant them…
As far as planting them, use a good quality potting mix and add some compost. I typically add slow-release fertilizer to all my container gardens and patio pots as well. See my prior blog post, called the 5-Must Do’s for more information. I typically don’t regularly fertilize my Canna lily plantings on a monthly schedule, with liquid plant food as often recommended, unless I have the watering can with me and I’m fertilizing other plants, than maybe. But, in general, they are very easy to grow. They tend to be low-maintenance plants, other than the part about storing them over the winter, that is a bit of maintenance in the autumn season, but worth it if you wish to reuse them each season. And of course, as with all container gardens and patio pots, you must water them in the summer as needed.
Very Tall Canna (dark foliage) in a large square planter on my deck 2020
Can be top heavy…
One thing to note about Canna lily plants is that they do grow tall and their stems are usually thick enough to stand on their own, so staking is not required at all, but I typically grow them in large pots of 22″ in diameter at a minimum and about as deep. They tend to multiply and produce more shoots so a good clump can form over the summer. As a bigger clump of stems form, it can be top heavy in a pot, and if a small pot is used, they may toppled over from the wind at times. The rhizomes from which they grow are usually about 6 inches deep in the soil, so when you are ready to take them out by digging up the tubers in the autumn season, you will find them there in the soil below. And if you are growing a really tall variety, be aware a very windy location could tilt them, but I don’t encounter that here at my house on the deck. I’m talking if you grew them on a high rise or place where it is unprotected with super strong winds.
These toppled over from wind at times last year (pot was really not stable enough for the tall varieties)
Make More Plants!
Another great benefit to using Canna Lily plants is they tend to grow bigger rhizomes each season. You may dig up the rhizomes in the autumn season, and divide them into pieces and store them from late fall and over the winter in a cool basement, dark place, and where it will not freeze (where it will not drop below 32 degrees F). You get more plants over time with this process.
Thriller in Arrangements
As I’ve noted before, a good balance of plants in container gardens is having a thriller (tall center plant), spiller (drapes over the edges of pots and hangs down), and fillers (self-explanatory). Canna lily plants make excellent thrillers. They give height to your container and planters, and bloom all summer into fall, non stop. As flowers fade, just remove them if you wish, keep the plant cleaned up as desired, and enjoy them all summer on your deck. And best of all is seeing hummingbirds zoom up to the flowers while you sit and enjoy their show.
Pair Them Up With..
Practically anything. As you see in the photo above, I have succulents in the base of the planter with those tall Canna lilies and various annuals. They are great with practically any warm season loving plants that enjoy full to part sun. On this post, about my Aqua Blue Planter on my deck from 2020, you will see a list of the plants I used as fillers and spillers below the tall Canna lilies. Many larger leaved foliage type plants do well with Canna lilies as well, such as Elephant’s Ear (Colocasia), which are also tropical plants. They do flower but usually only one or two blooms. However, for a tropical look, I just love using the big ears of Colocasias with my Canna Lily plants and other topical plants with fantastic foliage. Because many succulents enjoy summer hot weather, they pair well as fillers too.
I will continue blog about other tropical plants great on decks in the summer in Connecticut.
Stay tuned or follow this blog to receive an email when each new post is published here.
Thanks for visiting,
Cathy Testa Container Garden Designer and Installer Broad Brook/East Windsor, CT Zone 6b
In my prior post, I detailed my process for overwintering my canna lily plant rhizomes in my area of Connecticut (Zone 6). I’m continuing it here for those who have asked questions (some asked in person and some via Facebook recently).
Basic Steps:
As noted on my prior post, cut down all the foliage, dig up the root ball, brush or wash away the soil, and let the rhizomes with a stalk attached air dry. After the rhizomes sat in the sun for a day, it was much easier to pull them apart to separate the rhizomes from larger clumps.
These rhizomes with partial stalks were left out on the table for a day in the sun
When I showed a friend how to do this process in person, she freaked out when I pulled the rhizomes by the stalks to separate them and then I started tapping the rhizomes on the ground to knock off more dirt. She was worried I was damaging them, and I said, “Oh, don’t panic, they will be fine.” I thought it was kind of funny but I get it – you don’t want to ruin them.
How to separate the big clumps
Sometimes when you have Canna Lily plants growing in a container for several years, when you pull the root ball out, it is one big clunk of a mass of roots and rhizomes all stuck together. It can be hard work to pull them apart. It is better to separate the rhizomes so when you replant them, they will be individual plants. The big clump over time will just not produce as nice of plants and will reduce the flowers. What I find is I try to separate them as much as I can and if they are really stuck together, let them sit in the sun for a day or two, and after it is dried out, take a stalk in each hand and pull apart and usually they will come apart easily.
Big Clumps “before” they sat in the sun for a day. Above photo this photo is after.
See the larger clump on the top right? That clump was much easier to separate after I let it sit in the sun for a day and overnight. Sometimes you will hear a “snap” like noise as you pull the stalks and the sections cracked away, and that is fine within reason. You basically do your best to separate them cleanly, but if they don’t – one or two cracks in the rhizomes is not going to ruin it all. After I separated them, I also cut the stalks to be about 4″ from the top of the rhizomes and let it all sit in the sun again for another day.
Preparing the Storage Bins
I store my canna lily rhizomes in plastic bins. Narrow bins work better. The deep bins are not necessary and if you stack too many rhizomes in a deep bin, they tend to rot more. So the narrow boxes are just right. You want to lay the rhizomes next to each other versus piling them up on top of each other for best results.
Last fall, I made the big mistake of not drilling some air holes in the new bins I had purchased, and some of my elephant’s ear tubers had rotted (ack!). Never again. So get your drill out and make holes the size of a pencil eraser. Not much bigger than that. You want little holes, not big holes. Also, put the peat moss about 1/3 of the bottom. Do not fill the container with the peat. You only need enough to allow a nice bed for the rhizomes to sit on with some of the peat poured over the top lightly.
Narrow Bins Work BestRubber Maid Box Lid
When I asked my husband if the drill was charged, he responded with, “What size drill bit do you need?” My response was, one the size of an eraser of a pencil. He got it. I don’t speak measurements well. Everything is visual for me! I want the holes to be tiny and just enough for some air circulation to occur in the box. It needs to breath just a little while it sits in my unheated basement for the winter months.
Label the box
I can’t stress enough the importance of labeling the box with the date and the items you put in there. I wrote it down in a notebook one year and then couldn’t find the notebook later! It just helps IF you are storing several types of tropical plants underground storage organs (tubers, rhizomes, corms, bulbs, etc.).
Stalks cut shorter, and allowed to dry in the sun again
After I trimmed the stalks to be shorter, I let them air dry again because otherwise that open fleshy wound could invite insects in the bin. It somewhat cures the rhizomes, you may also want to turn them over mid day to let it dry on the other side. Doing this on sunny days is best because if it rains, they get wet all over again.
One of the separations
More plants next season
One of the best motivators for doing all this work is you will end up with many rhizomes to plant when you bring them back to life in the spring time.
About the peat
Peat with some Perlite
About the peat
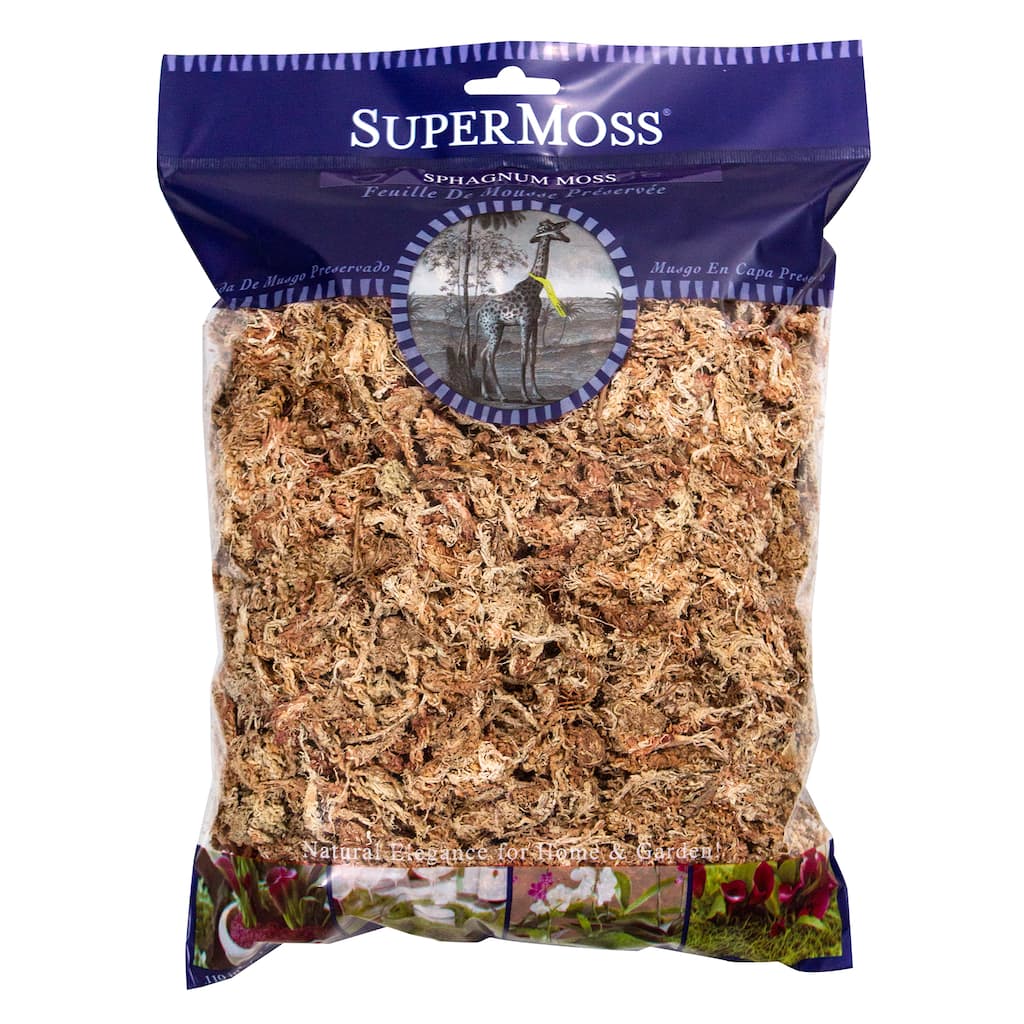
Does peat confuse you? It used to confuse me – cause peat moss is also used for hanging baskets or other projects in the gardening world. Do not use “Long Fibered Sphagnum Moss” which is used in hanging baskets, it is a more light dull brown color, and it does not work appropriately. It can hold onto moisture too much. The “Long fibered” moss, like shown in this photo below, is useful in craft projects, etc., but I find it does not work well for storing tubers, rhizomes, corms, etc. It stays too wet and doesn’t repel problems.
Do not use this type for storing the rhizomes
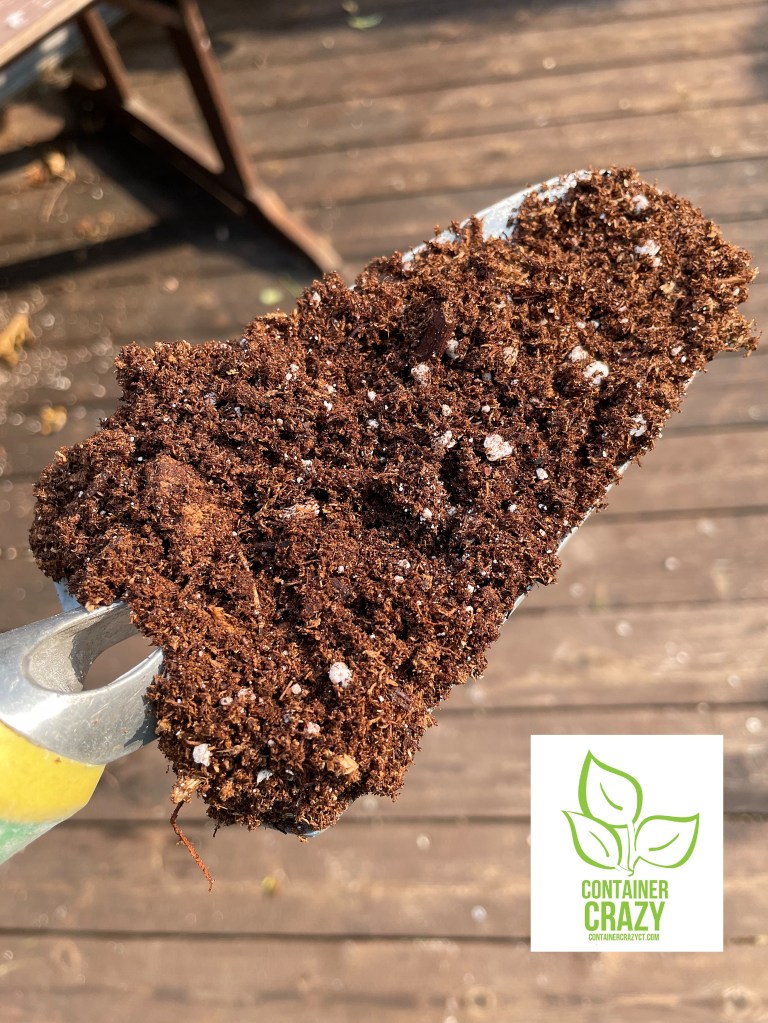
Use the brown spaghnum peat moss that typically comes in bags or square bales. It looks like this:
It looks like this without the white perlite
Last year, I had some extra perlite (white round balls in the photo below) which I tossed into a bin. Perlite is not in peat moss (just thought I’d mention that for observant people! LOL.).
In Bales or Half Bales
Available in compressed bales or half-bales
I’m not recommending any particular “brand” but usually I buy a compressed big bale like the one shown above, put it in a wheelbarrow, and break it apart with a small shovel. This type of peat is used in gardens, as soil amendments, and in potting mixes. It is used dry and I find it maintains well for several years, so the peat in my storage bins is reused over and over again “unless I had some type of bug or rot issue” in the bin which hasn’t occurred too much over the years. Also, I’ve read the peat moss’s acidic nature helps to keep problems out of the bin and away from the rhizomes. But we won’t go into that here, as I am trying to keep it simple. It is a great item to use because it retains a tad bit of any moisture just enough but allows air too.
Air holes along the top edge too
You will notice I drilled a few holes along the top edge of the bin too. If you are stacking these bins in your basement, the airholes on the top may be covered by the box above it so side holes are helpful.
Now, I’ve been told these things by people:
I just put my whole pot with the plant in the basement. (Yes, that works, but over time a big root ball in a pot won’t perform as well so eventually it is time to divide those rhizomes.)
I just put it in newspaper. (I am guessing this works but I trust my process and just keep doing it this way).
I just leave the canna plants in the ground. (Years ago, we could not leave the canna plants in the ground. They would freeze and die BUT I have found some that I planted in the ground next to my fireplace wall where the woodstove is used inside the basement, the canna lily plants have regrown. I believe the soil being a warmer in that area and the fact we have warmer temps from global warming has led to “some” canna lily plants surviving our winter ground temperatures, but I wouldn’t bet on it for any in containers left outdoors as they would certainly freeze. If you want to store the whole pot in the basement and not remove it to divide the plants, that is another option.)
I can’t be bothered with storing the rhizomes and will just get plants from you next year. (Yes! Sounds good to me. I grow many canna lily plants in spring and offer them for sale.)
Waiting on Storing this one!
Timing
All of this work may wait if you want to enjoy your tropical non-hardy plants here in CT, like this one I’m standing next to. I am waiting to do this one till at least early October because I am in love with this Alocasia. I almost lost tubers I had stored of these because of the non-air hole situation described above. The biggest leaf on this plant seems to be just getting bigger and bigger.
Gorgeous Alocasia Leaf 2021
Well, that’s it for today. I am continuing my work today outside here at my home. My husband has a joke that before we know it, it will be Halloween, then Thanksgiving, and then Christmas! I will say, “Stop saying that! Because I love my deck filled with plants and it depresses me to take all this down, but he is correct. Time flies when you are having fun.”
Thank you for visiting my blog.
Cathy Testa Container Gardening Designer 860-977-9473 Broad Brook/East Windsor, CT Today’s Weather: 75-79 degrees F. Cloudy till about noon. Tomorrow Weather thru Wed – looks good, then rain at end of the week. Rain equals wet working outside. I’ll thank myself later that I did this in the sun and not fighting the elements!
What I do for work:
Install Container Gardens Grow Plants from seeds (and rhizomes, tubers, etc.) Create and sell Succulent Topped Pumpkins in fall (next month!) Create and sell handmade greenery wreaths and kissing balls for the holidays (December!) Write with typo’s – LOL. Stare at plants as much as possible Have a good day…