Storing Corms, Tubers, Bulbs, Rhizomes for Winter

1 Comment

This year I’m trying a new method for storing my Alocasia corms (sometimes referred to as bulbs or tubers, but they are not true bulbs). I have seen Alocasia corms referred to as “tubers” in many garden reference and technical books, but for the purposes of this post, I’ll stick with corms as the term used for these Alocasia plants I am putting away for the winter months in Connecticut.

Bins Years Prior Used

For years, I stored the bases of underground parts from my elephant’s ears and canna lily plants in plastic bins with covers (air holes drilled in the covers) with peat. When I say “parts”, I’m referring to corms for the elephant’s ear (Alocasia and Colocasia) and rhizomes for the Canna Lily plants).

The peat (only a small amount below; used almost like a bed below the corms/rhizomes, and some peat lightly sprinkled over the tops of the corms and rhizomes) helped maintain a bit of moisture but kept the tubers in a dry but not too dry or too moist state.

However last year, some of my Alocasia corms had rot areas on them when I went to take them out in the spring to start growing again. They were too damp. Plastic bins will hold onto some moisture (versus a dry cardboard type box) but this problem of rot really had never occurred before. Since I want to make sure I am able to save these dramatic large Alocasia plants’ corms, I’m trying this new method this year.

Dug Up about a Week or few days prior

In last week’s post, I showed how I dug up the Alocasia plants from a huge cement planter, cutting off the foliage about 4-6″ from the top of the corm area, and laid them out in the sun for one day. Then I moved them to my basement in laundry baskets.

I also dug up a very large Alocasia plant prior to these, from a big tall patio planter, and laid out a huge corm with top part of the plant (stump like stem area) in a bin about a week before these above.

The ones in the laundry basket were still too damp when looking them over yesterday, so I laid them out on a table in my basement, and spread each corm on the table so they are not touching, and decided I will wait a few days longer before packing those up into boxes. I will leave these on a table another few days to air dry in my unheated basement.

However, I decided to pack up the others that were dug up prior from my gray patio planters. One of them is super large and heavy. It isn’t draining out any more water or moisture now, feels like it has dried enough, and there are no rot or damp areas on the corm area. It was placed in a bin in my basement about one week prior to those dug up from my cement planter so it and its side shoots have been drying longer.

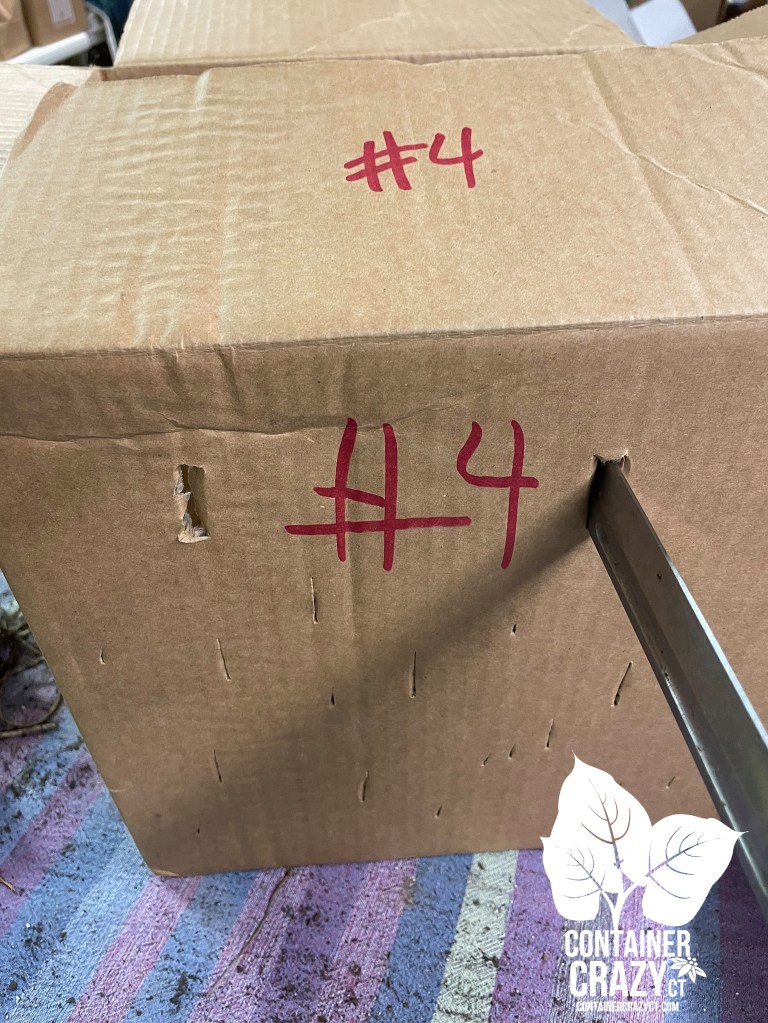
In doing a bit of research, I’ve read Alocasia corms may be stored in newspaper and put in a cardboard box with air vents. I happen to have some boxes available and used a large sharp knife to make slits in the boxes around the perimeter of the cardboard boxes for the air vents.

Making air vents

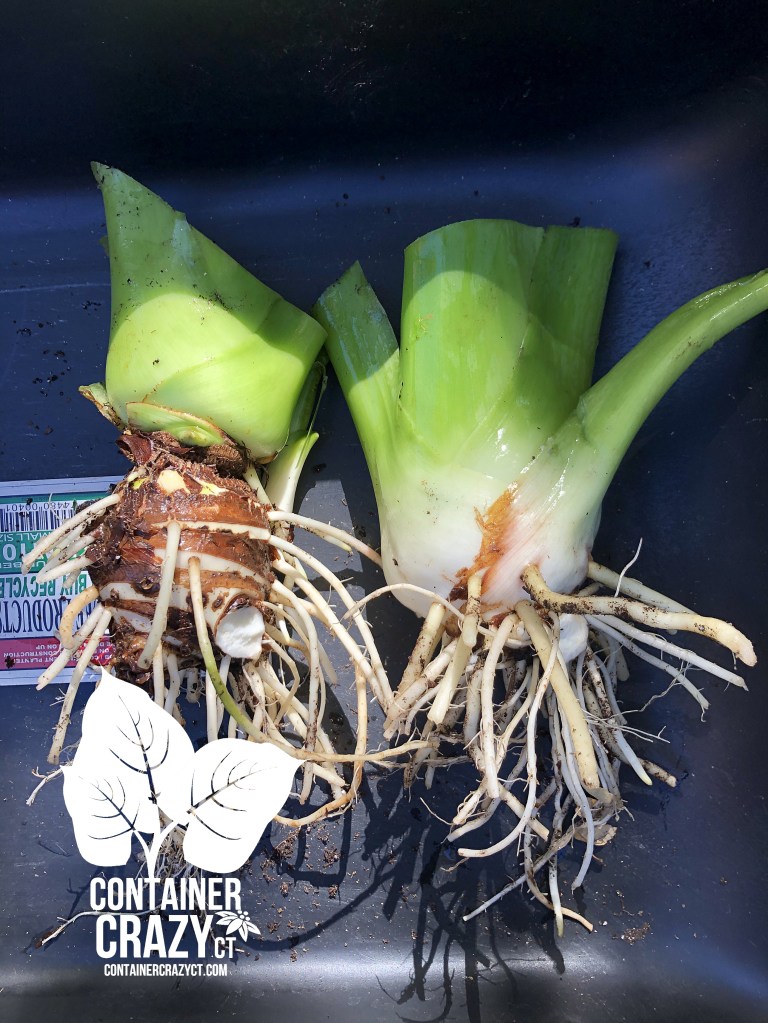
I placed crumbled up newspaper sheets in the base of the cardboard box and used the original plastic mesh bags, which were around each corm when they were originally shipped to me. I placed individual corms into these mesh bags for those that would fit. My largest “stump” shown top right of this photo below is too large for any of the mesh bags I kept on hand.

Mesh Bag with Corm inside

I loosely wrapped a couple sheets of newspaper around this mesh bag once the corm was inside and put it in the box. I am careful to not have them stacked or touching too much with other corms handled the same method because if anything is damp, that moisture will transfer to any touching corms. However, these were all fairly dry and not moist. The idea is to not overpack any boxes and keep air around each.

Now for the larger Alocasia stump. I keep calling it that because it is so much larger, it is more like a stump size! This one I had to find a larger long box and I have no mesh bag for it. It also has a large green area (the top part of where it grew) still attached which is not wet at all when I decided to lay it into the long cardboard box. Again, I crumpled up newspaper below in the box, and then I used a paper bag to cover it like a blanket and close up the box. I did not tape the box closed, as air circulation is important. I just overlapped the covers and I also put vents in the sides like with the other cardboard box prior to laying it in there.

Largest Alocasia “stump”

The root area is dry with dry soil a bit still on it, the corm area is dry, and there is still green life on the top part but there is no dripping water coming out of it – it seems like it is dry enough. I labeled all the cardboard boxes with date and placed it in the usual corner of my unheated basement (by the door where it is like tucked in a corner, stays cool, dark, dry and it does not go below freezing here.)

I have read the optimum temperature for storing Alocasia corms is 40-45 degrees F. Again, my basement is unheated. The only time it may get warm in there is when we use a woodstove at the opposite end of our basement, which is only occasionally. It does not go below freezing (32 degrees F) so they will not freeze. They are kept in a consistent cool 50 degree range or a bit below that for the whole winter. I will check on these in one month by making a note on my calendar to go look at the corms in these cardboard boxes and seeing if they look good (no rot, no moisture, no wet newspaper).

Again, this is the first time I’m trying the cardboard box method for these. I also wish to note, canna lily rhizomes tend to not survive if they completely dry and wither up, so I don’t think I’ll use this method for those plants, only for my precious upright huge Alocasia plants’ corms. I’ve read more about how these are okay more on the dry side. Makes sense because when I purchased the corms about 3-4 years ago, they showed up in a card boad box, with the white mesh bag, shown above, and only the brownish corm with no plant at all attached.

Label the boxes
Corner in Basement

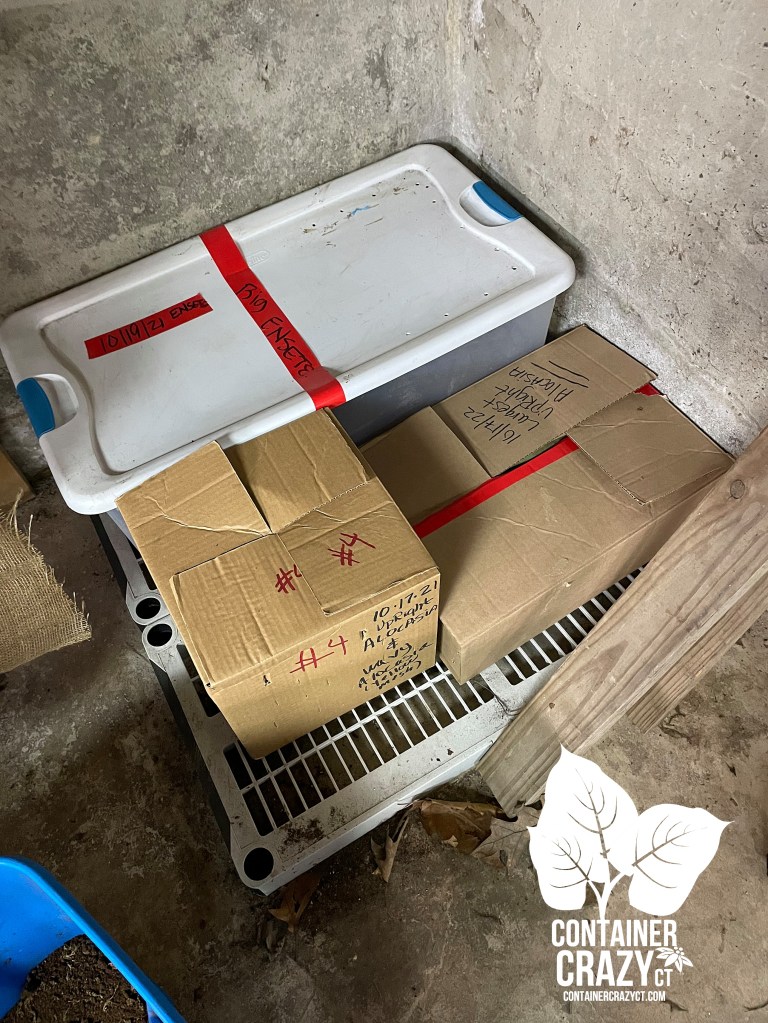
You see the big plastic bin near these two cardboard boxes, that was the bin I last used for my big red banana plant (stump), the Ensete, I had for over 10 years. It failed this year, so there’s nothing in that box right now. I also put a plastic shelf section below the boxes so it is not directly on the concrete floor which may lead to dampness on the bottom of the boxes.

Pic of corm inside a mesh bag

I just hope this works well this year and will keep you posted. Next up will be to dig up my canna lily plants from containers outdoors. Sometimes I don’t bother anymore with those as they may be easily grown from new plants next season, but it is always a great feeling to reuse and regrow plants to save money on purchasing new ones, but sometimes I run out of energy to keep digging up these things. Each year, I seem to do less storing because of the effort. Sunny days help!

Thank you for visiting,

Cathy Testa
Connecticut Planting Zone 6b
Date of Post: 10/18/2022

P.S. I also want to note, many references will indicate to let the plants get hit by frost first before storing underground parts like the corms or rhizomes, etc. because the freeze will induce dormancy to the plants, however, I often do this process just before a hard frost. The weathermen indicated frost may be happening this week. Wednesday’s forecast indicates about 34 degrees F overnight – so that is chilly!

Overwintering my Alocasia Plants

14 Comments

There are many tender tropical plants which I overwinter each year around this time of year in October. They are either dug up and packed up in a cool, dry, frost free place, moved into my home as a houseplant, or moved into my low-temperature greenhouse for the winter.

Today, I will share how I overwinter my newest favorite tropical plant, Alocasia macrorrhiza or Alocasia macrorrhizos (Jumbo Upright Elephant Ears).

Here is a photo of me standing by it around mid-September 2020. It is quite tall and an impressive specimen showcasing dark green huge leaves, big enough to serve as a patio umbrella.

Cathy Testa standing next to her Jumbo Upright Elephant Ears plants in 2020

Each leaf reached just slightly over 3 feet long from tip to the start of its rigid stalks, which were also 3 feet long. Thus, the plant towered over us at 6 feet tall total. The width of the leaves reached about 2-2.5 feet across.

Measuring the leaf after it was removed in the fall from the planter

This plant is not winter hardy here in Connecticut, so it must be removed from the planter to store the tubers (or rhizomes) for the winter. This may be done after the plants get touched by a light frost (which will damage the leaves and make them turn yellow) or immediately after a hard frost (which will completely kill the top parts of the plants and its foliage.)

I prefer to move them in before frost for two reasons: (1) It is not cold out and easier to work with the plants. And (2), sometimes if you leave the tubers in the soil too long, when they get cold and wet this time of year, rot may actually start on the tuber before you dig them out. The tuber will be soft if any rot has started. BTW, the tuber is referred to as a rhizome as well. For the sake of this post, I will use the term “tuber.”

Cathy Testa holding a leaf from the Jumbo Upright Elephant Ears plant in October 2020

While working this weekend to continue my overwintering chores, I asked my husband to take a photo of me with a single leaf to show the shear size of this dramatic foliage plant. I obtained the tubers in 2019. That year, the plant grew more clumps of leaves, but this year, in 2020, the plant grew much taller stalks and bigger leaves. I always tell my followers and customers, the bigger the bulb, the bigger the plant.

This planter going into my greenhouse

If the plant in your container or patio pot is small enough, you may bring it into your home for the winter, or even into a greenhouse. However, I typically choose to store them by digging up the tubers, after cutting off all the foliage, and storing them in my basement, which is unheated but does not freeze.

The location is key. You need to consider the place you are putting them. A cold closet in the home may work. You need to experiment the first time you do this and hope for the best. A garage (unless it is attached and gains some heat from the house), does not work. The tubers would freeze and die.

Okay, here are my steps:

(1) Chop off all the foliage. You may use either a sharp long kitchen knife or a machete, which I often use the machete when it is a very thick stalk or stump. Just be sure your tools are clean to not transmit any disease or insect problems. I usually start with removing each leaf stalk individually, then cut across the whole stump area if it happens to be large.

(2) Dig out the bottom part with the tuber from the soil. Do this by digging around the plant with your shovel or garden trowel and pushing down around in a circle. You should hear the roots snapping as you are cutting them during this process. Then lift the whole clump together out of the soil. Try to be sure you are not breaking the tuber below the stump area.

(3) Lay the bottom parts in the sun. The bottom part of the plant will either have a visible tuber, or not. Either way, lay them in the sun for a minimum of one day to dry (and/or cure, as they say). Sometimes, I let them sit in the sun for a few days but do not leave them out if you get a hard frost after digging them out. If the bottom piece you dug out is thick and fleshy, turn it upside down to allow the excess water to drain out. These plants hold lots of water. You may gently brush away any excess soil or use a garden hose to blast off the soil, but sometimes I prefer not to add any more moisture to them if I can help it.

Lay the tubers out in the sun

(4) Snip off any long roots. Notice in this next photo how long the roots reached. Because the soil was fluffy and dry in my planters, I actually pulled the roots out of the soil because I wanted to see how long they were. They almost reached the bottom of the gray tall planters. The reason I snip off the roots is to eliminate as much fleshy material from the pieces. Fleshy, wet materials may rot in the storage box.

Showing the root lengths

(5) Put the stumps (for lack of a better word) and or tubers into a storage box and cover it with peat moss. Sphagnum peat moss may be purchased in large square bales or in bags in smaller amounts. It is a natural and organic ingredient that absorbs moisture and aerates around the tubers in the box. Pour some of the peat moss in the box in the base, lay the tubers and stumps on it, and then pour dry peat moss over and around them. Do not over do this. You are only lightly covering them with the peat moss. BTW, the peat moss is reusable every year. It lasts a very long time.

(6) Place the box in a cool, dark, dry location that doesn’t get below freezing and is somewhat unheated. Such as my basement. If placing the box on a concrete floor, place a tray or something to elevate it a bit off the floor because as that floor gets cold in the winter, it may create condensation in the storage box. My basement does get some woodstove heat from time to time, but the woodstove is way at the opposite end of the basement from where I store my overwintering boxes. And the woodstove is not used all winter, just on some nights. So the area where I put all my overwintered plants in boxes stays colder. It has become my sweet spot for this process. It is okay to stack your boxes on top of each other. I use plastic bin type boxes with a lid. Do not use clear plastic boxes, use those that will eliminate any light. Sometimes I have drilled holes into the lids to allow some air to enter. The tubers tend to stay dry but just slightly moist by the peat around it – but not wet. Do not store them in a very wet state. This will lead to rot. If your basement is too hot and dry, they will dry up and shrivel and may just rot away to a dry state which is not usable. If your basement is super cold, the tubers might freeze and die.

(7) Label the box with a sharpie marker, date it, and note what you stored so you will remember in the spring. If the tubers make it, you may recognize them, but if they don’t, you will be wondering what you stored, at least I have, because I store many types of container garden plants over the winter months.

An Alocasia in a large pot

You have other storing or moving options as well. You could just move the pot with the plant into your basement and hope for the best, but you may not have the space, or the muscle power to move a big pot. And usually a big pot is too big for a home. But that is another option to mention. If you move the entire pot with the plant into your basement, you will need to monitor it for insects and add water to the plant, but at a very minimal fashion. You are not watering it like you would during the summer season.

Left – See the Tuber?

In this above photo, the tuber on the left is covered in brown papery like material, which you leave on there. However, on the photo on the right, you really only see a stump. Storing either works for me.

This storing process allows the plant to go into a dormant state. They will not grow in the dark boxes and will usually do fine. When spring returns, you may bring them out of the darkness by starting them in smaller pots inside the home to awaken them. They should not be planted outdoors in your patio pots or container gardens again until all chances of spring frost has passed. These tender bulbs will bring back repeat performance year after year by following my steps above.

If you found this post helpful, please comment below or share my site with others.

Thank you.

Cathy Testa
Owner of Container Crazy CT
Broad Brook, CT 06016
860-977-9473
containercathy@gmail.com
Other sites: www.WORKSHOPSCT.com and www.ContainerGardensCT.com
Container Garden Designer, Plant Lover
and a little “Crazy” about plantings in containers!

Currently taking orders for custom Succulent Topped Pumpkins. They are created with live succulent plants, fall or Halloween decor, and are amazing on real pumpkins. They are low maintenance, easy care, and last for months. Porch Pick-ups and some deliveries arranged. Inquire for current prices. 860-977-9473 texts are welcome.