Growing Tomatoes: My 5-Year Passion

Leave a comment

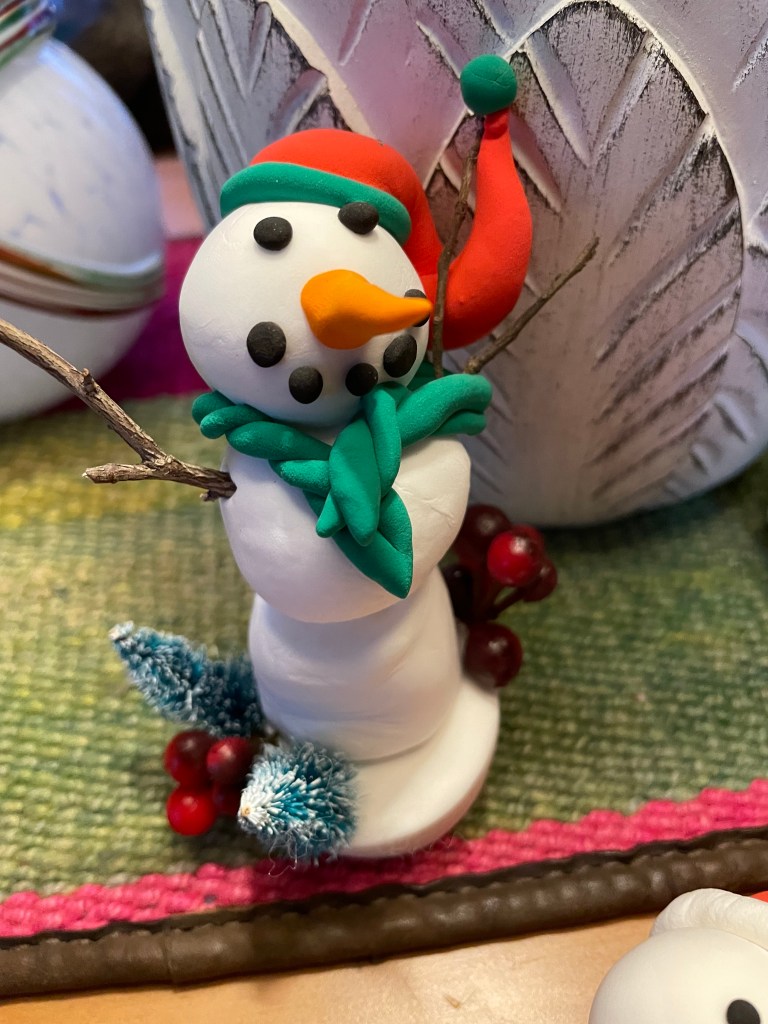
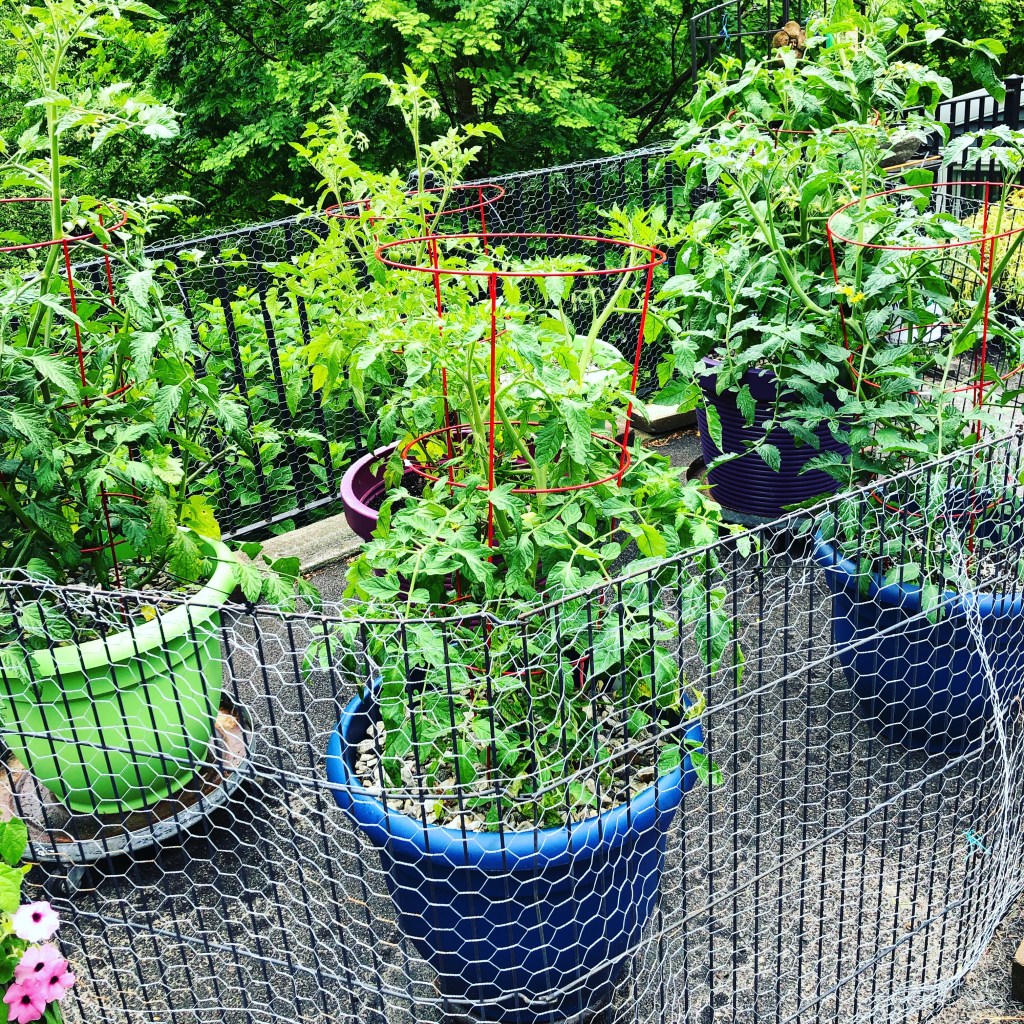
About the year of 2020 or maybe it was the year before, I started getting into sowing tomato seeds. That carried on for about 5 years. It became a passion and I always grew the plants in my large patio pots, rather than a garden. Here in this photo above are some of my plants in large pots. The chicken wire was there to keep wild animals (like squirrels or chipmunks) away.

I got into sowing the seeds so much that eventually I was growing up to 400 plants in my greenhouse. My greenhouse is a lean-to style of about 12 feet wide by 24 feet long. Supplemental heat was needed. I used seedling heat mats and the propane heating unit. Eventually, spring would arrive. The sun was enough to heat the greenhouse as the warmer season approaches in late March or so. It kept the baby tomato plants growing happily. I visited them every single day – no lie. I think plants know when you pay attention to them.

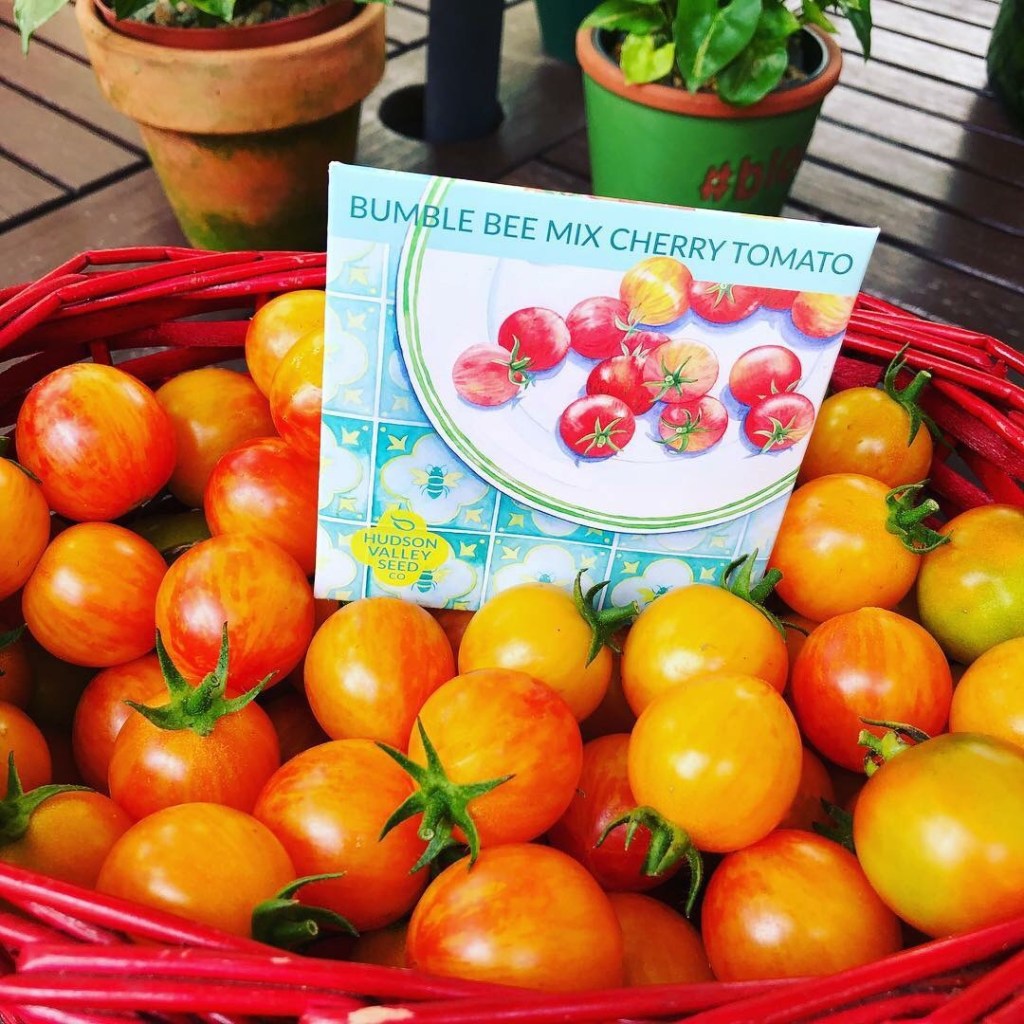
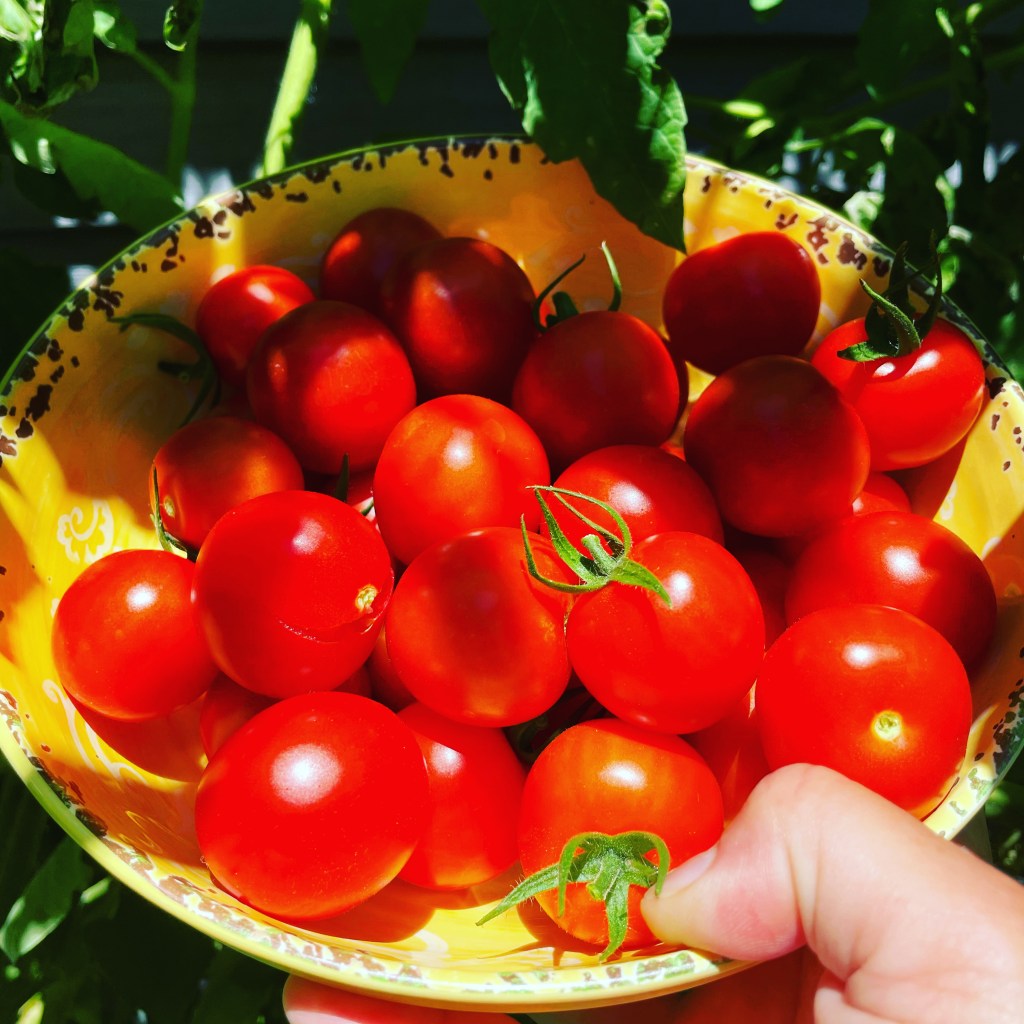
I have very many photos of the tomatoes from my efforts. I sold lots of plants too. My favorite seed company was Hudson Valley Seed Co. I discovered them at the CT Flower Show one year. I loved their artful seed packets, the instructions inside the packets, and their website is very informative. I also loved that they offered lots of unique varieties. Above is the “Bumble bee mix” cherry tomatoes. Why not experiment and have lots of varieties to eat and talk about?

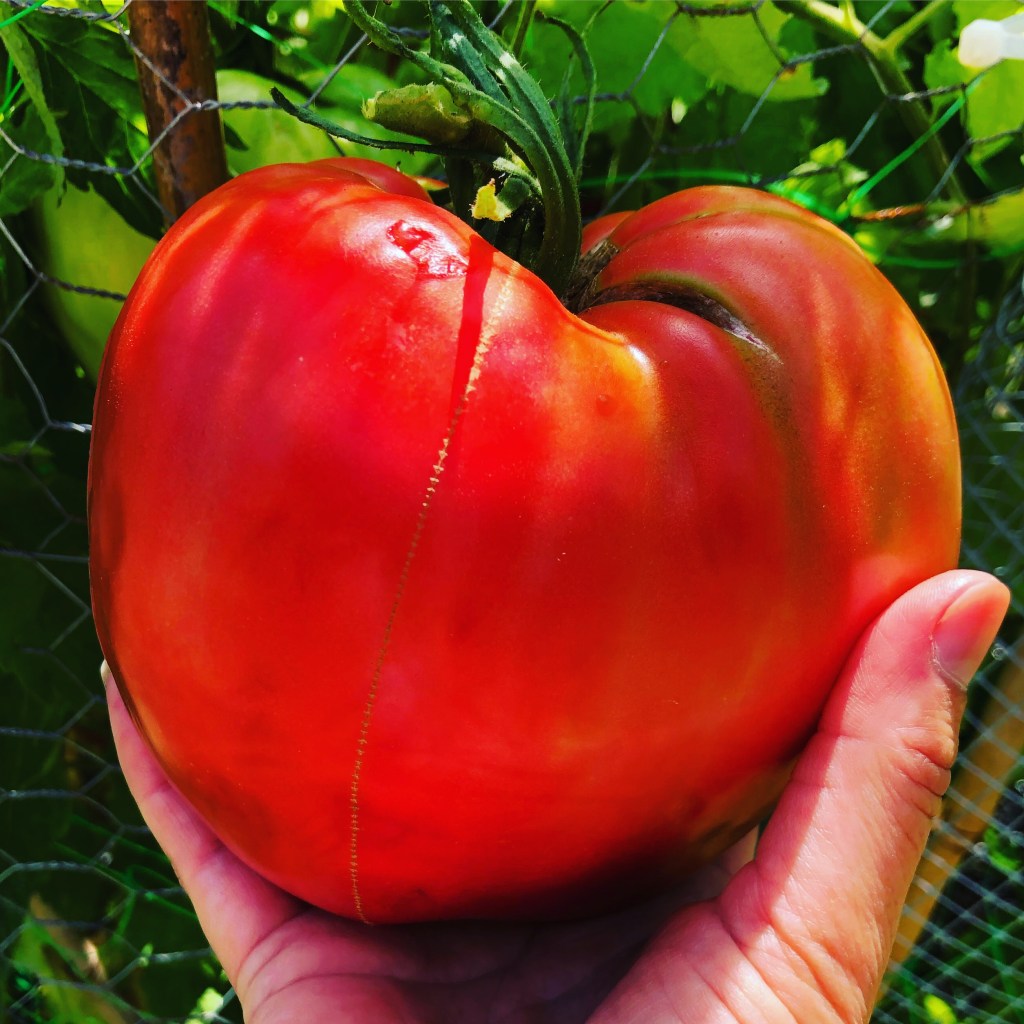
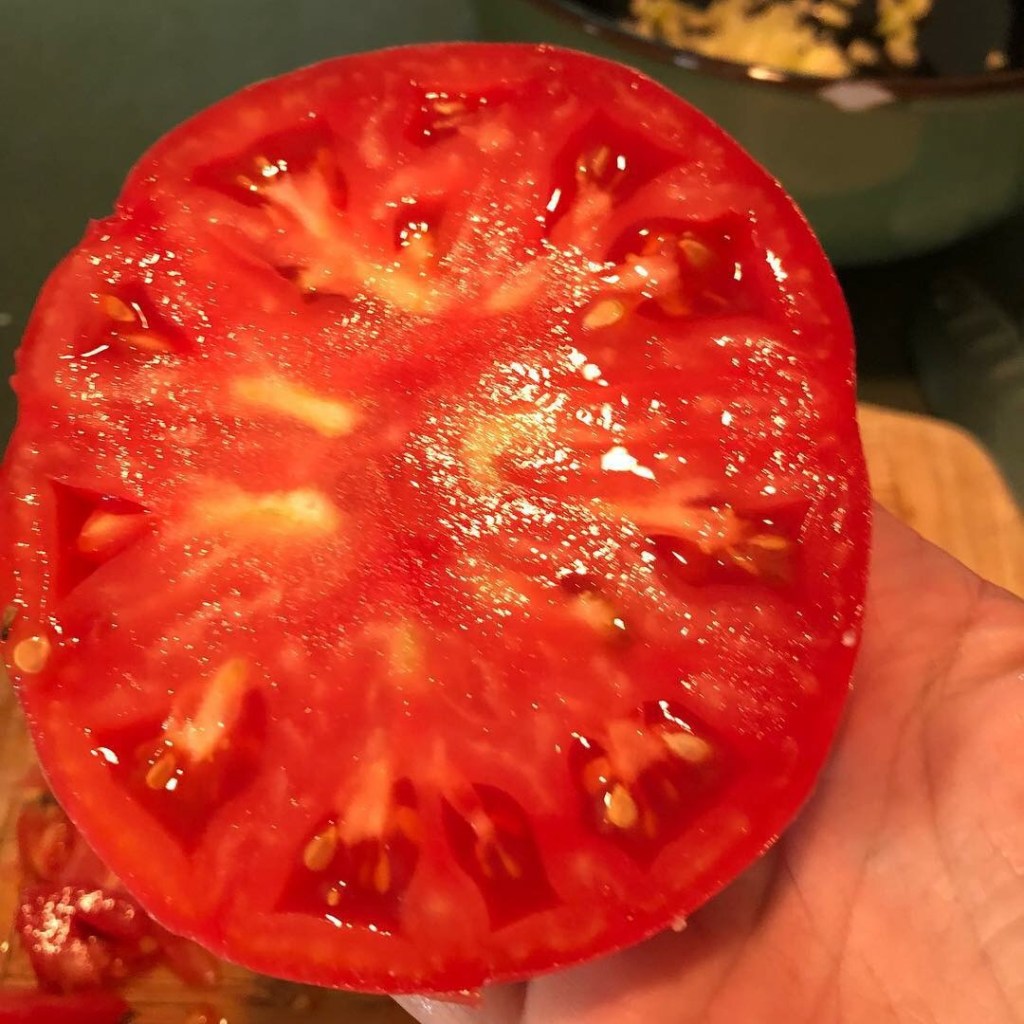
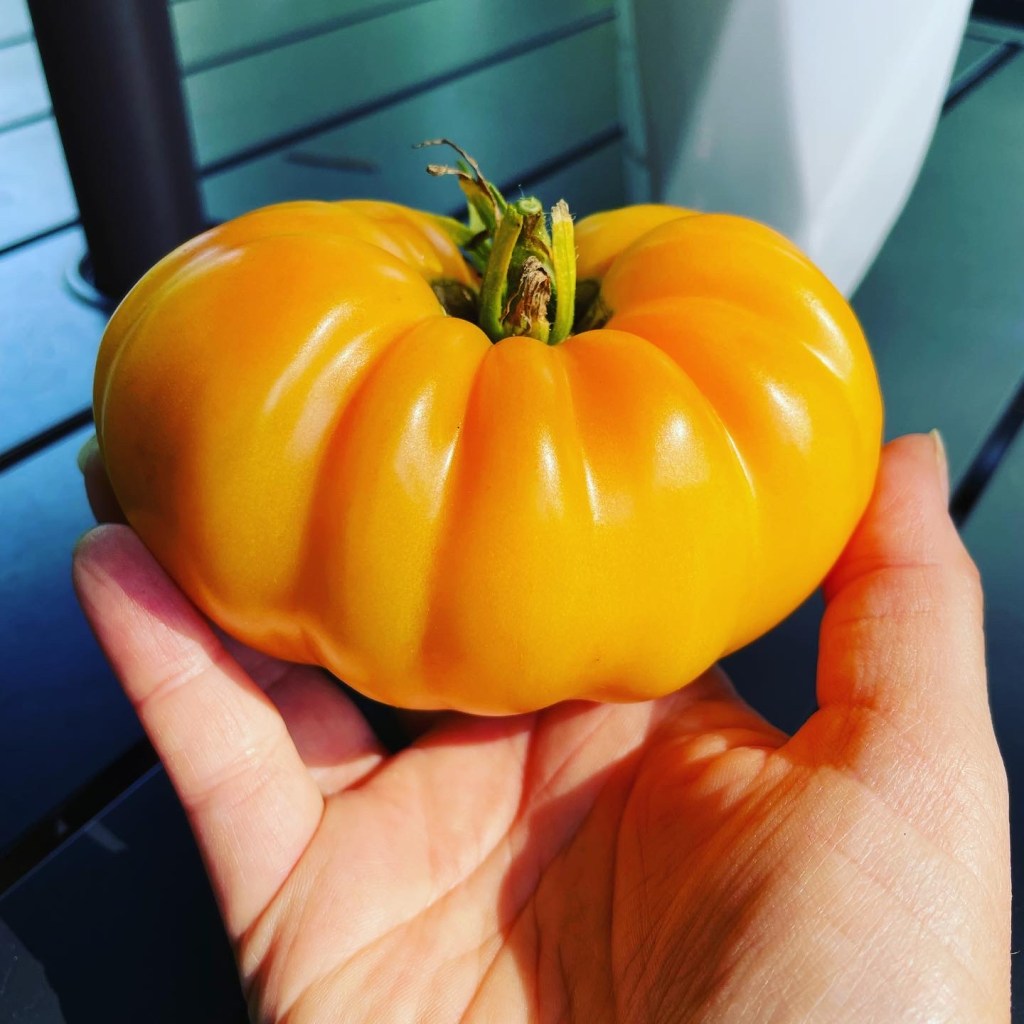
I stopped sowing the seeds a couple years back. I think of how many I did before. It became a big passion for a few years, probably 5 or so years. I am proud of what I had accomplished. As mentioned, I have lots of tomato photos, but I need to delete them now. I’m posting just a few here today. You can use the search bar to see my prior blog posts on many tomato types. Just type tomato. They should show up on this blog site. In this photo above, I’m holding an “Oxheart” tomato. Those were like the biggest EVER. Shaped like a heart. It was always amazing to see how big they got and they were heavy too.

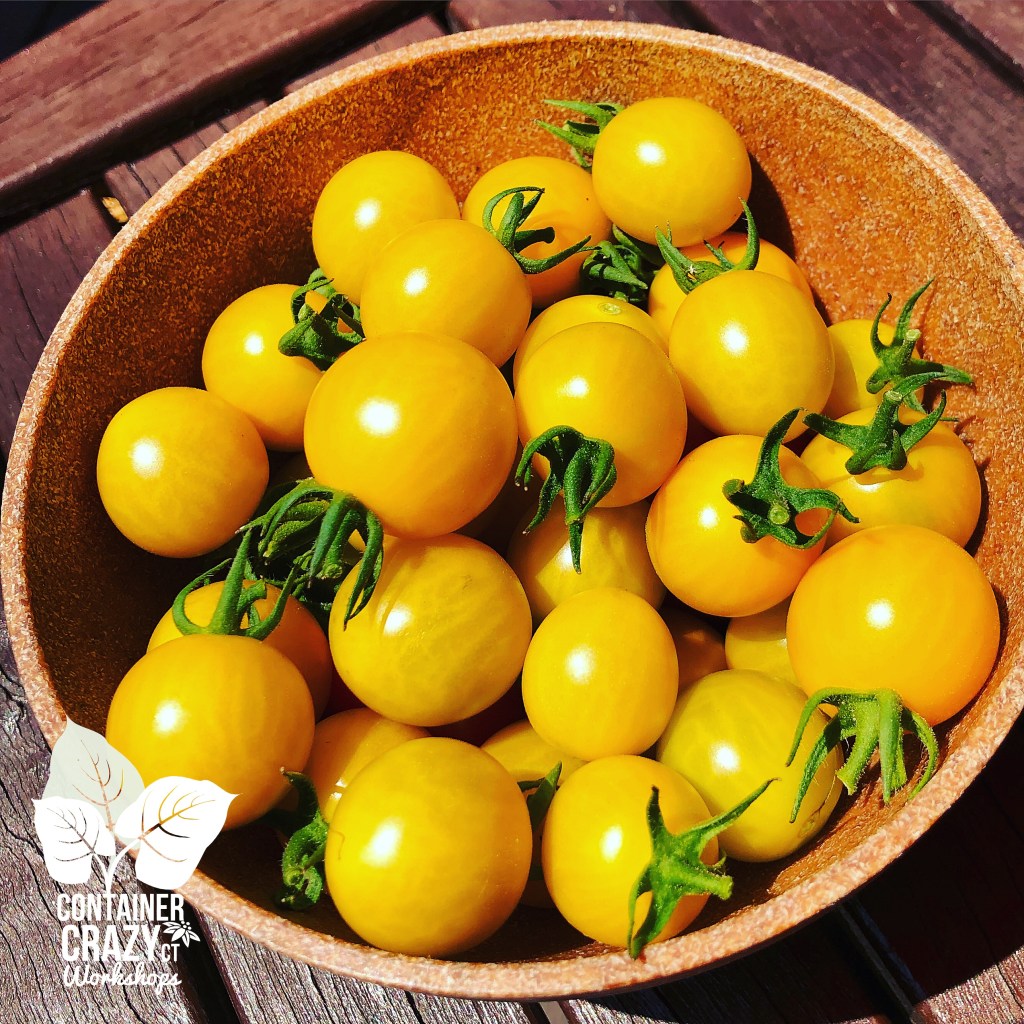
Theses above are the Honey Drop cherry tomatoes. Good Lord. So sweet and delicious. Really tops! I think cherry tomatoes are easier to grow than regular tomatoes. They don’t seem to get affected as much by things like blossom end rot. They grow prolifically so you have a real lot to pop in your mouth during the harvest season in summer. They almost grow like weeds!

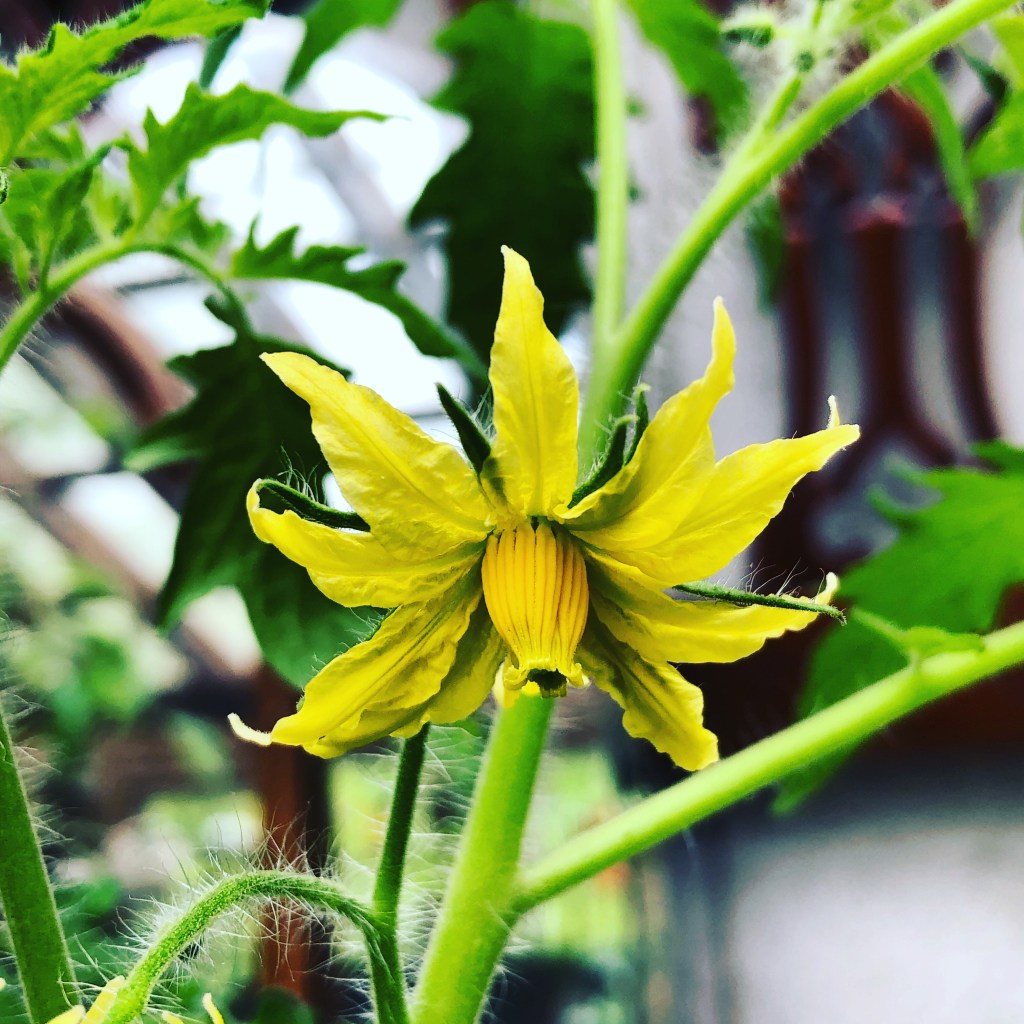
This tomato plant flower is from an Oxheart. Even the flowers were huge. You need flowers to produce fruit. The flowers were admired as much as the tomato fruits. They started growing as soon as the flowers were ready. More flowers, more tomatoes.

This is one of those “mouthwatering” photos. It makes anyone who loves fresh, garden tomatoes wish they could have one right now in the middle of winter. There’s nothing better than fresh. And when picked and eaten right away (if warmed by the sun), even better. I find it hard to find good tomatoes otherwise, like in stores. Growing your own is one of the best ways to get the best flavor.

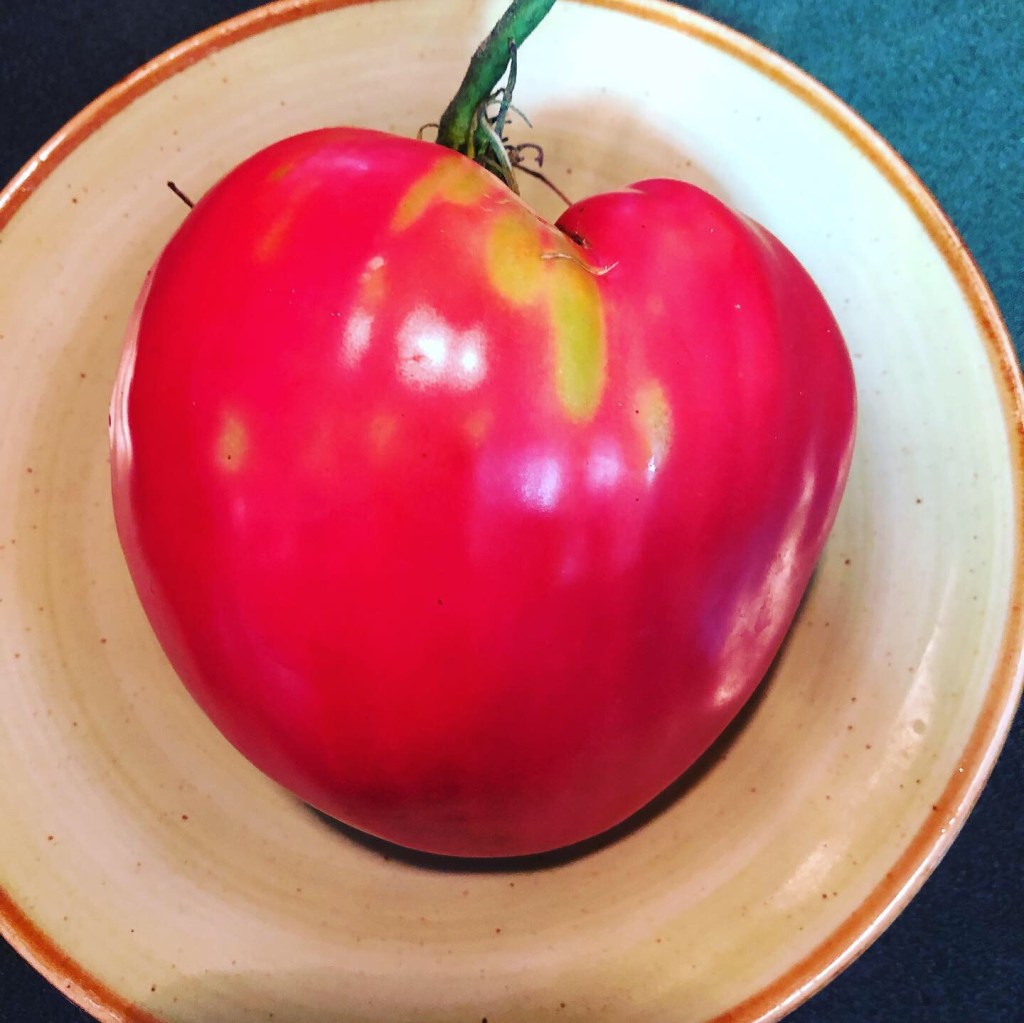
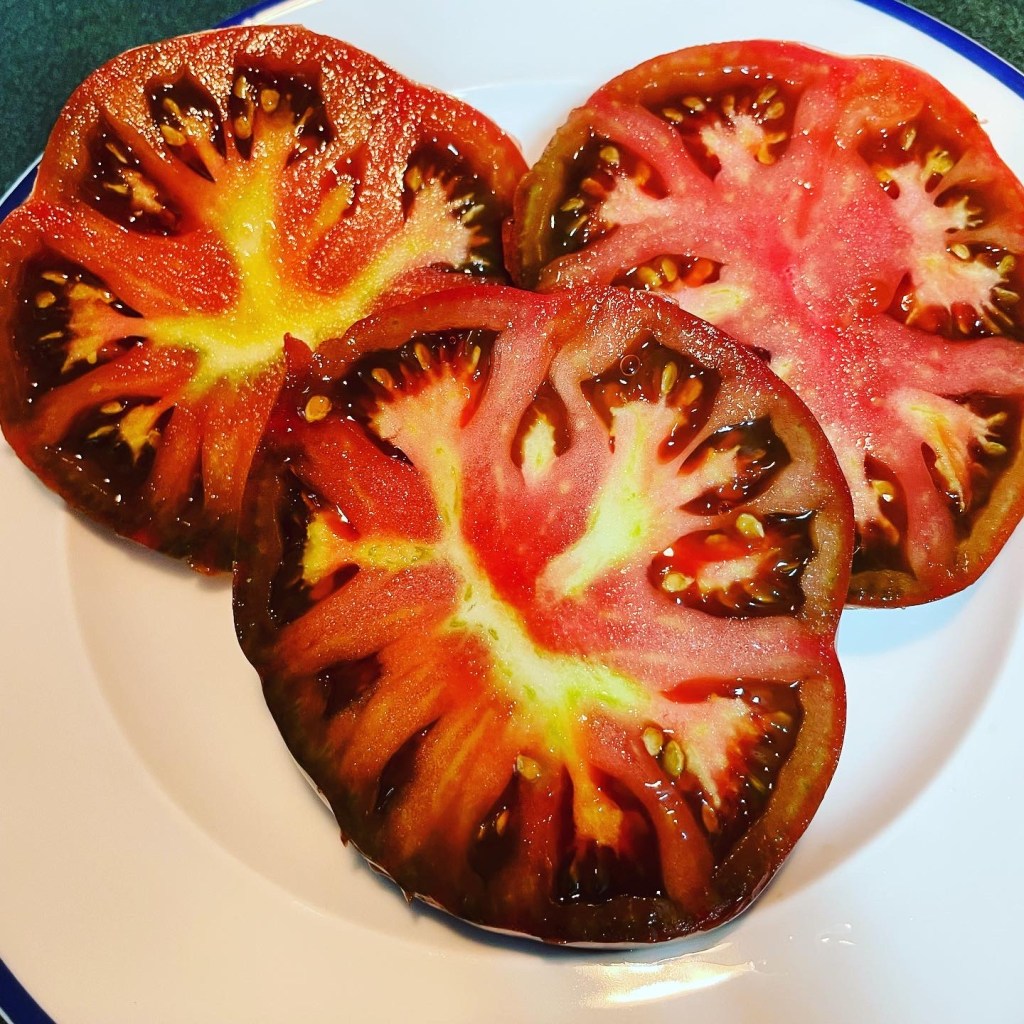
This is another photo of an Oxheart tomato. Isn’t amazing how nature produces fruit in the shapes of human organs?! When you slice this open, it looks like a heart inside too. They were heavy, full, and just so amazing to eat. They had a more of a mild flavor but very yummy.

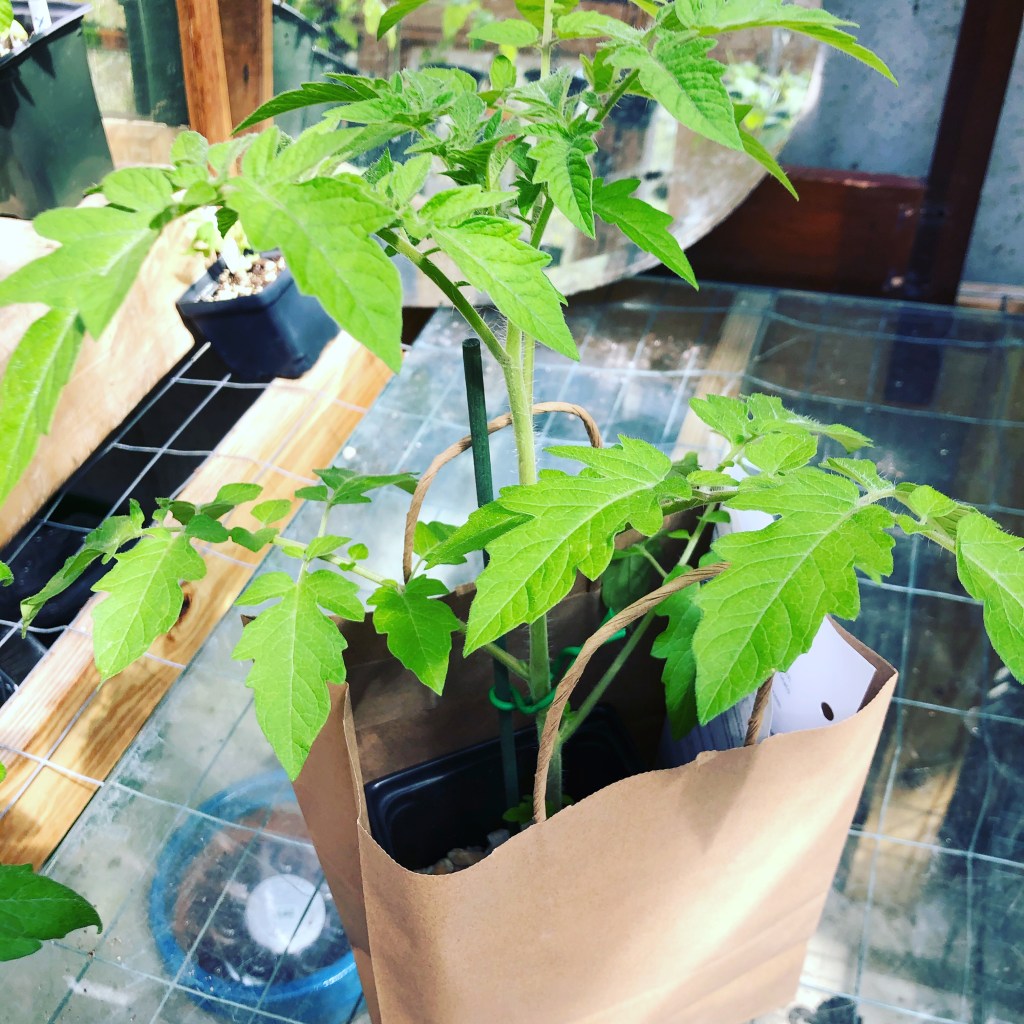
This is a starter plant in a bag ready for pickup. I sold them to lots of friends. And family members. Word got around. LOL. I’m proud of how happy these plants looked. It didn’t happen “just because I had a greenhouse”. It was an effort of proper soil. Proper potting up was necessary. I took care with proper hardening off and watched for any insects. If you don’t know what those terms are, just search them on my blog in the red search box. I’m sure I wrote about hardening off and things like seedlings, and more. In Feb or March, I would start to think about what to do for the upcoming sowing season. It was a time to consider preparations. I started planning things out that early. There were little tasks too, like properly washing seedling trays and pots, etc.

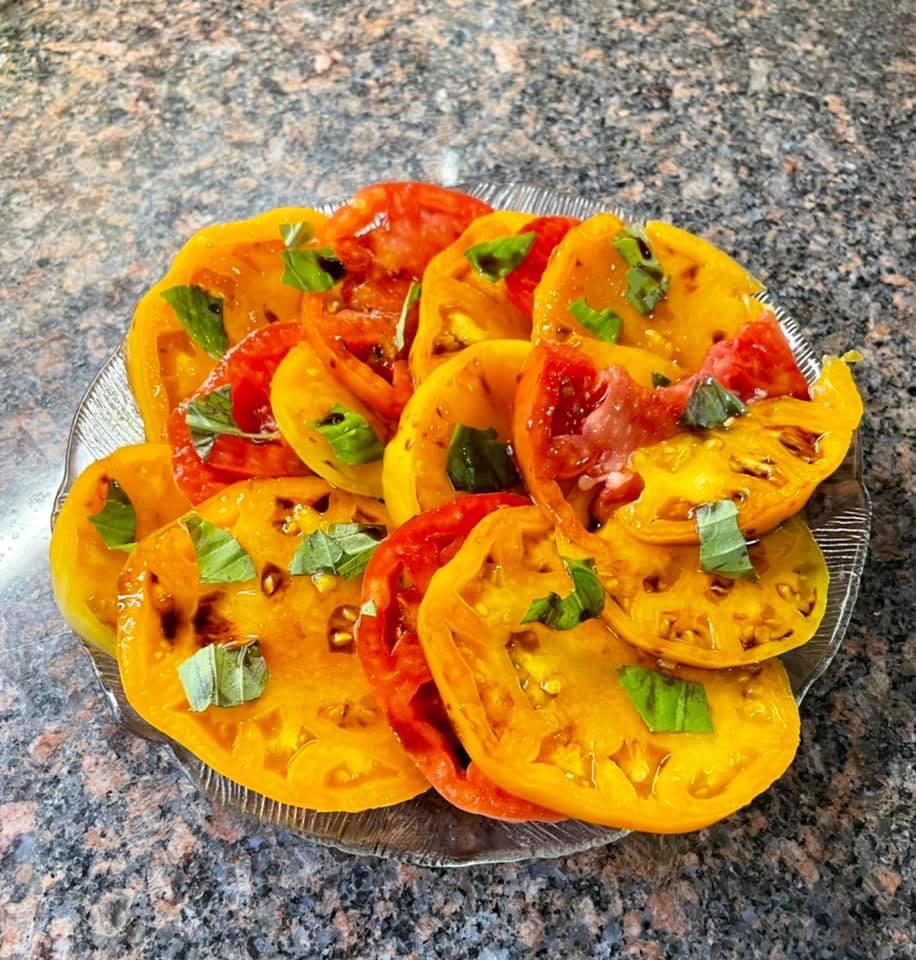
Another “mouthwatering” photo here or large golden tomatoes and some red ones. This is heaven on a plate in summer. We would live off these! Sometimes my husband would eat them all before I could take a bite! He was cute though and learned when the very first large tomato was ready, to share.

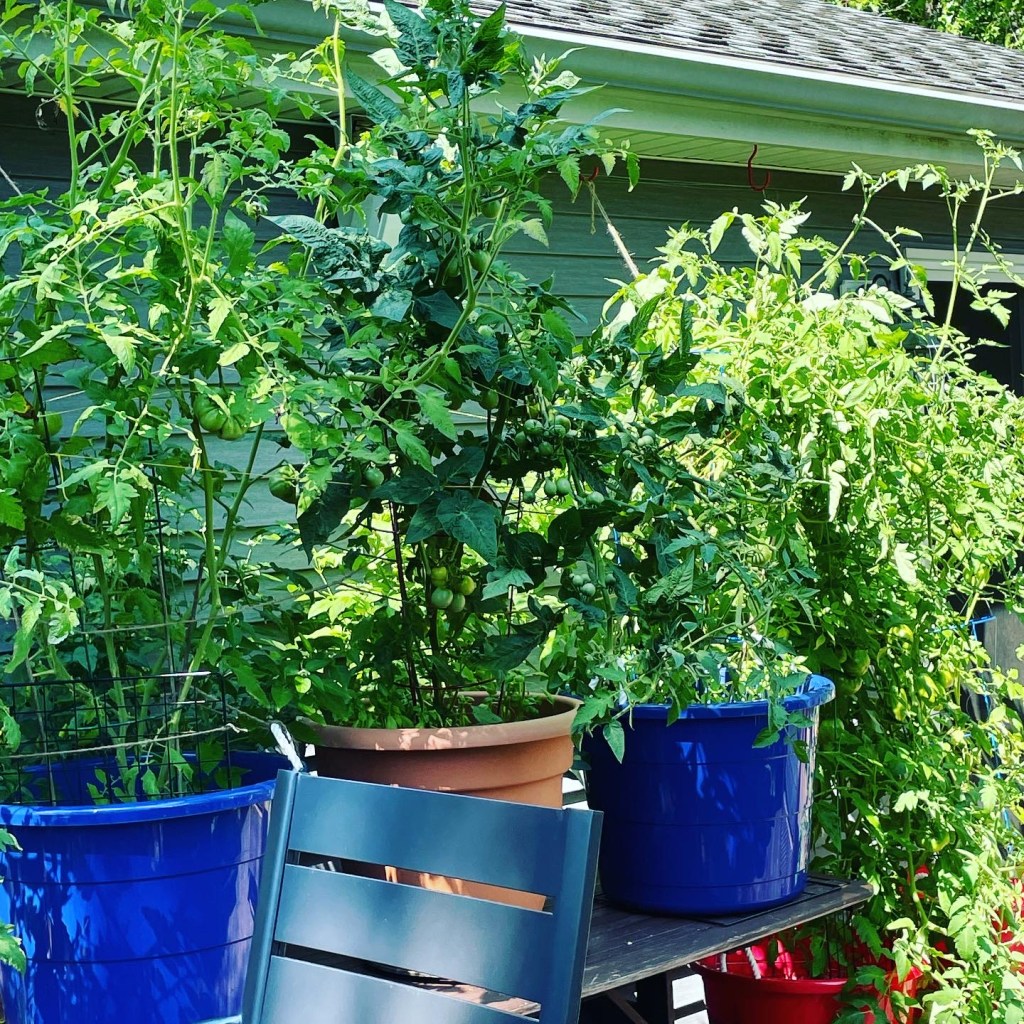
This photo is of plants on a table on my deck outside. I elevated them to keep the chipmunks or squirrels away as best as possible. My deck would become a tomato jungle in the summer when I was super into growing them in pots. It was fun to sit in a cozy deck chair with a bunch of tomato plants behind me. The animals really didn’t bother the plants until they started to see some coloring of the fruit. At one point, I would pick them a little earlier. Then, the tomato continues ripening on my kitchen counter.

Another big-time favorite was the Fox Cherry tomatoes! If you have never grown these – please do. OMG. So good for flavor and lots and lots of fruit. All of these above were from the Hudson Valley Seed Co seeds.

I think these were the Cherokee Brave tomatoes. Yummy! That is about all I can say. I liked the various colors of each type. Why not try different flavors and savor them. It is like tasting various wines.

Here’s a Goldie. Mild flavor but it is so nice to have a mix of colors when preparing a dish of tomatoes too. These always seemed to come out so perfect. Nice skins.

Well, that is it for now for a tomato recall adventure. Now I can go to my photo database. I can delete the hundreds of other photos I had taken those years back. Believe it or not, it is difficult for me to remove the photos. But, they are taking up space. It is time. I also have lots of other posts about my tomato growing process on this blog site from before.

Cathy Testa

Date of this post: 1/31/2026

Colorful Balcony Plants for Extreme Weather

Leave a comment

These are photos of vivid reds and yellow blooms in large patio pots showcased on a high-rise balcony. As you can see, the yellows and reds of the flowers on these plants stand out. They are also very drought tolerant. And full sun lovers.

I planted this combination on a high-rise balcony many years ago. The conditions up there were brutal in the summers at times. It was very sunny and hot for the first half of the day. The second part of the day was shaded due to the height of the building’s walls and the sun’s movement. But it also was extremely windy at times, and as hot as a very hot beach summer day. Notice in the next photo how much the blooms opened up.

The pots shown here were quite large. Plenty of quality potting soil was used. Some soil moist was added to help manage moisture levels. I also added slow-release fertilizer into the soil. But it was key to find plants which would survive the high-rise conditions. They must get water too. It was imperative to find plants with strong abilities to survive in the sun, wind, and heat. These plants did this well. These also did not need lots of clean up. The faded flowers of the Coreopsis are easy clipped off (deadheaded) if needed. All the other plants held onto the flowers in this combination.

As the summer progressed, the plants became full and offered super bright colors seen from afar. This was good. The view from the balcony owners’ large living room allowed them to see the reds and yellows. I also focus on different textures too. You can see the fine texture of the yellow Sedum. The larger oval leaves of the red edged Jade plant are also visible. Yes, a Jade (as in a houseplant). I never overlooked using houseplant candidates as well as perennials and tropical plants. Just like in a garden, textures add the drama and flow needed to please the admiring eye. I often held up plants next to each other. I did this to look them over and see if they seemed to work together. I was just like that with my eyes. I would figure out if they played well together visually. I also needed to know the plants’ overall habits and culture needs.

This is a Jade. It was a rather large plant. I loved the red edges. The red color only intensified in the patio pots with the full sun conditions. There was lots of warmth and heat on sunny days. These were able to withstand drought like conditions. I always emphasized that the owners should water every day. Plants need water. The soils dry out rather quickly up there on the top of a building in the city. And the owners were fantastic. They did water the plants as often as possible. They got an A+ on that as it wasn’t always easy, there were no faucets or hoses outside. All water was carried from the inside to the outside in buckets! When it rained, that was a bonus.

The yellow plant in the front is a Sedum. It is called, Lemon Ball Stonecrop Sedum. A perennial. Talk about an intensely bright yellow! Really pops. It was perfect for the front of the patio pot, tucked in nicely. That plant in this combination was a little more delicate. But, its vivid yellow was unbeatable.

And a must on everyone’s list is flowers which bloom most of the summer. I added these Coreopsis because of their beautiful yellow coloring with red centers. They also handled the drought conditions quite well. This one is called, ‘Baby Seed’ Tickseed Coreopsis. These are butterfly magnets and work well in rock gardens too. It was always a treat to see a bee or two. I enjoyed seeing a bee come by up there when I put flowers into the customer’s containers. Way up there. I think it was 26 floors high, or was it 28? I can’t remember, but it was up high. If you couldn’t handle heights, you would not be capable of work up there on their open balcony. It didn’t bother me to look over the railing to the city streets below. It was a unique planting experience and a great learning one too due to the high-rise location.

And there are of course the Mandevillas or Dipladenias. Big pretty blooms. Red on these and a vine-like habit. This one did not vine as much as others, but it was a staple for my balcony garden working days. They tolerate the winds, hold onto the flowers despite winds strong enough to move heavy furniture on the balcony. Furniture which had to be chained down appropriately always. Tropical plants they are.

Experiencing working on a high-rise balcony was one of my ultimate pleasures of having my former small plant related business. I only felt disappointed that they (the penthouse owner’s) did not discover me sooner. I wish I had worked up there when I was younger. I would have been able to handle more of the physical aspects. I was a solo worker. It was sometimes a challenge to figure out how to get all the soil bags, plants, and more up there. Because I am organized, I found ways to maximize my trips up the service elevator. I used wagons and a hand truck. I used the appropriate boxes and bins. I did it and I loved every minute of being up there. Well, maybe on those super-hot days, not so much. But I loved the plants and expansive balcony views enough to keep on working up there. It was an honor.

Cathy Testa
Date if this post: 1/29/2026

In this patio Pot:


Essential Greens for Holiday Wreaths: A Visual Reference

Leave a comment

Most of my former or current followers are aware of my holiday workshops. They were held to make wreaths and kissing balls. I obtained some of the best greens around and made sure the mix was of good quality.

But alas, those workshops are now memories. I continue to say good bye to past events related to my small plant business. I look over many, many photos I had kept. I need to start deleting them off my databases.

Thus, I really want to keep a history of the greens photos I took. Each photo displays the texture of the green. It serves as a great reference for anyone wanting to know which is which. This is mainly the only reason I’m posting them here on my blog. I plan to keep my blog for a few more years. If I need to look back on them, here they will be!

Let’s get started.

Seeded Eucalyptus – Isn’t it beautiful? It has beautiful soft blue tones to its leaves and tiny seed pods that look like buds to me. There’s no doubt it adds a special elegance when mixed with other greens in an arrangement. It also adds elegance on a holiday wreath. It is delicate with narrow stems.

Magnolia Leaves – Everyone loves these, but they were just too expensive to use. I do think they are gorgeous. The shiny front side of the dark green leaf and brown fuzzy-like backside of the leaf are stunning. They are big so they added the larger sized contrast next to finer textures. What I mean about expensive, is I could not justify the cost of getting a bulk in my workshops. I had to cut back somewhere, so eventually, I did not order these going forward.

Cedar – The scent and movable texture. Can be used nicely solo on a wreath. You can make a wreath fast if you use only cedar. The branches or tips are long and easy to bend on to a circular wreath frame. I used cedar only sometimes on super big wreaths I made for an outdoor balcony.

Douglas Fir – Needles are different than typical balsam. I think this was the Douglas fir. It didn’t seem to hold the needles as long sometimes. Stems are strong and sturdy.

Boxwood – In a galvanized tin on an old wagon. I love this photo! The boxwood retains its color for a long time and it not sticky like other greens. No strong scent to deal with either. Don’t need gloves.

Yew with red berries! This was one of the only greens I harvested myself from my father’s property. He had an old standing grouping of yew trees that were huge! People overlook this green. It has decent needle retention and adds another texture. Why not use it?! I did.

Holly! Sometimes I’d buy a batch, other times a very nice neighbor offered trimmings for me to come take. They are great but can turn black if touched by frost on a wreath outside. Be careful of the sharp spines when handling them to make wreaths.

Fir and Cedar (two photos above) – Both are aromatic. The scents were sometimes overpowering when I made lots of wreaths for orders. It surely is nice once the piece is finished. But when I spent hours making wreaths for orders, after a while, I started getting headaches from the overpowering scents.

Incensed Cedar – I always wanted some of these too. They have little cones at the tips which are yellow. Smell amazing overall. Easy to handle and work with. Great for use in candle centerpieces too. The branches are a little floppy like too, good for edges of patio pots as well.

Silver Fir – Much thicker stems. Really useful in container gardens outside for the holidays. Bulky like. If I wanted a strong green to stand up in a patio pot, this was the one. The stems are thicker. Sometimes they were not too good in kissing balls. They were almost too heavy to insert into the center.

Lemon Leaf Salal – If you can’t have Magnolia leaves, choose this type for an oval leaf shape. It is the next best option. Stems are sturdy and they last in vases as well. The glossy oval shaped leaves are pretty, and this green is one often used in floral designs as well.

Berried Juniper – Everyone loved adding these to their wreaths in my workshops. It was pricier compared to other greens. It holds up well. Has a special unique scent. Sometimes I used green wired picks to the stems to make it easier to insert into holiday creations.

Balsam Fir – The holiday standard and must have type. Balsam signifies Christmas after all. Because the needles hold on well, many people select Balsam Fir Christmas trees. It is also a long-lasting greenery. While sappy and sticky, it has a nice fragrance.

Golden Variegated Cedar – Isn’t it just lovely? That is a special green. Also, on the pricey side. But I would get some to add to the mix. I spoiled my attendees at times. I would limit the quantity per person at my workshops as best as possible. This is an Arborvitae and has a unique fragrance. The scales over lap and this one had yellow tones. Just stunning.

White Pine – Sticky but useful. Adds a slender texture. I would bundle stems together to make the incorporation of this evergreen more impactful in holiday wreaths or kissing balls. Sometimes I collected pine from a big tree in my front yard. I planted that tree as a tiny pencil sized cutting many years ago. It is cool to look at how large that tree is today. It towers quite high.

Silver Fir – I think. The needles are narrower than Balsam fir. I am confused at this time if this is the Silver Fir. But I’m sure I added it to keep the mix interesting. Maybe this was another type. Let me think.

Boxwood – Again, a nice green to add. I think this one was harvested from some of my own shrubs. The narrower type shown above in the photo of boxwood in a galvanized tub was purchased. Some people think boxwood has a strange odor. I really didn’t find that at least while using them in projects. I loved making a holiday kissing ball with only boxwood. It made the ball somewhat classic looking in my mind. And no sticky hands.

Here’s a photo of them bundled up. I can’t remember why I bundled the same type together above. Usually, I’d bundle a mix of each type and then make wreaths that way. What I mean is I would take a clipping of three or four separate types of greens. I would bundle them with green florist wire. Then I would attach them to my wreath frames. This made the wreath very full and fluffy.

Anyhow, they are all beautiful. I just love nature and all the gifts offered for use or just admiration. Using a mix of greens was a real luxury. It offered texture, shapes, and a fragrance mix. Many were considered florist quality. It was so fun. I still can recall the feeling of each green in my hands while I created with them. I know my attendees absolutely loved those years of my holiday workshops. In fact, I ran into one attendee who attended like my very first workshops. She told me it still gives her a nice memory today, even after many years. She remembers the time we all had together creating for the holidays. I liked hearing that from her.

Well, as noted, the workshops are history. They were pretty much canceled after COVID. They were officially canceled when I closed my small plant related business. In fact, I started making ribbon wreaths after not doing greens wreaths. But anyhow, that’s that!

If I ever wanted to reconsider making fresh holiday wreaths with greens, I would like these photos. They would jolt my memory. They would help me remember the various types of greens we used in our creations.

Have a good day and stay warm…

Cathy Testa
Date of this post: 1/27/2026

Mini the Cat: A Tale of Survival and Love

Leave a comment

She looks like a princess here, doesn’t she? My beautiful, adorable, black cat. She is named Mini. I picked that name because she is more on the petite size. She never overeats. She only gains a little more weight in the winter months from less activity.

Mini, our cat, is still with us at the age of 13, we think. The vet estimated her age the first time I took her to the vet as a stray kitten. She and her brother were left on the side of the road. The day she, Mini, discovered me is the day I took them both home.

I had just pulled into my driveway after a walk with my friend, Donna. My husband walked up to my car window. I rolled the window down and said, “We have visitors.” He instinctively looked behind my car to see who would be driving down our driveway behind me. I said, “No, look in the backseat.”

There he saw two black kittens in a box. He didn’t even bother to ask where I found them. He replied with an enthusiastic OK.

To be honest, Mini has been my animal soulmate. I always say she knows all my secrets. She is a very calm and smart cat. Here in this photo above, she is watching the yard for critters. She is a very good mole hunter. She will sit over a mole hole for a good hour. She stares with her head down patiently waiting. She has patience. Next thing you know, she is bringing one up to our deck to show me.

She used to cuddle on my lap a lot but lately, not so much. Maybe it is her older age. She prefers to sleep on a table in front of our wood stove these days. I can’t say I blame her. It is super warm. I setup a special pillow for her there and she just loves it, especially now with the big winter chills.

I love this photo above of Mini on our fire pit cover. Mini is sitting next to my terrarium bowl. The bowl has various succulent plants. She likes to hang out on our deck. She is always very smart about not wandering far into our backyard. She knows there are potential wild predators in the far backyard.

Another one of her favorite places to hang out in the summer is on our side steps. This is a funny photo of her. She is looking back at me. I tapped on the door window to say hello. It gets very warm in this spot during the late afternoons in the summer months. It is when the western sun hits the steps.

One day I discovered her sitting in this planter box. She was probably appreciating the warm soil and sunshine. She never eats my plants, tears at, or digs in the soil of my various planters. I am a plant lover. I have tons of containers and patio pots on my deck. She leaves them all alone. She is a good kitty. She doesn’t even touch my houseplants. Like I said, she is my animal soulmate. She knows I adore my plants.

This is another cool photo of Mini and Me! Her eyes picked up the orange color of the pumpkin somehow. This photo was taken by an i-Phone camera.

Mini was an abandoned cat. The story goes I was taking a walk with a friend on a roadside. Suddenly, two kittens came running out of the long grassy like brush along the roadside. At first, I said to my friend, Donna, “Don’t look at them.” I felt badly they were dumped there. But Mini was determined to not let us go. She chased and ran along the side of us meowing constantly. I swear I heard her say, “Don’t leave me here!”

I looked at my friend Donna who was nudging me to take them. She said she has dogs and just couldn’t. I finally caved after Mini’s determination. I said, “OK, I’ll take them!” Donna jumped for joy. She was thrilled we were not leaving them behind.

I never really was a big pet person. I did have a cat before, but it was Mini’s pure determination that called to my heart that day. Her more rugged cat brother, whom we named Hunter, was just browsing around behind Mini that day. He was hunting. But Mini was focused on me. Like I said, she is a smart cat.

That day, I took them out of the car at my home. Hunter saw a wild turkey in our backyard. He dashed out of the box and started to run to the turkey! I was like whoa, wait that turkey will hurt you and ran to grab him. I gave him the name Hunter right there on the spot. He was a much more tough cat, compared to delicate Mini. He was a boss. He didn’t like to be petted too much. But we loved him just as much.

After taking them inside to feed them that first day with us, they curled up together on a deck couch. They fell asleep. They knew finally they were safe. They were exhausted and it showed. It was adorable to see them curled up in a ball together. I bet they slept like that in the woods protecting each other before they were rescued.

The vet told me they were dumped off just before the age of needing to get neutered. He believed many people who dump cats do it then to avoid paying for things like pet care. They were not tiny kittens but a little grown. He also told me that, “Mini picked me, and it wasn’t the other way around.” I thought that was sweet. I also believed him.

I think when you save an animal, they know it for life. They are loyal. They never forget. Unfortunately, we lost Hunter a few years ago. He passed away and I felt sad for Mini. I wondered what she thought. But I do know this, she is a survivor. And I’m glad she picked me on that walk years ago.

Cathy Testa
Date of Post: 1/24/2026

Stay warm during the big chill this weekend…

Camping Tips for the Rhythm & Roots Music Fest

Leave a comment

Music, dancing, food, vendors and fun with camping options. Sounds wonderful, doesn’t it? The only drawback, at least for me, is it is dry camping. Or “camping in the rough” as they call it.

Camping without the full hook-ups is really not my gig. My husband was sure we would be fine. We have a generator with the camper. But I know I like my amenities. This is especially true in the hot summer months.

This music fest’s camping setup does not include full hook-ups. They have a pump-out truck for black tanks. It drives around if you wish to do the pump out for a fee. This service is available before hitting the road after the music fest.

There are camping showers for a fee and porta-potty setups for rent if desired. They offer free portable water refill stations.

Despite my apprehensions, my husband convinced me into signing up for the Rhythm & Roots festival. It is held in September in Charleston, Rhode Island. He assured me the camper generator would be fine. He said we’d have enough water in our camper’s holding tank. And all that jazz.

I was glad I purchased two shower passes as a precaution. Our camper tank water did run out rather quickly. This didn’t surprise me. But then we had an issue with our refrigerator, and some of our food got spoiled. I learned to take these situations in stride. There are many food options at the fest so that is good. We would not starve. LOL. And it was a good idea to have a cooler on hand.

THE MUSIC FEST

The Rhythm and Roots Festival is a big one. They have 3 large stages. One is for the main acts, and another stage is covered by a white tent. A third stage is all about dancing, and some of the attendees really can dance. It is super fun to watch them dance all day and all night! There are Cajun, zydeco, blues and more styles. All the music fest stages are spread out on a very large property. Plenty of lawn to find a spot to put your chair and enjoy the music. The camping area is off in the background of the fest setup. It is very walk-able from the camping areas to the festival areas. It can be a longer walk depending on the camping site you picked upon your entry. Bikes are allowed in the camping areas.

There are plenty of food vendors, wine and beer, and craft vendors at the music fest. We found the prices of the drinks to be rather high. They do not allow outside alcohol in the concert field, and all bags are thoroughly searched. This is mostly due to the town’s regulations of the park’s property. You can bring snacks in a small cooler.

No open fires are allowed at the campground. This didn’t really impact us because we didn’t hang out at the campsite too long other than to sleep. We were mostly there for the music shows. I liked returning to the campsite occasionally during breaks. Having extra outdoor lights, maybe solar, is helpful. They help you find your way back to your camper after dancing and listening to the music all day. Bring a small flashlight with you too. I actually used the small flashlight at the music fest’s porta-potty in one area. It was dark, and it helped me see! A battery-operated lamp to put outside of your camper on a table is a good idea as well. We usually listened to the music into the evening, so it was dark walking back.

The camper generator use was limited. I remember we used it for lights and such at night until we were ready to crash out. The fest site indicates the time which generator use is allowed. No one likes a loud generator noise all night. We kept it on for maybe an hour at night.

WATER

As mentioned, we did run out of water because we had a smaller camper. It was our first time trying to judge how long the water in the holding tank would last. Luckily, the camper festival showers provided by the fest for a fee were setup nicely at the campground. A camper neighbor heard we ran out of water. They offered us a 5-gallon container of drinking water they had extra. Very generous of them. I had water bottles but that wasn’t enough. I learned buying a refillable 5-gallon jug was a good idea. I always take one of those with us for dry camping situations now. It’s also wise to have a shower robe. You’ll need it for walking through the camping area to and from the showers!

PRIOR CAMPING ARRIVAL TIME

The way the camping is set up as first come first serve after purchasing your camping passes from their website. There are no reserved spots. You drive in after waiting in a long line of campers. You can arrive the day before the fest starts or during the fest. We waited in line for at least an hour or two with the campers to enter the park’s grounds. This was the day before the weekend show starts. We left our house early. By the time we arrived to get in line, there were many campers there ahead of us. So, arrive early! We found a spot that was paved once we entered and received our wrist bands. We backed in easily to the location we selected in a paved area. There are some paved areas and some lawn areas to set up camp. It was well organized, so it didn’t feel hectic.

When it comes to attending music fests, there is no beating having your sleeping arrangements right on site. I love that part. Being capable of walking back to the camping areas was perfect. It is so convenient. What’s not to love? But for me, I love a nice shower after dancing all day and cold refreshments at my site. Thus, dry camping is not really my thing. I try to be as organized as possible. After a few camping trips, I learned to take a lot in stride. I also try to do my best. It is a good thing I am an over-thinker. I often think of things like flashlights. I brought a battery-operated fan for air circulation in the camper. I also think of other simple things. Like light weight blanket for the fest to sit on, etc. Maybe some hand sanitizer or hand wipes for clean up at your camper, etc. Sometimes it is the little things to help dry camping situations.

THE TYPE OF MUSIC

This fest has top acts. There is a mix of blues, zydeco, Cajun, and many more. See the festivals website for the line up schedule. There are many to enjoy. It is spaced out really well. Lots of volunteers direct you to the appropriate lines. All of that is good. The food is good too. The acts are excellent, so my opinion on the cost, is just my opinion. Some would definitely feel it is suited for the quality of the acts. It is not that – it is just we like to save money and some of the extras feel pricey. There are a few more restrictions at this festival compared to others we have attended.

ALL THE OPTIONS

For us, we find the overall fest pricing high. I personally get confused at the options. You pay for camping, and it includes a ticket to the fest for 3 days of the fest. I am confused by that. Does one cover the two people in one camper? Or do you each have to buy that 3-day pass? And then there are the extras. Extra price for the shower passes (which did save us when we ran out of water). Extra for separate vehicles (some people camp in a car or van). Extra if you want a porta-potty set-up. They are providing many options which is a good thing for festivals of this size. At times, however, I found it confusing.

CAMPING PEOPLE

It was fun to walk around and see the different set ups. And fun to see the decorations. People are so creative with showcasing their personal style at each tent, camper, van, you name it. We did not experience any loud party animals where we set up. It was mostly quiet. And we did select a camping spot in what they called the RV “quiet area”.

THE CAMPING MAP

Here is the festival map: https://rhythmandroots.com/faqs/festival-map/

One of our camping neighbors was a musician and he and a friend quietly played guitar tunes one night. I often have trouble sleeping. The next day, I told him that his gentle guitar music serenaded me to sleep. I listened to it from our camper window.

Walking from the fest grounds to the camping area is easy. They do not allow non-campers in the camping areas. Someone checks wrist bands as you walk into the camping sections. Depending on where you camp, the walk can be longer. Bikes are allowed but not into the music fest area. Bring a lock.

THE GENERAL RHODE ISLAND AREA

Misquamicut Beach in Westerly, RI is not too far from the fest area. If you were to make a week trip out of it for some beach time around the fest. I did not research camping options around the beach.

And if you like plants, check out a place called The Umbrella Factory! It is not far from the fest area either. Very cool plant place.

By the way, I believe the fest camping sells out fast. It is a popular fest and a fun one. Just be aware of the need to sign up early if you give it a go!

Cathy Testa
Date of Post: 1/21/2026

Sorry no photos on this one either – They have been already deleted from my i-Phone. We attended this fest in 2023. Even thought it was September, it was hot. I remember I was happy to have my umbrella with me for some shade at the fest!

Cheer Up Winter with Sunflower Photos from CT

Leave a comment

The temperatures are getting colder here in CT during mid-January. To cheer up my day and yours, I thought I’d post some sunflower pics. I took them at a farm in Ellington, CT one summer.

Oakridge Farm plants them. Look at this view of a photo I took. So many sunflowers! Lots of bees that day too.

I took about 40 photos with my i-Phone. This one I really like. It is such a nice close-up shot of a bee in the center of the sunflower.

A cool shot. See the bee mid-air?

This is a view from my truck bed cover. I was leaning against my truck and took this shot.

I like the back of the flowers as well as the front.

I’ll save all the sunflower facts for AI. Today was just about sharing a few photos and to help us remember spring is about 8-9 weeks away. Hang in there!

Stay Warm Today!

Cathy Testa
Date of Post: 1/20/2026
Current Temp: 16 degrees at 6:40 am

P.S. The first day of spring is March 20, 2026.

Camping Adventures Near Scenic Cape Cod

Leave a comment

For many years, my husband and I would venture to the Cape Cod in Massachusetts for summer vacations. Our favorite location was Orleans and going to Nauset Beach. We stayed in B&B’s, cottages, or motels. This was way before we started our camping adventures in our early 60’s. When we went to the Cape to head to Nauset Beach, we were in our 20’s, 30’s and 40’s probably! We have a history of going to the Cape, but camping near the Cape was new to us.

Nauset beach is the type of beach my husband loves. It has big waves and rushing waters. It also has a very long beach. The sand is beautiful. The area is nice. The area near this beach has couple good restaurants, bars, and market-like stands. Shark sightings began to appear in the waters at this beach. We went there at least once every summer for a beach vacation. Nevertheless, after many years, we stopped going to the Cape because of the sharks.

BOURNE SCENIC PARK CAMPGROUND:

Fast forward to 2023. As new campers, I wanted to find a campground on or near a beach. Naturally, Cape Cod came to mind. After some research, we decided on a campground called “Bourne Scenic Park” located at 370 Scenic Highway, Bourne, Massachusetts.

It is actually located before officially entering the Cape via the Bourne Bridge. We were super excited to check this place out. On the day of our arrival, it was an extremely hot humid day in July. Check in offices were very professional, busy, and well-setup. It was a smooth check in process.

We proceeded to go find our assigned camp site spot. We were new to this so had no idea about prior research. Let’s just say, the site was not good for us. It was on a slight slanted hill, and there was no easy way to back in. As we tried to navigate getting to it, we got stressed fast due to the heat and humidity.

I actually jumped into our truck to sit in the air conditioning. My husband pranced around trying to figure out how we would park our travel trailer. It was our first camper travel trailer and was only 16 feet long. He is a determined guy, but I was really thinking this is not going to work.

I remembered my more experienced camping sister. She has been camping for years. She told me her husband called the office once to say this site is not going to work. I got on my cell phone and long story short; they offered 3 other sites to go look at. After some nudging, my husband agreed.

Viola. We got a much better spot and a fellow camper even helped direct us into our site. I guess he knew we were already stressed. By the way, the site we did not like was C-12. The site we ended up with and did like was site 54. Site 54 is on a corner and it is not huge site but fit our little camper just right. I liked that there was a stairway down to the Canal trail. It was almost directly across from it as you walked over the other side.

CAMPSITE MAP

Here is a link to the PDF of the park’s camping site map:

This site had electrical and water but no sewer hook-up. It was our first experience with the infamous honey wagon and using a dump station. But I won’t go into that part of the story just yet! Let’s talk about the fun stuff first.

NEAR A BEACH

This place was not on a beach but a beach was super close by, called Scusset Beach. They had a daily parking fee payable via a thing called YODEL app using your cell phone. We drove there and paid to park. You can easily bike there on the canal path from your campsite. This is possible if you are a biker. At that time, we did not have bikes yet. Those came later. So, we drove to the beach, and I think it was about 3 miles away.

There is a large bathroom building at the beach. It was fairly clean. But it was a little bit of a walk to the beach from the very large parking area. The path was uphill but not bad. We always bring a wagon to load our daily beach gear onto. We did try fishing one morning from the beach but a lifeguard told us that was not allowed. I’m not so sure about that, however, we stopped fishing and said, oh well.

Scusset Beach is at the southwest corner of the Cape Cod Bay and has about 1.5 miles of beachfront, plenty. The water was refreshing. We really enjoyed spending a day or two on this beach. It was part of our camping adventure during that hot week in July.

BACK AT THE CAMPSITE – THE BATHROOMS:

The facilities at the campsite were clean and they provided a bathroom code to enter the building for that. There are all types of campers here from seasonal folks to all types of travel trailers and RV’s. I don’t recall tent camping being there though.

MORE ABOUT THE LOCATION:

The best part of the campground location was that this place is on the banks of the Cape Cod Canal. Along the canal is a paved bike path. We would carry our wagon down the steep steps to the canal walkway from our campsite and bring chairs. Sitting there with a lunch and watching the canal and an occasional boat go by was entertainment for us two. We found it was difficult to try to fish there, due to the large boulders along the water.

GOTTA GET LOBSTERS!

Of course, being near the Cape meant lobsters for us. We visited a place called the Lobster Trap not far from the campgrounds. It is at 290 Shore Road in Bourne, MA. We absolutely loved getting lobsters there. Eating while watching the views was wonderful. Here’s their website: https://www.lobstertrap.net/ I think it was about 5-6 miles from the campground.

VISITING OTHER PARTS OF THE CAPE:

We are the type of campers who enjoy visiting the area where we camp. Of course, we had to spend a day doing that. We drove all the way to Provincetown for shopping, eating, and hanging out. P-town as they call it is a great place to go on whale watches too. We did not do that this visit because we had done that plenty of years prior. They are excellent. Really fun especially on a beautiful hot sunny day.

THE BRIDGE

If you decide to try Bourne Scenic Park yourself, be aware. There has been talk for years about construction on the Bourne Bridge. There has also been talk about the bridge itself. I do not know the current status at this time. I imagine it would affect your travel or bookings. Also, entering the Cape via the bridge is where traffic can back up. We arrived at a good time with no concerns around that.

As far as overall, the campground was good. It had features we enjoyed, it is a busy place with lots of campers and a big mix. Many seasonal folks too. It is laid out in an odd way. Some sites are along the fence above the canal trail. Some are mixed together lower. Some were across a bathroom facility. Some were tucked in tightly. It is kind of spread out in different scenarios.

We had a great time and the staff was amazing. They did help us when we needed to change our site and we were lucky there was another choice. They made that process seamless. They did have firewood and propane available. I remember they had a band one night, but we did not go see it. I don’t think they have a pool. But there are plenty of water views all around and a beach very close by. It felt secure with a gated entry.

NO PHOTOS:

I can’t find photos on my phone or in my files from this trip unfortunately. Sorry about that! If I do, I will add them later for you.

Thanks for visiting!

Cathy Testa

Date of this post: 1/16/2026

P.S. I left out the sewer part – just a job which was assigned to my hubby – that was part of our deal if we became campers – LOL! It was fine with no issues. There is a dump station on the way out of the campground park.

Creating a Festive Air-Dry Clay Tree: Step-by-Step Guide

Leave a comment

As mentioned in a prior post on this site, I started playing with air-dry clay to make holiday decorations. It is more about crafting therapy for me. I find working with my hands, even on simple crafts, allows my mind to relax. I suffer from tinnitus (ear ringing) and when I’m focused on something else, it relieves my symptoms at times.

One fun creation was this holiday tree I made which is festive and fun. The colors are bright and vivid. It was an experiment and rather easy yet very fun to make!

Air-dry clay can be found on Amazon of course, like almost everything else! This one is labeled as:

36 Colors Magic Clay Nature Color DIY Air Dry Clay with Tools as Best Present for Children Toy for Kids.

It arrives in little packets of 36 different colors. The packets, more like pouches, are 0.45 oz each. They are plastic packets which seal on the top to help the clay from not drying out. The clay is light and is not baked after making something with it. It naturally dries to what I think feels like a hard foam of sort. It was about $8.99 to get the magic clay, as they called it.

This is what I made with the clay recently. I like the colors. Festive, fun, and “Who-ville” like in my mind! I decided to use a Styrofoam cone center. I wrapped the cone in plastic wrap and began to create.

I selected colors one by one. I thought I should place a type of green color between each vivid color. Working from the bottom up. I would take clay out of the packet. I rolled it into a worm-like shape. Then I wrapped it around the foam. Remember, the foam also was wrapped in plastic wrap.

I connected the worm-like shape to form a ring around the foam for each layer. The ends were going to be attached. This would leave a line at the connection point. I decided to make that line at a different place for each “ring.” This way, I could add a little ball over that line. Hopefully this is making sense. I didn’t want each ring’s connection point to have a line all the way up. They should not be in the same place on the tree.

When I got to the top, I put a ball on top to finish it off. Each ring rolled out on a board before applying it to the cone was therapeutic to me. I put on a holiday movie and just enjoyed the whole process. Again, I worked from the bottom up.

Air dry clay dries slowly. I have found when I made other three-dimensional items, they flop as they dry. The idea of using the foam center as a mold was to keep the tree upright as it dried out.

I let the air-dry tree stay on the foam center for about two full days. I started to contemplate adding my other little ornaments I made. These include the Santa. I decided not to add them to the air-dry clay tree.

The flat ornaments I made of the Santa, stocking, and gingerbread man were fun to make too. In the end though, I think I loved making the festive funky color tree the best! I ended up making the other items (the Santa, stocking, gingerbread man) into ornaments to hang on my tree.

The last step of the tree was to remove the foam center. I gently tugged on the plastic wrap and eventually it came out. The center inside the tree was still damp. It slowly dried and the tree did not flop. If you put plastic wrap on the foam, leave a tail at the bottom end. This ensures you can grab it by the plastic wrap to pull it out of the air-dry clay tree. If tugging at the plastic wrap does not work. Take a tool to poke up the foam form on the bottom to try to grip it out.

As I worked on the tree, I started to add the balls for each ring. This was done to cover where the worm-like rings connected. Don’t wait too long to add the balls. It is best to add them while the clay is still damp so it sticks.

Here is the underside of the tree. This was another easy craft to make. The key is using colors that work together. And just enjoying the process.

Hope you enjoyed this post!

Cathy Testa

Date of Post: 12/20/2025

Simple Steps to Create Holiday Decor Balls

Leave a comment

I discovered a very simple method to make pretty holiday balls using a Styrofoam ball and holiday ribbon! I wish I had discovered it earlier. I would probably have many of them to put on my Christmas tree.

Supplies needed:

5″ Styrofoam ball or bigger if you wish
Holiday ribbon (I used 2″ wide solid gold ribbon)
A wooden dowel like tool with pointy end (a bamboo skewer would work)
Sharp scissors
1 piece of twine (3″-4″) to make a loop to hang

Video:

At the very end of this post is a video showing how I inserted the ribbon pieces. Scroll down to see.

Steps:

Cut the ribbon into pieces (see below). I went with between 5-6″ lengths. I believe I cut at least 60 pieces from the ribbon roll I had on hand. I wanted to do red, but my red ribbon on hand was shear and shiny. I knew the “white Styrofoam ball” would show through sheer ribbon. Cloth pieces can be used as well, but using ribbon for me was super easy. I grabbed a roll of the solid gold ribbon I had in my craft stock. I used sharp scissors to cut pieces 10 at a time.

Golden Ribbon above on a roll. It was wired ribbon, but I don’t think wired ribbon would be required.

View of the 2″ wide ribbon

View of the ribbon pieces. I cut the pieces on an angle on the ends. Also, I suggest you keep all the ribbon cuttings the same size so make a uniform ball.

Next step is getting the 5″ Styrofoam ball. And having your wooden dowel tool ready. I had some florist like long plant sticks on hand with one end is pointy. Trying to think of tools you already have on hand. For example, I think a bamboo skewer would work. Basically, anything that is somewhat long and has a pointed end. I don’t think anything “metal” would be good, it would poke thru the ribbon.

Take a piece of ribbon and push the center of it into the ball using the wooden tool. The tool does not poke thru the ribbon. Just pull the dowel tool away when you sense the ribbon piece is secure in the ball.

I believe I used at least 60 pieces of ribbon to cover the entire ball. I kept inserting each piece near the next until the ball was completely covered.

When you get to a place where you would want a piece of twine to hang it, make a loop with the twine and tie it together and put it with the ribbon to push it into the ball.

When you completely finish covering the ball, it looks like this.

You could imagine if you made several of these, you could put them in places in your tree to make it a nice design. As I mentioned before, I wanted to make red balls, but I didn’t have the red ribbon on hand.

Nice material can be used. If you had some type of cloth and cut that into pieces. It’s pretty easy to do. A a bit time consuming but I was enjoying it – to me it is Craft Therapy!

I ended up hanging the gold ribbon ball I made and it looks cute. There are possibilities with this craft item. They can be tied together like garland if you made several. They may be hung from a chandelier. Any color can be created.

Hope you give it a try!

Cathy Testa
Container Crazy CT
Date of this post: 12/19/2025

Using the dowel, insert each piece of ribbon by pushing it into the ball.

Fun and Easy Air-Dry Clay Crafts for Christmas

Leave a comment

Last year, I started playing around with air dry clay and making things with it for fun. No stress. Just a way to use my hands and play with clay.

Recently, this year, I made a few items and thought I’d share how it all went. First, I purchased packaged clay on Amazon. (BTW, I get no kickbacks from sharing thoughts on Amazon products, it is just FYI).

It was air dry clay for kids with six molding designs. This basically means a set of different colored clay portions came in six separate envelopes. They were nicely packaged. It had a little card to help you figure out how to design what is shown on the front. Here’s a photo of one to make a little wreath.

I liked the envelopes because if you have any clay left over, you store it in the package/envelope.

The instructions included in the packages were pretty basic. It was just a little card to show steps, but it was easy to understand. It had all the right holiday colors like red, green, white, etc. to make the item depicted on the front of the package.

What I have discovered with air dry clay is that it can flop. It is a little frustrating. I’ll make an item, like a snow man. As it dries, it starts to lean or flop.

In fact, my snowman started to turn into a melting snow man. Not literally melting, but you see below in the first photo how it is all the way over, like Mr. Snowman had a bender the night before.

The snowmen I ended up making were all different. I didn’t follow the package’s formula or design for the snowmen. I was just playing around with it. Adding little embellishments is easy as well, just stick into the clay like the mini trees and berries.

Here’s a tree I made where I did follow the design packet’s instructions. But again, it started to lean as it dried. The clay is soft and when it dries completely, it feels like a hard marshmallow texture.

The clay was leaning all the time. I thought, “Well, let me try to make some flat items instead of three dimensional.”

I really like how the flat creations came out. They look like Christmas cookies or even fondant cookies that would go on a cake. In fact, if a little kid was around, I would need to be careful. They would think it was a real cookie and take a bite!

This is when the fun started to kick in for me. I want to make more and will do so. I’m just trying to think of how to use them. I really don’t want to make ornaments, too traditional. Maybe they would look cute attached to something. Maybe I should make a fake cupcake and put it on the top – like a dessert! Or a fake cake?

Anyhow, that is about it for this post. These types of simple crafts would be fun to do with kids. The instructions are basic. The cleanup is easy.

Tips on the clay – once something is attached, it is not easily removed off. If you wet the clay and rub it, it will smear the color. You don’t want to do that. Any unused clay also needs to stay in an enclosed package to not dry out. It is best to use the clay relatively quickly because eventually it will dry out.

Thank you for visiting,

Cathy Testa

Date of this Post: 12/12/2025