It’s December 2024 – Wow! Only about 4 weeks till Christmas. Usually, in past years, I was one busy, hyper, nervous woman preparing fresh holiday greens for an upcoming huge holiday workshop during this week, but I stopped doing that during Covid year. And now I’m in a new stage of my life, being retired. I still plan to post on this plant related blog from time to time, but this year, I didn’t post that much. I was in a funk. Family drama entered during the first year of my retirement and my husband’s – such is life, sometimes timing can mess up the best laid plans. I am hoping 2025 will bring better days, but in the meantime, I do find that creating crafts is a form of therapy. So, on my sad days recently, I thought to myself, “Make something – anything. Even if it doesn’t come out good.”
When I worked on my fresh greens for those prior big holiday workshops consisting of teaching how to make wreaths, kissing balls, and other beautiful holiday items, it was my holiday too, but I was always nervous too. Will I run out of fresh holiday greens? Do I have enough for all the attendees? Will the greens last? Sometimes, I over purchased greens or holiday craft supplies like ribbons, berries, pinecones, or whatever used to embellish the wreaths and kissing balls made in workshops or for my special orders just cause of the fear of running out. So, after 20 years or so of doing my holiday workshops, I did end up with some extra “supplies” in my stock room. Thus, I could craft now by myself for another 10 years probably – LOL.
I saw one day a candy cane wreath made of pinecones on a social media feed, and I thought, hey, I have plenty of pinecones still in my stock. And I have 3 frames left in my stock shaped like candy canes. Pinecones are something I would just gather in the woods mostly. Sometimes I purchased them from a wholesale supply house if they were special, like those with silvery sparkles, or an extra touch with berries or whatever.
Thus, I made this candy cane pinecone wreath using a wire frame recently (see photo below). It was easy in ways but tricky with the hands. I just pushed some pinecones I had (faux and real) that were already batched in 3. Three pinecones wired together previously. I used two types and fenagled them thru the wire frame and then just used standard florist wire to secure. The backside of this candy cane wreath is sloppy – but I didn’t really care, cause first of all, you can’t see the back, but I also didn’t care, because I was doing “craft therapy.”
I have some of that moss in stock too – it is a dry type, and I grabbed bits of it and tucked it around. I also have some of those larger red balls and I love those and added some here and there, then added a premade curly bow. I used some glue gun glue to secure some items, but that was it.
Once I was done, I posted photos and people were kind and said they liked it! But it is not perfect. And that is okay. Gathering together with friends, making something crafty, isn’t always about being obsessed with decorating your home for the holidays. It is sometimes used to heal the soul, to heal what may be off for your holiday season. I know that sometimes, in my workshops, I would sense someone that may not have been totally festive – something was off, maybe they were sad, maybe they were lonely but when we all got together to craft together, it tends to make you focus on something else and it is art therapy! It allows your mind to be distracted, to focus on something other than disturbing or upsetting thoughts. It can help you. It is art therapy, and I hope you get some of your own therapy time in too if you need some!
P.S. Someone asked me if I put the white touches (frosted look) on the pinecones myself, which I did not, but you can do that – just grab a sponge, put some white paint on it, and roll the pinecone across it and let it dry.
Love, Cathy T ContainerCrazyCT.com Located in East Windsor, CT Currently retired
Today I did it – I clicked the button to not renew my subscription to another blog I maintained, called Workshopsct.com. It will officially expire on 2-29-24. This site was used to announce my workshops a few years ago, and most recently, my service offerings from things like my creative Succulent Topped Pumpkins to Summer Watering Services. I have officially closed my small plant related business, but I am always here to offer tips on container gardening, plants, and hobbies. Thus, for now, this site, called Container Crazy CT, is staying.
I think one of the hardest things to let go of is all my amazing photos of plants, many of which were showcased on WorkshopsCT.com. I’m addicted to plant photos – probably because I’m a visual person type of person. I love reviewing my photos and thinking about the story behind each container garden creation, or a nature situation like spotting of a butterfly or other cool insects and also looking back on photos of many types of plants, flowers, herbs, succulents, cacti, tropicals, tomatoes, and even weeds at times! LOL.
Anyhow, saying goodbye to a blog is not easy for me so I’m doing it in steps. First to go is Workshopsct.com, and next will probably be my 3rd blog about container gardening services, called Container Gardens CT. But, again, this blog, for the time being is staying. I’ve been writing on it for over 10-15 years, I’ve lost count! Below is a photo of the screen shot of workshopsct.com, just for the heck of it.
Enjoy the rest of your weekend! Cathy T of Container Crazy CT Today’s date: 1/14/2024
In my opinion, there are some greens which are better than others, but what really makes a wreath absolutely beautiful is using a “mix” of fresh greenery in the holiday wreaths.
When I first started working with fresh greens, I had no clue how to prep them, what they required to store well prior to creating wreaths, and which would be best to use.
Fresh greens will dry out thus getting them too early is not a good idea, so the timing is key. Like almost anything in the horticulture world, your items are perishable. I always waited until right after the Thanksgiving holiday to pick up my green’s orders to start making custom wreaths.
In order to reduce the loss of needles or drying out the greens, they must be stored in cold temperatures in boxes or some in plastic. Some of the boxes should be lined with plastic, while others are stored in boxes coated with wax inside. In general, all greens of all types gathered for holiday wreath making should not be exposed to winds, harsh sun, or even cold cement floors, which can draw out moisture. Some kinds may be laid out on tables, but key is storing them in cold and dark inside locations until ready for use.
Some greens, if a bit dry, may be rehydrated by cutting stems and setting them in vases or buckets of water, or even dunked in buckets of water, but some should not be treated that way. Others I would sometimes rinse with water from my hose outside in wagons, or let the snow fall on them in my driveway as they sat in wagons for a bit of moisture exposure, but then other types of greens should not get wet. If stored wet, they can turn yellow or rot. It depends on the type of greenery.
Learning how to handle the greens and which looked best and worked well in wreath making was something I learned by researching, experiencing, and testing various greens from balsam fir to berried juniper. I always took notes each year on how well the greens held up and would notice which performed better than others.
In this post, I want to share some tips with you on how to best prepare and use various greens in your wreaths. I will go over 15 different types in a series of posts. As I mentioned, I loved using a wide mix of greens to have full, fully, and textured creations. The contrasts of greens and various textures made the wreaths absolutely beautiful.
Let’s begin!
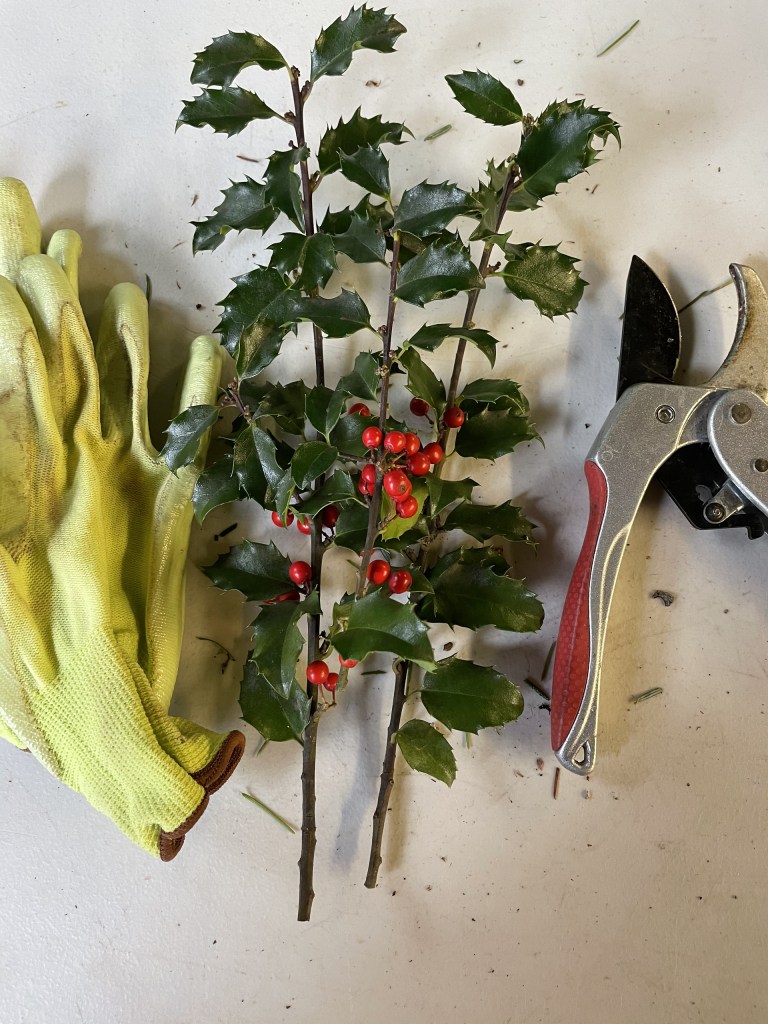
Holly
Evergreen holly is no doubt one of the type of greens people love in their holiday decorations. Their attached bright red berries stand out and they are the essence of Christmas memories. However, one downfall of holly is that it will turn black if wet and hit by frost or freeze. And handling them repeatedly when making wreaths can be painful due to the spiny edges of their leaves. However, holly is easy to insert into wreaths, sturdy, and provides a nice deep green with the red berries to the wreath with the mix of other tones of green colors, but holly is not super full or fully. That is fine, but just something to note about using holly. If it doesn’t get wet and frozen, it will last a very long time in a wreath until it kind of dries out. When they do dry out, however, they still retain the leaves on their sturdy stems for a long while.
Holly bushes, (Genus Ilex), are simple evergreen plants with dark green leaves and there are many cultivars available in our part of Connecticut to plant into your landscape. Many people have evergreen holly shrubs or trees readily available to prune from for their Christmas decorating from their own yards or landscape beds. But take note, these shrubs can suffer in the landscape from winter dry out from winds or water-loss when the ground is frozen, but otherwise, they are relatively easy to grow, taking part-shade or sun locations. And they can get rather large over the years too.
Every year, two of my friends offered to come take cuttings of their holly shrubs for my wreath making but I also ordered holly from a supplier too. I have a neighbor who generously offered her big, huge holly shrub to take from. It was gigantic. I’d quietly walk over with my wagon and pruners to take cuttings. It was always a type of annual pre-holiday ritual.
Her yard has lovely plants in her various gardens, and it was nice to take long holly stems with red berries and load them into my wagon. I was sure to do this only about 3-4 days before my wreath making workshops to have the best freshness. Sometimes, I would see a praying mantis case attached to a branch and leave that one be. Her holly shrub got rather large over the years where the top was not reachable without a ladder, so I never was able to get that high to cut them. I always methodically thought about taking cuttings to improve the outer shape and form of the plant. It was generous of her to offer cuttings.
My brother also offered to stop by his holly bushes one year to take cuttings for my workshops. He has a rather large expansive open back yard. The sun was shining on me that day when I went as it was a beautiful blue sky cold day. His holly shrubs are on a little slope. I sat on the ground taking cuttings. No one was home and it was a quiet, brisk, and sunny with a slightly cool air about. I remember thinking how wonderful his property was. Serene, quiet and peaceful. After I was done getting cuttings from his hollies, I laid on the ground next to the shrubs on the slope and faced the sun and sky above and felt the sun’s warmth on my face. There was something magical about my harvesting adventures.
Pruning evergreen hollies in the fall or winter however is really not the best time to do so. It should be pruned in the early summer for your typical landscape maintenance routines. Pruning them in winter exposes the stem’s ends to cool temperatures but only taking a limited amount in the winter didn’t detrimentally impact the shrubs. In fact, if my own hollies in my yard get out of shape, I wait to take top cuttings before the holiday wreath making process for my wreaths, or to gather to put in vases as holiday decoration.
If you decide to plant some evergreen hollies in your landscape, be aware that “some” types of holly plants require a male and female plant to set the beautiful red berries. If you decide to plant one for the first time, inquire about this at your local nursery. Female hollies produce the red berries and I believe you probably need only one male holly shrub to achieve success. Another consideration is pets, as some say the red berries are toxic to pets. I never had this issue here cause my adorable cat does not touch my plants but be aware holly berries can fall off and even leave a red mark on your hardwood floors if they get squished when you happen to step on one.
As I noted, the only downfall to holly is the leaves can turn totally black if wet and hit by frost. So, when you store them in a box with plastic, be sure you are not storing them wet. Freshly cut, when possible is best too, so you reduce the time is no longer attached to a shrub or tree and starts to lose some moisture. And storing them in plastic enclosed in a box is best done when the holly is cold. Loosely store them in the plastic too. They do not have to be tightly packed, but always in a cold room. An unheated garage is perfect.
In my workshops, I referred to holly as a specialty green to use in our wreath making – one to use as an accent in your creations. One year, I obtained a variegated type of holly with green and white leaf margins from a supplier, it was amazing, and I just loved it. It was so beautiful. It provided a more professional look to the wreaths, and it also felt and looked luxurious, at least I thought so. However, it was fairly pricy and not always readily available from the supplier, so if you decide to plant a shrub, consider the variegated types as well.
One last thought, I have read that holly is ethylene sensitive. If exposed to ethylene, the leaves and fruit will fall off. I never had to worry about that much. Ethylene is produced from some types of ripening fruit so businesses storing fruit or ripening produce with plants must be aware of this sensitivity. If you are running a business and holding holly with other plants or fruits, there are products out there to treat plants for this. I remember a grower talking about this when we went on a field trip during my college days. We walked into a huge freezer or maybe it was a fridge and he talked about the concern of ethylene. People in the floral industry are also those who are probably ethylene experts but for homeowner harvesting plants for wreath making it is most likely not an issue to worry about.
Overall, I did not have issues with harvesting, prepping it, or keeping any type of evergreen holly cuttings and stems fresh for my holiday making workshops. It was a bit pricier though and since we used it only as an accent, I started to remove it from my list of the 15-20 types of greens I would obtain. Often times, workshop attendees brought a little of supply of their own holly cuttings to use. Fortunately, as mentioned above, it is an easy type of evergreen shrub to obtain from our local nurseries. Sometimes I wish I had the forethought to plant all the types of plants used in wreaths in a big field and we could have a harvest party for the holidays! I have quite the imagination.
Stay tuned for the next post on the next greenery on the holiday list!
Thank you for visiting.
Cathy Testa Located in the Broad Brook section of East Windsor, CT
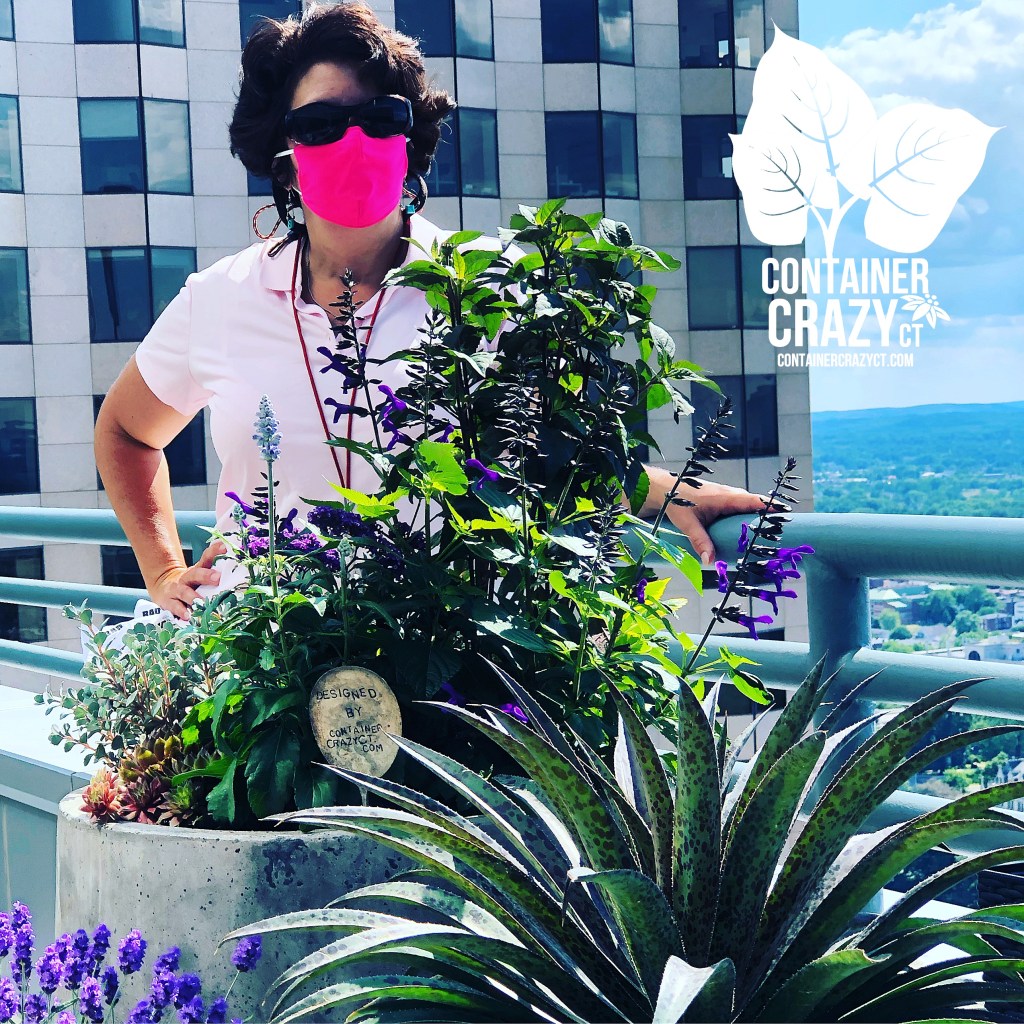
I like finding cool and unique plants for my clients’ balcony gardens every season, so when I spotted two rather large Mangave plants at a local garden center, I had to grab them despite the price. I was excited to plant them in two large upright planters and I asked my husband to take a photo of me standing right behind the planters.
Cathy Testa with Mangave in front planter
The mask wearing was on purpose, to show a timeline history of my plantings, and this had to be when masks for COVID were still required. Anyhow, I wore a pink mask and I loved how the photo came out. We were still required to wear masks at this time so I think it was 2020, or 2019.
Mangave is a Cross between Manfreda and Agave
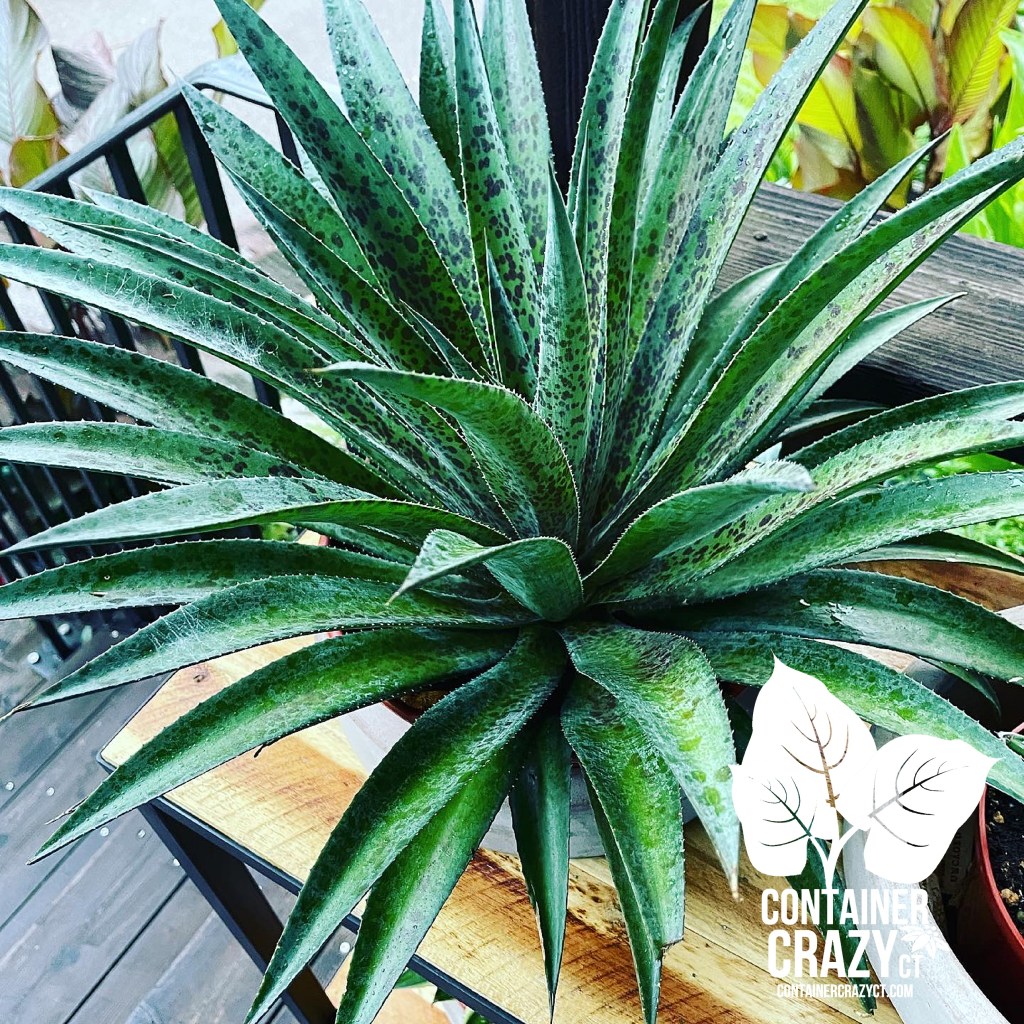
I’m a big fan of Agaves, so when I spotted an article about the new Mangaves, which I read about prior to finding the only two available at a local garden center, it elevated my excitement of getting them and planting them as a unique and dramatic specimen at this location. I love the outlines of the plant, the speckling on the leaves (spines), and the fact it was not something commonly found at that time.
Taking the best from both genera, Mangave have the accelerated growth rate, spotting and softer spines from manfreda, mixed with the durability and large architectural forms of agave. Mangave hybrids bring the potential of hundreds of new colors and habits not previously seen among agave in a product that’s more grower-friendly, with a quicker finish time and less prickly spines.
As the principal breeder of Mangave, Hans is the perfect source for the story behind the succulent, his experiences with the crop and how he sees it contributing to the world of horticulture.
It is true, the spines are less prickly than typical Agaves. In fact, spines on Agaves are so sharp, they could be used as a weapon! And the spotting patterns on these new Mangaves are very interesting on the spines, and it has a wonderful architectural form, and yes, they grow fast! My two specimens were already rather large so I knew they must have been growing somewhere at a growers for a while before making it to a local garden center in my area to be offered for sale. In fact, when I spotted them at the garden center, they were sitting on the floor in their large nursery pots under a bench, as if almost hidden from sight, near other succulents and cacti. I lifted them into my shopping cart at warp speed, let me tell ya. I knew I had to have them.
They served as wonderful candidates all summer long at the clients’ site, and I think the only downfall to these plants is the spines are extremely flexible and soft, thus with one bump, the tips break off. I don’t like that aspect because it feels like a break to the overall form and architecture of the plant, so they are somewhat difficult to move, especially when you are moving plants up to a high-rise, but the effort was worth it. When moving them, use caution to not break any of the spine tips when possible, as I did the more I experienced observing, growing, and using this plant. It turned out to be more useful than I had expected.
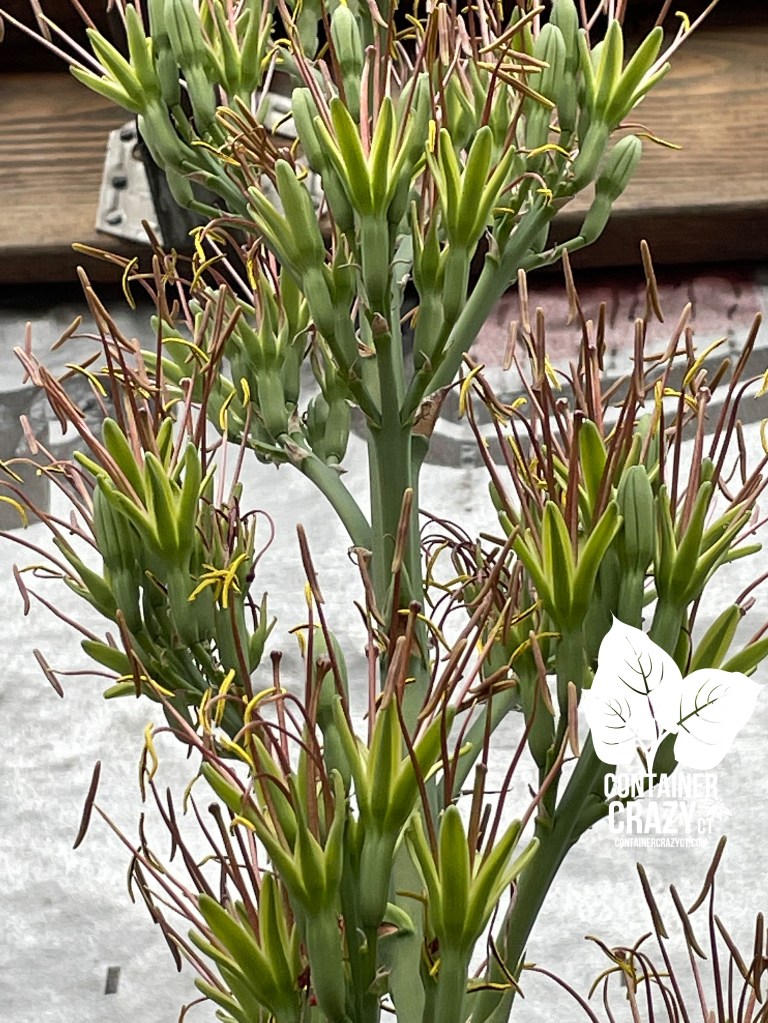
September 21
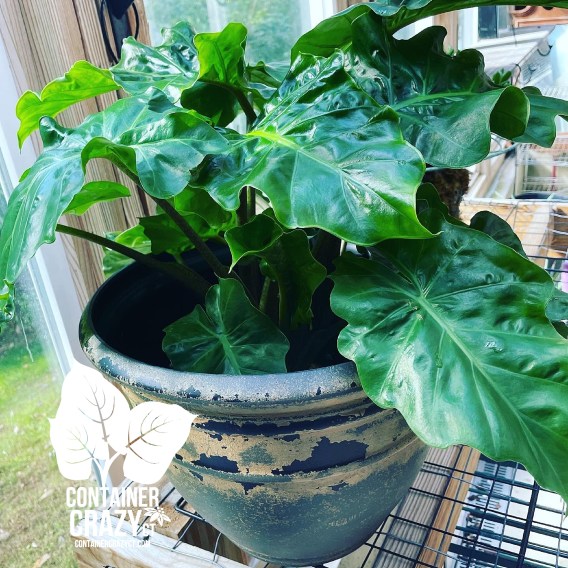
In September of 2021, I noticed a bloom coming up on one of the Mangaves, which I had returned home earlier from the client site. Sometimes plants are taken back, and in this case, one of the Mangaves at the client’s balcony had started experiencing growing issues, so I took it home, inspected the roots, and sure enough, there was some type of pillbug in the soil. Because I cherished this plant, I removed all the soil and repotted it in new fresh potting mix that is well draining and more on the coarse side. Agaves typically don’t like wet soil, and I suspected the soil was probably wet prior to even planting it. I watched it for a while outdoors to see if it would improve, which it did, then in the autumn season, before frost time here in Connecticut, I moved it into my greenhouse. It was around that time, in September, that it suddenly started to shoot up a bloom stalk.
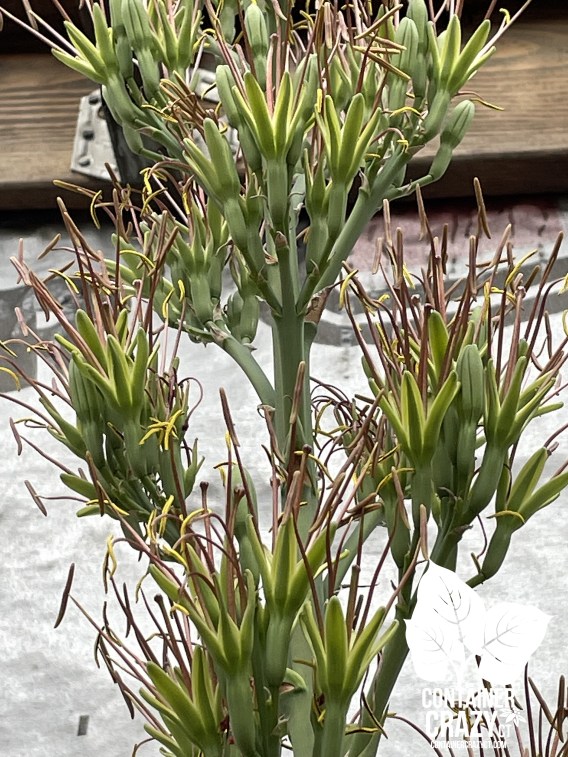
A Bloom Stalk Surfaces in 2021
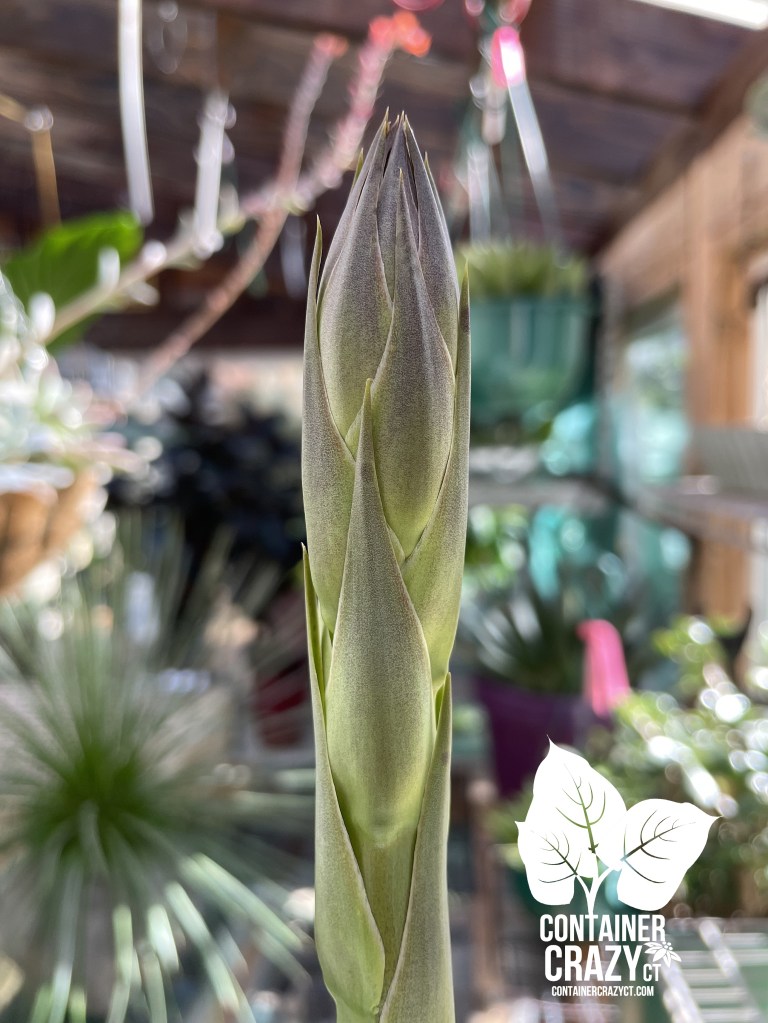
When the bloom started, I was super excited about this and posted a photo to my Instagram feed (seen above). As some plant people may or may not know, Agave plants do not commonly flower. Some will bloom after several years, while others may take as long as ten years or even a hundred years to produce a bloom; this is why Agave plants are referred to as century plants. And the flowers will grow on the tip of a very tall stem, solo rising up from the middle of the plant, and the stem/stalk will grow super tall, reaching for the skies, or in my case, reaching for the ceiling of my lean-to style greenhouse. Knowing this, I was pretty excited to see how long it would take the flower stem (referred to as a candelabrum or wand for Agaves) to grow and how high it would reach in my greenhouse before it would produce flower buds. The stem (or wand if you wish to think of it that way), has no leaves on it and to me, it resembled an asparagus stalk.
Photo Taken As It Kept Rising
September 27
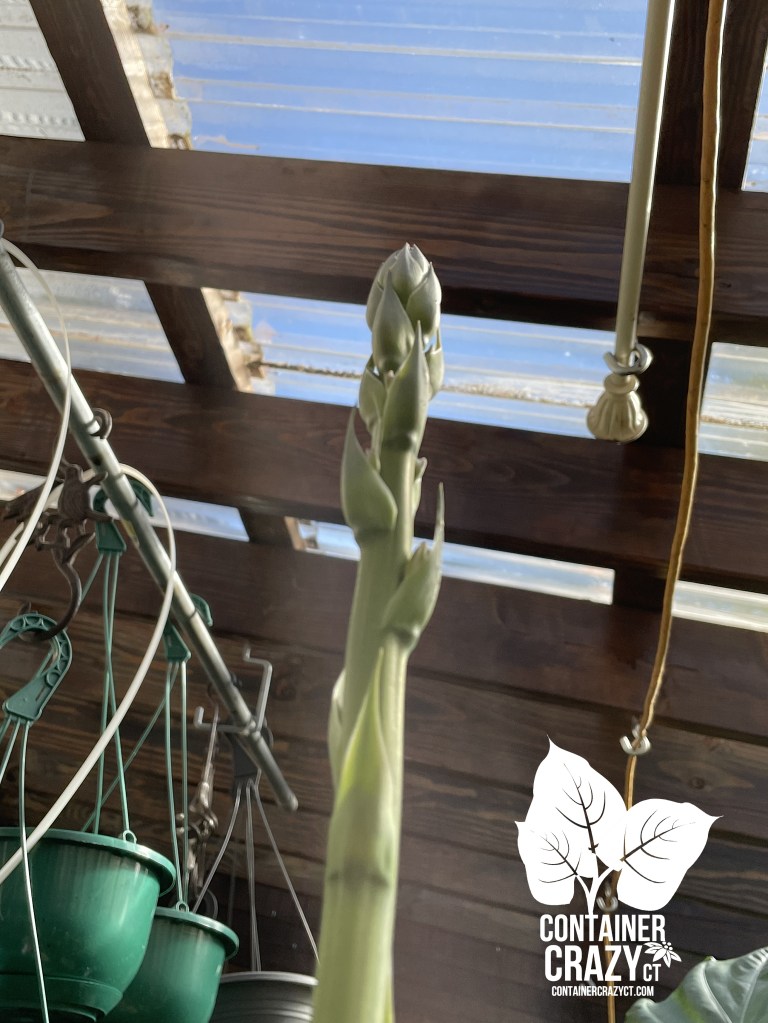
Within 7 days, you can see from the next photo how much the stalk rose from the center of the Mangave. It was growing up, and every day, I’d walk in to take a look, and I started to have to move it around because as it got taller, it was reaching the lean-to style of the greenhouse’s roof. I wondered if it would soon hit the ceiling.
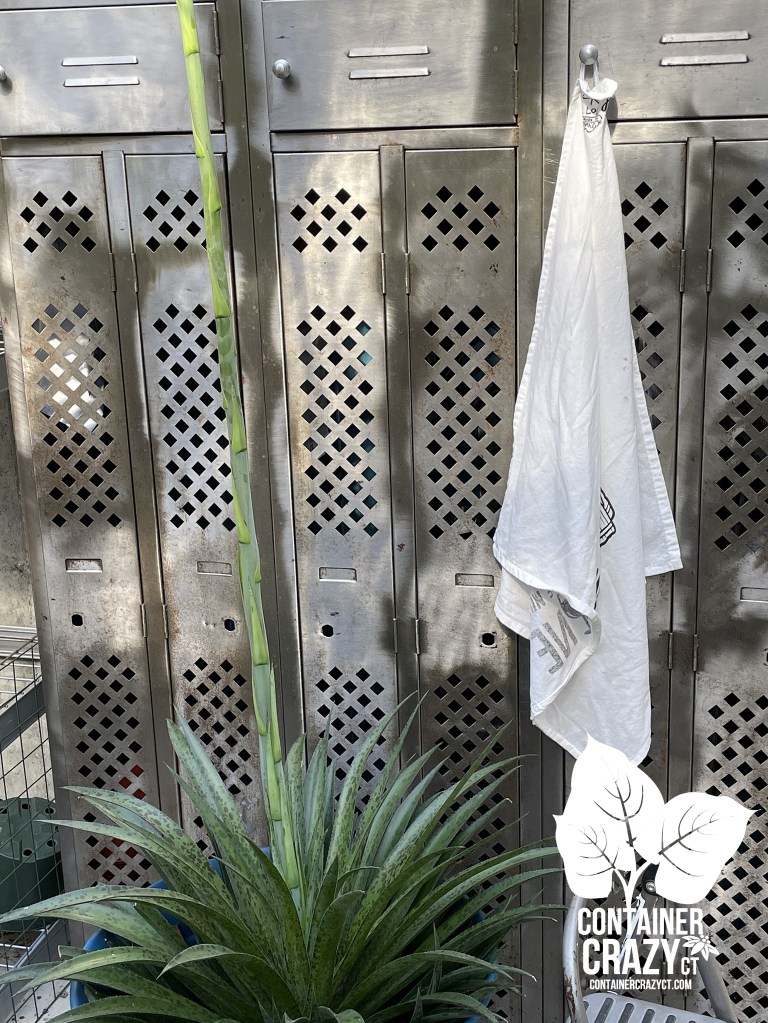
Mangave flower candelabrum or wand
It got to the point, the stalk was so tall, I couldn’t get the whole thing in a photo. Here is a photo (above) where I moved it in-front of an old silver locker I picked up at a vintage shop, and it was about as tall as that cabinet by this point. As you can see, it definitely looks similar to an asparagus stem.
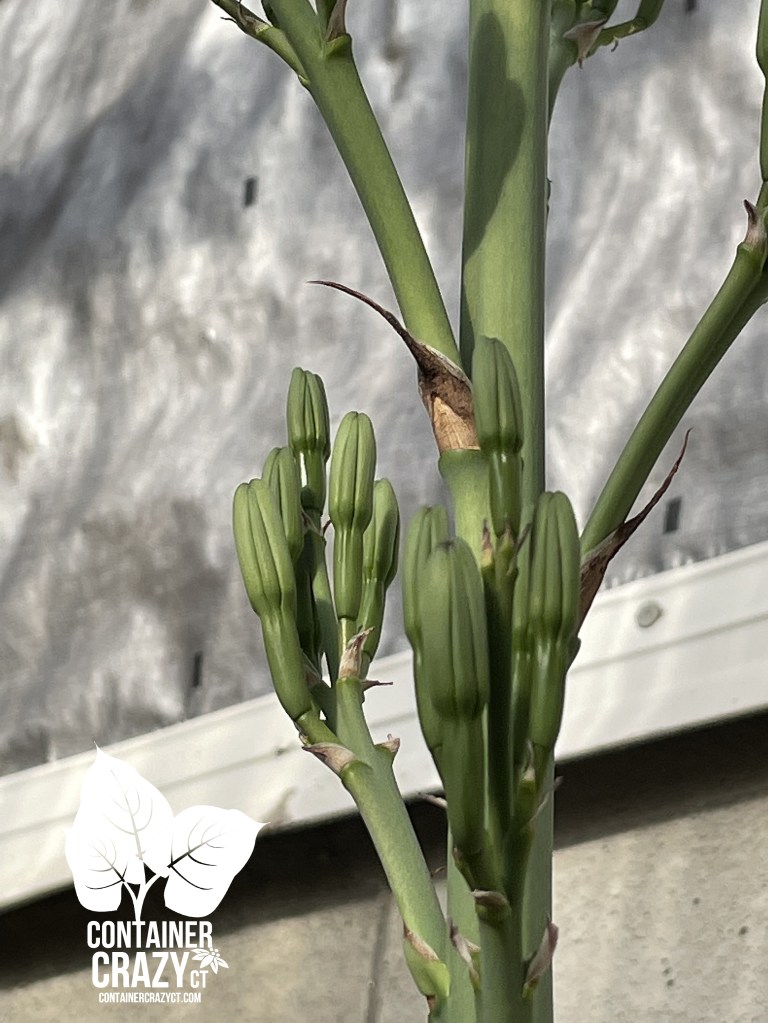
Very Top of the Stalk
Then the next phase was starting to reveal. Side shoots on the top started to form with flower buds. I knew I was in for a big surprise soon. And fortunately, the very tip of the stalk was not touching the roof of the greenhouse. It appeared I had just enough space to keep it inside for the rest of the winter.
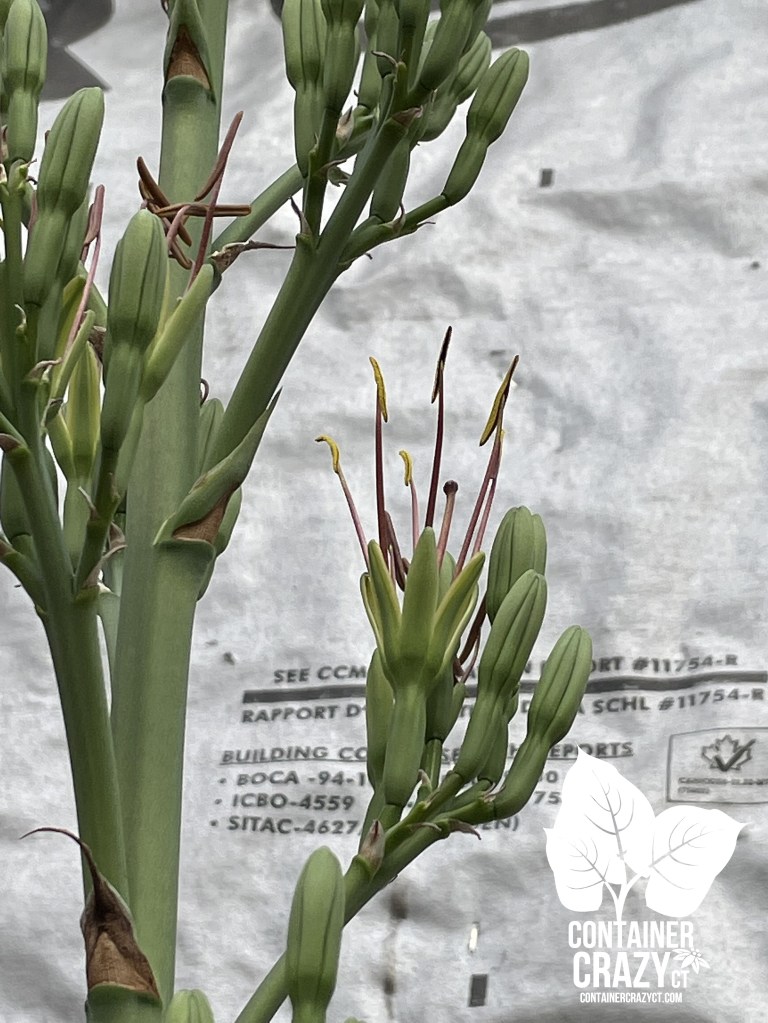
Flowers Opening
The flowers started to feel like a fireworks show to me. That is just how my mind works when it comes to nature’s surprises. The flower clusters started to form to the sides of the main cluster on the top and as they opened, pollen was visible and I thought it was a shame as it would not be pollinated inside my greenhouse during the winter months, but just the same, it was a fun experience to witness all the buds opening over time.
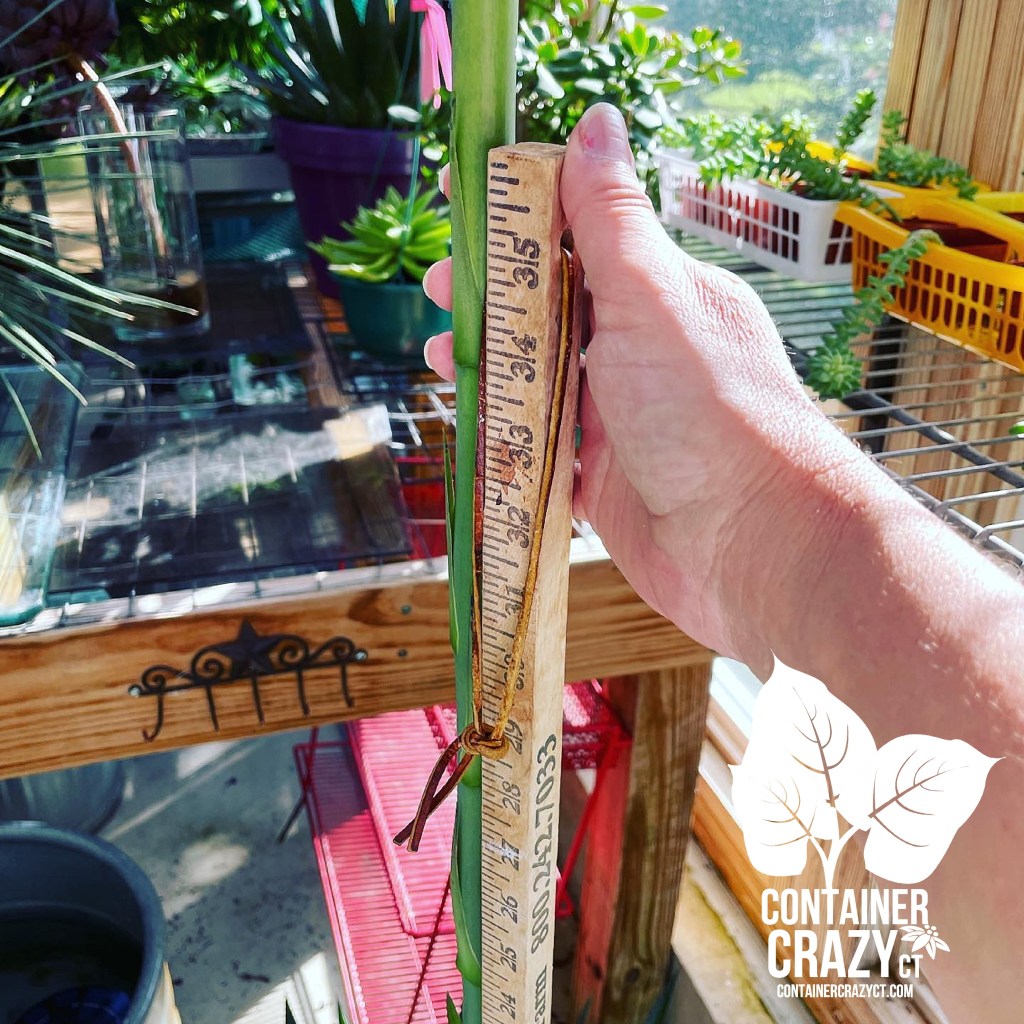
By December, 3 months after I first noticed the stalk rising from the center of the plant, it had buds and the stalk was about 10 feet tall. In reviewing some of the posts I was sharing, around December 11th, it was 6 feet tall. Later in December, it grew to ten feet. By the following spring, I decided to chop off about 1/3 of the stalk and it was time to get it out of my way so outside it went. I put it on my deck, and to my surprise later in the summer, more side plants formed at the top of the plant’s flower stalk (where I had cut it off). It also produced many pups on the sides at the base of the plant, which I decided to use to top off my succulent pumpkin centerpieces; it made a nice spikey looking thriller on the top of the pumpkins.
Mangave used on the Succulent Pumpkin CenterpiecesMangave plants used on Succulent Pumpkin Centerpieces by Cathy T.
This plant ended up surprising me in many ways and kept on giving. It did not die off as some plants do after flowering for Agaves, and retuned to my greenhouse yet again this fall. Not only that, I repotted some of the pups earlier, and they grew rather quickly into larger plants (as noted by the breeder above, Hans, they grow quickly).
Agave and Mangave plants make wonderful specimen plants, are beautiful in larger pots, and they handle full sun and don’t require lots of fertilizer, and they may be kept inside the home over the winter, if not too large, or if they haven’t grown a major flower stalk of 10 feet tall, and they over winter well in a low-temp greenhouse too from my experience. It is pretty cool when you start off admiring something and witness many returns and uses which were unexpected, like how I used them on my succulent pumpkin centerpiece creations this season.
PupGrown LargerTaking MeasurementsMangave top Left with other Agaves, Succulent, and Kalanchoe
I like collecting various Agaves and now Mangaves and will continue to do so. I find they are easy care plants and you can obtain various sizes and styles if you keep your eyes open for special finds!
This year I’m trying a new method for storing my Alocasia corms (sometimes referred to as bulbs or tubers, but they are not true bulbs). I have seen Alocasia corms referred to as “tubers” in many garden reference and technical books, but for the purposes of this post, I’ll stick with corms as the term used for these Alocasia plants I am putting away for the winter months in Connecticut.
Bins Years Prior Used
For years, I stored the bases of underground parts from my elephant’s ears and canna lily plants in plastic bins with covers (air holes drilled in the covers) with peat. When I say “parts”, I’m referring to corms for the elephant’s ear (Alocasia and Colocasia) and rhizomes for the Canna Lily plants).
The peat (only a small amount below; used almost like a bed below the corms/rhizomes, and some peat lightly sprinkled over the tops of the corms and rhizomes) helped maintain a bit of moisture but kept the tubers in a dry but not too dry or too moist state.
However last year, some of my Alocasia corms had rot areas on them when I went to take them out in the spring to start growing again. They were too damp. Plastic bins will hold onto some moisture (versus a dry cardboard type box) but this problem of rot really had never occurred before. Since I want to make sure I am able to save these dramatic large Alocasia plants’ corms, I’m trying this new method this year.
Dug Up about a Week or few days prior
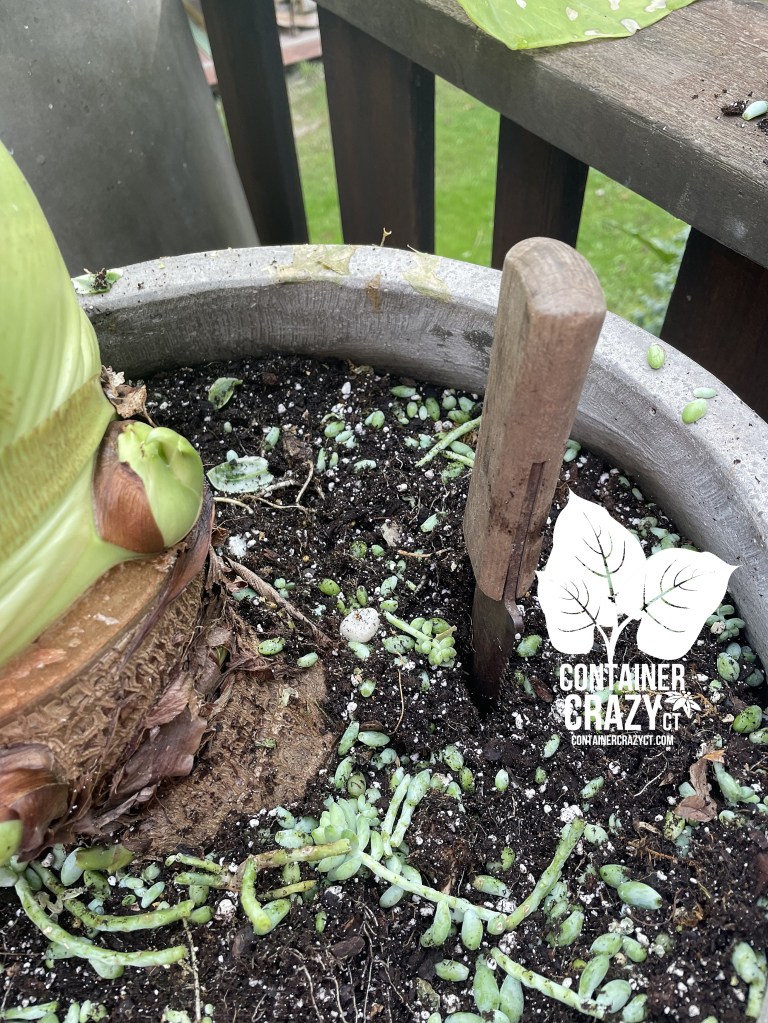
In last week’s post, I showed how I dug up the Alocasia plants from a huge cement planter, cutting off the foliage about 4-6″ from the top of the corm area, and laid them out in the sun for one day. Then I moved them to my basement in laundry baskets.
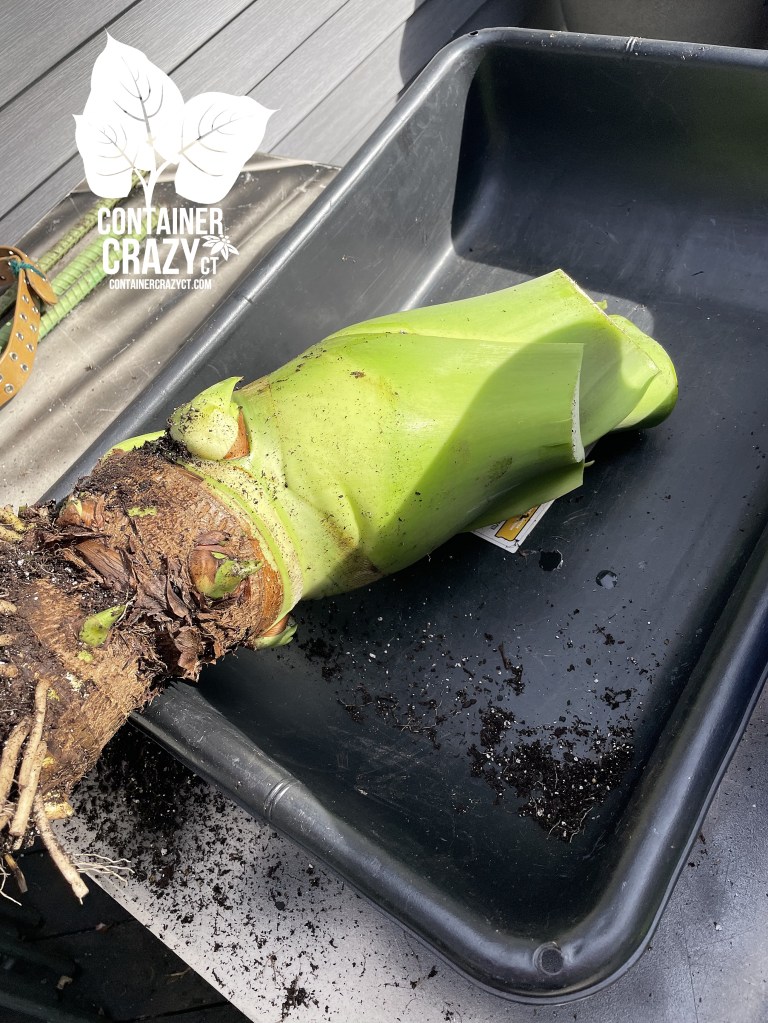
I also dug up a very large Alocasia plant prior to these, from a big tall patio planter, and laid out a huge corm with top part of the plant (stump like stem area) in a bin about a week before these above.
The ones in the laundry basket were still too damp when looking them over yesterday, so I laid them out on a table in my basement, and spread each corm on the table so they are not touching, and decided I will wait a few days longer before packing those up into boxes. I will leave these on a table another few days to air dry in my unheated basement.
However, I decided to pack up the others that were dug up prior from my gray patio planters. One of them is super large and heavy. It isn’t draining out any more water or moisture now, feels like it has dried enough, and there are no rot or damp areas on the corm area. It was placed in a bin in my basement about one week prior to those dug up from my cement planter so it and its side shoots have been drying longer.
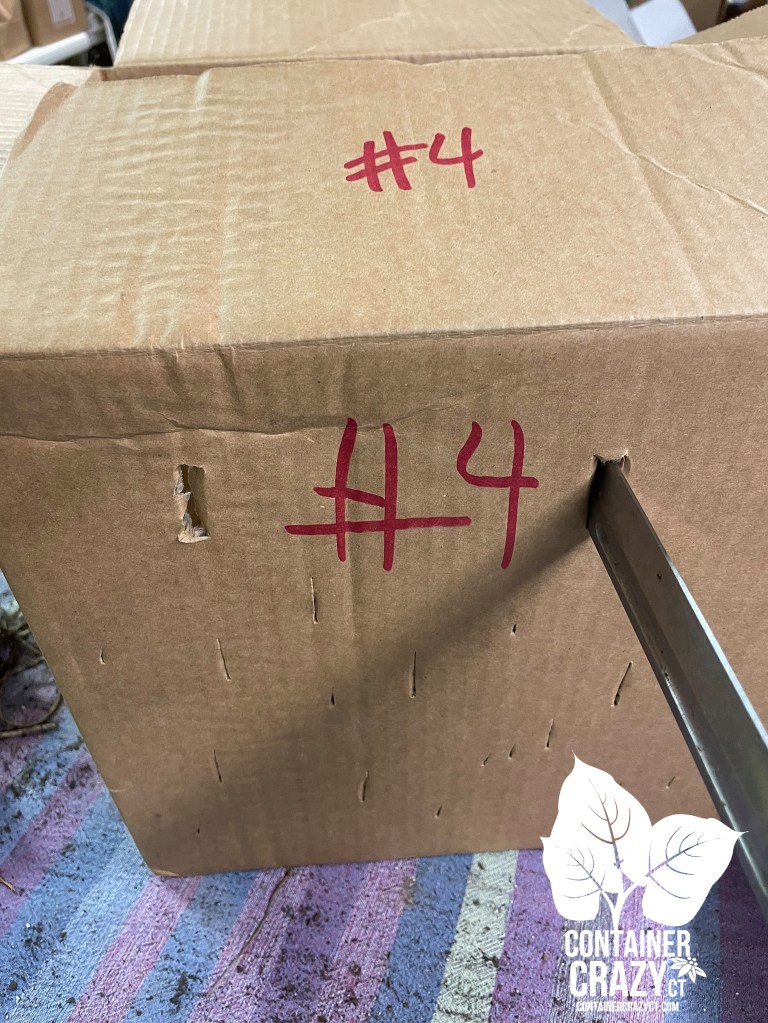
In doing a bit of research, I’ve read Alocasia corms may be stored in newspaper and put in a cardboard box with air vents. I happen to have some boxes available and used a large sharp knife to make slits in the boxes around the perimeter of the cardboard boxes for the air vents.
Making air vents
I placed crumbled up newspaper sheets in the base of the cardboard box and used the original plastic mesh bags, which were around each corm when they were originally shipped to me. I placed individual corms into these mesh bags for those that would fit. My largest “stump” shown top right of this photo below is too large for any of the mesh bags I kept on hand.
Mesh Bag with Corm inside
I loosely wrapped a couple sheets of newspaper around this mesh bag once the corm was inside and put it in the box. I am careful to not have them stacked or touching too much with other corms handled the same method because if anything is damp, that moisture will transfer to any touching corms. However, these were all fairly dry and not moist. The idea is to not overpack any boxes and keep air around each.
Now for the larger Alocasia stump. I keep calling it that because it is so much larger, it is more like a stump size! This one I had to find a larger long box and I have no mesh bag for it. It also has a large green area (the top part of where it grew) still attached which is not wet at all when I decided to lay it into the long cardboard box. Again, I crumpled up newspaper below in the box, and then I used a paper bag to cover it like a blanket and close up the box. I did not tape the box closed, as air circulation is important. I just overlapped the covers and I also put vents in the sides like with the other cardboard box prior to laying it in there.
Largest Alocasia “stump”
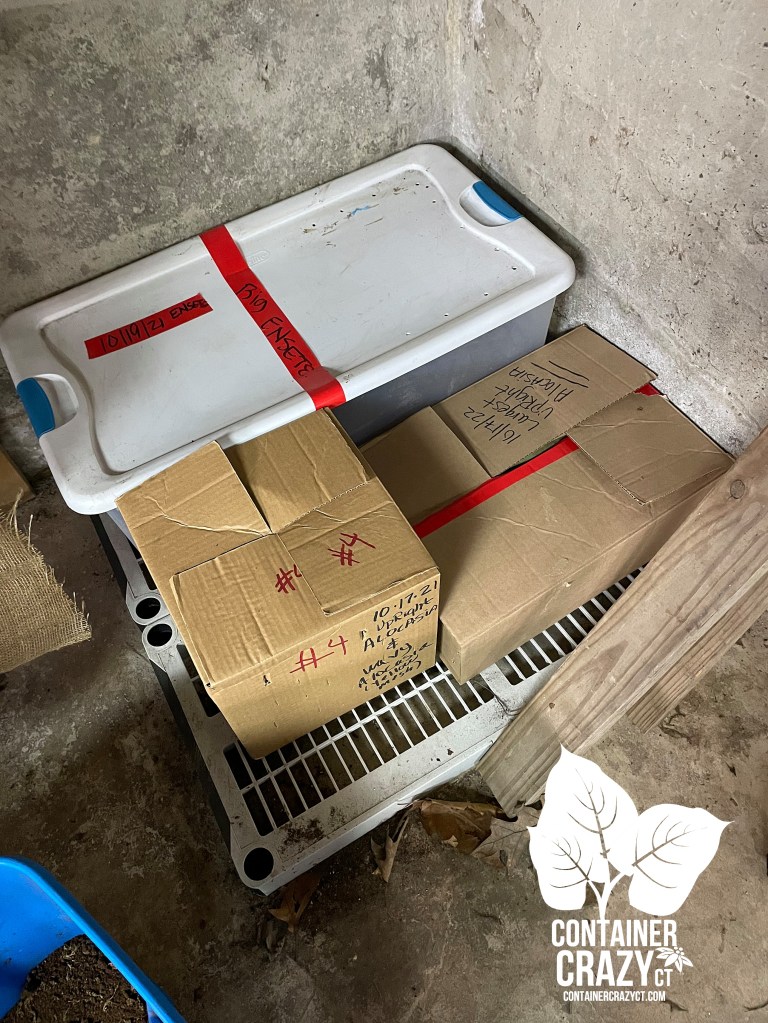
The root area is dry with dry soil a bit still on it, the corm area is dry, and there is still green life on the top part but there is no dripping water coming out of it – it seems like it is dry enough. I labeled all the cardboard boxes with date and placed it in the usual corner of my unheated basement (by the door where it is like tucked in a corner, stays cool, dark, dry and it does not go below freezing here.)
Box Top DatePaper bag serving as a blanket
I have read the optimum temperature for storing Alocasia corms is 40-45 degrees F. Again, my basement is unheated. The only time it may get warm in there is when we use a woodstove at the opposite end of our basement, which is only occasionally. It does not go below freezing (32 degrees F) so they will not freeze. They are kept in a consistent cool 50 degree range or a bit below that for the whole winter. I will check on these in one month by making a note on my calendar to go look at the corms in these cardboard boxes and seeing if they look good (no rot, no moisture, no wet newspaper).
Again, this is the first time I’m trying the cardboard box method for these. I also wish to note, canna lily rhizomes tend to not survive if they completely dry and wither up, so I don’t think I’ll use this method for those plants, only for my precious upright huge Alocasia plants’ corms. I’ve read more about how these are okay more on the dry side. Makes sense because when I purchased the corms about 3-4 years ago, they showed up in a card boad box, with the white mesh bag, shown above, and only the brownish corm with no plant at all attached.
Label the boxes
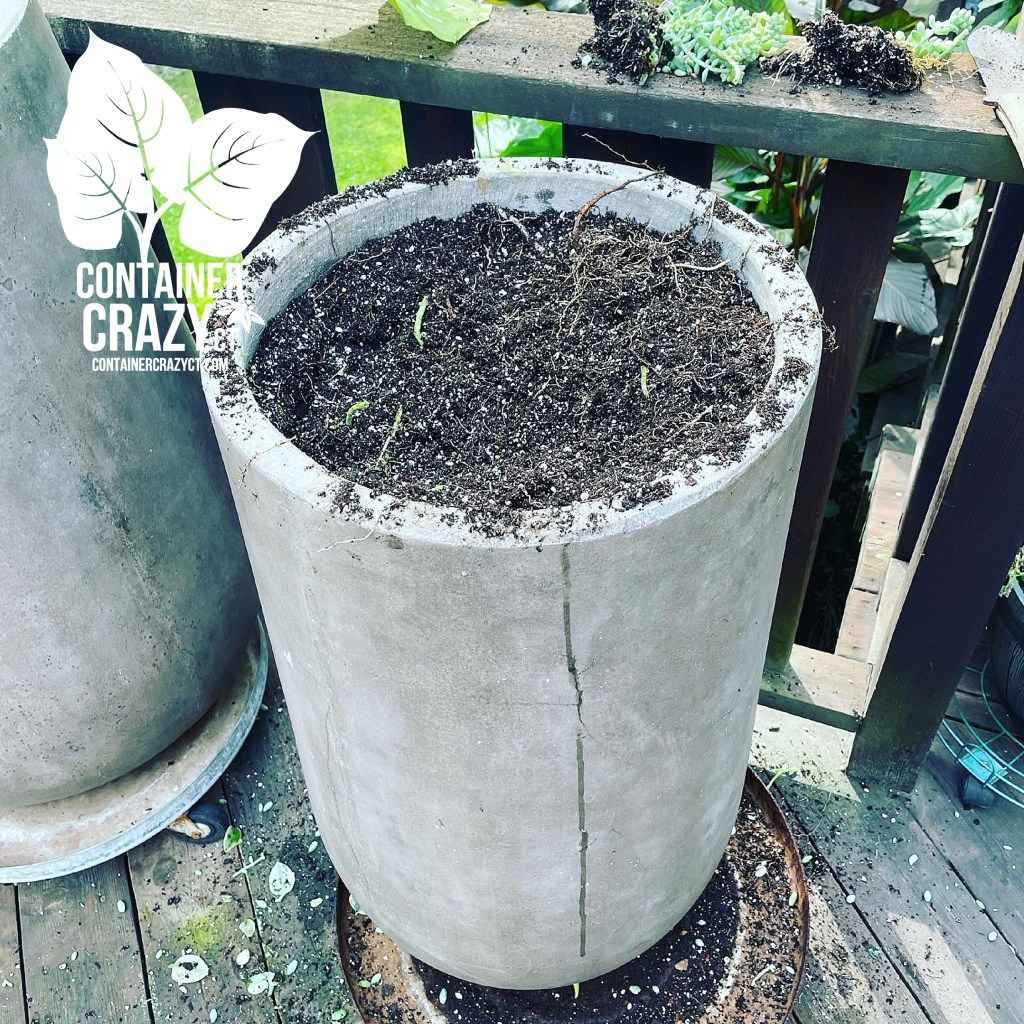
Corner in Basement
You see the big plastic bin near these two cardboard boxes, that was the bin I last used for my big red banana plant (stump), the Ensete, I had for over 10 years. It failed this year, so there’s nothing in that box right now. I also put a plastic shelf section below the boxes so it is not directly on the concrete floor which may lead to dampness on the bottom of the boxes.
Pic of corm inside a mesh bag
I just hope this works well this year and will keep you posted. Next up will be to dig up my canna lily plants from containers outdoors. Sometimes I don’t bother anymore with those as they may be easily grown from new plants next season, but it is always a great feeling to reuse and regrow plants to save money on purchasing new ones, but sometimes I run out of energy to keep digging up these things. Each year, I seem to do less storing because of the effort. Sunny days help!
Thank you for visiting,
Cathy Testa Connecticut Planting Zone 6b Date of Post: 10/18/2022
P.S. I also want to note, many references will indicate to let the plants get hit by frost first before storing underground parts like the corms or rhizomes, etc. because the freeze will induce dormancy to the plants, however, I often do this process just before a hard frost. The weathermen indicated frost may be happening this week. Wednesday’s forecast indicates about 34 degrees F overnight – so that is chilly!
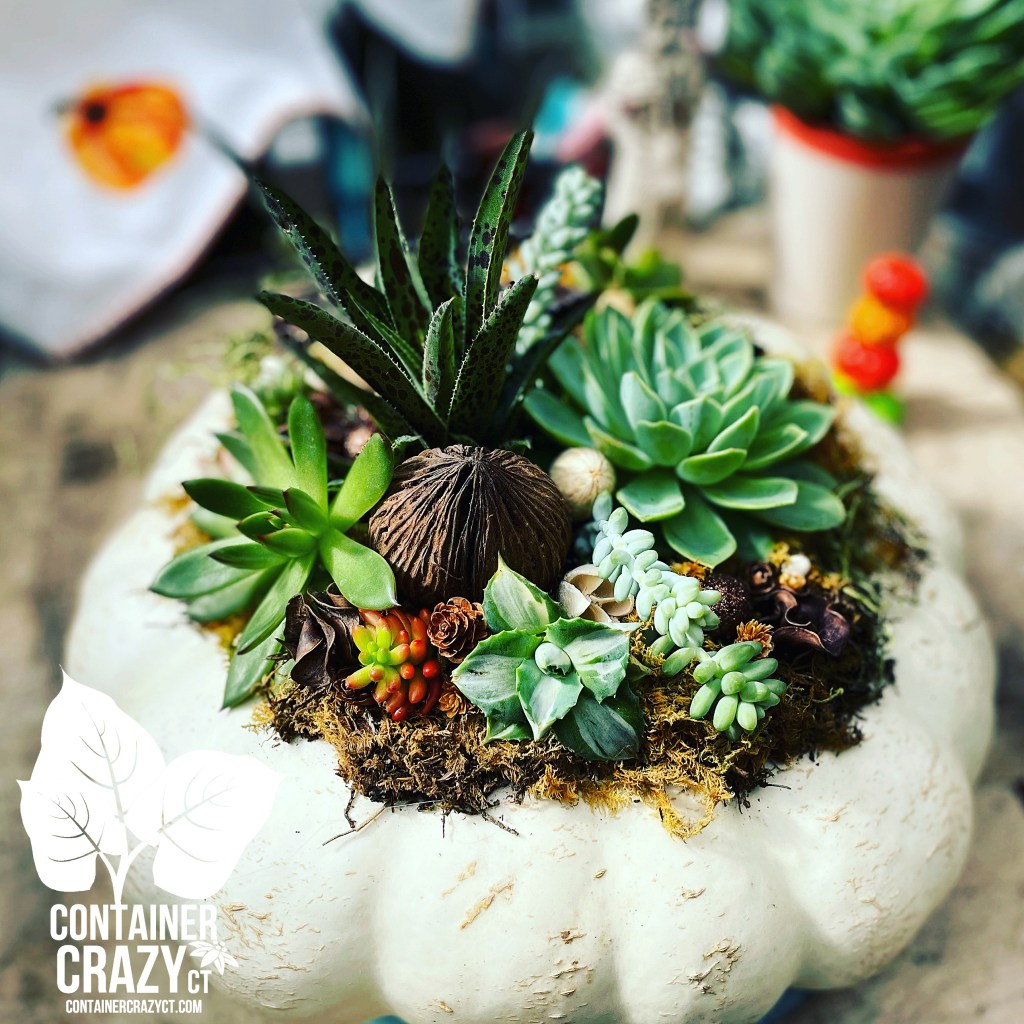
By now, many of my outdoor plants have been moved inside the greenhouse, or if it is a smaller houseplant, into my home, but I am not finished yet. I still have a bunch of elephants ears to dig up out of some larger planting areas to store tubers, corms, etc., and doing things like covering outdoor furniture soon.
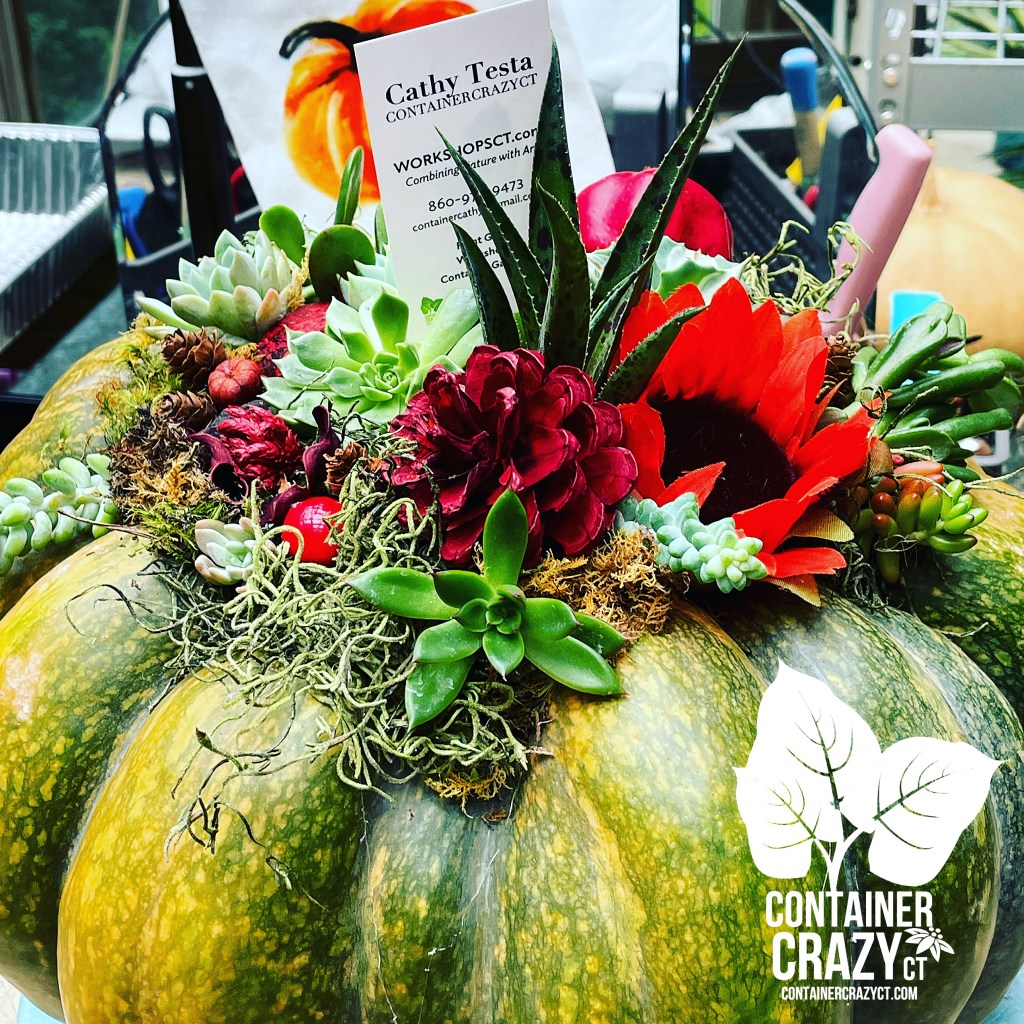
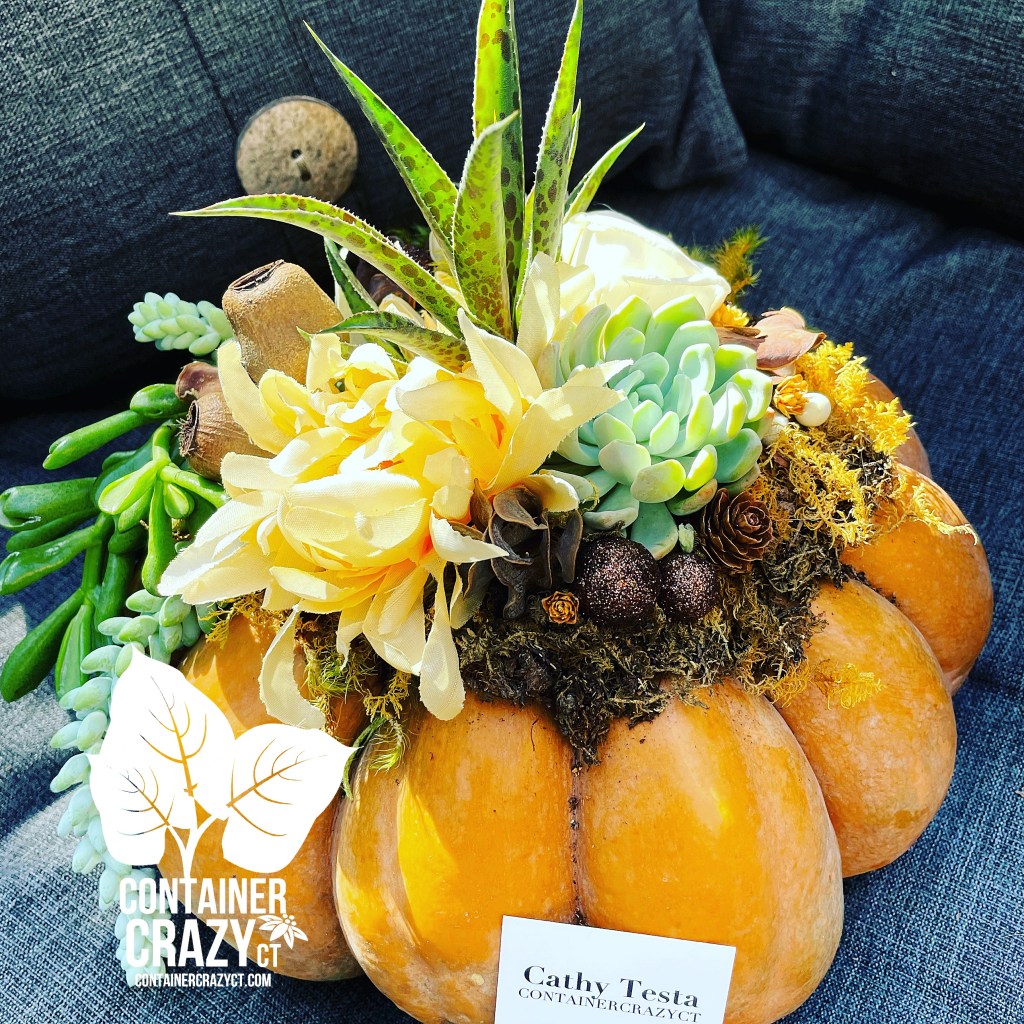
In the meantime, I make Succulent Topped Pumpkins for custom orders! This is fun and I love making them. This year I am focused on making medium to large size pumpkins and each is very unique. People will ask, how long do they last – the answer is for months. They make a beautiful centerpiece, or to serve as focal point of a table-scape in your home, and make wonderful hostess gifts.
Just Made Yesterday!
Between making succulent topped pumpkins and running other errands, etc., I go back to my deck to do more outdoor winter prep work. Maybe it is emptying a patio pot of soil and then washing the pot with soapy water to put it away in a clean state for use next year, or perhaps it is asking the help of my husband to use a hand-truck to take down heavier pots, like the one with a giant Agave in it. We did a few of those bigger pots on Sunday morning while it was nice yet very chilly out. It appears that some of Connecticut got a “touch of frost” per my friends comments here and there, but my tropical plants were not blackened from frost which usually happens with a true hard frost, so there is still time to work, and this week is looking good.
Moved Into the Greenhouse
Some things I do to the plants in pots being moved are blowing off leaf and debris by using a leaf-blower, this helps to push out stubborn debris in between the plants’ leaves. I also wash the outside of the pots with soapy dish water and inspect the plants to make sure it doesn’t have any visible insects (or a frog or snake, LOL). I also like to move in pots when the soil is dry so I try to do that (move before a rainfall and avoid watering). I keep an eye on all the plants moved in because as they warm up on sunny days indoors, those insects may decide to show up. A key thing to do is scouting. I know one lady friend who puts all her plants in her garage and does a bug bomb routine each fall season. I don’t do that but I will always have a handy insecticide bottle in case I suspect any insect danger. And I have a rule, if the plants is really badly infested by insects, I don’t keep it – but I am so careful with my plants, thus, this situation is not encountered often here, but my advice is, don’t bother if it has a major problem with insects at this point.
My Cozy Chair for Winter Days
I also moved one of my outdoor cozy chairs into the greenhouse this year with the comfy cushions. In the winter, there is no better therapy on a sunny day than to sit in the warmed up greenhouse with a gardening magazine or book. It totally heats up your bones just like as if you were sitting on a beach on summer’s sunny day! It doesn’t work when cloudy but sure does when sunny. It is a special space and I had to make room for a cozy chair (it should be an exercise bike, but you know, that would just turn into a plant stand).
It turned out the chair is my photo spot too for the succulent topped pumpkins I’ve been making for some orders. It sits perfectly on the chair for a quick photo before pick-up by the customer.
A Nutty Brown Succulent Pumpkin
It is very expensive to heat a greenhouse in the winter here so I keep it at a low temp, just enough to keep tropical plants or tender perennials (some of them rather larger) alive until next season. They are able to endure the conditions in a semi-dormant state. I almost considered shutting the heat down completely this year due to the expense of everything, but I’m very lucky that my husband insists I keep my routine going because, as he says, “This is your passion.” Plus, I think he likes sitting in there on cold sunny winter days too. Sometimes we play a few games of cards.
Another thing I do is take cuttings or collect seeds from plants (I did most of the seed harvesting already a weeks ago). I never ever run out of tasks I need to do – there are always nursery pots to wash and store, debris to toss from jobs, and items to organize, or repair work. I sometimes feel like I will never finish it all. It is a circle that never stops revolving for me and I’m sure most gardeners understand this, plus I have a small little business, so there are also those tasks related to plants. I hope to get more done today due to the warm sunny weather expected.
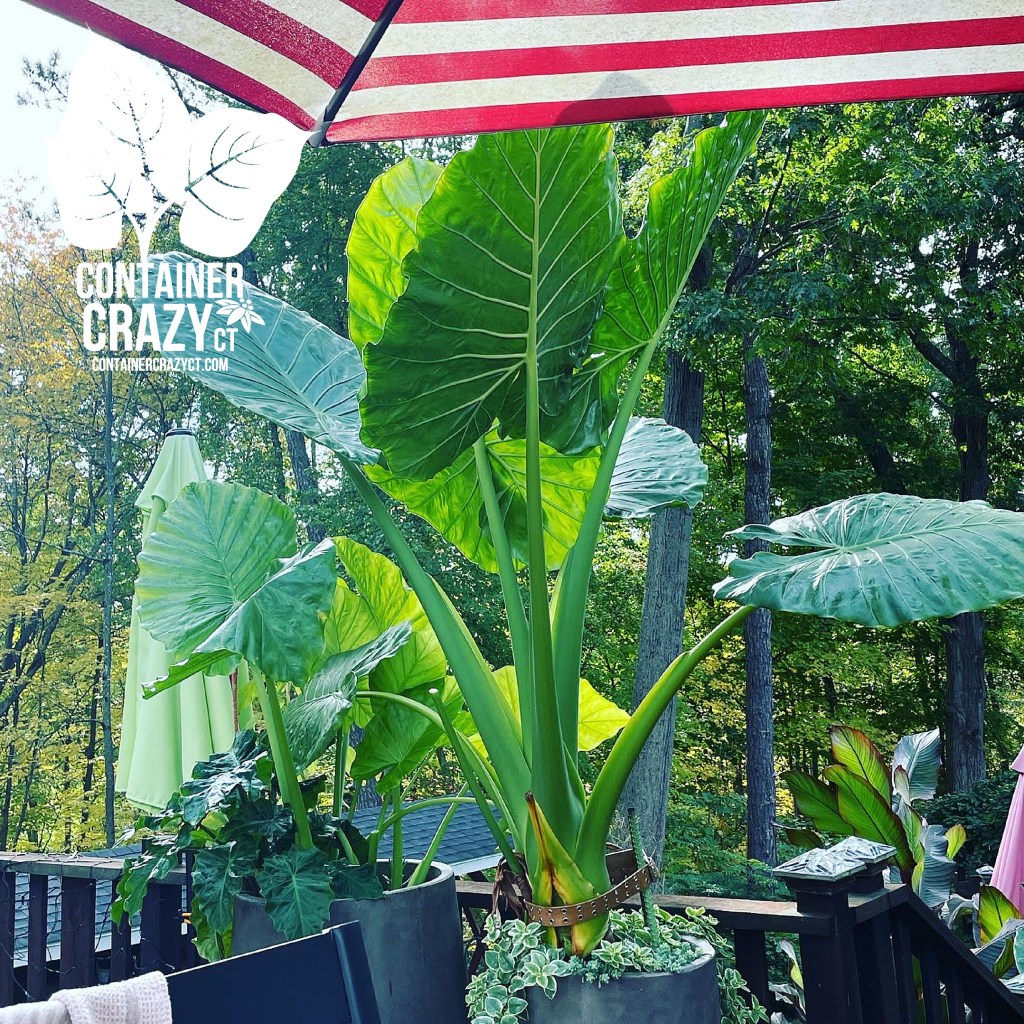
This is part one – showing my process of disassembling my largest elephant’s ear plants from containers or planters. I purchased the tubers in 2019 for this Alocasia, which I refer to as an “upright elephant’s ear” because the leaves point upwards towards the sky. It is often referred to as a Giant Elephant’s Ear, Giant Taro, or Upright Jumbo). Official name is A. macrorrhiza. They grow from 71 to 96 inches (6-8 feet tall) from summer to frost and prefer partial shade. The leaves are very dark green, glossy, and impressive! It prefers partial shade but will do well in more sun with appropriate moisture. In my zone, it must be stored, but warmer zones, I suspect you may keep them outdoors or protected somehow.
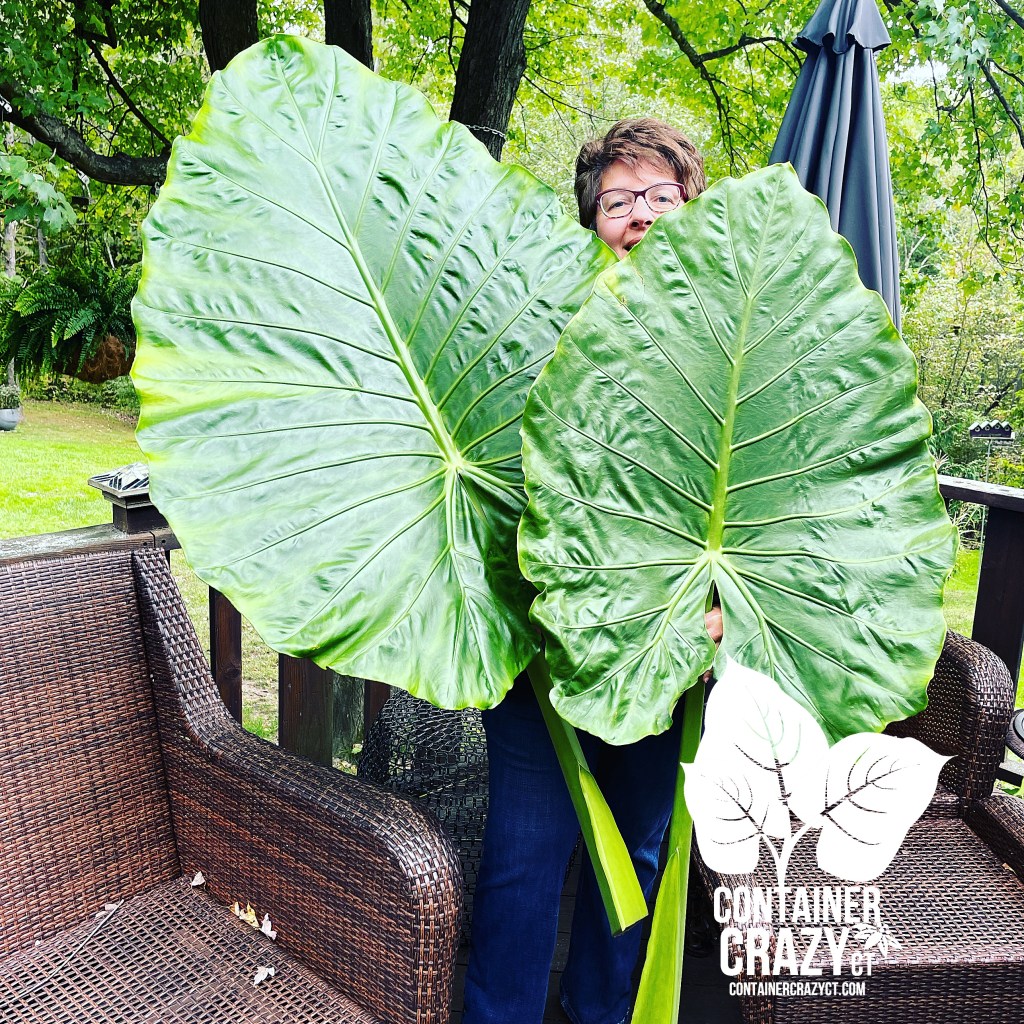
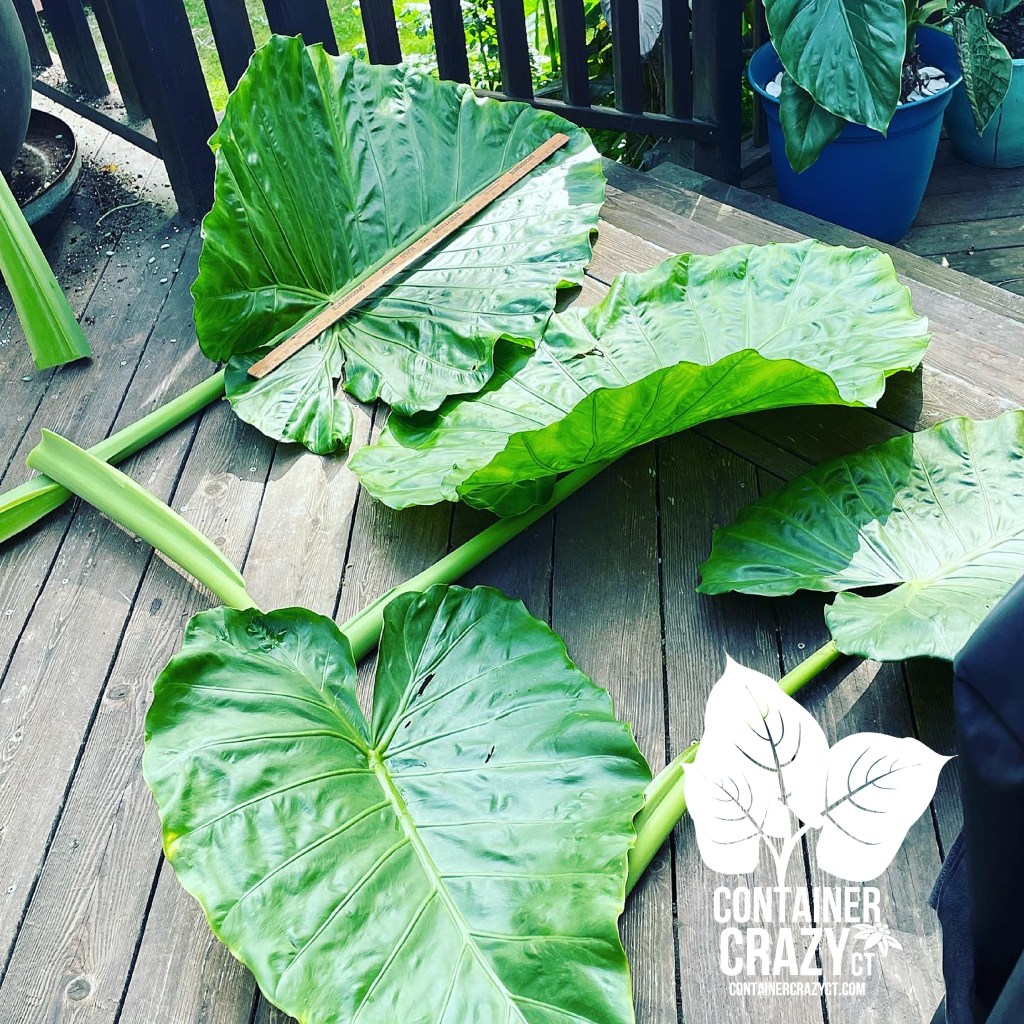
2022Cathy Testa holding two of the leaves
As you see here, I’m peaking behind two of the leaves. The leaves are at least 3 feet long with the stem an additional 3 feet as well. They tower above me in my planters and put on quite the big tropical show in summer. Now, on to how I disassemble them in preparation for our Connecticut winter months:
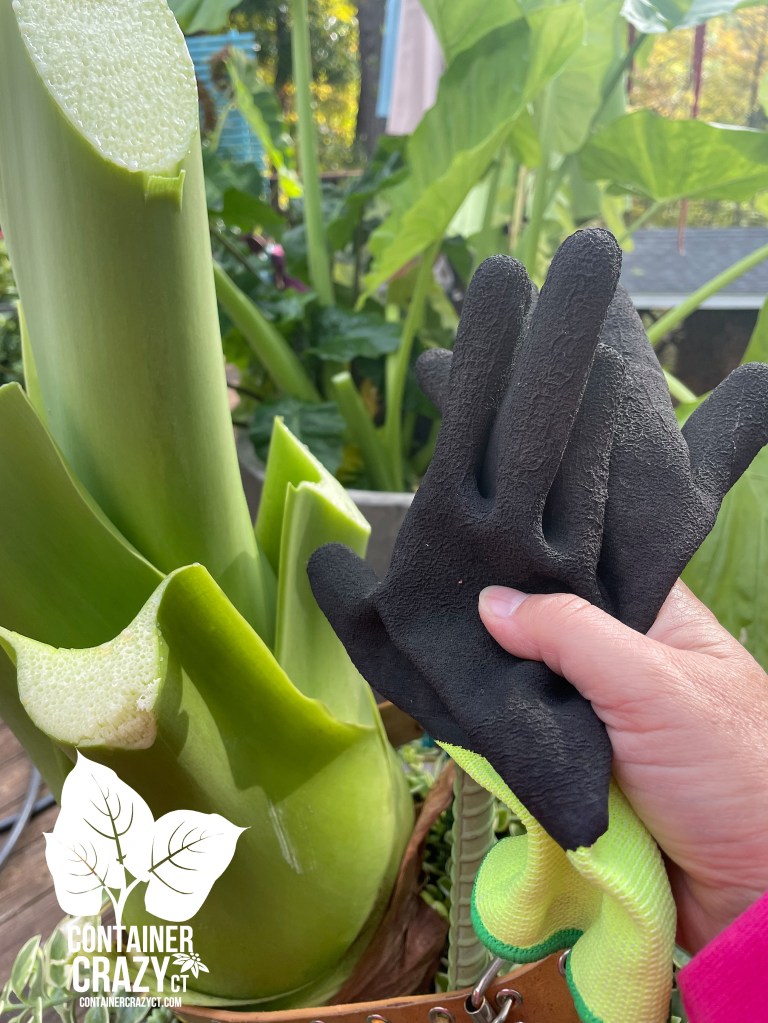
Definitely Wear Gloves
TOOLS
Gloves: Definitely wear garden gloves. These plants release a sap that will make your hands itchy – believe me, I regret when I don’t wear them. Even digging around the soil, I found my hands will itch later.
Hori hori knife: I really like this tool, heavy duty, serrated edge, perfect for cutting the roots in the soil around the base of the plant to release it. I find this to be one of my most useful overwintering tools.
Bin: A clean bin to put all the tubers and root bases in to let dry outside if it is pleasant weather, or inside if it is rainy.
A Large Kitchen Knife or Machete: I couldn’t find my machete, so a long, clean, sharp knife is a great back up.
Clean Up Tools: A leaf blower works to blow away dirt that will fall everywhere.
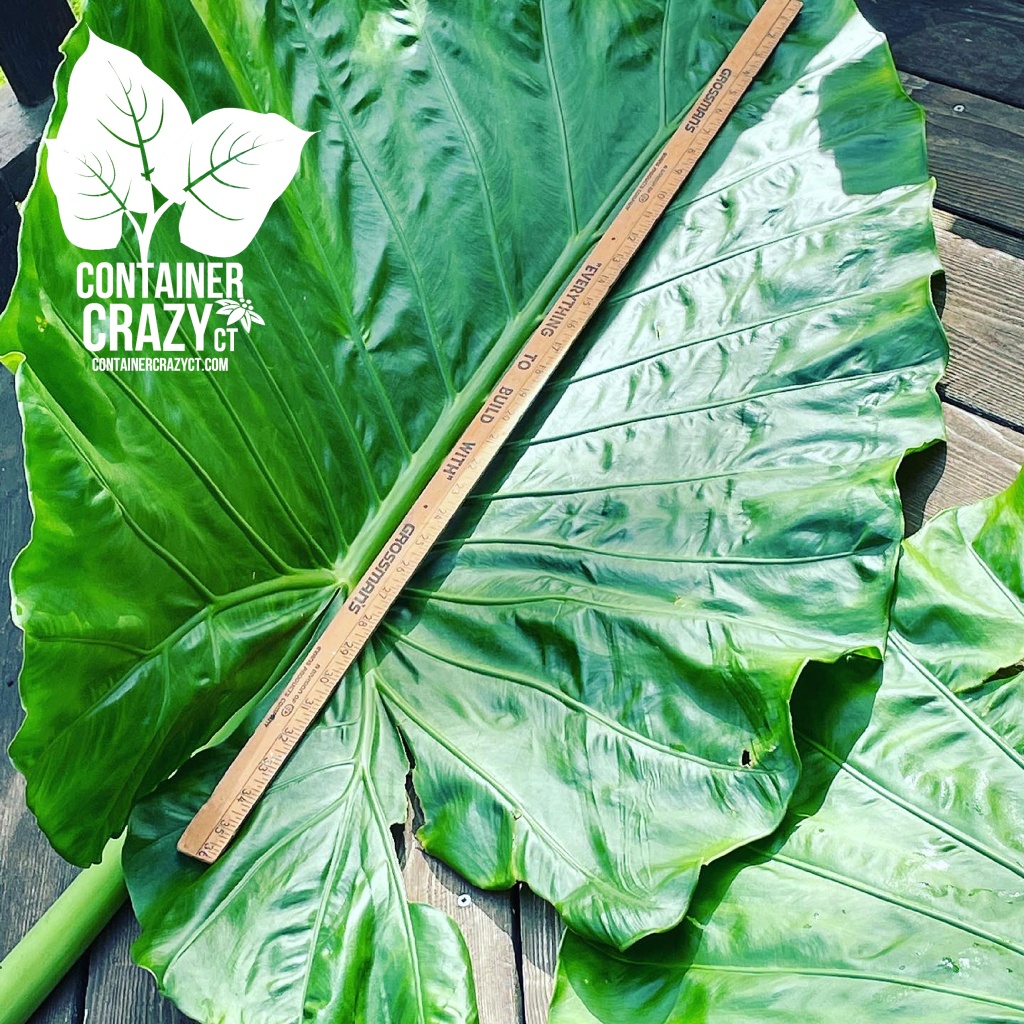
Ruler: Yes, measure those babies!
Large Knife
Cut away all the foliage by using the knife to slice each stalk off individually at the base of the plant. The main thing is to cut away from the plant so the angle of the slices are able to drain away excess moisture. At least that is how I do it. I’m also very careful to not nick surfaces with my knife tip – always avoid any damage while I work.
Slicing off each leaf at the base of the stalk (petiole) – stem – whatever you wish to call it!
As you slice off each petiole at the base, be sure to do a clean cut, avoid tears or anything which would allow entrance of mold or insects later on. A clean cut is recommended. If you mess it up, cut it again below where you just cut it.
Measure the leaves cause it is impressive!
I always measure so a ruler is handy, or measuring tape, and then take photos. Because sharing is caring – LOL. Everyone loves to see how massive these leaves get. It is fun to Instagram the photos!
Here are two of the biggest leaves above. It is too bad I am not set up to make leaf castings of these babies, they would make impressive art for the garden!
Close up of Slice
As you can see, the slice is downwards and away from the center of the plant. I slice each stalk individually and pile the leaves to the side.
All leaves removed
After removing each stalk, I use my Hori hori knife to cut around the base of the “stump” in the soil. As I push the knife around in the soil, I hear the crack of the roots being cut. Then I will push on the stump back and forth to help loosen it. Once I feel it is ready to be “delivered” from the soil, I start to pull it out – It always makes me feel like I’m a doctor delivering a baby – hahahaha. I have quite the imagination at times!
Cutting a circle around the base of the plant to cut the roots belowOut with more top sliced off
I will put it in the clean bin and trim the roots with clean sharp pruners or cutters, and slice the top off a bit if it still too big to fit into the bin. Leaning it upside down, or on the side to help drain excess moisture is helpful as well. Some folks may recommend not trimming the roots but I always have. New roots grow when it is replanted. My theory was less “fleshy” material the better. Fleshy material has the tendency to rot sometimes over the winter months.
After I got the massive big base out and laying out to dry, I worked on the planter next to it which had more off sets from the same type of Alocasia. I then let this dry in the house for about 6 days. Oh, I also removed as much soil as possible from the tuber areas. I used my gloved hands and kind of just rubbed or pushed off the soil. You may use a garden hose with water blast but that will only make the tuber wetter, so I didn’t do that. In the past, I have used a soft painters type brush to get soil off.
TIMING
In Connecticut (my planting zone is 6b) you may do this process either before or after we get a fall frost which could happen anytime now, but sometimes I like to start this while things are dry and temperatures are not too difficult to work in, so I started on these two planters last Thursday (9/29/22). It was a cool, breezy, day with little sunshine but that would be better than the rainy cold days expected the days following. The date if this post is 10/4/22 and no frost yet, but there are some talks it could happen this weekend, I hope not, cause I have lots more to do!
I placed the bin in the house for a few days and then moved it to a table in my basement. The next phase is storing them. For years, I stored all my tubers, rhizomes, corms in peat in bins with air holes drilled on the tops. But this past spring, I had rot on portions of my tubers. This year, I plan to store them dry in paper bags for some at least. I will most likely test the paper bag process and see the results. I will post photos of this soon. I also saved some mesh netting bags (like those used for Avocado’s in grocery stores) to put some tubers in.
Oh, when I took these apart last week from the gray planters, they had NO ROT anywhere on the tuber areas (brown area at the base) which is good news. No rot means they won’t have rot as they dry for a few more days. When I store the tubers, I will share it here as well.
The tubers need to be sored in a cool, dry place. I use my basement which does not drop below freezing but is unheated so it stays cool. It is recommended that you do not store them in plastic bags which would only trap moisture. If stored in a paper bag, make sure it has holes for vents. Again, for years, I stored them in peat moss in bins, but had rot issues this year in spring, and I didn’t want to loose these tubers of this super big Alocasias, now that I’ve regrown these plants each year. These particular tubers were from 2019 so it has been replanted 4 times now. A definite pay back from the investiment!
PLANT IN SPRING
Next year, after all danger of spring frosts, I will replant these Upright Elephant’s Ear tubers to grow again. Many tropical loving plants may be handled this way, such as Canna Lilies. For years, I stored my big red banana plant, Ensete, the same way as shown above. In fact, here is the link to the Ensete post if you are searching for it on my blog site: https://containercrazyct.com/2013/10/31/storing-my-big-red-banana-plant/. Unfortunately, I lost my big red banana plant this year in 2022. It was the first time it rotted too much.
NEXT OVERWINTERING PROJECT
Ack, I have to dig all of these up soon – anyone want to come help me?!
Canna Lily on ends with Upright Alocasias in the centers
Cathy Testa Connecticut A Container Garden Designer Also make custom orders, grow tomatoes in spring time, make succulent pumpkins now in fall season, wreaths during the holidays! Thank you for visiting and your support.
DIASSEMBLY ALOCASIA QUICK STEPS:
Get your tools ready (knife, gloves, bin, hori hori knife, cleanup tools, etc.). Cut away each leaf stalk at base cleanly. Cut around base of plant in the soil area to break free roots with hori hori knife. Pull out stump (base with the tuber) out of the planter, and let dry for several days to a week. Store in an unheated, dry, cool area that does not go below freezing in winters.
After waking up from the foggy mind, after our confusing holidays, I start to pull out my calendars from last year, which includes two (if not 3) wall style calendars, notebooks with key dates, reviewing my own blog posts from the past year for key dates, and going thru client binders to get my new 2022 calendars started.
Yes, I have all those various sources to track activity by dates. I want to remember the odd things that happened because it helps me to be prepared, or to try to plan ahead, and to remember, in the gardening world, lots of variables come into play (timing, weather, pandemics, etc.).
Unexpected Snow Fall in April?
For example, do you remember when we had a snow fall in April of 2021? I do. I purposely took a photo of the date scratched into the top of my fire pit cover, and I also noted the date on my 2021 wall calendars. The notations are reminders of things that can happen when you least expect it, or we should be expecting it, cause it probably happened the year before, or it may again…
Cold Rains on Memorial Day?
Like for example, do you remember the cold temperatures and crazy rain we had on Memorial Day weekend last year? It traumatized me because I literally finished planting a site the week before! I was so worried about the plants and how they would be impacted by the freak cold rain we got the whole weekend after I finished my job site. I went silent. My husband even asked me why I was so quiet as we drove out for a weekend at that time, and I told him, “I’m super disappointed in the weather we had over Memorial Day.” Then I stayed silent for the rest of the drive.
Flooding of Summer Fields…
Also, what about the floods we had in farmers’ fields in 2021 during the summer months – which impacted the availability and quality of pumpkins I use when I make succulent pumpkins in October, and of course the rain during the summer that messed up the ripening of our tomatoes?! Need I say more…?
And dare I say it, Ugh, COVID. As my friend posted recently, “We all want to say bye-bye to Covid!”
The darn Covid world. It is everywhere it feels like. We never thought it would last this long or rebound, right? How many challenges must we face? Let’s not get into how it impacted everything, shipping, staff, uncertainty, availability, etc. And the very sad and depressing things, such as many people getting sick, hospitals overwhelmed, it just seems hard to rise up again. My blood pressure has risen. From the stress (or too many sweets over the holidays.)
In the world of gardening, you do face challenges. I told a grower once, “Every single year, it is different.” They agreed. It was very hard to plan and predict in our usual manner.
Global warming impacts us too. We see lots of changes in weather. It is so unpredictable. Thus, my calendaring routine is even more critical. Or is it? Because sometimes, its been difficult to take a deep breath at times, and start again. But alas, it is January, and I must start again.
Today, is January 6th, 2022. It will be sunny (thankfully, because I have to take down some outdoor holiday decor) and it will snow tomorrow, but then be clear on Saturday (unless that changes). I’ve started to come out of my holiday brain fog and started looking at key gardening and planning ahead dates.
Sowing Information
I remember that last year, around this time, people started searching about sowing information for their seeds. So I’m going to re-share the link below where shared some tips from last year around this time:
I have to admit, I’m still not done reviewing things, but I’ve started, and it reminds me of this: January is about “planning” and probably early ordering (at least for me), February is “ramp up” month, March is “sowing” month, and April is “growing month” which goes into May. And hopefully this year’s end of May will bring better weather when we are ready to put all plants outdoors for our vegetables gardens and tropical plants, etc.
I know this post is a little choppy, but I needed to get it out there to let you know, I’m here and I guess I will take on the unexpected challenges yet again. Because when I’m in my greenhouse on sunny days in the winter, it revives me. I see the plants not giving up, despite being on the temperatures cool side in the winters, and some plants will even bloom. I’ve been witnessing, in fact, my Mangave plant blooming. It shot up a 10 ft tall stalk and the buds finally opened. They are still opening. The very top of the stalk is almost touching the roof. I have to step up on a ladder to get photos or look up as I did this this photo below taken a few days ago.
Mangave buds opening into 2022
In the meantime, I hope this post is not too blah, because besides all the gardening challenges of last year, I still encounter enthusiastic plant lovers and I still am very passionate about plants – and it makes it all worth it. I think I’ll be ready to go at it again. Stay tuned.
Cathy Testa Container Gardens, Plants, Plant Gifts, Seeds, and More! 860-977-9473 (texts welcome) containercathy at gmail.com See also:
Alas, we are two weeks till Christmas! I’ve been so happy to create for everyone and I can’t thank you enough for your small business support of my Cathy T Custom Work of my holiday kissing balls, wreaths, garlands, variety of holiday greens in boxes, swags, and holiday installations of planters and sites.
My hands have been a little sore and my back a little achy but I love what I do so much, I continue to move forward. Each detail is important to me and now, with the last two weeks of planning underway before Christmas Day, please keep me in mind if you are looking for any last minute Grab-n-Go Gifts. Some are made with plants and some without. I usually post as I create so you see how they are made and what is being made minute by minute.
Also, if you have any last minute greenery decorating needs, I have some beautiful cedar available in bunches while they last. Almost all my greens are used, which makes me happy! This means planning worked out and no-waste of the beautiful fresh greens! Limited supply on the greens now as of this writing (12/13/21). Thank you again for ordering from me this season. Now its Plant Gift time…
In regards to the HolidayPlant Gifts, please give me a day ahead to make it and then swing by to Grab-n-Go on your daily last minute shopping adventures. Just text me your questions or interests. 860-977-9473.
Details are also shown on http://www.WorkshopsCT.com. Some items available: Terrariums or Terrarium Kits (great gift idea!), Holiday Moss Trees with Succulents, Hanging Small Globes with Holiday Themes, and other perfect hostess holiday themed gifts. See my Facebook Pages or Instagram under Container Crazy CT for the latest daily holiday creations.
Thank you,
Cathy Testa Container Crazy CT Broad Brook/East Windsor, CT 860-977-9473 Today’s Date: 12/13/21 See also www.ContainerGardensCT.com for Holiday Installs See also www.WorkshopsCT.com for Custom Creations
2021-12-25T06:49:00
days
hours minutes seconds
until
Days Till Xmas
⭐⭐⭐⭐⭐
Rating: 5 out of 5.
Customer Comment: Thank you again, it is just the perfect size and even more beautiful in person. I can really see your creative talent in your work. I especially like the two hanging zip ties added for height option. Also, the extra ornaments and matching ribbon. Nice little added details that you think of. It smells soooo good too! – Wreath Purchaser, L. Mickey, 2021
Champagne Colored OrnamentsTop Made to Match Homeowners Theme with Elves fun colors, and Bottom Wreath was Created to be Natural with Burlap Bow
I hear the wind blowing outside as I type this – Yup, I’m an early bird. Lots to do, wreaths to make, and holiday gift orders to create.
If you are local and interested, please feel free to reach out regarding my custom hand-made wreaths with a fresh mix of greenery, bow and some décor, or bow-less, which some people prefer.
2021 Wreaths Made to Order for Porch Pick-ups, Broad Brook, CT
I started humming Christmas tunes the other day as I was gathering up my beautiful fresh greenery materials to make a wreath. Usually, I start watching or listening to an old classic holiday movie while I make the wreaths, because watching is not really possible as I’m looking down as I work to create a wreath, adding decor and items after I assemble the wreath itself. But hearing the holiday themes of a good movie provide me that uplifting feeling of the holidays coming up and decking our halls with greenery!
Hubby Holding Wreath
I have to admit, I do think about the crowd of attendees at my former Holiday Wreath and Kissing Balls Workshops from time to time. There was always a “spirit of good holiday vibes” with me when I would setup my workshop space for the annual workshop tradition, but alas, those have ceased (when COVID hit and also because I think Cathy T KB Clause got a bit worn out.) Setting up the space was very time consuming. It was almost like throwing a mini wedding, but I’m so happy to create custom wreaths and other items since I ceased the workshops! My offerings are outlined on www.WORKSHOPSCT.com for more information.
Large KB’s
The next best thing is making custom orders for everyone. I’m still here working at it, so if you need a wreath and are local, contact me – while supplies last. Ho-Ho-Ho, let’s Go-Go-Go!!!
Thank you – Cathy T.
Cathy Testa Container Crazy CT Broad Brook, Connecticut 860-977-9473 For More Info about Holiday Products at www.WORKSHOPSCT.com