Growing Pumpkins – Round Two

Leave a comment

This is my 2nd year trying to grow some Long Island Cheese Pumpkins and I started them a bit too early again. They were ready by mid-August, and I’d prefer them to be ready by mid-September. Anyhow, they are just fine sitting on a table with no blemishes and curing for a week or two in the sun. I use them primarily to decorate for autumn but maybe I’ll get into growing more of them next year as a food source for winter soups and Thanksgiving pies!

The Long Island Cheese Pumpkins resembles a wheel of cheese in shape and the color is very pale compared to ordinary orange pumpkins, but I like these for the shape. The seeds for these may be directly sown into a garden or large pot or started early indoors. I started these indoors in early to mid-May of this year, and last year, I had started them indoors in mid-April. It seems early May was still a tad bit too early. So, a new date is noted for 2024.

Because squash, which this pumpkin is technically a squash, grow really fast, they should not be started earlier than 3 weeks before spring frost. It takes about 98 days till they are ready. Anyhow, if they arrive earlier than your needs, just let them cure in the sun for a week or two. Cured squash will store all winter. They are pretty cool in that regard. And because they last a long time, they are perfect for the succulent topped pumpkins I usually make to display in the home thru Thanksgiving time.

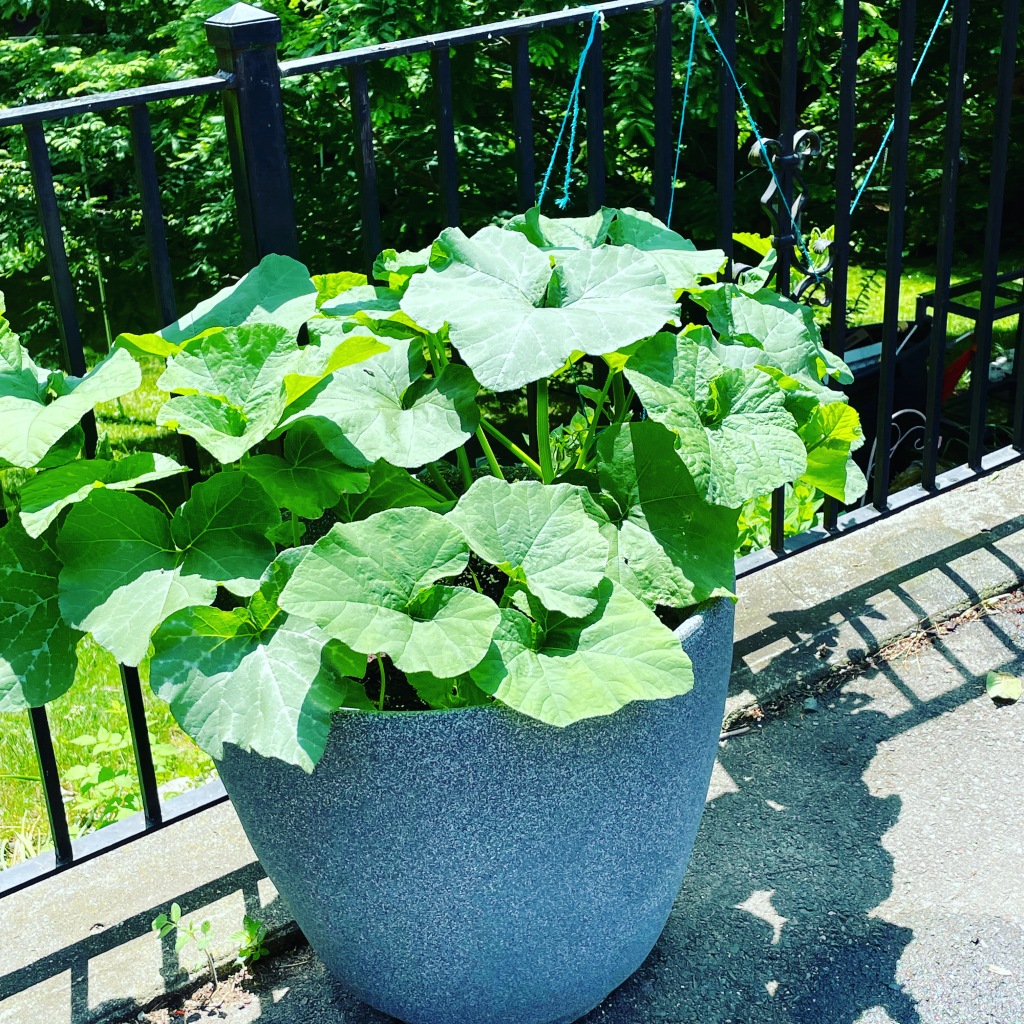
This year, I grew them in two places. One in a super big pot on my driveway and one in a large square planter on my deck. The one on the driveway worked out well because I take garden twine and help them run up the twine along a wrought iron fence. The tendrils quickly grasp on various places on the fencing, and they hang on. By having them on a twine like this, the pumpkins do not touch the ground so there is less chance of any rotting from sitting on a wet surface and no blemishes. Also, no animals messed with them. That could be because they were somewhat hidden by a background of other plants.

The one on my deck sprawled out on to the deck floor and then I let it hang over the edge of the deck. I got only one pumpkin on that one, but it was cool to see it hanging in the air, so I helped it stay put by using a hanger. Anyhow, the one on the driveway got 4 pumpkins. I’ve been just kind of experimenting and having fun with them. As I learn, maybe I’ll get into growing more next year.

One of the nice benefits of pumpkins is their huge beautiful yellow flowers – which the bees absolutely adore. Some mornings, I’d find up to 4 bees in one flower buzzing away. If you want to help pollinators, plant some pumpkins!

Pumpkin on the left (tomato plant on the right)
Pumpkin hanging from deck above.
Sitting on a table to cure for a couple weeks.

You can see the color difference in the last photo above. I kind of determined when to pick them by the firmness of the rind and also looking at the stem, but I was somewhat guessing too. Plus, the plants started to look a little worn, so I figured it was time to cut them loose around mid-August.

I watered the plants regularly with generous amounts of water, but I did not fertilize except one time with a liquid feed. The soil had compost in it in the pots. The plants prefer full to nearly full sun, and the one on the deck didn’t get as much sun as the one on the driveway. Oh I said the animals didn’t bother the pumpkins, but some of the leaves got munch off once, maybe by a brave rabbit. Brave because my cat is an excellent rabbit hunter.

I plan to do more research on pumpkins because for some reason I’m interested in them! Maybe because it seems they don’t get bothered much if provided a safe place to grow. Wish me luck for next year – I hope to have more harvested.

Have a good weekend,

Cathy Testa
Broad Brook, CT

First Time Growing Pumpkins from Seed

4 Comments

When I was a kid, my dad lined up 5 jumbo sized pumpkins he grew himself on our driveway in front of our garage. Me and my siblings gathered around to pick our choice and stand behind them while my dad (or maybe it was my mom) took a photo. It is one of my favorite photos from my childhood when it comes to pumpkins and a vivid memory.

Last year, I tried growing some pumpkins of my own on a very small scale compared to my dad. He grew his pumpkins in a one-acre garden also filled with tomato plants and other vegetables. As children, we never lacked fresh vegetables. They were always abundant in the summertime. I can imagine for my dad it was not only a hobby but a necessity with five kids to feed plus one other sibling who came a little later than the rest of us!

Anyhow, I decided to try growing some pumpkins in a large pot at home and put some of the seedlings in a friend’s plot at a community garden. It was neat to compare how each growing scenario did. The one in the large patio pot grew just fine, but it did not produce as many pumpkins as the one grown in the ground at the community garden.

The type of pumpkin seed I chose is called Long Island Cheese Pumpkin (Curcurbita moschata) because of its shape. It looks like a small Cinderella pumpkin or a cheese wheel. It is edible as well, but I wanted to grow them to use for my succulent topped pumpkin centerpieces I make in the autumn season.

You may direct sow the seeds of this pumpkin into your garden or start them under protections up to 3 weeks before frost. I did neither of those. I sowed them indoors, in my greenhouse about three weeks before frost. Then transplanted them in my big patio pot near the end of May. The pumpkin fruits were ready a little too early for my needs (as noted I used to create autumn centerpieces) so I made a mental note to start them later this year in 2023.

Pumpkin seeds germinate easily (usually within five to seven days), and the seedlings will grow quickly. Also, the seeds are larger, thus pumpkin seeds are a great choice to sow with kids. Their smaller hands are able to handle the seeds easily, the sprouts will pop up quicky, which is great for kids. They will feel the reward of sowing seeds within days. Bear in mind however, the little plant will grow fast, and you will need to transplant it before it gets unruly. Also, because the seed is larger (than say tomato or pepper seeds), you may direct sow the seeds into a small starter pot (versus into a seedling cell tray). Small nursery pots or even a terracotta pot or something the size of a soup can is a good size pot for kids too. See my photos below of the seedlings I started in small black nursery pots (probably about the 3-4″ diameter size pot) and I put only one seed per pot.

Pumpkin plants may be grown in large pots (about the size of a half-barrel), but just be sure to give the vines plenty of space to sprawl. I placed my pumpkin pot by a fence which runs along my driveway, and I guided the vines onto the fence as it grew longer. It was growing along beautifully, and pumpkins started to appear after the flowers, but the leaves developed the problematic powdery mildew later in the summer on the leaves. Powdery mildew looks just like powder on the leaves but be aware there is a natural patten to the leaves along the leaf veins of this pumpkin which may confuse you. The powdery mildew usually grows on the whole leaf or in big patches, whereas the natural pattern on the leaves is along the veins. See the photos after this post to see what I mean about the patterns.

The plants in my friend’s community garden did not experience any major pest or disease problems, other than the pumpkins had blemishes on one side because one side stayed rested on the ground. Those grown in my large pot were hanging from the vines on the fence due to my trellising them, so they did not have blemishes on the rind. And the pumpkins did not need extra support as they hung from the vines on my potted pumpkin plant. They seemed to hang there just fine.

This type of pumpkin is technically a squash, and it may be cured and stored all winter, but I did not cure or store them because I was using them for my centerpieces. But I did put them outdoors on a table for a while which is part of the curing process because I was waiting to decorate them. They did not rot which is great. These cheese pumpkins have hard rinds which were of benefit to me for my uses because of how I use them to create with succulents and floral design items. And the shape is a desired shape I like to create with the plants, so they are just perfect for my needs in that regard.

The seed packet indicates they are ready in 98 days (approximately 3 months), thus this season, I will actually count backwards from this timing to make sure I have them at the right time for my centerpiece purposes. I started them a bit too early last year in 2022. I will wait to start the seeds a few weeks later than last year and will have to work out my timing on my calendar. It is also important to note that pumpkin seeds do not “require” being started indoors early as is done with tomato seeds. They may be direct sown into your garden, but I prefer to enjoy starting seeds indoors, so I do so.

When you plan to plant the started seedling plants outdoors, be sure to wait a little while after spring frost has passed. Because squash and pumpkins are warm-season plants, they are frost tender and while frost may not kill them, they will be damaged by shock if exposed to frost. And again, because these pumpkins grow very quickly, there is no rush, they will move fast and keep you moving as you witness their vines grow for miles (well, not literally miles, but they grow long for sure).

If planted in a patio pot (make sure it is a large pot with drainage holes), be sure to locate it where the vines won’t be in the way. If in the garden, be sure to keep rain or collected moisture away from the plants (i.e., should plant on a slope) and or perhaps check them to rotate the pumpkins so the rind won’t be damaged from laying on the ground as they develop and grow larger. Also, full sun sites are best for pumpkins, as is for most warm-season vegetables.

In regard to transplanting the pumpkin seedlings into a large container or patio pot, I used good quality potting soil and mixed in slow-release fertilizer. I also situated the pot where I knew it would be out of the way, easy to water with my garden hose, and along a fence so I could lift the vines up and trellis them. I used twine to guide the vines, but the plant also produces tendrils which naturally clung around the wrought iron fence areas. I probably added compost to the soil as well. With very little attention, the plant grew well and quickly. I would see bees visiting the flowers often and took many photos of them in the mornings. The large yellow flowers are pretty too.

Squash or pumpkin seeds generally last 4 years if stored appropriately (cool, dark, dry locations). I have packets from last season, so they are good still (i.e., viable) and I plan to test out the growing process of these Long Island Cheese Pumpkins again this season. Things I will change are a) timing of starting seeds; sow later this year by a week or two so the fruit is not ready too early for my needs, b) grow more of them in large pots; do 2-3 pots this year along my fence, c) grow some pumpkin seedlings for my friend’s community garden if they would like some again, and c) cure them since I plan to have more this year.

Thanks for visiting and Happy St. Patty’s Day!

Date of Post: March 17th, 2023

Author of Post: Cathy Testa of Container Crazy CT

Photos Below:

Natural pattern on the leaf veins in this photo above
Note: One seed per pot shown above. See the seed leaves before the true leaves appear.
Note the pumpkin on the top right has some blemishes and a bit of what looks like rot forming (from the community garden).
Me at my Friend’s Community Garden, the pumpkin plants are in there!
Succulent Topped Pumpkin Creation by Cathy Testa (photo above).

Last Spring Frost Date 2023

Leave a comment

Every year, I use the date of May 12th as my estimated last spring frost date. My tomato plants and hot pepper plants cannot be planted outside before this estimated frost date. If I planted my new starter plants outside before the estimated frost date, I’d risk losing them. Frost will kill them. In addition to this timing, usually the soil is not warm enough outside either; so, there is a period of time to acclimate your plants outdoors before you actually plant them in the ground.

There are many resources on the web where you can search for what the spring frost date is in your area. Some of the sites provide the ability to just enter your zip code to see where it falls. For example, try this site provided by almanac.com. When I enter my zip code, a date of April 27 is produced as my last spring frost date.

April 27th is too early for me. Based on years of growing tomato and hot pepper plants from seed, I feel this date is far too risky. May 12th is a safer date, and this is the date I use to count backwards on my calendar to determine when to sow my seeds. See my prior posts on that. So I use that last spring frost date to count backyards for sowing seeds, but also my estimate as to when I might be able to put my starter plants grown from seed outdoors to acclimate them after the frost has definitely passed.

In addition to frost, tomato and hot pepper plants like warmth. While the last spring frost may have passed, the ground is still cold and not completely warmed up outside. So, planting the starter tomato plants waits a bit longer – till end of May (Memorial Day). Following this timing has worked out for me over the years.

What typically happens is we may get a early warm up. It will feel fantastic outdoors and your soul and body will feel as though it is time to plant. But I caution you to be aware, things always change quickly. I am always amazed at how fast Mother Nature changes her mind.

Not only does Mother Nature change her moods, but she also has the amazing ability to provide a new twist on the weather and climate. For example, I think this past winter has been a mostly a windy winter with no snow! We’ve had no snow until one day this week in March. Before that, there were days that felt like spring! My husband is amazed he has not plowed the driveway once this entire winter of 2023.

Last year, it was a drought year during the summer months of 2022. That was not helpful to my container gardens during the summer when my tomatoes and other plants were outdoors growing fully. Anyhow, my point is, only Mother Nature truly knows when the last spring frost date will be, and I swear, last year, I don’t recall experiencing a hard frost in the spring. I usually write it down on my wall calendar when it actually occurs to track information. Climate change, Mother Nature’s closest cousin, throws in his own blend of ideas on how to mess with our planning and tracking. You get the idea. Climate change has been changing some of our past gardening routines and timing.

The key thing is if you get anxious, to remember to watch your local weather stations during late April to early May, and they usually will give you a heads-up if a hard or light spring frost is coming. And if you decided to tempt fate and put your plants out into a garden before frost and a later frost happens, you could protect your seedlings perhaps by using an appropriate method to cover the plants. This may be okay for plants not so affected by frost and cold, but I find tomatoes really should be put out when we are sure it is warm enough outdoors and after the estimated frost date. Exposing them to frost situations will only cause your plant to start off wrong. Frost will kill the plants that need warmth the most, like tomatoes and pepper plants, as well as any tender non-hardy plants.

Between May 12th, which again is my personal estimated spring frost date, to the end of May, this is the time period where I harden off my tomato starter plants outdoors. It gives you a couple weeks to expose them to the outdoor elements gradually. The starter plants are put outdoors on a table to be exposed to the outdoor elements each day and taken back in. If you decide you want to start moving them into their permanent container gardens, patio pots, and anything other than a garden in the ground, I suppose you could move the pot into your garage if a frost arrives, but I don’t recommend planting them outdoors earlier than Memorial Day (end of May). It just gets the plants cold and stressed.

With all of this said, I’m referring to my location in Broad Brook, CT which is Zone 6b. You may live in a part of Connecticut that is warmer, or perhaps you have some unique setup or micro-climate. When you look at sites providing frost date information, they explain in detail the calculated risks of frost dates and all the factors around these estimates.

I know when I first tried to determine my last spring frost date information, it drove me crazy. There were so many variations, it is truly frustrating. If you are new to gardening, ask your nursery person or neighbor who’s a gardener what date they may use as their estimated guide for their last spring frost date. I’m sure you will get various responses on that. But always be aware, plants have different needs. Not all vegetable plants are equal. Some vegetables may be exposed to cooler temperatures, so if you ask, be sure to ask for the type of plant you want to transplant into your gardens or container gardens and patio pots.

As I have noted, hardening off is required for indoor grown seedling plants. They must be moved outdoors to get them acclimated. You must protect them from harsh sun, gusty winds, and cool temperatures. Usually, you start by putting them in a shady location and move them more each day for a few hours to sun.

This is my date list of how it goes for me:

May 12th – My Estimated Spring Frost Date; Watch the tv news around this timeframe, see if they announce it then or before.

May 15 – May 26 – Harden off the Starter Plants outdoors for a few hours every day.

May 22 week – People pick up starter plants from me and harden them off at home (or they secretly plant them early because they feel it is safe for them! LOL).

May 29 – Start planting all outdoors in pots and in the ground and enjoy watching them grow till they produce fruit in the summer! May 29th is the date for 2023 Memorial Day.

Have a good day,

Cathy Testa
Broad Brook, CT
Container Crazy CT

Sowing Tomato Seeds Every Spring Season in Connecticut

Leave a comment

Except this year.

And I am missing it!

Every year, from February to April, my hands are usually very busy sowing and growing tomato plants from seed in my greenhouse. I begin in February with planning out dates, looking at the required timing for each seed type, and doing other tasks such as gathering up my seedling soil mix, seedling trays, and sowing tools.

Usually, in March, some of the seed sowing begins! I get all my seedling trays prepared by washing them appropriately, selecting locations on shelves in the greenhouse, getting my seedling heat mats lined out as well, and hanging seedling grow light fixtures above some of the seedling tray locations.

But this year, I am not going through this set-up and sow process (except for some flower seeds) because, for a period of time in April, I will be away due to some travel planned. To be away and not be here at my home to monitor the sprouted and growing seedlings in my greenhouse would be disastrous because seeds require constant moisture and other small steps for growing success.

If it is your first-time growing tomato plants from seed, remember that once the seed is planted in your seedling mix and waiting to germinate and sprout from the soil, you cannot simple walk away and forget about them. Each day, you should monitor the moisture of the seedling mix, and if the soil is dry, remoisten carefully. I usually use a watering can with a shower head type spout which gently flows out water as I carefully move the watering can over the top of the seedling trays to apply just enough moisture to keep the soil slightly moist. I often move the trays off the heating mats, water, and let it drain, then return the trays onto the heating mat under the grow lights.

Then we wait. We wait for that first little green sprout to appear above the soil mix. It is always a little boost when I see it there, and it gives me a feeling of happiness. I know it sounds a bit corny, or silly, but it truly does. Soon that baby sprout will grow into a seedling. During this growing phase, tomato seedlings are just like babies, they require care and watching.

If you ignore seedlings by leaving them for a week at a time, or even a weekend, they will surely dry up and wither. There are some exceptions to this perhaps, like using clear covers to maintain a bit of humidity and moisture, but my style of sowing and growing tomatoes from seed involves reviewing them each day and monitoring their needs. Do they need a bit of moisture, do they need a new location in the greenhouse to receive more sunlight, do they need to be removed off the heat mats? All of these questions come to mind as I watch my baby seedlings start growing.

Some seeds require anywhere from ten weeks before your last spring frost date to two weeks before your frost date to be sown indoors. Here in Connecticut, I use a timeframe of about May 12 to serve as my last spring frost date, and then I count backwards on the calendar and mark each timing. For example, 10 weeks would fall on March 3rd, and 8 weeks before the May frost date would fall on St. Patty’s Day, March 17th.

Let’s take for example an amazing tomato plant I grew from seed for a few years now called Oxheart. It grows tomatoes the shape of a heart and the fruit grows to three-pound sizes! They are incredible. The seed packet for Oxheart tomatoes indicates they may be started anywhere from 8 to 10 weeks before your last spring frost date in your state. You need to know what the estimated frost date is for your state and count backwards. Once I asked the seed company where I obtain my seeds from why some packets have such a long span, for example some packets will say sow the seeds three to eight weeks before the frost date. That is a long span, right? Eight weeks would be around mid-March while three weeks before falls around the end of April.

Their response was that it is because they provide a range. And you may go for some date in the middle of that range. Due to local climates, planting conditions, temperature, water, light, soil make up and more, all plays into how long it takes to grow your seedlings. Also, if you prefer more mature plants to transplant, you may start your seeds on the earlier side of that range. If you may be putting your seedlings into a cold frame outdoors, you may be starting later. I think for the past few years, I started them on the early side of the range and ended up with plants about the size big enough to put into one gallon nursery containers. And I’m happy with that size. One other thought is if you start on the early side of the range, you will need to pot up your seedlings into larger pots as they get bigger before they may be transplanted outdoor at the end of May. Just like babies needing new clothes as they grow. If you prefer not to pot up and have smaller plants, just start your seed sowing on the later end of the range indicated on the seed packet. But don’t go beyond the last week indicated on the packet. Say it is two to four weeks before the frost date, if you want till one week before the frost date, you may create a situation where your plants will not produce fruit on time. The reason you are starting the seeds indoors is because the growing season outdoors is not long enough to direct sow tomato plants due to our climate. So, you must start them early indoors to get started, then transplant after danger of spring frost and when it is warm enough outdoors.

To keep track of the timing on when to sow your seeds, I have created charts and I also note the dates on my wall calendar. This I have found to be very useful and helpful. Take the time, if you are starting seeds for the first time, to look at the “weeks before your spring frost date to sow” and mark the date on a wall calendar. Start with the expected spring frost date for your state, mark that and count backwards.

Memorial Day is the timing I use to plant the tomato plant outdoors. So, think about that span, anywhere from March till May, you are working on growing your seedlings and getting them prepared for the great outdoors. I like growing various tomatoes. Many are heirlooms which are some of the most delicious tomatoes you will ever eat. Some of my heirloom seeds are sown six to eight weeks before the frost date, some are sown four to six weeks before, and some are two to four weeks before. I suppose those I may sow around the end of April may make it on my sowing list because I will be back by that time from my travel, and let’s be honest here, I can’t resist sowing some – I just have to!

All of the tomato plants I start from seed usually are grown in container gardens at my home in fabric grow bags, large patio pots, and wooden large planters. I enjoy watching them grow and usually have to keep the squirrels away or pick the fruit before they fully ripen otherwise those little wild animals in my yard end up taking a bite or two. And of course, I’ve sold many tomato seedling, otherwise known as starter plants, to friends and family. They already told me they are going to miss my tomato plants this year. I don’t blame them!

And it is also important to remember that everyone has their own unique process and style to sowing and growing. I’m sure more advanced growers would have their own tricks of the trade perhaps, but for me, this calendaring process has worked out. You may find many more posts about my journey with tomato seeds on my blog site called, http://www.ContainerCrazyCT.com. Please feel free anytime to ask questions. Oh, and by the way, I have seed packets available if you are local and interested.

Thank you for visiting and enjoy your weekend. Below are photos of some of my tomatoes!

Cathy Testa
Container Crazy CT

Broad Brook, CT

You may find me also on http://www.WorkshopsCT.com and http://www.ContainerGardensCT.com

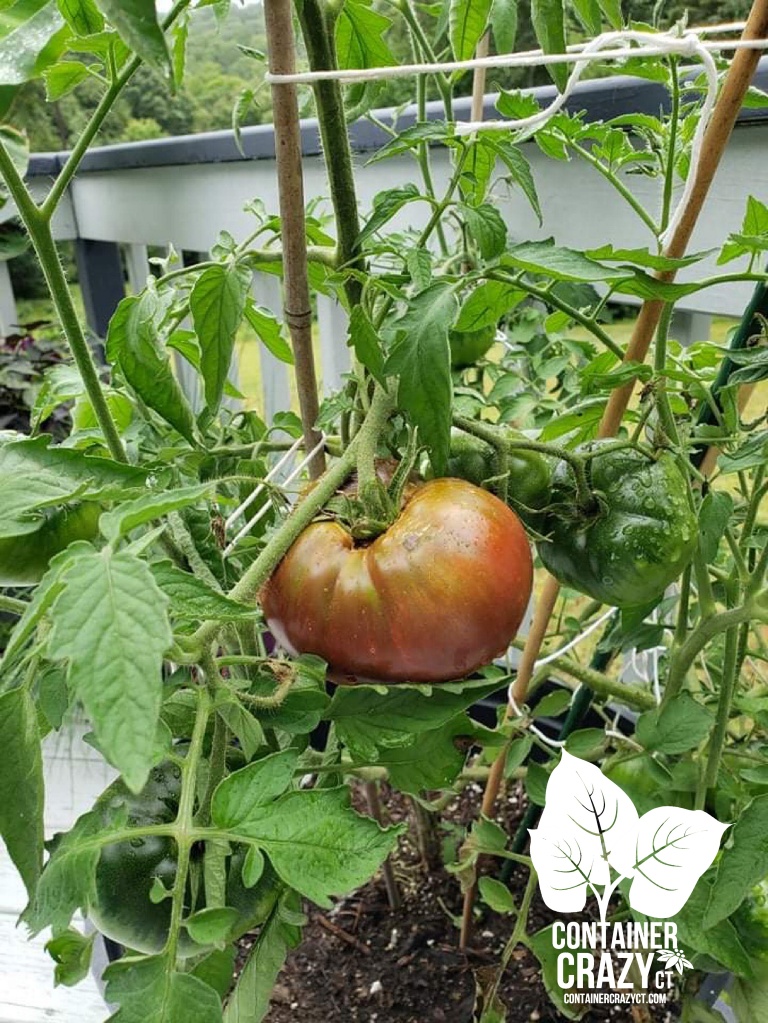
Photo of a Beautiful Goldie Heirloom Tomato on the plant
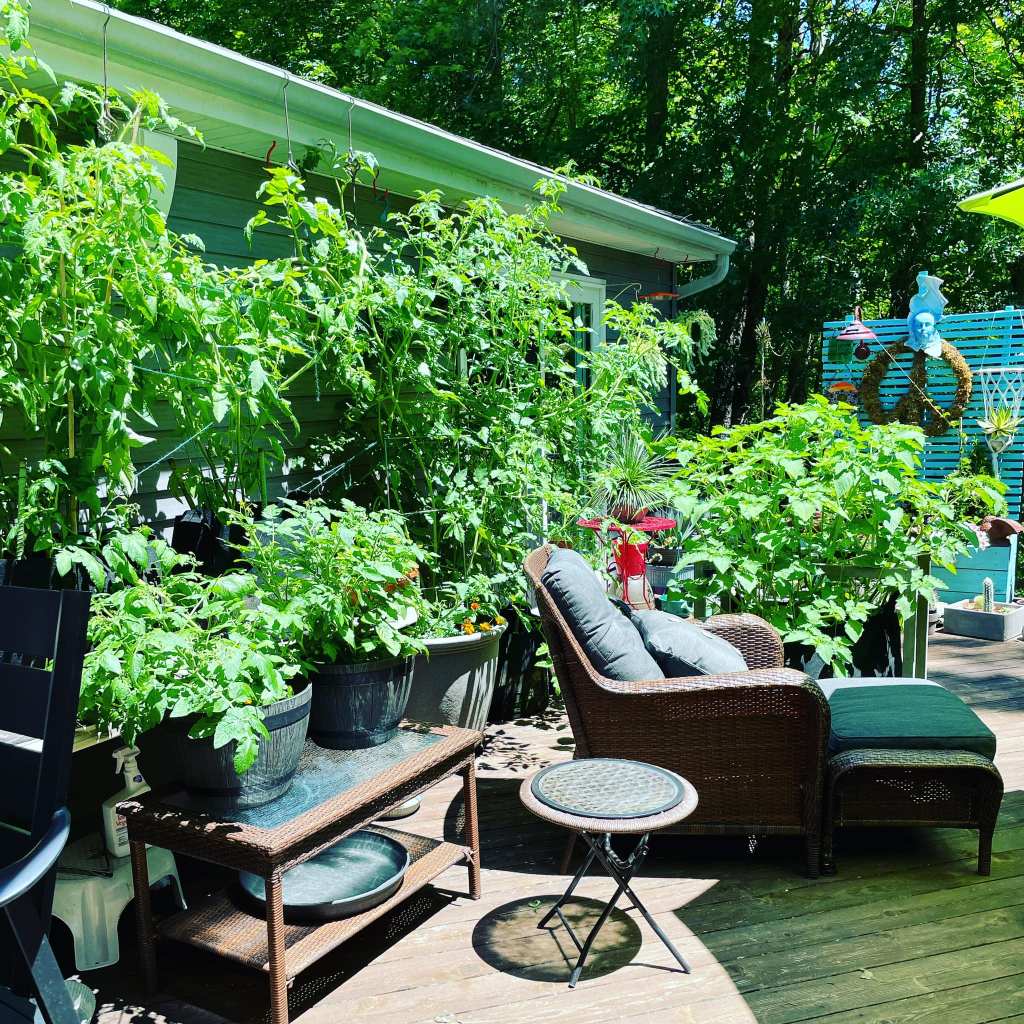
Next photo is of Cathy T’s deck with tomatoes growing in fabric grow bags. It looks like a big jungle of green and it is a great backdrop to a cozy chair where you may sit and watch the squirrels try to outsmart you!

Growing Your Own Tomatoes and How to Start

Leave a comment

Growing your own tomatoes is one of the most rewarding things you can do if you love the flavor of fresh tomatoes. Each bite brings joy – seriously.

But where do you start?

Well, probably the first things are you need the seeds, and of course the growing supplies, but you also need to have an understanding of timing – when to start your seeds so they are ready in time for planting outdoors after frost periods in spring – so for us in CT, to make it simple, outside safe planting is late May (usually Memorial Day). Note: Areas of CT have different scenarios but in general, Memorial Day is usually when it is warm enough and induces great starts of your tomato plants.

I was trying to think of when I started my own journey of growing tomato plants from seed. I think it was spurred when I saw seed packets with artful packaging that I decided to buy some of those packets and get started studying and researching on the steps involved to grow them. I did lots of reaching online, got books, you name it.

I don’t think learning all the aspects of seed growing is necessarily difficult, but it does take some time to learn all the nuisances around seed growing. Like, for example, if you start sowing indoors too early, you will have plants too big and realize you can’t move them outside yet because it is too cold in early spring, then you are struggling with how to care for them inside. If you start too late, your plants may not produce tomatoes in time during the summer and you would be disappointed.

If you search this blog site, you can find more details about my process. Here are some links below.

Note: February is a good time to plan, because some tomato seeds are started in March.

When To Sow Seeds: https://containercrazyct.com/2021/01/29/when-to-sow-seeds/

How Many Seeds Per Packet: https://containercrazyct.com/2021/01/26/how-many-seeds-per-packet/

Easy Seeds to Sow are Lettuce Seeds: https://containercrazyct.com/2021/02/18/easy-seeds-to-sow-are-lettuce-seeds/

Seeds Arrived on Time: https://containercrazyct.com/2021/01/20/seeds-arrived-on-time/

All You Need to Know About Starting Seeds: https://containercrazyct.com/2021/01/15/all-you-need-to-know-about-starting-seeds-indoors/

Planning Ahead is Required If you Wish to Grow from Seed: https://containercrazyct.com/2019/02/21/planning-ahead-is-required-if-you-want-to-start-plants-from-seeds/

Tomato Seedling Stages: https://containercrazyct.com/2021/02/15/tomato-seedling-stages/

I probably have more posts about seed growing on this site, just type the word “seeds” in the search bar, and they should pop up. Or you may want to type in the word tomatoes.

I do all of my growing of the starter plants (grown from seed) in large grow bags, large patio pots, etc. But we do want a “real garden” of the ground here someday, which will be a big job because it will need to be fenced in. We have a river behind our house, and it attracts lots of wild animals, etc. I love container gardening and have been very successful growing tomatoes in pots – they just should be large enough pots and watered and placed in sunny areas, and oh yah, have drainage!

This year 2023 – some things are changing:

I have decided I am not going to grow my tomato plants – for those of you who buy them from me – read that again, I am NOT going to grow them. It has to do with the fact that I have a trip planned right when it is the most important time to monitor the tomato starter plants. Someone said, hire someone. Well, not going to happen. LOL. First, I’m too small to hire anyone really. It would be too expensive, and second, my babies (the tomato starts) need ME. And I would probably stress about it and not enjoy my trip. Things like watering, inspecting, checking for any critters, opening the greenhouse doors on good days, rotating, all of that takes time and I usually visit my plants twice a day when I grow from seed at the time I’ll be traveling.

So anyhow, I was browsing some photos of my tomatoes (the fruit) from last season, which made my mouth water, and caused me to want to share the photos so you have an idea of the seed packets I have in stock at this time. Should you be interested in buying seed packets, you know where to find me (referring mostly to locals who buy my plants typically). If someone wanted a bunch of packets mailed, ask and I’ll let you know. I also will give you additional information, like planting tips and guides.

Say hello to Goldie.

I grew this one for the first-time last year (2022) and wow, wow, wow. Goldie heirlooms have amazing flavor. Some who bought plants from me said it was the BEST one ever. It is an heirloom. Sweet flavor, melt in your mouth flavor. Because a squirrel or two discovered my plants on my deck in my pots, I did pick some early and let them ripen on my kitchen counter and that was totally fine. They know when they are ripe and take bites! So, a lot of times, I started to just pick them before they were completely Golden.

You can see in this photo of me holding one, it is not completely golden color yet. Heirlooms are cool, they have the odd shapes, and they are tasty.

Note in the background of the photo above are Long Island Cheese Pumpkins – I grew those for the first time this year with the help of my cousin who put some plants in her community garden. Mine were in pots. It has a shape perfect for my Succulent Topped Pumpkin arrangements in the autumn season, but they are also grown to eat in pies and soups. They must be direct sown or started early.

I have seed packets available for both – the Goldies and the Pumpkins noted above.

Fox Cherry Tomatoes above – These I have been growing for a few years. They are bigger cherries, noted for being able to easily put on a skewer to grill. Also, a popular favorite by folks, plus cherry tomatoes grow easily and produce tons of fruit. For beginners, try cherry tomatoes.

In this above photo, you see the Fox Cherry tomatoes next to some of the Goldie heirloom tomatoes as I picked them. And also in this yellow bowl is a Cherokee Purple Tomato. Also, a wonderful heirloom and early producer. Purple-hued, very nice coloring and as yummy as the best of them.

In the background, you can see some of the Ground Cherries (papery husk) which I also grew on my deck in a huge grow bag, wow, those lasted into the fall. They are a snacking one for me. I was grabbing a handful and eating away as I walked away. Those have a very pineapple like flavor. A chipmunk discovered my ground cherries and I let him have a ball with that, as there were plenty on the plant. Ground cherries tasted like a non-guilty candy snack to me. Interesting flavor and sprawls out as it grows.

Green Zebra – This one no one seemed interested in. I can see why – tomatoes with green and yellow patterns, but to me that is the fun of growing – trying new varieties! Just like vacations, I like to adventure to new places and see new things – same with my tomatoes, I guess. This one has a tangy like flavor and I love mixing colors and flavors so it was very cool one to try.

Tiny Tim Tomato – These fits small pots easily and are grape-like sized fruit, but last year, they grew larger fruit at times. We had a drought type year, and my plants went nutso producing fruit on my Tiny Tim pots in patio pots that were probably 10-12″ in diameter. I put the pots on high back chairs, so the squirrels or chipmunk did not bother them. Look at the clusters on these plants! They were filled big time last season. This one says to start early too on the packet.

Paul Robeson Tomato – I will have to locate the photos of this one but I also have packets available of Paul Robeson tomato seeds, they have a beefsteak size with amazing flavor and the fruit resists cracking. The color is orange to purple.

Bumble Bee Mix Cherry Tomato – I also have seed packets for these and will find a photo later to post. They are striped with yellow, purple hues, orange. Same size as Fox Cherry. Prolific producers as well.

For more information on the seed packets, just email or text me (see numbers below).

Also, remember, February is getting ready and then March is starting to sow “some” varieties, others start later.

Going to the Flower Show in Hartford this year? It starts on 2/23/23 which is next week, Thursday. That’s also a good time to get seeds or information packets – sometimes they hand out little seed starting charts for free. There will be plenty of growing supplies there to check out as well. Have fun if you go!

Thank you for visiting.

Cathy Testa
Blogger, Plant Lover
860-977-9473
DMs on Facebook under handle of “Container Crazy CT”
Texts on number above.
Also, on Instagram under the handle of “Container Crazy CT”
Feel free to email me if you want – I’m old fashioned and still use emails! LOL.

See my other websites too:

www.WorkshopsCT.com
www.ContainerGardensCT.com

Hardening Off Tomatoes 2022

2 Comments

This week’s weather in my part of Connecticut is fantastic. My tomato babies will love the heat in the greenhouse from the sun and the breezes flowing thru the doors and vents. I am not, however, putting my tomato plants outdoors yet too much because it has been very breezy and windy. I use caution because I don’t want to dry out the delicate tomato start leaves.

This time of year is very busy for plant business people so I don’t really even have that much time to write this am, but as I sip my coffee no. 2, I wanted to post a quick hello and a pic or two. When the breezes subside, I will be rotating out my tomato starts in groupings this week to harden them off (acclimate). I try to avoid full sun and place them on trays where there is some shade from a nearby dawn redwood tree (a tree very useful because it looses its needles in the winter (thus, no shade is cast during winter on my greenhouse) but gets the needles growing now so it provides the shade I enjoy for my hardening off of the tomato plants.

If you put your tomato plants out in full sun immediately from your indoor growing environment, it will burn the leaves and white patches will appear on the leaves afterwards (usually you will see it the next day on the leaves). So I always do shade, part shade, part sun and luckily I have that available. I also use tables, shelves, and it becomes a little crowded, but in addition to focusing on hardening off the plants in non-full sun locations at first, I make sure things are spaced inside and out to allow air circulation around the plants. This helps prevent diseases on the leaves or other issues.

Some of my tomato starts are ready to be potted up and I usually do some to one gallon pots as needed. Others are still okay in their smaller pots, but if they start to lean, I know it is time to twine them to a small wooden stake.

Most of my plants are spoken for now, but I believe I still have some of the wonderful heirloom Cherokee Purples available. And Ground Cherries, those are still small and I’m not sure why, but I have faith they will perform when the time is right. This is the first year I am growing the Ground Cherries from seed. They are like hot pepper plants apparently, they really need heat to grow well from seed. I discovered the ground cherries last year, they taste like pineapple!

Ground Cherries from a site I visited last year in New Hampshire – inspired me to try them this year!

Well, this is all I can write for today, I have to get out there, get plants watered, out and then off to a site to prep for planting later this month. BTW, I wait to put my tropical plants and tomatoes/warm season vegetables in their permanent outdoor pots and or grow bags till Memorial Day. Hardening off is taking place now on good days with sun and not too windy or cool conditions. And I will rotate them out in groupings. Plus they still need to grow some. So happy about the great weather to do all!

Have a great day and week! Enjoy this weather!!

Cathy Testa
containercathy at gmail.com
860-977-9473
Broad Brook/East Windsor, CT
Zone 6b
Container Gardener
Plant Enthusiast
Nature Lover!

Seedlings and Transplanting

Leave a comment

I started to transplant seedlings from my seed tray into small pots yesterday. It was a very sunny warm day and a pleasant time to work on this, but it did take me half the day to complete, and I cut back on the amount of seeds I have sown as compared to last year.

Seedling Tray as of 4/11/22

Most instructions or reference books will indicate to transplant once the first true leaves have developed. Above is a photo of the stage at which I transplanted them yesterday. Usually, I wait a bit longer for those two top true leaves (above the cotyledons) to be a bit larger, but I had time to work on this and will be away from my greenhouse for the next few days. It will be sunny for a day or so and the temps will rise so putting them into bigger pots will help to reduce moisture loss or chances of soil dry out while I am not here to attend to moisture monitoring. (Tip: Water your seedling tray so the soil is moist before removing the seedling to transplant into a pot.)

Into Potting Mix

I used 5-6″ round pots and added fresh slightly pre-moistened potting mix (not seedling mix) and I used a clean golden knife to make a hole to insert the seedling into. I’m probably over cautious and handle all with care as to not damage the small seedlings. The golden knife was from a utensils set I received as a gift over 30 years ago – yes, as a wedding gift. The funny thing is I never really liked the gold color so I stored the set – and now they are used as gardening tools for me in the greenhouse. I can’t remember who gave that set to me. They would be surprised to know I’m using them this way today.

Seedling Size as of 4/11/22

I make a nice pocket to insert the seedling into the round pot. I do not fertilize at all at this point. The seedlings’ roots are still very fine and tender. I tend to not fertilize at all until a month later. Some recommendations will say to start fertilizing with half-strength with soluble plant food. I don’t do this at this stage. They will be able to stay in these pots for a 2-3 weeks, I think. I’ll keep you posted as I go along. It really depends on the amount of sunshine we get for growth results. (Tip: Remember, it still can snow in April – it did on 4/16/21).

On a table

I put some of them on a table set in the middle of my greenhouse and others on table racks. (Note: I do not recommend leaving on the glass like I did above, it is better to have air circulation below the pot as well as above, in my opinion. But sometimes I run out of space.) These are Cherokee Heirlooms above. Again, I usually wait till the seedlings are a bit larger but I had the time to do the work yesterday, so I got it started.

Fox Cherry Tomatoes

I also have quite a few Fox Cherry (yummy!!) tomatoes potted up (transplanted) as well. They are looking nice. I’m sure when we get more sunny weather, these will pop up rather quickly in growth. (Tip: If a seed shell is still stuck to the tip of a leaf, use a spray bottle to mist some water lightly on the seed, and it will remove easily.)

Liking the Look of My Foxes!

You can use seedling mix if you wanted to, but I tend to use potting mix at this stage. I handle them carefully, not pulling by the leaves but gently inserting the golden knife into the seedling tray cells and pushing up the root area as I remove them to put in the black pots. Sometimes I will bury the tomato plant just a little deeper. The stem has tiny hairs that turn into roots, but it is not necessary to do this (plant deeper) if you don’t want to. If your seedlings are leggy and stretchy however, this can be helpful.

Goldie Heirlooms

I sowed these for the first time last year, the Goldies! See photo below. We had too much rain last year when they were outside, but I am hopeful this year will be better for these babies. I am careful to not over water them right now, because they are so tiny and tender right now, I don’t want any rot to set in at the base of the stem. Good air circulation on hot days in the greenhouse is helpful. If the sun is out and the temps rise quickly, vent the doors, and turn on a light fan. It is important to not make the soil soaking wet, and checking them often. At least I do.

Last year’s Goldie!

Well, just a short post for today. We are getting rain all morning, up to 1 pm, then will be sun this afternoon, some of tomorrow will be sunny too. Bring on that sunshine. My new little tomato starts need them.

Remember, if you are local and interested in some of my tomato starter plants in mid-May, get on my list. I am not growing as many as last year, due to trying to conserve expenses (pots, soil, etc).

Thanks,

Cathy Testa
Zone 6b, CT
Broad Brook/East Windsor, CT
containercathy at gmail.com
860-977-9473
www.WorkshopsCT.com (products)
www.ContainerGardensCT.com (container designer)
http://www.ContainerCrazyCT.com (blog)

Cherokee on a Plant in 2021

Growing Tomatoes Sucks

3 Comments

Ha! Ha! April Fools!

Growing tomatoes definitely does NOT suck. It is one of the most rewarding aspects of summer container gardening!

I’m in the early stages of seed sowing this year, and here are some photos to share with basic tips, with all kidding aside! 🙂

Pre-Moisten

Tip No. 1 – Pre-moisten the seedling mix

I use a clear bowl and pour a small bag of “seedling” mix into it and then add water from my watering can. Using a clean and sterilized small scoop or utensil, gently stir the mix. It is best if you are able to do this a night before to allow the mix to absorb moisture, but a few hours before is fine as well, but this step is crucial. Allow that mix to take up a bit of moisture so it won’t float out of your seed tray and also the mix sometimes needs to rehydrate before use.

Close Up of the Seedling Mix in a Tray
Make a little hole

Tip No. 2 – Use a clean tool to make a tiny hole

Sometimes I have used a bamboo skewer, or you may just use your hands, I guess, but I prefer to make a tiny hole with a tool and then drop the seed into the hole with tweezers. You have the option of one seed per cell or a few seeds (and separate them later), but I tend to do one per cell in most cases. Again, make sure the tool you use is clean and I avoid reusing them unless they are easily cleaned. What I mean is after one tray, I may toss out that little plastic straw I used or put it in a recycle bin for use other than seed sowing. Be careful not to transmit things from tools. I’m referring to sowing tomato seeds in this post (and some of the hot pepper seeds).

Tip No. 3 – Seeds In Hand

Pour some seed into your hand or a paper cup as you work to drop them into the seedling mix – guess this is not really a tip but I have a good pic of me with some tomato seeds in my hand. Make sure if your hands happen to be wet to not to put an unsown seed back into your seedling packet because you will transfer some moisture from your hand to the seed to the packet. If you don’t use all of the seeds in your seed packet, store the packet in a cool, dark, dry place away from hot sun, temp flux’s, or moisture or damp conditions. And know how long seeds last for whatever you are sowing. Some seeds last 25 years, others last 2 years.

Seeds in Hands
On Seedling Heat Mats and Under Grow Lights

Tip No. 4 – Use a Grow Light

This is the first year I am using a high output energy efficient high bay fixture grow lamp. My trays are in my greenhouse BUT we get lots of cloudy days when I start to sow seeds in my area of Connecticut (usually starting in March thru May). On the cloudy days, I’ve been turning on the light. It hangs over the trays with a pendant chain which I am able to lower and rise the position of the lamp fixture by taking the chain and an S-hook to adjust it. I do not have it on a timer, I turn it on in the mornings on cloudy days, and turn it off by dinner time. It is only needed when the seeds germinate and are showing above the soil. This is a fluorescent lamp style. Tip is to watch it carefully as the seedlings grow so you do not burn the foliage as they grow higher.

Covers – Natural Sun was Hitting them in this photo one morning

Tip No. 5: Use clear covers to help maintain moisture of the seedling mix until they germinate is very much recommended, however, I tend to not do that – because I work from home, I check the trays every day at least twice a day. I look to see if some cells have dry soil (lighter in color, touch top to feel moisture if need be), while others are still are moist. I literally will carefully water only the ones that are dry, so because I am home and a plant addict, I check them often. If I was not home all day, I would be concerned about them getting too dry and go with the clear dome covers instead to help retain moisture during the phase of waiting for the seeds to germinate.

Tip. No. 6 – All same type of seeds in a tray

I made one minor error, I put tomato seeds in the same big tray in several rows and in the same tray, some hot pepper seeds in adjacent rows. Pepper seeds take a lot longer to germinate (3 weeks) because they really like very warm soil and air temperatures, while the tomato seeds germinated in five days! So now I am like, ah, I have to put the tomato side under the light. Next time, I will avoid that scenario. They only need the light when they rise above the soil. Hopefully this is making sense, LOL.

Other General Tips for Sowing Stages:

Don’t sow too early. Don’t sow too late. Know the timing. I’ve discussed in prior posts.
Visit trays twice a day to monitor watering, as noted above unless using dome covers.
Take photos, its fun and it allows you to see adjustment ideas for the next season.
Label seed packets with a Sharpie marker if seeds are still in the packet (I put a dot on the back if I used only some of the seed and a check mark on the back if all seeds were used.)
Record the date sown on the plant label and on a wall calendar or notebook. When the planting season arrives, you will get too busy. Taking notes is important.
Remember that in mid-May (for CT zones), you have to harden off the seedlings outdoors for a while before you actually plant them in patio pots, grow bags, raised gardens, etc.
Watch the weather forecasts.
Target your weeks before based on the expected last spring frost in May (usually mid-May).
Target your planting time when safe to plant outside (usually around Memorial Day, usually).

Types of Lights

I did minimal research on lights to be honest. There are several types of artificial lights for the greenhouse world. You do not need lights when the sun is shining in a greehouse for seedlings of this type, and the heat rises in a greenhouse quickly on sunny days, so you may need the alternate – a fan, or small gentle fan for your trays. Using a light should help the strength of my seedlings this year. As I’ve noted above, for many years, I did not use grow lights at all and I was successful. There are incandescent lights, high intensity discharge lights, fluorescent lights (the type I got), and light emitting diode (LED). All of these I will research when I have time I guess! LOL. Some are more expensive than others and some are hotter than others. Note: Some fluorescent fixtures are not good enough for other types of plants, but they work for seedlings with the right T strength. It is too complicated for me to go into and I’m still just learning about them so not much more I can offer on that for now, but if you do get lights, be sure you consider the placement, how you will adjust the height of them or the trays below. I read someone said they use books to raise the trays, rather than lower the light fixture but I also have a heat mat below. And I don’t want to bring books that may get wet into my greenhouse and keep dampness below the trays. Yes, I’m an*al that way – I over think it. Do research on the lights first if you have never used them, there are lots of neat setups now for indoor home growers. I just read of one that is a small shelving system perfect for apartments with lights already installed, etc. Many options out there.

My Tomato Jungle Last Year (2021)

And tomatoes do not s*ck – I was just kidding – it was a joke. Don’t slap me. Sorry, couldn’t help it.

Have a GREAT weekend!

Cathy Testa
860-977-9473
Container Garden Enthusiast
Zone 6b
Connecticut
Dated: 4/1/2022 April Fool’s Day

Will We Be Short on Potting Mixes again This Year?

Leave a comment
Cathy Testa of Container (Garden) Crazy CT (Photo in my greenhouse by JMS Art & Photo)

Potting Mix is probably one of the most important aspects of success for growing healthy plants in patio pots. It must be a quality product. If the bag of soilless mix is damaged, not a good brand, or these days, possibly unavailable, you are in trouble.

Every single product or tool we use to grow plants (pots, trays, fertilizer, seeds, soilless mixes and specialty media, labels, etc.) has increased in prices and there are continued delays in the supply chain. This will affect all of us this year again potentially, however, it won’t stop us (because we love plants, or course! But I see it coming and if you haven’t noticed these issues, you will.)

I usually don’t make my own potting mixes for my container gardens, seedlings, or starter plants, but this year, I am highly considering it. In fact, I just read an article here, where they share a downloadable PDF file of how to make your own potting mixes. BTW, I trust sources from universities or extension services the most. By making your own mix, you are in complete control of each component. I’m guessing it may be cheaper but I am not sure until I compare apples to apples, so to speak. However, there is such an ease with opening a reliable trusted brand of professional potting mixes, if they are available and fresh.

Photo in Cathy T’s Greenhouse – Yes, that’s my hand in the mix!

Traditional pre-made potting mixes contain perlite and/or vermiculite, and peat. Good mixes are light-weight, have good water holding capacity, and mixes vary based on the specific growing needs (seeds, transplanting, bedding plants, plugs, potting up, etc.). Some mixes will have things like beneficial mycorrhizal (or biofungicides to prevent root diseases). Some will contain alternatives to peat, such as coir. Some have organic fertilizer added, and some don’t. Some mixes are pH adjusted and contain starter nutrients. This list goes on and on, and it all sounds wonderful, doesn’t it? That is if you can find it and trust it.

Photo from Cathy T’s Greenhouse

After using various bagged potting and soilless container mixes for ten years, I am able to tell when a mix is healthy the minute I opened the bag. I’ve talked about what to look out for when you buy potting mix for your container gardens, patio pots, and planters here on my blog. I still need to update that article I wrote, called “The 5 Must-Do’s for Successful Container Gardening” which I wrote a long time ago and did a brief update to it in 2019. But it still needs lots of work. Potting mixes is a big topic. I just haven’t had the time to really dive into a more extensive version of that article.

Now here we are in 2022. And I’m frustrated with the potting mix scene. I’m not alone. Lots of plant related Facebook groups have questions on potting mixes. People are frustrated because they get issues in or from the mixes (i.e., fungus gnats), and they just want good results, and so do I. They fear using the wrong type or brand, and even I have from time to time. Why? Because lately some results from “some” mixes let me down, and now with supply-chain issues, I wonder how this will impact availability and quality of mixes in 2022.

Pouring Potting Mix into a Bubble Bowl Terrarium – Cathy Testa of Container Crazy CT

Potting mixes are like a good foundation to building a house. And we all know what happened when one ingredient in concrete for home foundations became a huge issue, where houses had to be lifted and new foundation poured because house foundations were cracking and deteriorating. Well, I kind of feel this way about potting mixes. Potting mixes are the foundation to starting seeds, potting up your indoor houseplants, and building up soil mixes in your outdoor container gardens and patio pots, along with other components as needed. If one thing is wrong with them, it may lead to issues (e.g., poor drainage, insects harboring, or no moisture holding capacity). And there are many sources of potting mix brands out in the market, and it is growing, as defined in this link based on recent market analysis. The affects of COVID have impacted production and demand. It makes me wonder, what will roll out of those long awaited semi-loaded trucks, when they do arrive.

Castor Bean Seed Coming Up in Healthy Mix

For years, I had no issues acquiring the potting soilless mixes I needed, but the past couple years, eh, I’ve encountered some issues. And this year, because of all the things still impacting our supply chains overall, well, there are now potential issues with availability. This is my prediction, but we will see. I did receive a comment that orders were all back ordered a few months ago but the bottom line is lately we just can not predict what will happen next. So, my overall thought is, will potting mixes be in short-supply this year? And how will you or I manage that if so? What adjustments will need to be made? And also, remember, being flexible in the growing scene is key. I struggle with this because I want to be in control, but I’ve learned over the years, you must be flexible and strong! LOL. Because growing plants is a science and an art, and a bit of a guessing game sometimes too.

Cathy Testa
Container Gardening
containercathy at gmail.com
Zone 6b

These Tassel like Flowers will Hang to the Ground and Last for Weeks in Container Gardens

Leave a comment

I have tons of gardening and plant reference books in my home office on tropical plants, succulents, landscape designs, perennials, woody trees and shrubs, vegetables, herbs, fruits, container gardening, and more plant related topics, but I do not have many reference books specifically about annual flowering plants (such as sunflowers, zinnias, or marigolds). I guess that is because my passion with plants started with mostly large showy tropical plants, and annual flowers have always been somewhat of a staple plant to me in Connecticut, thus they are not typically the unusual types of plants I enjoy. I use annuals rarely and only when I want that pop of color in a container combination in the summer. I find annual flowers typically look tired towards the end of summer because they are fast growers and push out lots of flowers, exhausting lots of plant energy, whereas tropical plants and their flowers last well into the autumn season here in Connecticut.

However, I discovered upon researching amaranth annual flowers (herbaceous ornamentals or a short-lived perennial in some climates), a particular species caught my eye last year in a seed catalogue. What I read in one of my books is that they are plants from the “tropics” of the Far East (per the one book I have on annuals, which is an old book!). The book indicates they are “brilliant, heavy-looking plants, reaching 3 to 5 feet tall” and grow in rich or poor soils. Another website indicates they are native to India, Africa, and Peru. In some ways, they are similar to the tropical flowering plants I already enjoy; plants from warmer regions. This is why I picked them as a candidate to sow from seed last year, plus the species I selected is a variety that grows much taller than normal, very tall, reaching 48″ tall. This would be perfect as a specimen plant with my other large showy tropical plants such as canna lilies, elephant ears, castor bean plants, or banana plants in my container gardens and patio pots.

Container Gardens by Cathy Testa of Container Crazy CT – Featuring Amaranthus caudatus

Coral Fountain Amaranth (Amaranthus caudatus)
Love-Lies-Bleeding, Amaranth, or Tassel Flower

Of all the common names or flower descriptions of this plant, I guess tassel flower represents the flower form the best in my opinion of this species I selected. The plant’s large plumes (technically called inflorescences) dangle down in clusters of coral colored tassels as if they are fastened at the top of tall stalks. The flowers are fuzzy, clumpy, and resemble dreadlocks (another great word to describe their form and appearance!) They are chunky and petal-less. They resemble fountains or waterfalls in form, and may be used in wedding bouquets, as cut flowers in vases (long-lasting), and in container gardens where you wish to present a dramatic unexpected showy element. The foliage is not very large, and are a lime green lighter color on this type of amaranth, and I read the leaves are edible, but I did not experiment with that aspect, yet. After admiring the interesting aspects of this flowering annual with cool attributes, I decided to sow some seeds last year and give them a try.

Coral Fountain Amaranth – Cascading Plumes

When to Sow the Seeds

The seeds should be started indoors either at the end of March of middle of April based on our weeks before our typical spring frost timing in Connecticut (or use the appropriate 4-6 weeks before your last frost of your planting area). You may also direct sow these seeds in the ground after the threat of frost has passed (frost threat ends mid-May usually in Connecticut – check your weather and seed sowing charts). The seeds take 75 days (or about 2.5 months) from the time you transplant them to produce flowers. Starting them earlier will give you more time to enjoy the flowers which last well into the end of summer. The seeds are tiny and the packet has up to 250 seeds. That’s a lot of amaranth sowing, so use caution when sowing to not over do it.

Seeds Sown in a Flat Tray

Some Sowing Problems I Experienced

However, I experienced some problems when I sowed them. I did a whole flat tray of them, and they seemed to not be really pushing growth a while after germinating, so I painstakingly put them in 2″ round mini pots one by one and thought I’d wait to see if that would help. It did, but one day I left the tray of the mini pots outside by my greenhouse and a rain gutter above rushed water down on them during a rain fall that day – pretty much destroying them all. All the tiny seedlings got stressed and the potting soil completed washed out. My bad – I’ll remember there is a gutter above problem next time, but I did manage to salvage a few seedlings and decided to put them in planters later when they were large enough to transplant after all chances of frost. I think the reason they may have been slow to grow from seed initially is because seeds germinate best at 75-80 degrees F and they need a night temperature of at least 65 degrees F after transplanting. Maybe my night temps at the time in my greenhouse were not warm enough but I am not sure.

ACK! Rain gutters heavy downpour washed out all the soil

Exposure Full Sun or Some Shade

One of the containers I planted them in is a rather large round black container in my back yard (probably at least 3 feet in diameter and about 4 feet tall). I put canna lily plants, elephant ears plants, and some of the amaranth transplants I managed to salvage in it. The seed packet indicated the plants like dry, hot conditions in full sun but will grow in partially shaded areas. The large black round pot is on the east side and gets shade part of the day. The packet also indicates the plants are drought tolerant (and may get root rot in poorly drained soils where is stays wet in the ground all the time, which was not a concern for me since I do all in patio pots and container gardens with sufficient drain holes). A drought tolerant plant is beneficial for container gardening, however, as you don’t have to worry about dragging the watering hose or watering can out there too often in the summer to water it. They are very easy to grow and tolerate poor conditions once the plants start to grow and get established, in fact, you may want to use caution with not overwatering it once it is doing well. Wet soils for this plant may lead to root rot per various sources.

An Insect was visiting some of the foliage

Use Large Pot Sizes and Sturdy Stakes

Because this species of amaranth grows very large and tall, place this plant in an area where you enjoy witnessing them cascading at the corners or edges of your patio pots. Consider taller upright planters because of how the plumes will descend down in big chunks towards the ground level. You want to be able to enjoy how they flow downwards like a waterfall without them hitting the ground. Fortunately, that was the case of my big round black pot in the backyard. As I started to see them progress, I thought about the wild and unusual form being a real show stopper if they were staggered in huge garden. The plums grow so long and become top heavy thus a good support stake is recommended when they start growing flowers. I used thinner bamboo poles which would be hidden against the stalks in the pot. The weight of the flower plumes becomes substantial as they start to grow well and large into the summer months.

Castor Bean Plant Bottom Right with Darker Foliage
Coral Fountain Amaranth (bottom) near the dark foliage of an Alocasia (above)

Companions with Darker Foliage

Consider pairing it up with plants with darker foliage and use tall plants too. The color of this amaranth’s leaves are a light lime green with an oval shape, and the flowers are a light coral color. It will show up more against a darker foliage plant, like a canna lily with plum colored foliage or a castor bean plant with the darker foliage. And consider pairing them up with other plants which are mid summer bloomers so you will get a mix of bloom colors for the look you wish to achieve in your patio pot or container gardens. I noticed hot pinks looked great with them too for contrast. Think hot pink canna lilies.

In a Vase at Cathy T’s

Used in Floral Arrangements for Weddings

I started to create a board on Pinterest last season to show what the flowers would look like, but this board is of other photos of various Amaranth plants. I discovered quite a few photos where the flowers are used in wedding bouquets and arrangements, but the only consideration I had on that is when the flowers reach maturity, they tend to drop tons of tiny little seeds. When I placed some in vases last year, it dropped lots of seeds on my outdoor patio table. I wondered how they work with those as cut flowers for floral arranging to avoid that problem (the potential mess it makes), and realized that would take some more research. I now realize you would have to harvest the flower tassels before they mature to avoid the abundant seeds in them later. The flowers plumes bloom from July to frost, and mine were full with flower plumes towards the end of the summer here in Connecticut. If you wanted to grow some for a wedding, you would want the wedding to be a summer wedding and again, harvest them before maturity so you don’t get a situation of tiny black pepper sized looking seeds falling down your wedding aisle runner. The plumes also look great in tall vases and provide a rather exotic interesting vibe in outdoor spaces. They may be used as fresh flowers or in dried flower arrangements. In fact, I saw some in a floral shop this winter and I kicked myself for not saving the plumes of my own last summer.

Bees Loved – Many Visited!

Food for You or Pollinators

Some reference books indicate they are favored by bees and that is true, I did see lots of bees visiting the tassels of its petal less flowers and took photos, and at times I would witness a bird perch on the tall thick stalks. Additionally, there is some information about how parts of the plant are edible and seeds may be used in porridge. I didn’t really look into that much however. Maybe this year when I grow them again, I will do so. The seed packet indicates amaranth are one of the most nutritious of the ancient grains. This turned out to be a stunning plant, which friends and family noticed, when they visited. I had one by my entrance stairs, and one day, my brother shouted out as he was leaving, “That plant is cool!”

Amaranthus definitely have a cool vibe!

Cathy Testa
Container Garden Designer
Broad Brook, Connecticut
Zone 6b
860-977-9473
containercathy at gmail.com
See also:
http://www.WorkshopsCT.com
http://www.ContainerGardensCT.com

By My Stairs – the planting my Brother noticed one day!
Great Plant for our Important Bee Pollinators