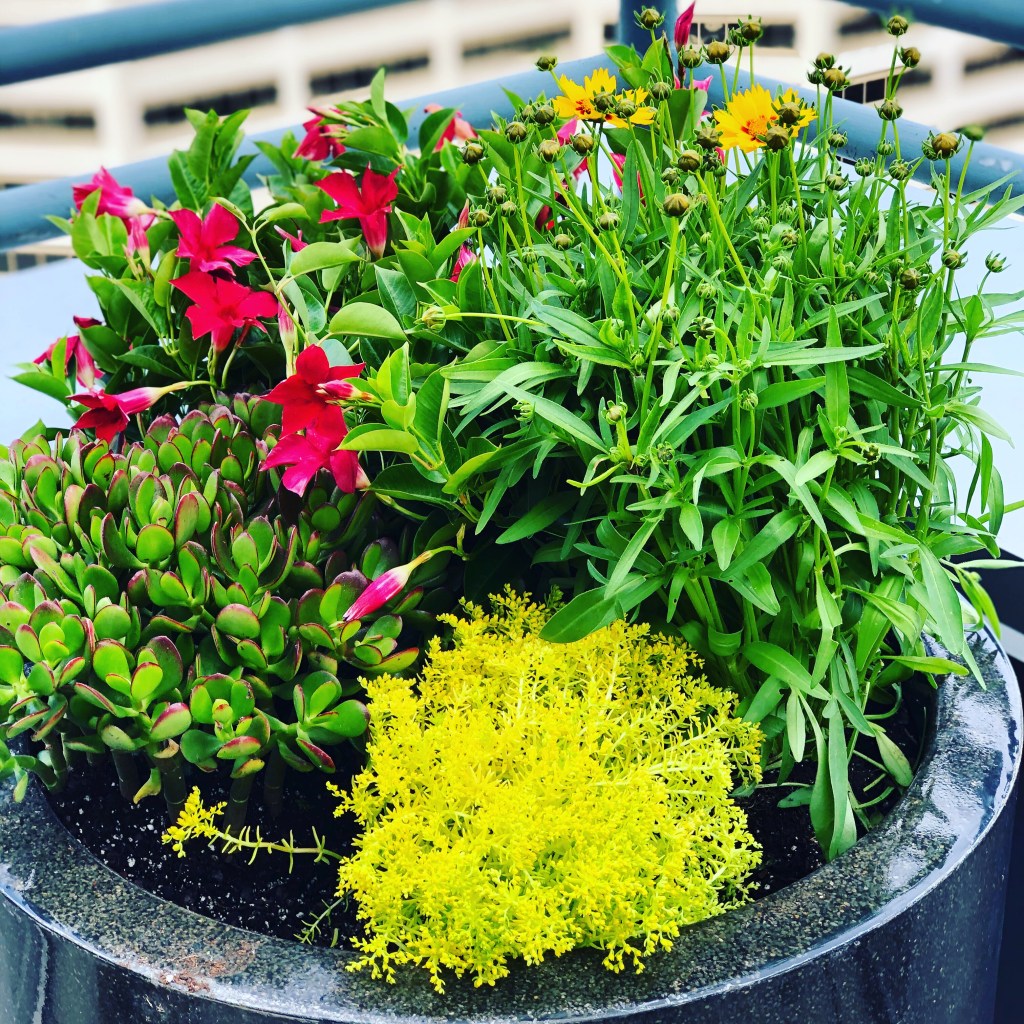
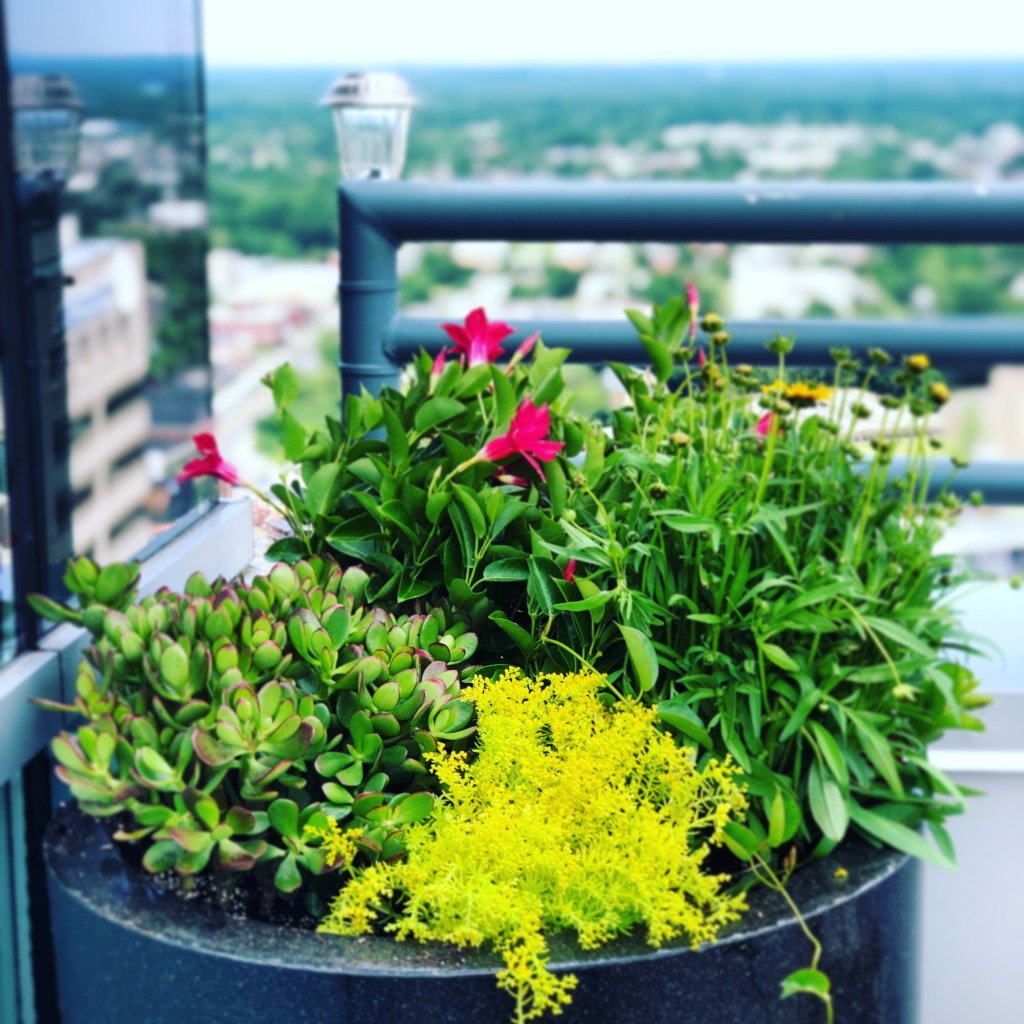
These are photos of vivid reds and yellow blooms in large patio pots showcased on a high-rise balcony. As you can see, the yellows and reds of the flowers on these plants stand out. They are also very drought tolerant. And full sun lovers.
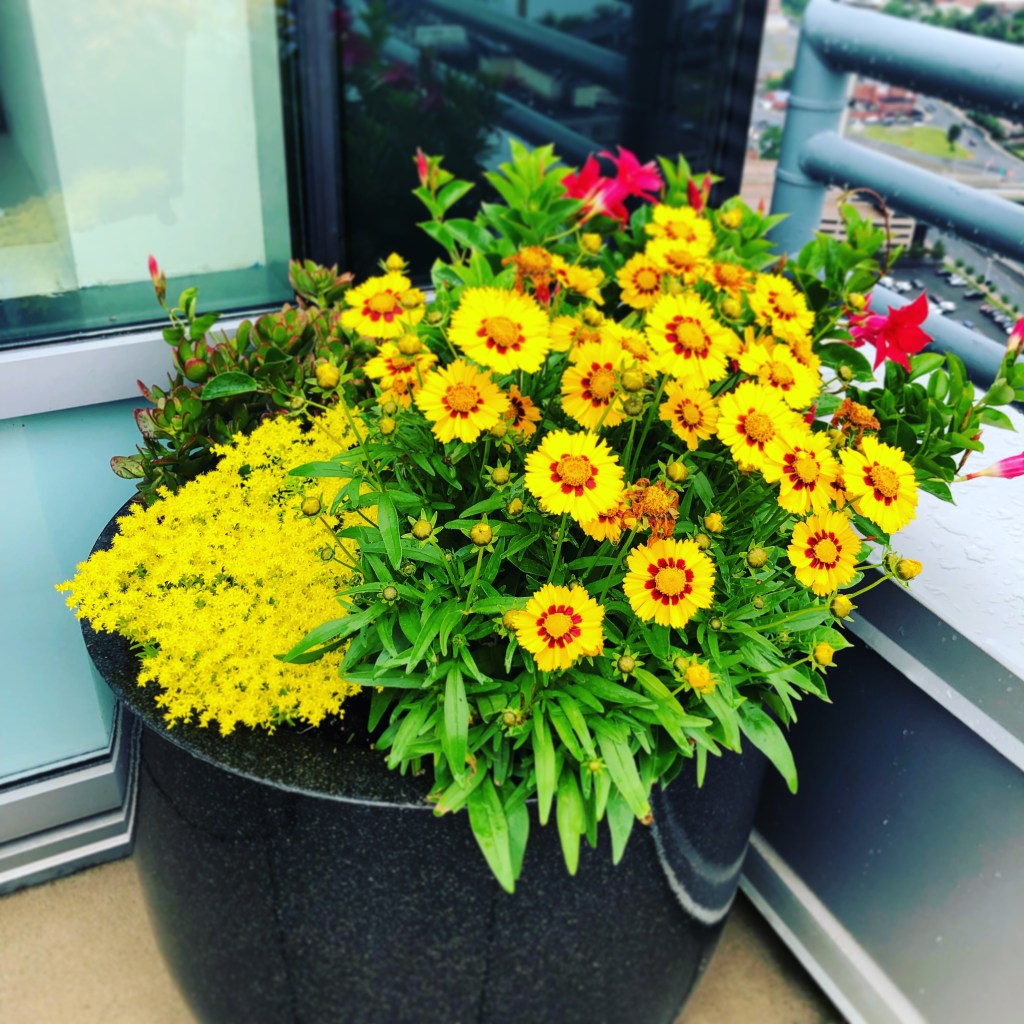
I planted this combination on a high-rise balcony many years ago. The conditions up there were brutal in the summers at times. It was very sunny and hot for the first half of the day. The second part of the day was shaded due to the height of the building’s walls and the sun’s movement. But it also was extremely windy at times, and as hot as a very hot beach summer day. Notice in the next photo how much the blooms opened up.
The pots shown here were quite large. Plenty of quality potting soil was used. Some soil moist was added to help manage moisture levels. I also added slow-release fertilizer into the soil. But it was key to find plants which would survive the high-rise conditions. They must get water too. It was imperative to find plants with strong abilities to survive in the sun, wind, and heat. These plants did this well. These also did not need lots of clean up. The faded flowers of the Coreopsis are easy clipped off (deadheaded) if needed. All the other plants held onto the flowers in this combination.
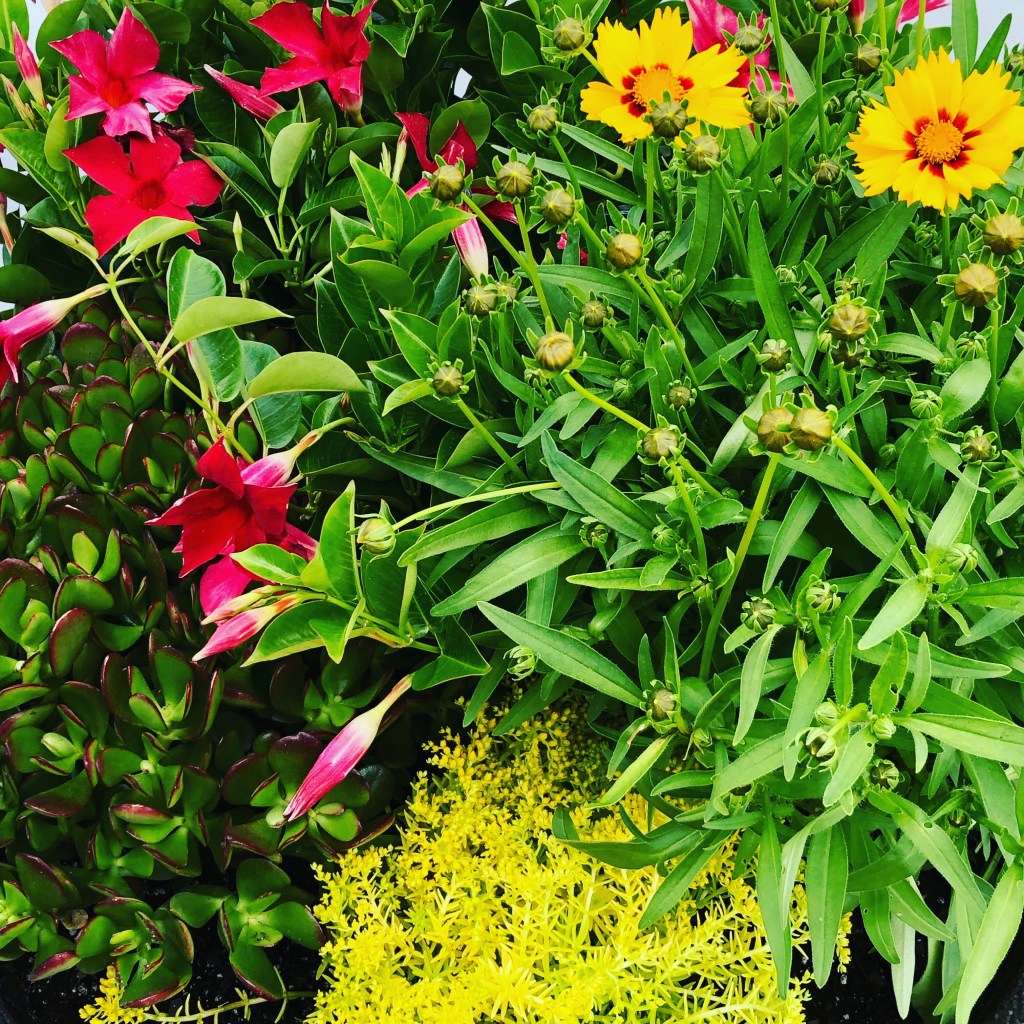
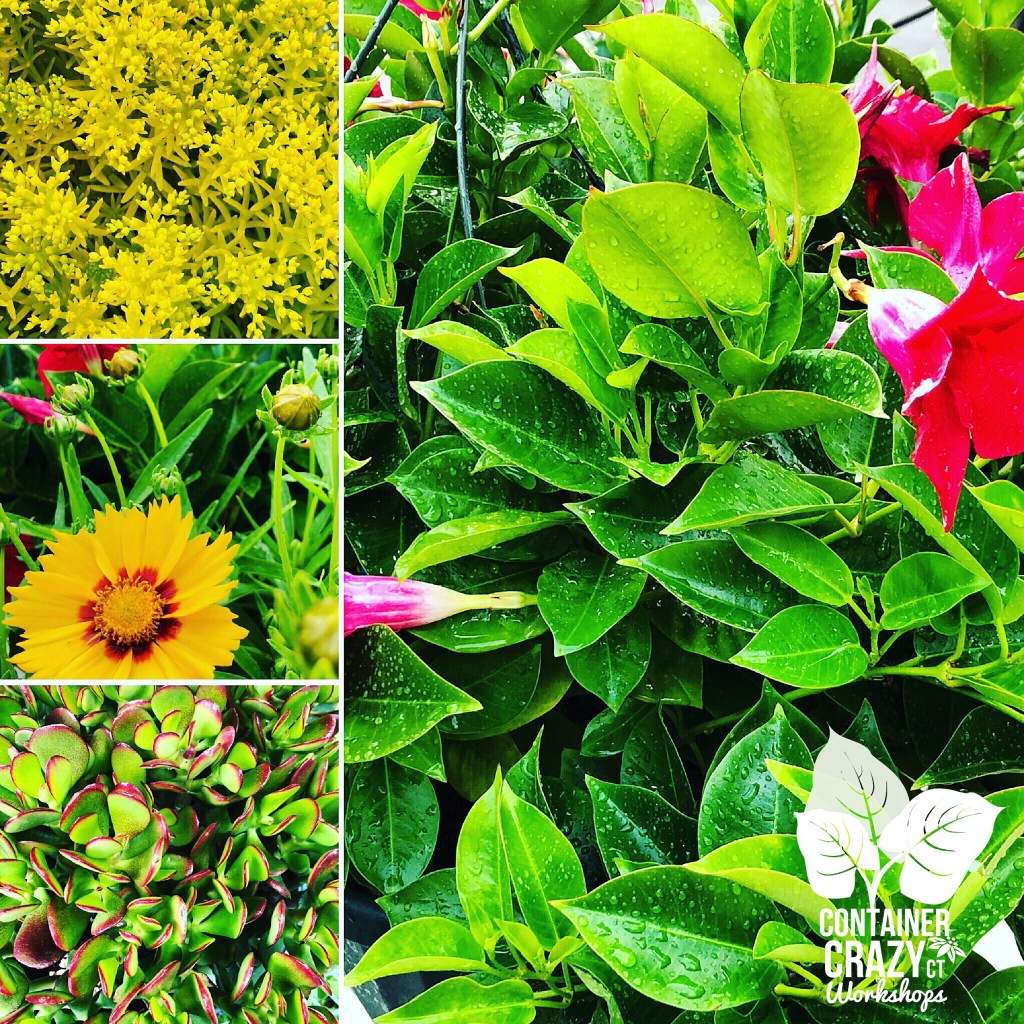
As the summer progressed, the plants became full and offered super bright colors seen from afar. This was good. The view from the balcony owners’ large living room allowed them to see the reds and yellows. I also focus on different textures too. You can see the fine texture of the yellow Sedum. The larger oval leaves of the red edged Jade plant are also visible. Yes, a Jade (as in a houseplant). I never overlooked using houseplant candidates as well as perennials and tropical plants. Just like in a garden, textures add the drama and flow needed to please the admiring eye. I often held up plants next to each other. I did this to look them over and see if they seemed to work together. I was just like that with my eyes. I would figure out if they played well together visually. I also needed to know the plants’ overall habits and culture needs.
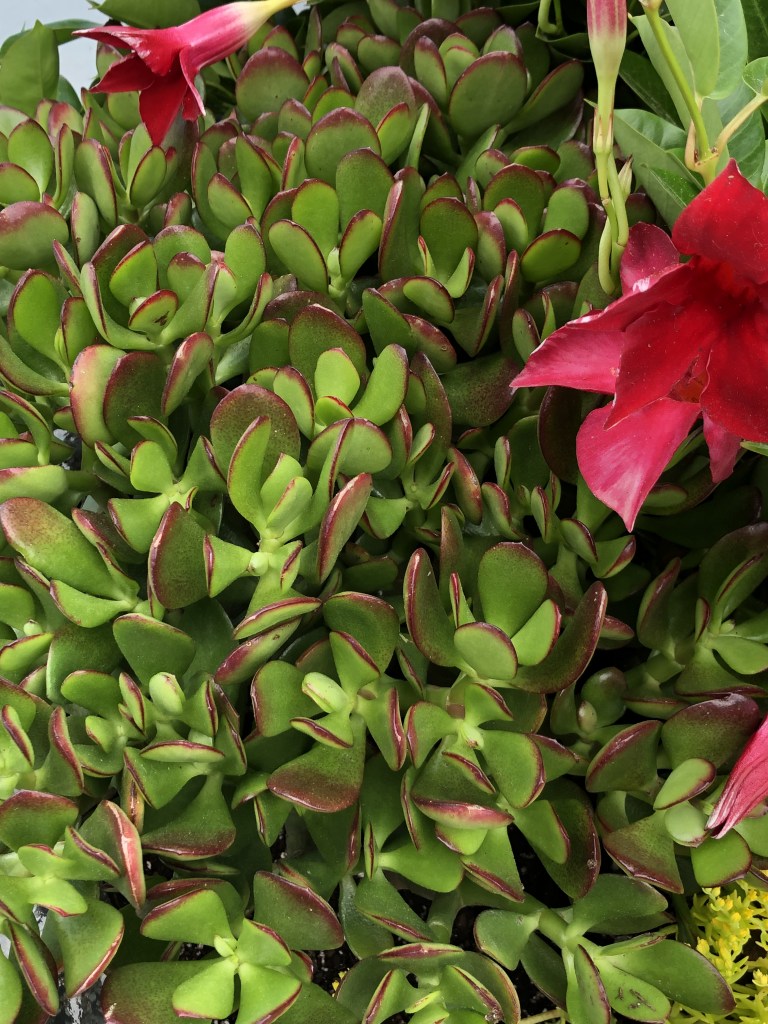
This is a Jade. It was a rather large plant. I loved the red edges. The red color only intensified in the patio pots with the full sun conditions. There was lots of warmth and heat on sunny days. These were able to withstand drought like conditions. I always emphasized that the owners should water every day. Plants need water. The soils dry out rather quickly up there on the top of a building in the city. And the owners were fantastic. They did water the plants as often as possible. They got an A+ on that as it wasn’t always easy, there were no faucets or hoses outside. All water was carried from the inside to the outside in buckets! When it rained, that was a bonus.
The yellow plant in the front is a Sedum. It is called, Lemon Ball Stonecrop Sedum. A perennial. Talk about an intensely bright yellow! Really pops. It was perfect for the front of the patio pot, tucked in nicely. That plant in this combination was a little more delicate. But, its vivid yellow was unbeatable.
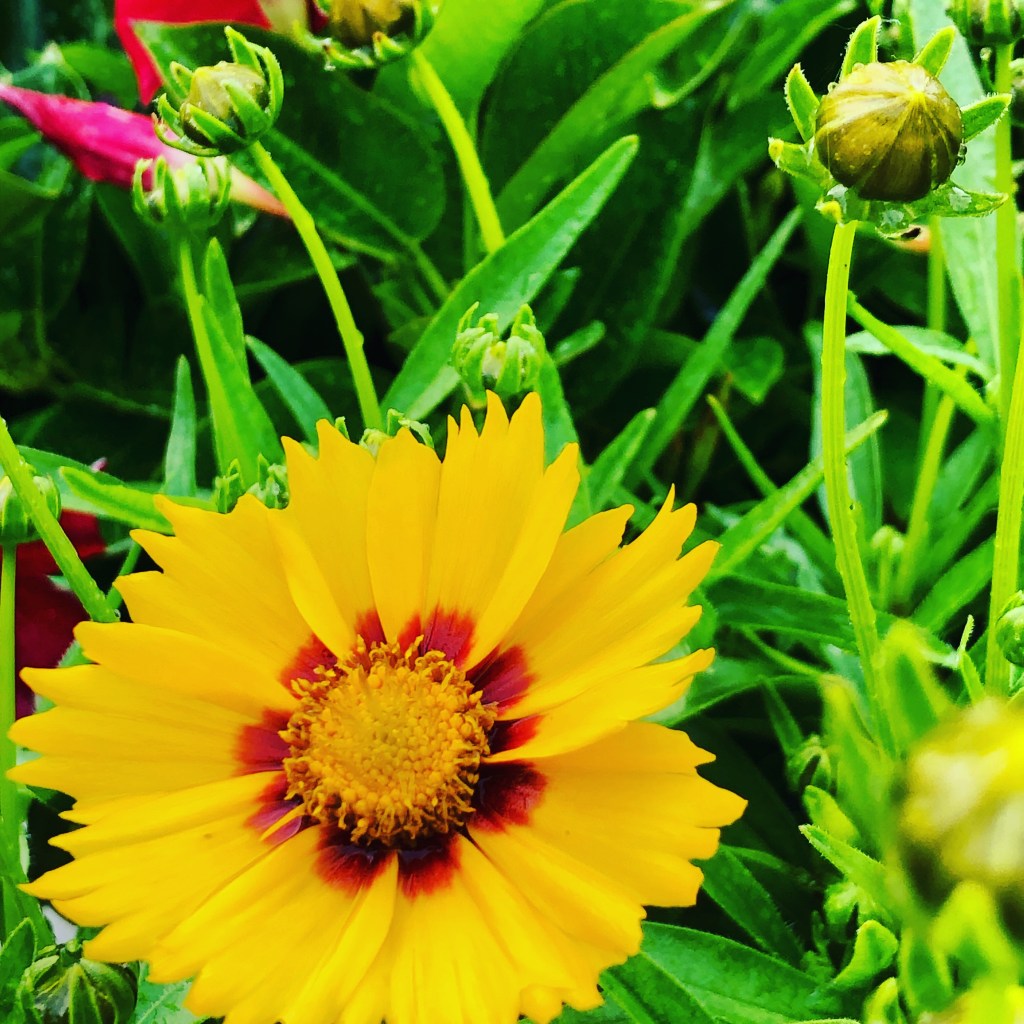
And a must on everyone’s list is flowers which bloom most of the summer. I added these Coreopsis because of their beautiful yellow coloring with red centers. They also handled the drought conditions quite well. This one is called, ‘Baby Seed’ Tickseed Coreopsis. These are butterfly magnets and work well in rock gardens too. It was always a treat to see a bee or two. I enjoyed seeing a bee come by up there when I put flowers into the customer’s containers. Way up there. I think it was 26 floors high, or was it 28? I can’t remember, but it was up high. If you couldn’t handle heights, you would not be capable of work up there on their open balcony. It didn’t bother me to look over the railing to the city streets below. It was a unique planting experience and a great learning one too due to the high-rise location.
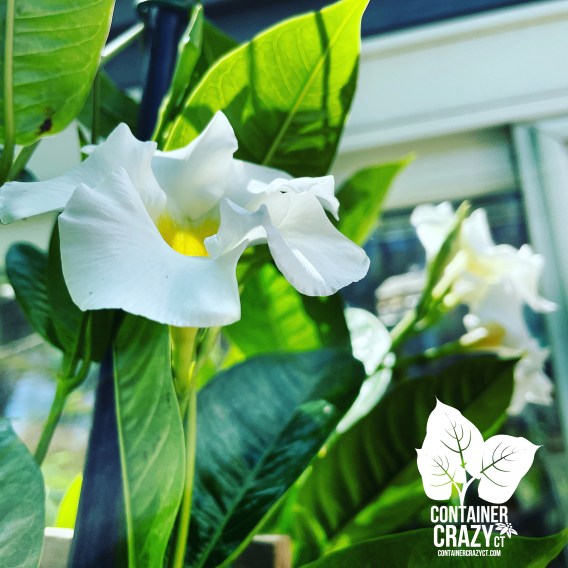
And there are of course the Mandevillas or Dipladenias. Big pretty blooms. Red on these and a vine-like habit. This one did not vine as much as others, but it was a staple for my balcony garden working days. They tolerate the winds, hold onto the flowers despite winds strong enough to move heavy furniture on the balcony. Furniture which had to be chained down appropriately always. Tropical plants they are.
Experiencing working on a high-rise balcony was one of my ultimate pleasures of having my former small plant related business. I only felt disappointed that they (the penthouse owner’s) did not discover me sooner. I wish I had worked up there when I was younger. I would have been able to handle more of the physical aspects. I was a solo worker. It was sometimes a challenge to figure out how to get all the soil bags, plants, and more up there. Because I am organized, I found ways to maximize my trips up the service elevator. I used wagons and a hand truck. I used the appropriate boxes and bins. I did it and I loved every minute of being up there. Well, maybe on those super-hot days, not so much. But I loved the plants and expansive balcony views enough to keep on working up there. It was an honor.
Today I did it – I clicked the button to not renew my subscription to another blog I maintained, called Workshopsct.com. It will officially expire on 2-29-24. This site was used to announce my workshops a few years ago, and most recently, my service offerings from things like my creative Succulent Topped Pumpkins to Summer Watering Services. I have officially closed my small plant related business, but I am always here to offer tips on container gardening, plants, and hobbies. Thus, for now, this site, called Container Crazy CT, is staying.
I think one of the hardest things to let go of is all my amazing photos of plants, many of which were showcased on WorkshopsCT.com. I’m addicted to plant photos – probably because I’m a visual person type of person. I love reviewing my photos and thinking about the story behind each container garden creation, or a nature situation like spotting of a butterfly or other cool insects and also looking back on photos of many types of plants, flowers, herbs, succulents, cacti, tropicals, tomatoes, and even weeds at times! LOL.
Anyhow, saying goodbye to a blog is not easy for me so I’m doing it in steps. First to go is Workshopsct.com, and next will probably be my 3rd blog about container gardening services, called Container Gardens CT. But, again, this blog, for the time being is staying. I’ve been writing on it for over 10-15 years, I’ve lost count! Below is a photo of the screen shot of workshopsct.com, just for the heck of it.
Enjoy the rest of your weekend! Cathy T of Container Crazy CT Today’s date: 1/14/2024
A New Year is coming up in just a few days, and what is in store for 2024? It is hard to tell. Things are changing for me. My husband has retired. It feels surreal! It is amazing, and it is an adjustment. New days are coming.
We now feel we will have time to do some gardening together for a change. While he has always been the most enthusiastic helper to my plant endeavors over the years, even learning some of the plant’s Latin names, we could not actually physically build a garden together at our home because he was always so busy with work.
I always fill our long deck along the back of our ranch style home with container gardens filled with plants of all kinds and some vegetables over the years. Tomato plants and hot pepper plants are two of our fav’s. But we have done others like Edamame and pumpkins, just to name two! And of course, many big planters filled with wonderful tropical plants like Ensete, Colocasias, and Canna Lilies.
Steve, my husband, always helped me with the heaving lifting of bringing up pots with a hand-truck to our deck, but sometimes, I was on my own and that is probably how I strained some muscles here and there. We are both getting older and need to be careful with that.
We always dreamed of having a large, raised bed type of garden system in our backyard. One where there are several raised beds in a pattern to walk through, with a fence and arbor entrance. However, one of our big dilemmas is the wild animals! There are plenty in our yard from groundhogs to squirrels. In fact, I usually allow the groundhogs to keep their home under a shed and have babies which are cute to watch scurry across the backyard when they see or hear us at the house or on the deck, but now, how will we ever keep them away if we build our dream vegetable garden in our backyard?
Wild animals have become one of the biggest challenges to gardeners. Some people will put gardens in the front yard or lawns, closer to the street, and that may help keep pests away. However, our front yard is a big hill so that wouldn’t work. Plus, there is no water access up on our front hill.
Sometimes I think we will take down our pool now. It is more costly to maintain. The bucket of chlorine tabs of supplies went up so much in price that we don’t think it will be worth it. The pool filter always breaks, and we are not home in the summers all the time, so we can’t watch the filter basket – stuff like that. Could that area be our new garden space if we did remove our pool? Not sure. Even if it was, it would have to be foolproof to protect from the pests.
That is just one of our goals. I always also grew tomato plants from seed, and it is a wonderful experience. I don’t see the hubby tending to those, but maybe we could grow the plants in our greenhouse till fruit time, but a greenhouse can get very very hot in the summer, maybe too hot to set fruit. Fans and screens need to be maintained, and I suspect insects would be a bigger problem in the greenhouse rather than outdoors where there are more natural insect predators to help. So, I’m not sure on that idea. Maybe I will test it out this year for the first time though. Maybe with smaller tomato plants, like some cherry tomatoes because inside the greenhouse, groundhogs and squirrels can’t enter.
One friend suggested just using the community garden space in our town for a garden, but I would really like to tend to a garden at my home and be able to enjoy it daily. Our backyard is totally surrounded by woods and the river runs down in the back which brings along many types of wild animals. Deer is another. And we all know here in CT how deer love to eat plants. It is like I need a fortress.
We also have lots of home improvement ideas brewing in our minds but which to do first will be the big question. I’m sure we will make a list and decide from there.
Also, I’m kind of semi-retiring myself. I am no longer offering my container garden services and have closed down my business officially via paperwork, but I will always still dabble in plant fun. The other big question is, do I keep my plant blog going?
Can you believe, I’ve written on this blog, Container Crazy CT, for over 15 years? I do have quite a few visitors per my stats, and I added ads this year only because I need helping with maintaining it. For many years, I never put ads on here. I just freely wrote articles to share.
I wonder how much I would miss my blog if I stopped it all together? I have even looked up things on my own blog before to remind me on what I did for this or that. I don’t get many “likes” on this blog on the actual posts – I think it is because people need to log in to do so, and today, clicking likes and heart is so easy for every other platform from Instagram to Facebook, so I think my blog is a bit old fashioned in comparison. It is not so easy to just click like.
When spring arrives, I will have to decide what my new adventures may be. I have often dreamed of getting a pottery wheel and doing pottery in my greenhouse as a new gig. But the expense of a kiln may be too much. Someone told me the other day you can bring pottery to be fired elsewhere – I’ll have to research that. That was always one of my dreams to make my own pottery items.
But the ultimate dream would be to just move to Hawaii. Yup, that kidding husband of mine jokes – Let’s do it – knowing full well he probably would NEVER agree to that! And yes, Hawaii is way too expensive! But dreaming is a good thing – we all should dream – one never knows.
Welp, if you feel like commenting on your thoughts – let me know. Just a week ago, my cousin’s son told me he was researching plant stuff and came across one of my articles from this plant blog. I thought, oh gosh, I hope it was a good article because he is super smart and a talented professional horticulturist himself. What was he looking up? How do deal with squirrels in the garden! Go Figure.
Happy New Year’s to You all. I hope you have some new goals in mind for 2024 too – even if they are unclear like mine.
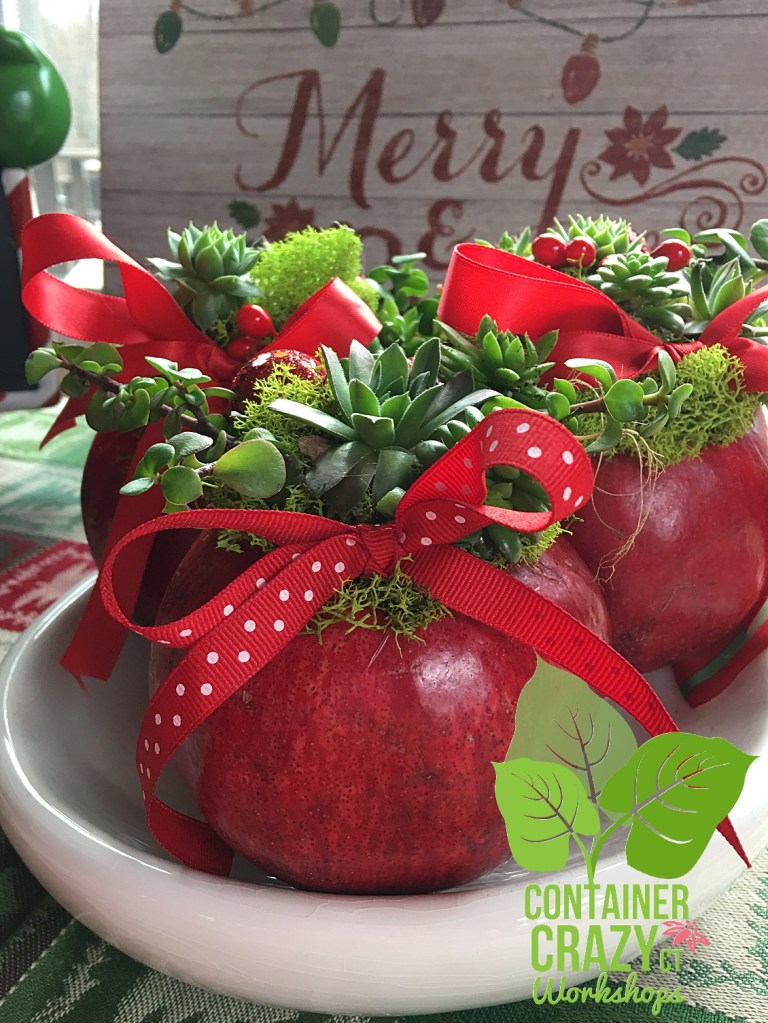
Back in 2016 – yes, that far back, I made what I affectionately referred to as, Holiday Pommy Balls!
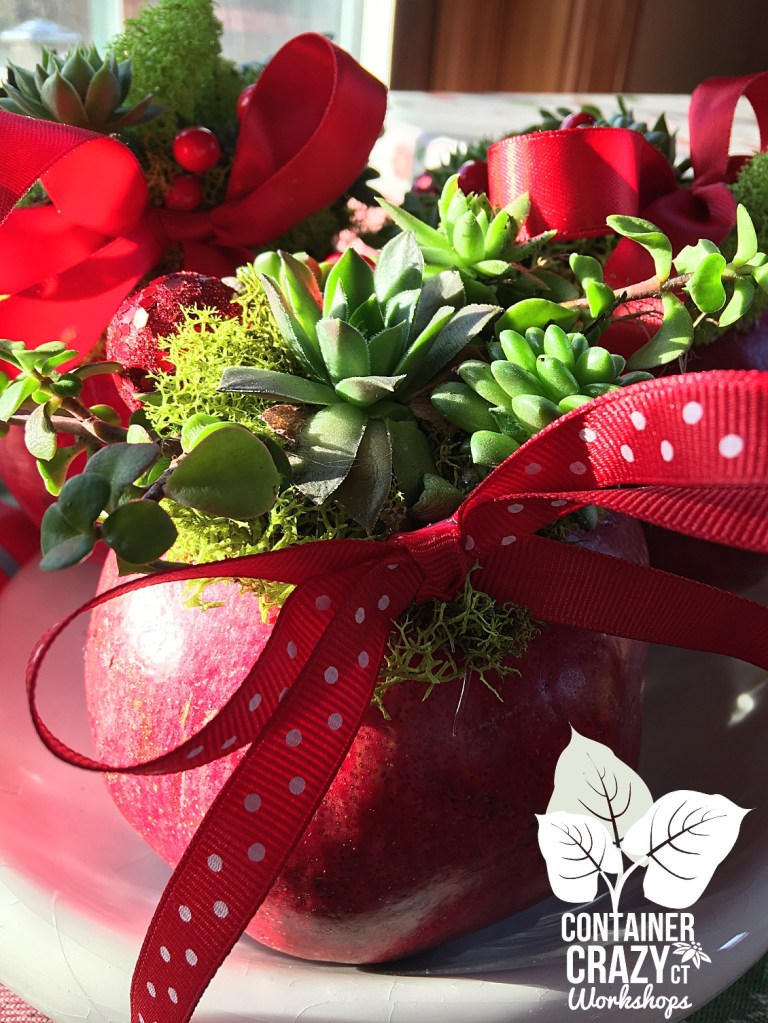
What are they? Real pomegranates topped with live succulent plants and some holiday bling.
At that time, I didn’t want any photos of them to be shown on social media. I thought they were the most adorable creations for holiday decor. I knew it was a unique idea that popped up in my mind.
It just came to me one afternoon, and I thought, “Hmm, could these pomegranates be used like succulent topped pumpkins I made in the fall to create a holiday item?”
Spontaneous thoughts are how these things happen. It just comes to me. And, because I had this feeling at that time that any unique item I was creating was being copied, I asked people who got them from me not to share photos of them.
Seems silly, doesn’t it?! I was at a point; I actually didn’t want to share it on Instagram or other places.
Anyhow,
Pomegranate fruits were introduced to me by my husband when we were dating and living in my small apartment next door to my parents. I remember him cutting one open and enjoying the fresh goodness inside – the red juicy seeds. Every holiday, we enjoy some of these as a tradition. They are in season September to November and can be found in the grocery stores in December and January.
Back then though when we lived in an apartment, we put some of the seeds in a bowl to show my dad. He had never tried pomegranates either! He said, “This is a trick?” We laughed and replied, “No, these are good and good for you!”
Flash forward to 2016, and just one day I had some pommies at home to eat soon, and that thought came into my mind. I grabbed my glue gun, some of my smaller succulents, made a tiny holiday ribbon bow, and added glitter balls. Voila! They came out so darn cute. And were really fun and easy to create!
They are natural and I love that. Also, pomegranates will dry out naturally over time, and usually with no rot. So, the plants sat on top for a long time and may be removed later, similar to succulent topped pumpkins I’ve made in the fall season. As shown in the photo below, smaller white pumpkins were used.
Any type of succulents will work from Echeverias to Sempervivums. Use a few donkeys tail to drip over the sides. Usually, the succulents will self-root eventually into the moss.
The only ironic thing is that I was sure I had tons of photos of them, but going into my detachable hard drives yesterday, I realized I could only find a few photos. Why? I don’t know. Probably because I told people not to post photos too. Maybe they are sitting on my old laptop that is collecting dust on the floor in my office. Here’s just the few that I located in this post.
Pomegranates can be kind of expensive at times. I do think they look better with large pomegranates, over small ones. We searched out pommies at various grocery stores, and if they were bright red, firm, and perfect, I would grab them to make my new idea of succulent topped holiday pommie balls.
The steps are so easy to make them: Glue some moss with a glue gun to the top, add the succulents with roots into the moss using the glue gun glue to secure each carefully and try not damage the succulent, and add the bows or whatever decorations you would like.
The pommies looked so nice on a table, setup somewhere in the home. I could see them lined up on a large dining table at each plate, or even within holiday greens as a centerpiece. Either way – adorable and natural. They also made a perfect hostess gift and were again, what I thought was a very unique idea!
I haven’t made any this year (2023) because I don’t have any succulents in stock, but if I did, I’d be tempted. If you make some, let me know. Please share your thoughts!!!
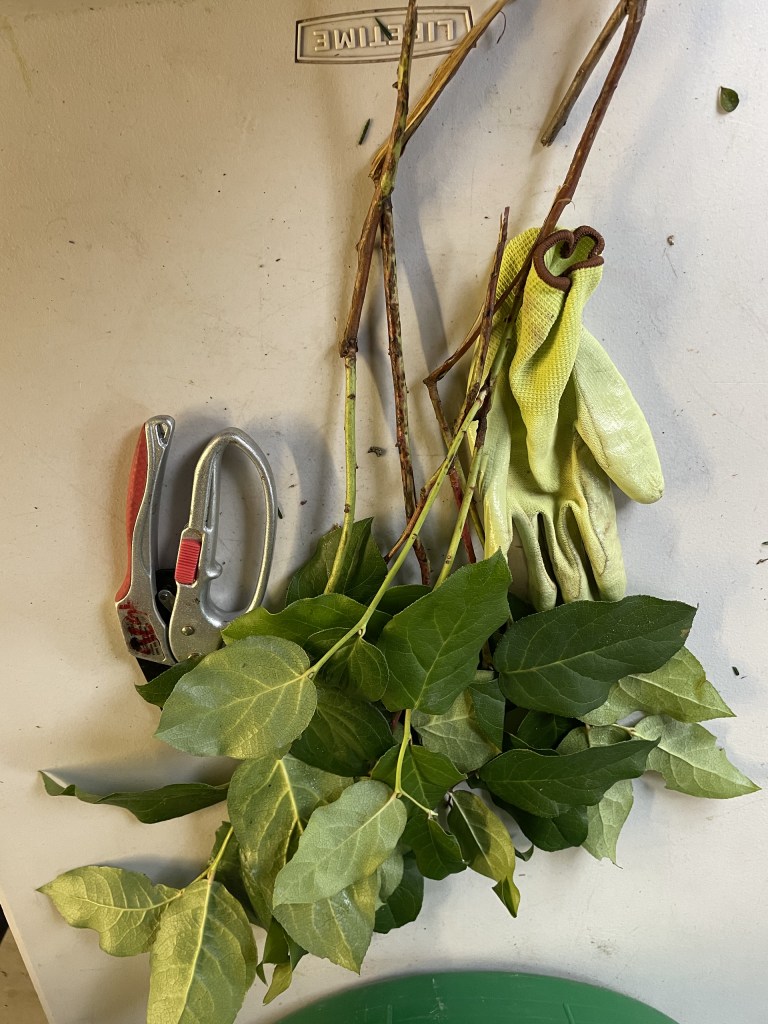
Shore pine was not one I had on my list of greens for a few years until I discovered it. It is odd how you may know so much about plants and such, but then make a new discovery just because you noticed some sitting in a box at the supply house!
I was picking up my typical greens’ orders in early December one year, and I just happened to see it in a box on another table, and asked, “What’s this?” The reply was, “shore pine.”
Next question, of course, was, “Can I get some?”
I always wished wholesale suppliers would have classes. A manager literally rolled her eyes at me when I asked or suggested this idea. I understand, they just don’t have the time, they are so busy, and teaching us is not part of their job, but I do wish there was an intro to what they have and how to use it, especially if someone was a newbie.
Anyhow, if you are new to the world of greens for wreath making, hopefully you found me because I started writing this month about the various greens used in holiday wreaths and kissing balls. Each post is covering a different holiday greenery.
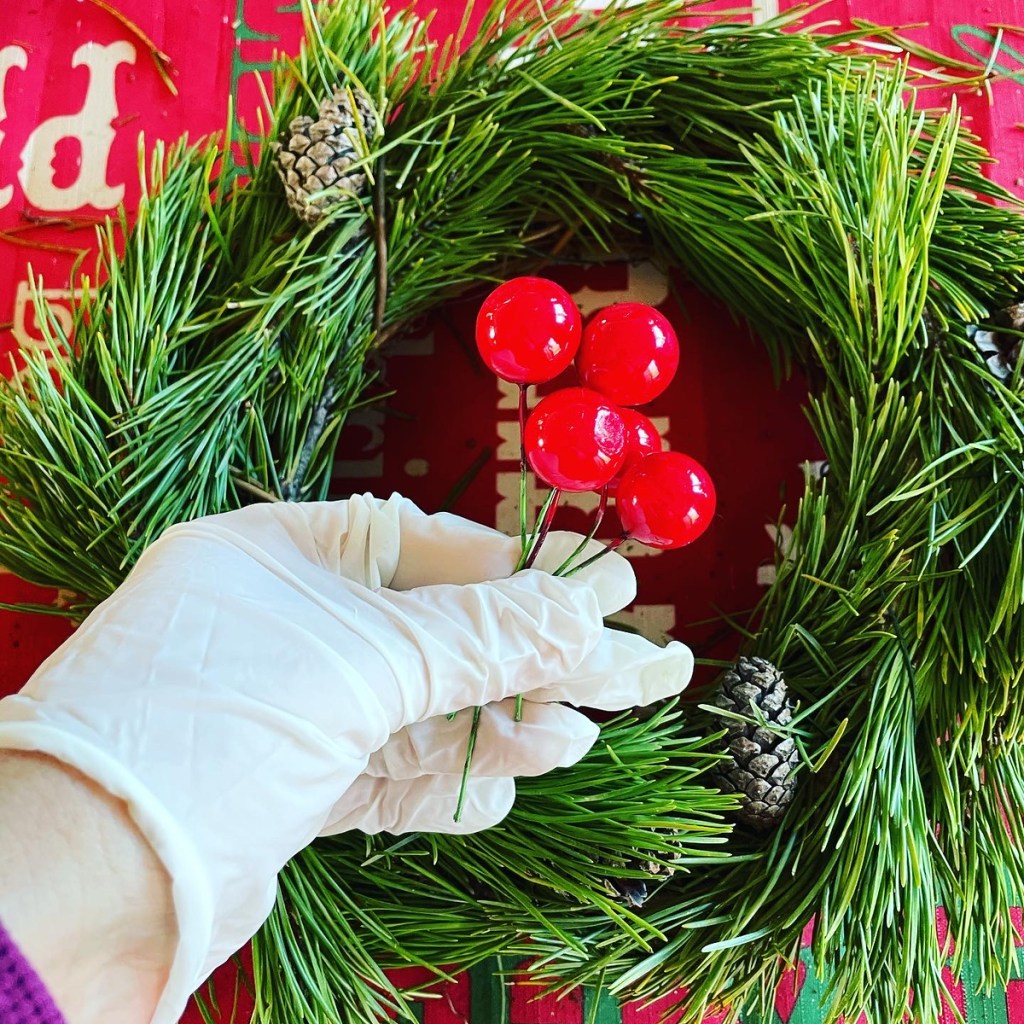
Shore pine is a needled evergreen tree or shrub. The needles appear and grow along very long stems. The whole stem is covered with the short dark green needles, so you end up with a nice long piece of fully covered dark green needles on a stem.
The stems are somewhat flexible, but I think what I liked about these the most is how long the stems were. You could literally use whole pieces of the shore pine branches to make a quick simple wreath without cutting it into pieces if you wanted to, and because they are flexible, they were easy to bend in a circle around a wreath frame. Then just using some green florist wire, wrap here and there to secure it to your wreath frame.
One year, I made some Peace Sign wreaths. I used coat hangers to make the center of the peace sign and used the shore pine wired to it – it was relatively easy to secure. Again, the long pieces of the shore pine worked well for this application.
On this wreath, I also secured moss behind the shore pine so it would be a nice green color.
Shore pine is a great item to add to the mix. It offers another texture when side by side with other greens. It also makes an excellent thriller tall piece in the center of outdoor holiday pots.
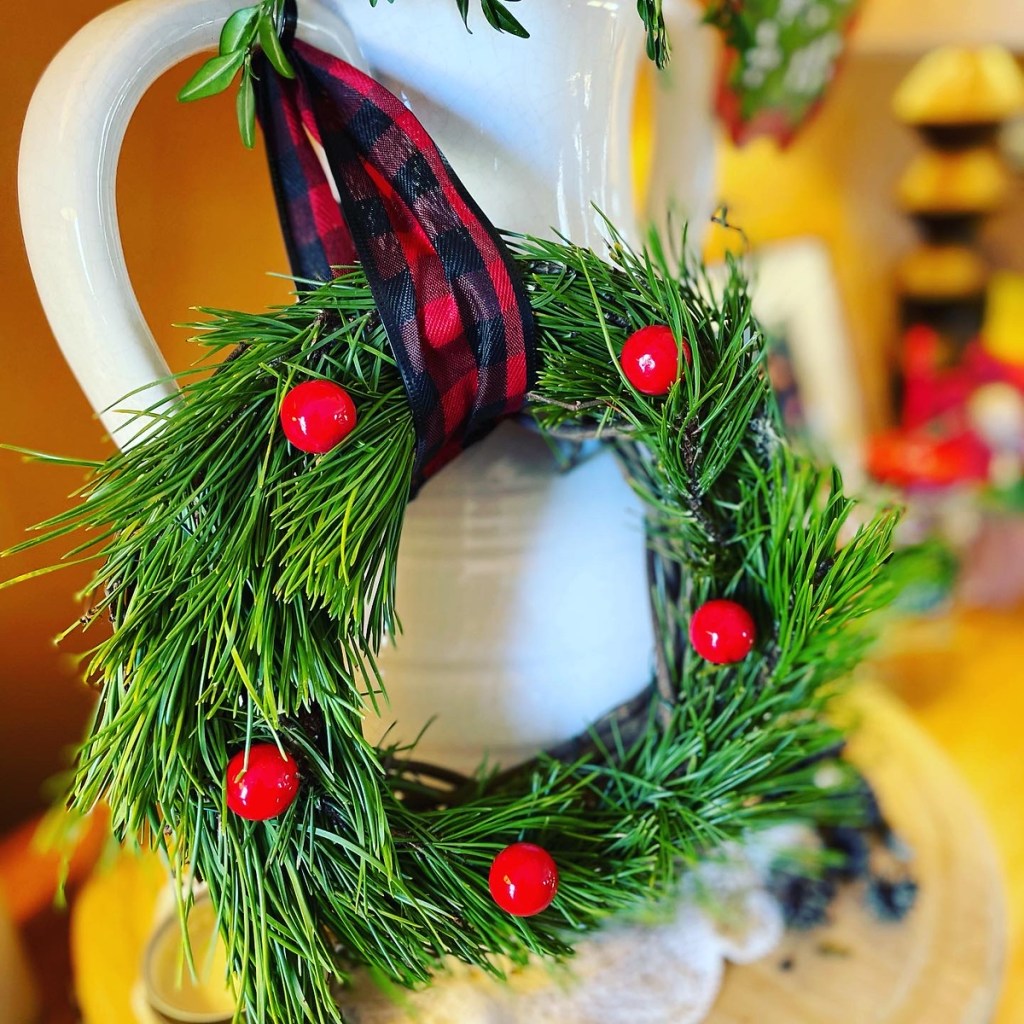
Another way that I used it was as pot toppers. Rings with greens that would be placed level on the top of a pot around the circular perimeter of it.
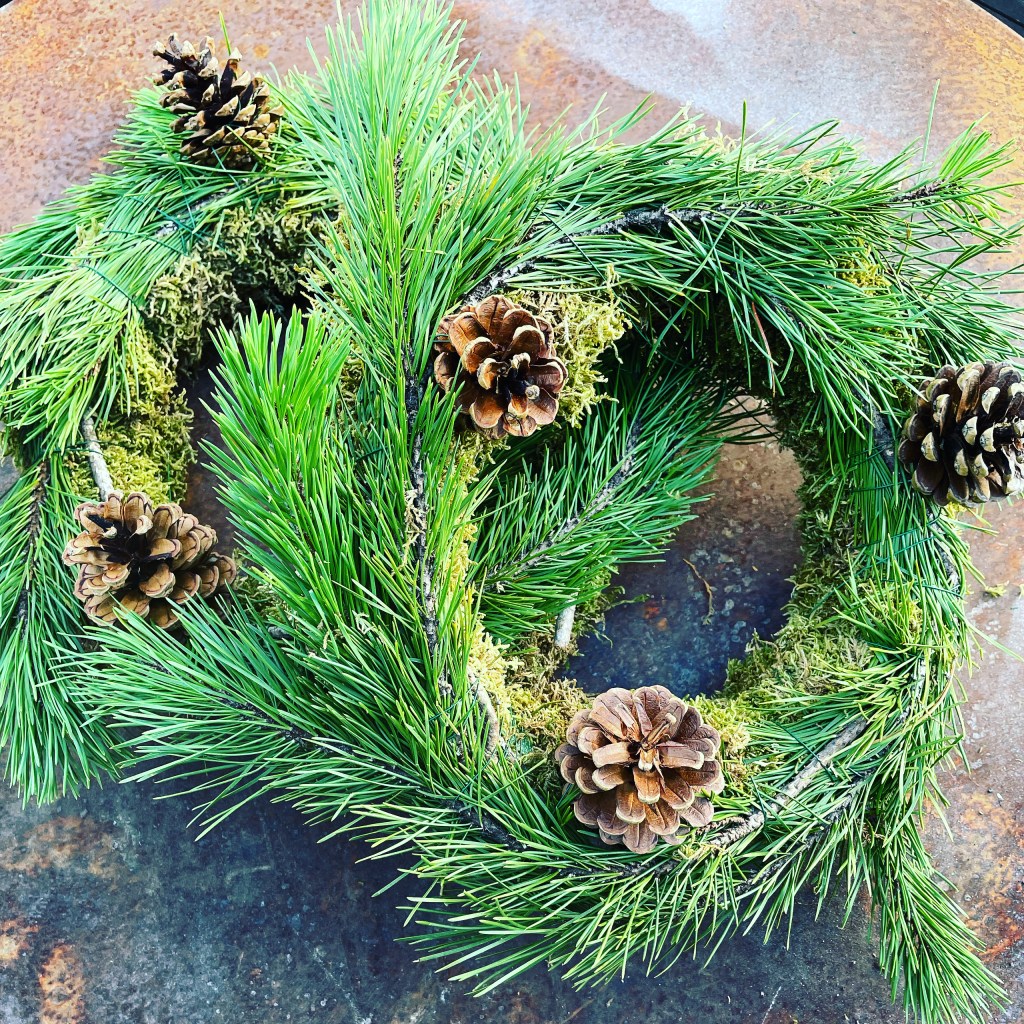
By just adding some wired pinecones, it was an instant way to dress up a pot. On this photo above, I used small green foam type wreaths as the base, covered them with moss, and just bent the long stems of shore pine over it and wired it in easily.
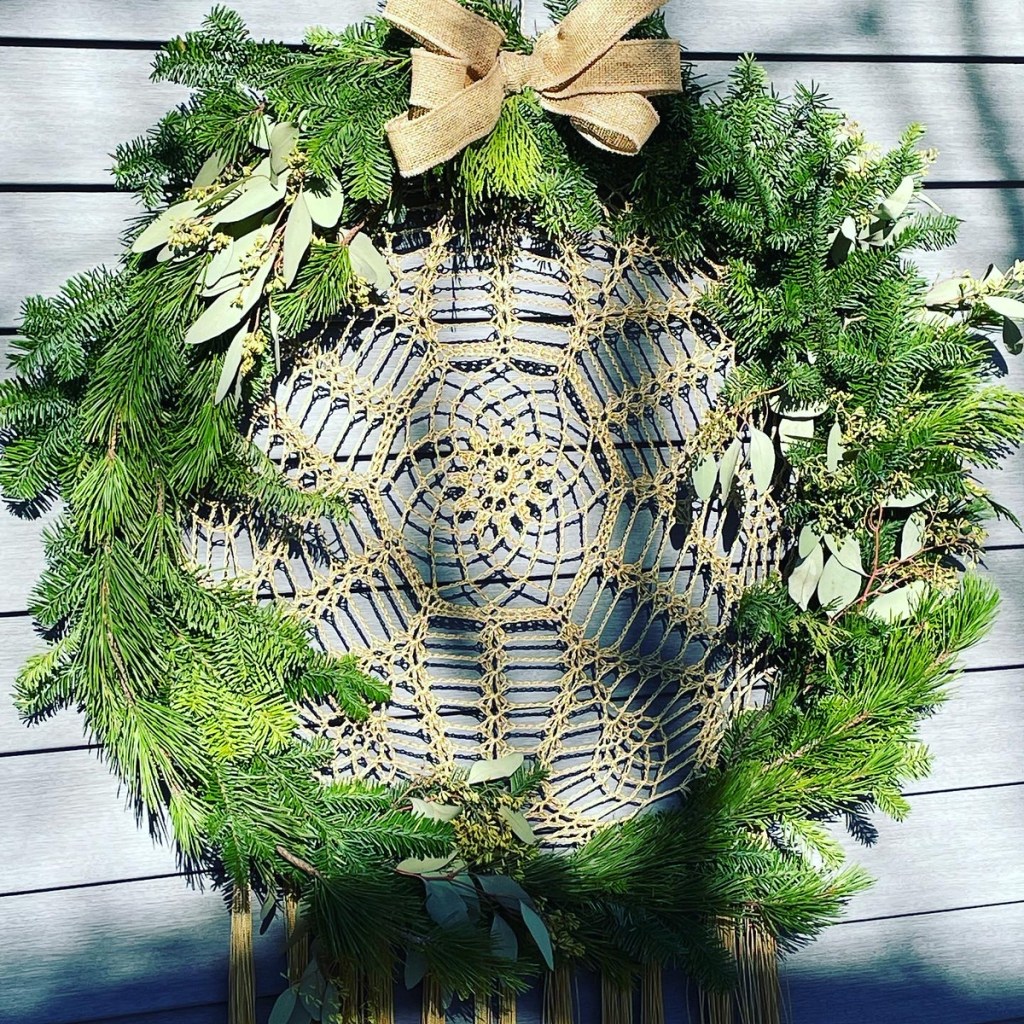
This dream catcher wreath I made has a round bamboo type wreath under it. As you can see, the long pieces of shore pine were perfect to just mold around it easily and secure.
As far as longevity of the shore pine, I would notice some minor tip yellowing after the holiday or if the shore pine was stored too long. Otherwise, it had decent needle retention and I found it was an easy use green.
Some pieces would have tightly closed cones attached too. And when provided as an item in my box of greens, it was another layer of green texture to use.
I can’t find the photo of this but years ago, a friend at my workshops, made a horse profile wreath and the shore pine is perfect to create the mane along the horse’s head portion. When I find the photo, I will update this post! But any animal like wreaths you may consider making, think of the shore pine as useful for things like that – a tail or whatever. All you have to do is get creative!
Hope you are enjoying these “greens reviews” posts and are having the time to make your own creations this season.
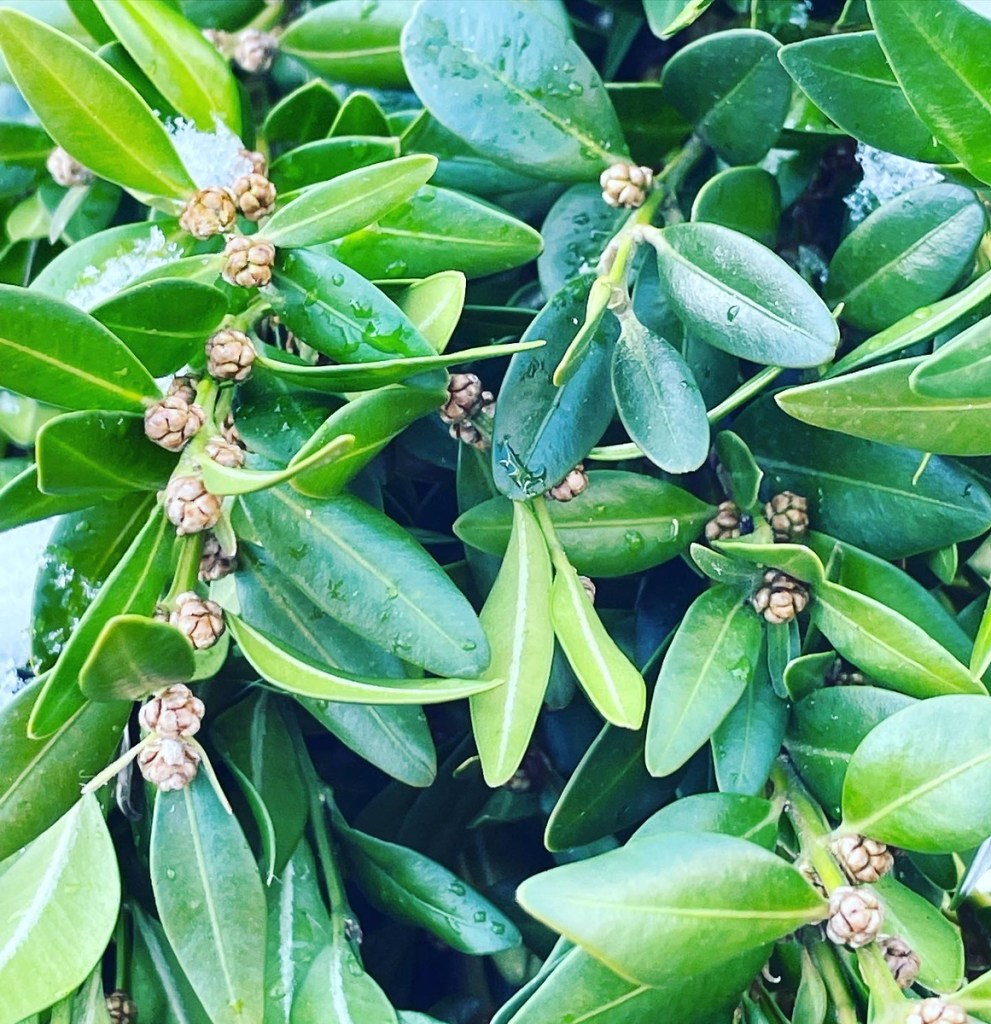
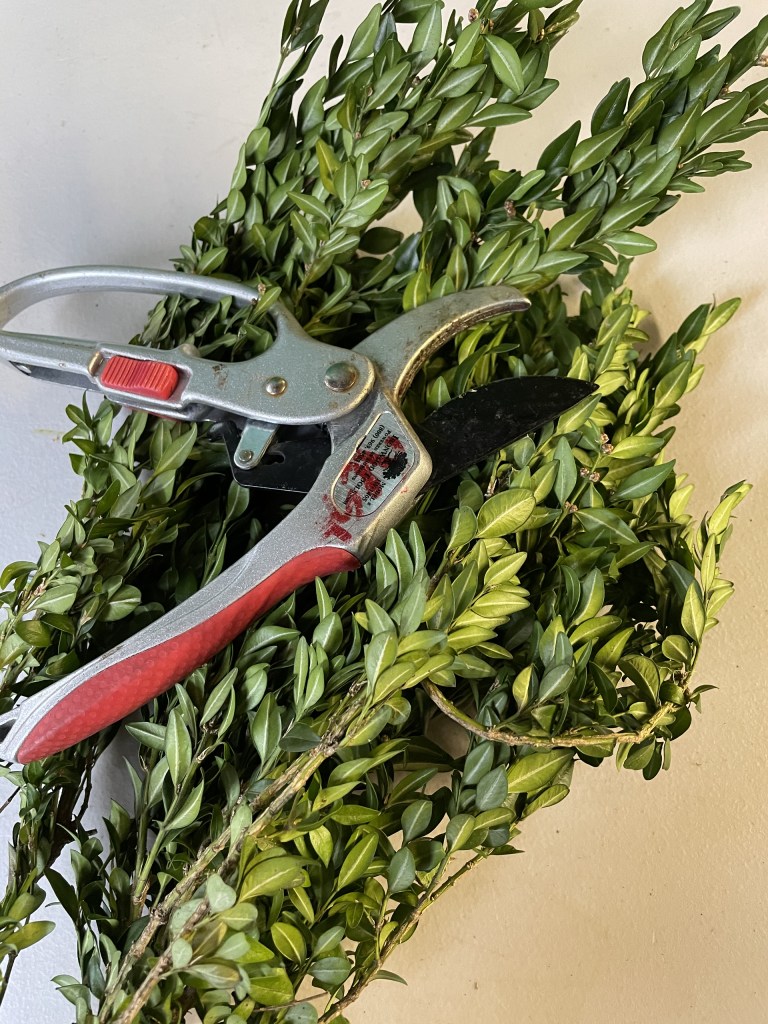
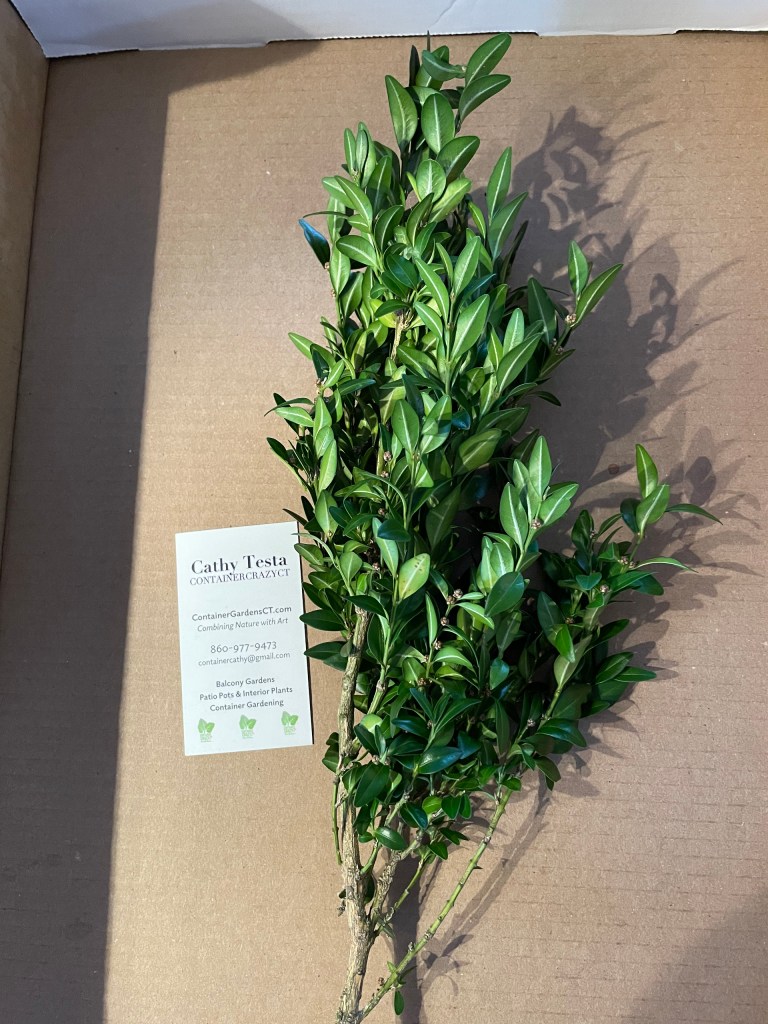
Do you know what the word Buxus is? It is the genus name for boxwood. It’s one of the easier botanical names to remember. Anyhow, boxwood evergreen shrubs have rounded or obovate shaped leaves, on slender green stems. It is a dense evergreen shrub used in landscapes and commonly available at nurseries. It is also a greenery available from floral suppliers or retail locations at nurseries during the winter to make festive arrangements such as fresh greens wreaths and holiday kissing balls.
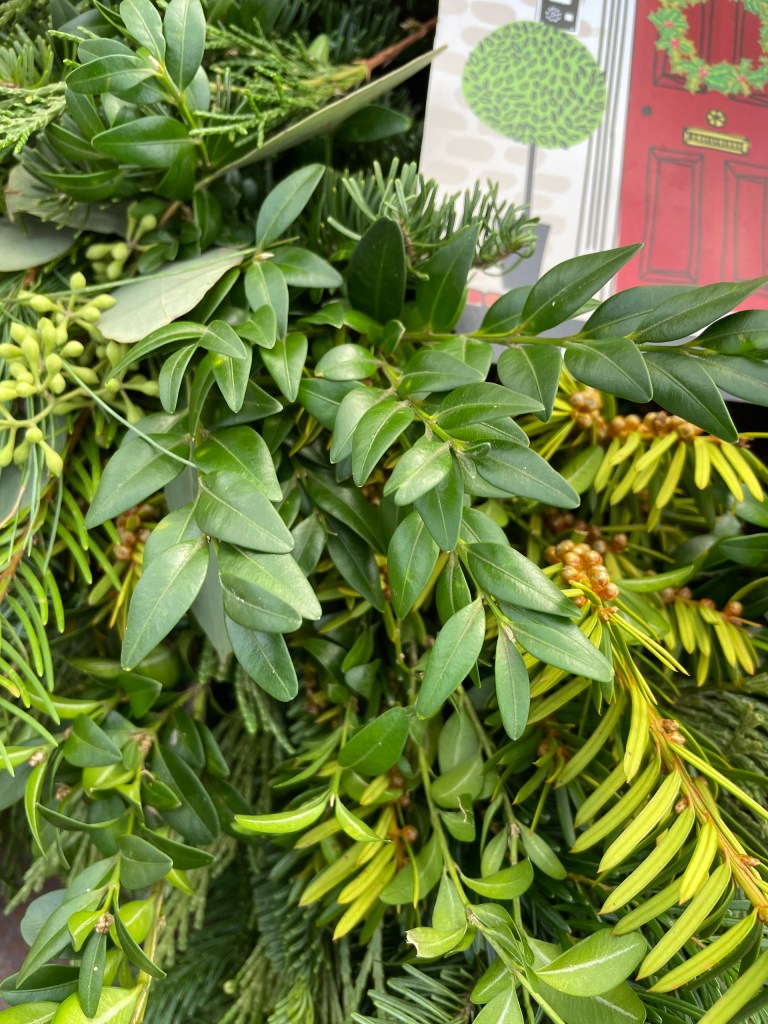
As with most evergreen shrubs, there are many varieties or cultivars available of boxwood. Some have more narrow leaves and others have oblong leaves. For example, common boxwood (Buxus sempervirens) has elliptic or ovate to oblong leaves. Because I am a plant person, I notice the differences in the leaf shapes on boxwoods more so probably than a typical person. The leaves are small and glossy on both sides of the leaves usually, and in arrangements for the holidays, the leaves retain their dark green glossy color very well. Boxwood greens add a nice textural and color element.
I’ve written about the benefits of using boxwood in wreath making before on this blog. For example, there is no sap to contend with as with balsam. After a while, your hands get very sticky when making many fresh holiday wreaths, so that can be a benefit. Also, the boxwood bunches or stems are light weight. I liked using them to make boxwood only holiday kissing balls because of this feature, as other kissing balls would get terribly heavy when I did a mix of greens to create them.
As far as a quality green, I like boxwood on the greens list. It tends to give a classy look to a wreath or kissing ball. Used alone or with a mix of other greenery, it works very well. In my mind, it is a nice benefit or not sure of the word, but a higher-end type of greenery to use and if you can afford it, I say do it!
A holiday kissing ball made with boxwood greens only.
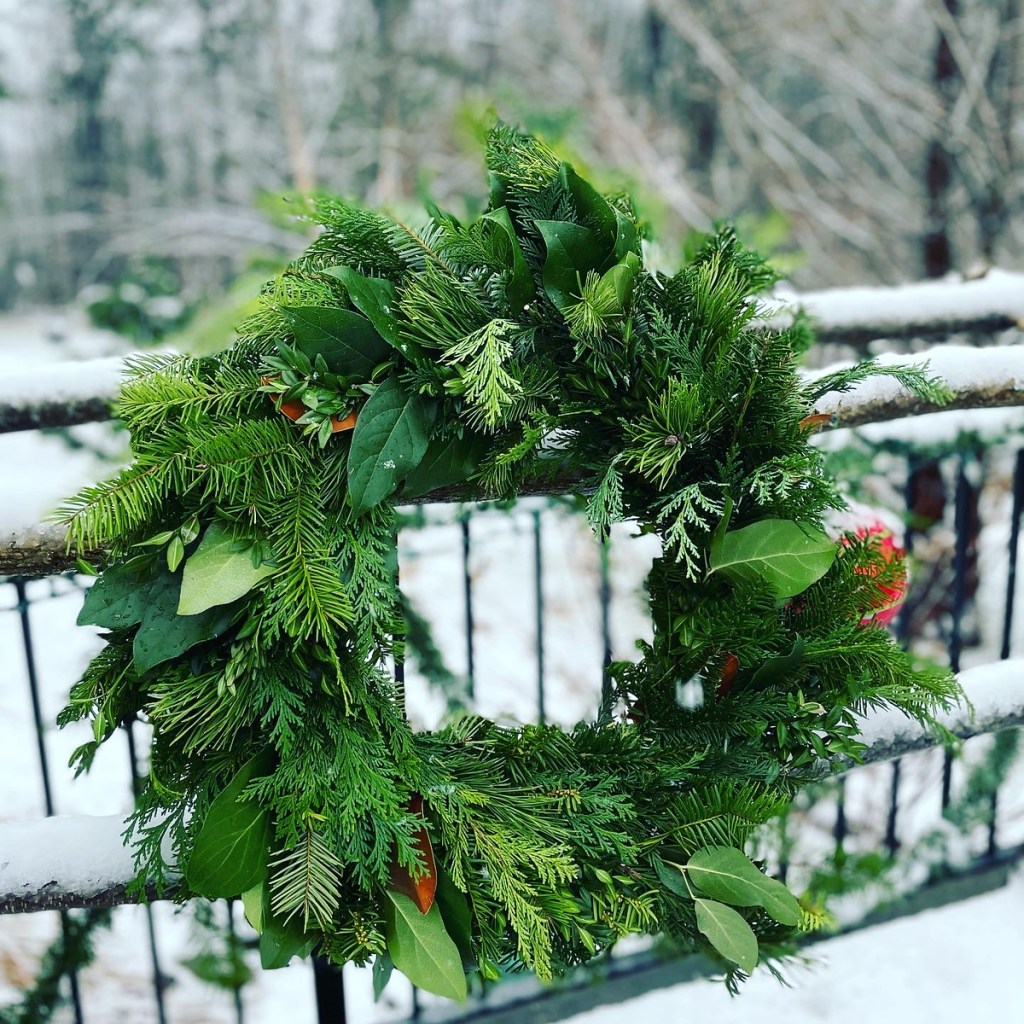
Wreath by Cathy T with Boxwood and Magnolia Leaves
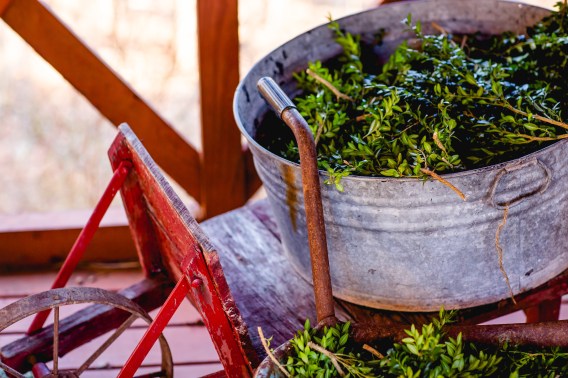
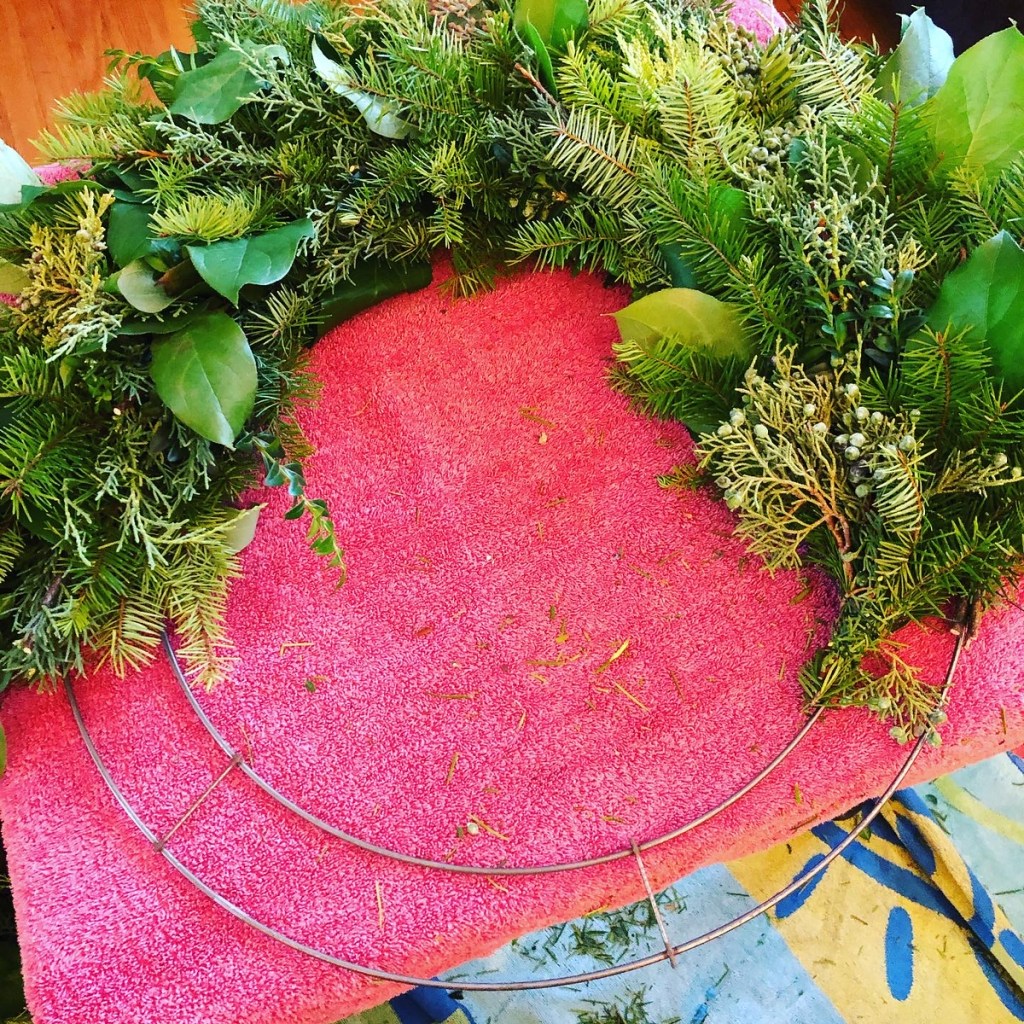
Boxwood ready for a workshop
Typically, the boxwood I would order was packed in boxes or burlap bags, and they were always fresh and good looking. To keep them hydrated, if I felt they needed it, I would take a bucket or bin like the one shown above, fill it with water and drop the boxwood tips and stems into the water to soak them for a bit. Then I would shake off the excess water after they had a good soaking (maybe about 15 minutes or so). I would shake the bunch and then lay them on beach towels to somewhat drain.
As mentioned in my prior posts, the greens need to be kept cold. In the florist trade, it indicates the boxwood greens should be in a cooler at a temperature between 36 degrees F to 41 degrees F. Anyhow, I kept them in the waxed coated boxes or the burlap bags in an unheated garage. However, if I soaked them in water to rehydrate, sometimes I would just place them in a bin after the excess water was removed. Again, rehydrating them was not often needed.
Boxwood on a Wreath by C Testa (with Lemon Leaf shown also)
Another nice aspect about using boxwood is the stems are very sturdy. I would recut the stem ends to a bit of a point to insert into kissing balls center ball foam easily. BTW, you may also rehydrate boxwood before use by recutting the stem ends and inserting them into vases of water, but I usually did not do that or need to. As noted above, if there was a need to rehydrate them, I’d do the soak method in water in a tub for a bit then dry them out a bit so they would not be repacked soaking wet. Outdoor weather like snow or sleet did not bother the look of the greens either once they were in a wreath outside.
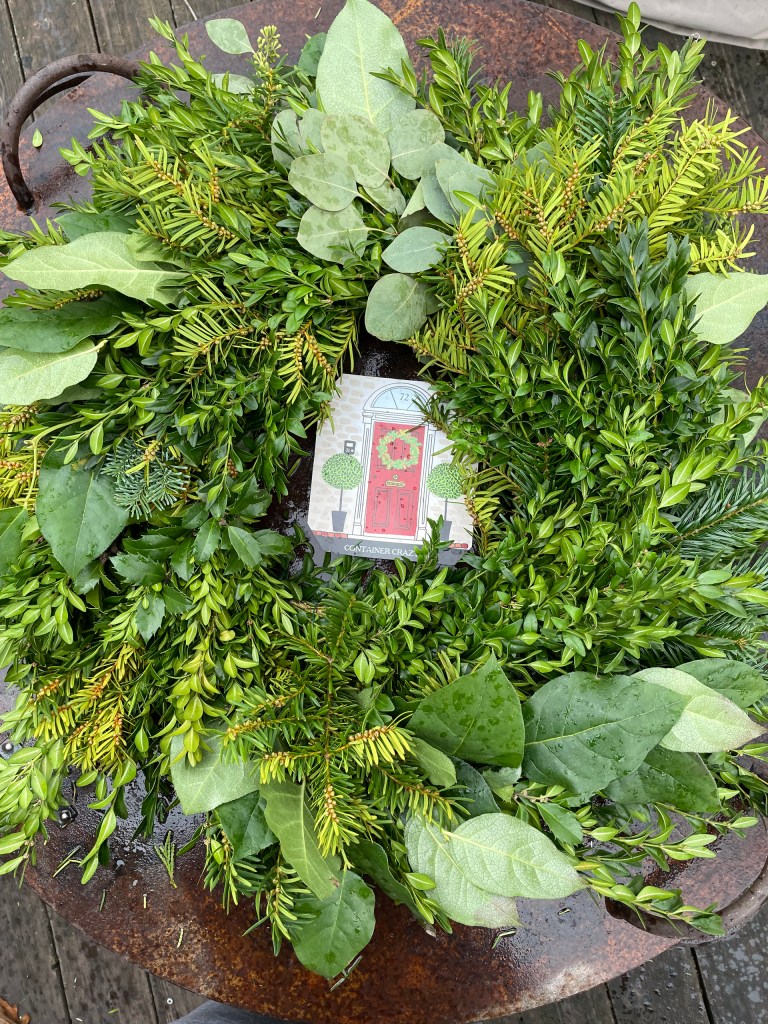
For a couple years, I offered boxwood in my box of greens mixes. These boxes of greens were for people who wanted to make their own wreaths at home. Included were many other fresh greens such as balsam or Douglas fir, Salal lemon Leaf (prior post), yew, silver fir, berried juniper, holly, and more. I never harvested boxwood from my own shrubs or others, but these shrubs are common in the landscapes, so if you happen to have a big enough shrub stash of them, they can be harvested from to add to your holiday wreaths. Typically pruning boxwood is done in the spring but taking some minor cuttings for your arrangements is usually harmless for winter decorations.
Of all the greens I would order, boxwood was usually the highest price on the list. Therefore, I did treat it as a quality green to use with a mix of greens, but if I had some left over or someone wanted a boxwood only wreath or kissing ball, I would charge accordingly. The price was worth it because boxwood is an elegant green that makes your arrangements look classy, in my opinion.
Wreath made by C. Testa with a mix of greenery. Boxwood accents shown.
Wreath by C Testa with Yew, Lemon Leaf and Boxwood
Boxwood Only Wreath by C Testa
Another nice aspect of using boxwood is it was a faster assembly as shown above on this wreath with only boxwood. It would take a lot less time than bunching various greens together.
Boxwood Only Holiday Kissing Ball
Snips and tips of boxwood greens are nice in vases or other holiday decorations. For example, if you wanted to make a snow scene in a glass bowl, the cuttings can be used in there and last a long time with no odd scent. And as mentioned good color retention. I really can’t think of any downfalls of using it. I would rate it higher as a good quality type of green to use and hopefully you will have the opportunity to do so in your own holiday arrangements!
Salal lemon leaf is a widely used green in the florist industry, but I didn’t know it. I was first introduced to it by my contact at a florist supply house when I asked, “What other greens hold up well that I can add to my greens list for the holidays?” She mentioned Salal.
Salal – Oval Green Leaves Shown above with other greens
Salal lemon leaf is packaged in bundles with rubber bands. Each stem holds several oval shaped green serrated leaves at the growing tips grouped in an alternating pattern. At first glance, I thought, “Wow, these are beautiful.” I definitely wanted to get some, and so I did.
As I read that linked post above, I didn’t realize it grew by rhizomes and I’ve never seen a picture of this plant in its natural state. Apparently, it grows like an understory plant in the forest. It is noted under the botanical name, Gaultheria shallon. It the florist industry, it is listed and commonly known as Salal Lemon Leaf.
Salal is a wonderful alternative, in my opinion, to holiday magnolia leaves. They have a similar shape, but they do not have the thickness or the brown color on the undersides of the leaves like magnolia leaves do, but they are a very pretty glossy green color, and are smaller sized. Apparently, if you rub the leaves together, they smell like lemon from what one website indicated, but I’m not sure on that. I never noticed any scent or fragrance from the leaves.
Salad used in a Holiday Pot Creation by C Testa
They come packed with the rubber bands and bunched in boxes lined with plastic. Sometimes wet newspaper was wrapped at the stem ends to hold some moisture, and sometimes I would remoisten paper towels to wrap on the ends too, but overall, this plant really held up well prior to use, and on wreaths and in holiday kissing balls, and after. I also discovered that it holds up pretty well in vases of water too by recutting the stem ends, because one year, I had some left over and set them in a vase of water.
Salal Lemon Leaf in Vase of Water
I referred to salal lemon leaf in my workshops as a “premium green.” They are pricier than other greens obtained for wreath making and are used more in floral design. It is not a green commonly seen in traditional wreaths sold in the retail settings and stores. As I began to work with salal more each holiday season, I discovered more about it that I loved. Using salal lemon leaf became a real pleasure to me. I think they are gorgeous.
One year, for the heck of it, I thought about spraying silver paint on them. To my amazement, the silver held on quite well outside. I don’t recall if it rained or snowed a lot that year though, but I was a bit surprised the spray paint did not wash off the lemon leaves.
The stems of the salal are very long and somewhat hard but flexible, but they were strong enough too, if you wanted to carefully insert some into a kissing ball, it would penetrate the Styrofoam or florist foam ball with ease, so long as you don’t jam it in there. I would hold the tip of the stem closely at the bottom and push it into the ball for holiday kissing balls here or there. I like the look of wreaths and kissing balls with a mix of greens so this was always a special touch added.
Kissing Ball with Salal and Other Fresh Greens by C Testa
Salal lemon leaf looks gorgeous in wreaths. I suppose you could make a whole wreath with just salal, but it is pricy, so to me it was a beautiful accent plant to use to add those special touches on the hand-made wreaths. Each bundle comes with many stems, and I would keep them stored as bundles before each use.
As with my other holiday greens, a cold room is best for storage before use, like an unheated garage. I also put a tarp over the boxes. I guess that was my method to ensure they stayed as cold as possible and avoided any direct sunlight from garage windows, but in the floral industry, these are kept in florist coolers.
I never “treated” them with any products to maintain freshness but there may be some out there, I am not sure. It wasn’t needed overall for my holiday creations. The leaves also, to my pleasure, held up very well in the windy conditions for a couple balcony high-rise clients I had. They did not break off which is so important because the wind is very extreme on some days in the middle of winter on the top outdoor balcony floor of a 38-story building, and so I was so pleased this green was good to use in my big wreaths which hung on a wall outside.
I always mix various greens together but at one of my workshops, a lady put a batch of salal on her wreath and alternated batches with other greens. It came out lovely and here’s a photo of her holding her wreath from that workshop, which one of my last workshops for fresh greens wreath making – a celebration year (2019). The year before COVID arrived.
I also sold boxes of various holiday greens and added stems of salal to the mix. One year, a lady made garland with her greens box for her stair railing at her home and shared this photo with me. I thought it was just beautiful and a very useful way to highlight this florist quality green.
I felt salal stood out well in the various wreaths I made. I kind of fell in love with this product and really felt it was a wonderful and long-lasting item to offer. I know all the women, and sometimes men, who attended my workshops loved using it too. I would tell them to disperse the salal lemon leaf in places on their wreath to serve as an accent. It also worked well in holiday pots as shown above in this post.
Salal in a Wreath by C Testa
I never really experienced anything bad about using it or storing it – so long as you received it fairly fresh from your floral supplier. It would sometimes have a smell in the box that would remind me of stem rot, so I was always sure to check on it – make sure it was okay, not too damp in the box at the stem ends and staying fresh. Overall, it was the case and never an issue. I never misted the leaves and kept those dry and cold in the boxes when stored before use.
Salal in a wreath by C Testa
Salal lemon leaf made the wreaths, kissing balls, garland, and holiday pots look more professional and luxury style in my opinion, so it was a keeper on the fresh greens list every year. I’m glad it is one I asked about early on! Hope you will use it too in your creations.
Thank you for visiting and Happy Thanksgiving to you!
Cathy Testa Located in East Windsor/Broad Brook, CT Date of Post: 11/23/2023
Making a Wreath by C Testa
Salal Lemon Leaf Photo by C Testa
Stay tuned as I will continue to go over the various fresh holiday greens used in wreaths. So far, I’ve covered Yew, Holly, and with this post, Salal. See prior posts for more information. I hope you are enjoying this upcoming holiday season.
Note: I am making Ribbon Holiday Wreaths this year for sale – see my www.WorkshopsCT.com page for information or visit me on Facebook or Instagram under Container Crazy CT name. Thank you – Cathy T
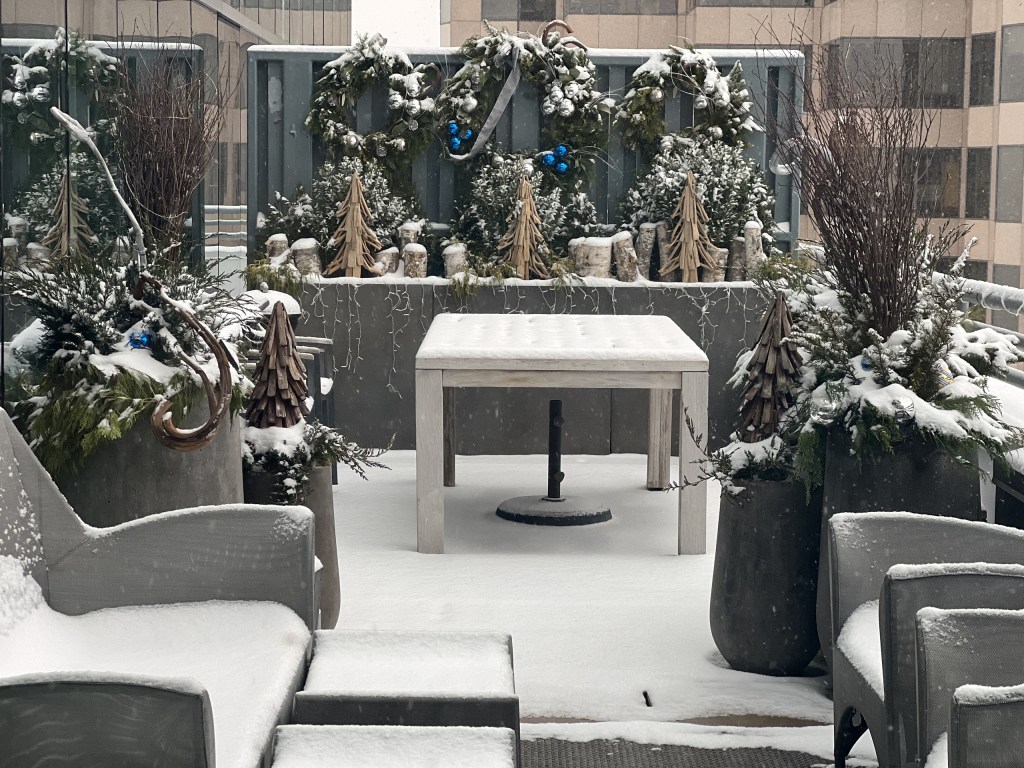
I thought it would be fun and helpful to go over some of the successes and fails of creating a holiday scene on a high-rise balcony. Unlike the typical home scenarios, fresh greens cannot be literally stuck into soil in a planter. Usually that is all takes hold greenery very well in a pot to dress it up, however, this would not work on a high rise due to the strong winds. The winds are strong enough to blow off heavy furniture. Furniture had to be bolted down or locked down literally with cables. I had to get creative with the mechanics to ensure all the holiday decorations would remain in place within the greenery of the planters and wreaths.
Not only did I have to think through how to secure everything up there on a high-rise exposed to all the winter elements, but I also had to consider how to get it all up there without damaging items. Luckily, my hubby became my winter assistant. I would spend weeks ahead picking out decor items, creating fresh large wreaths, estimating greenery needed for all the planters, and organizing all in boxes so we could work efficiently out in the cold during the installations.
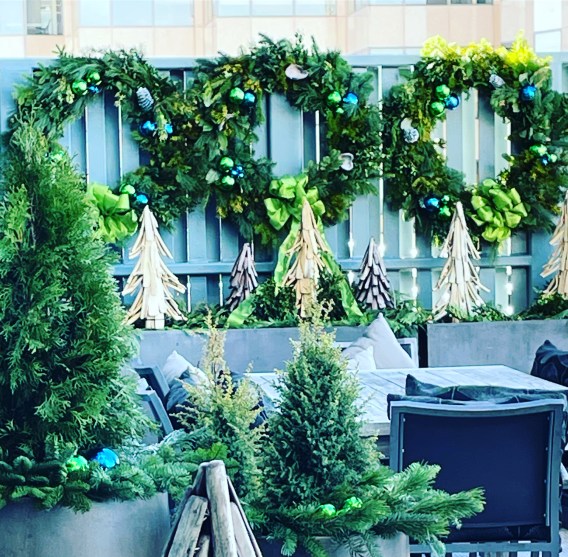
Each year, I created a new color theme for these clients, and this particular year, it was blues and silvers. Believe or not, those very thin curly silver sticks stayed in place fairly well, they did not fade and keep their glittery charm, but I didn’t just shove them in there, I secured them with heavy-duty florist wire too. Same with the silver pinecones. Wire did the trick, and it wasn’t too difficult to secure those two items in the greenery on the wreaths.
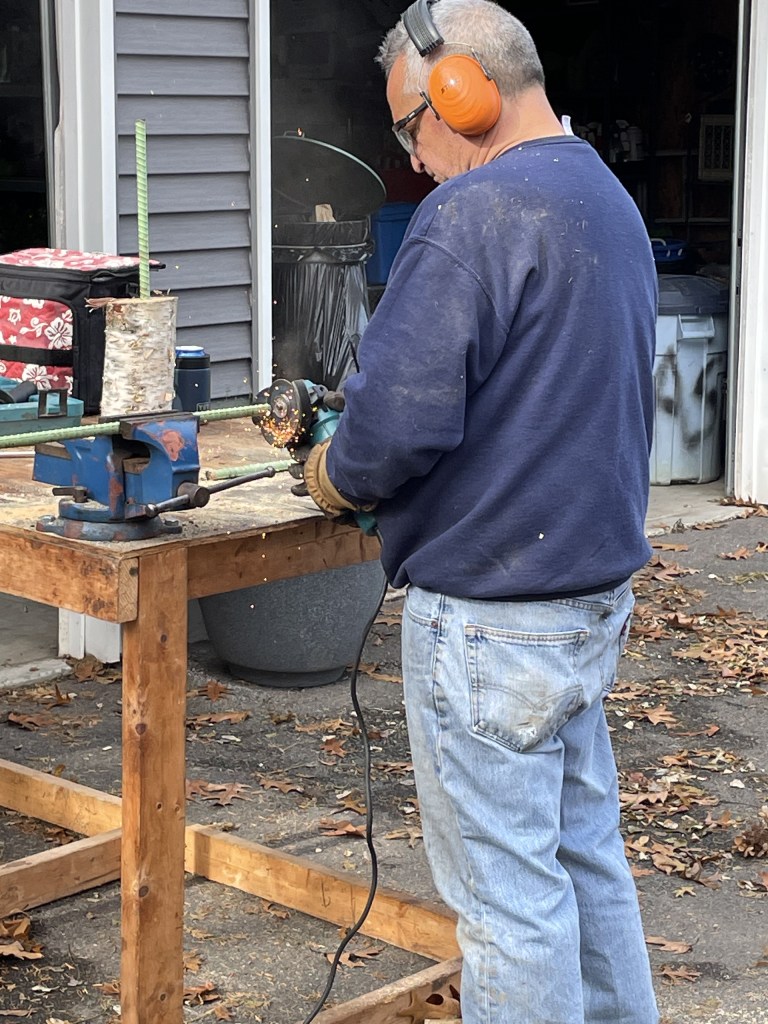
However, the ball ornaments, well those were tricky. First, they have to be shatter proof ornaments (fortunately, commonly available). I started with trying to glue them to wooden dowels but that didn’t hold too well because glue can crack in the cold. Later I realized, these have to be wired thru the actual ornament. So, for each one, I used a heat-type soldering gun tool to make a small hole on each side of each ornament (by each side of where the ornament typically has a round hook), and then threaded thick florist wire through each ornament. That worked. You can sometimes find ornaments with the wires securely attached but even still, the wind was so brutal at times, I needed to make sure the ornaments would not fly away outside. I looked into obtaining a very large and long sewing needle to help with the threading of the wire thru the two holes. The needle helped greatly to get the wires thru the two holes and then attach it to the frame on the back through the greenery.
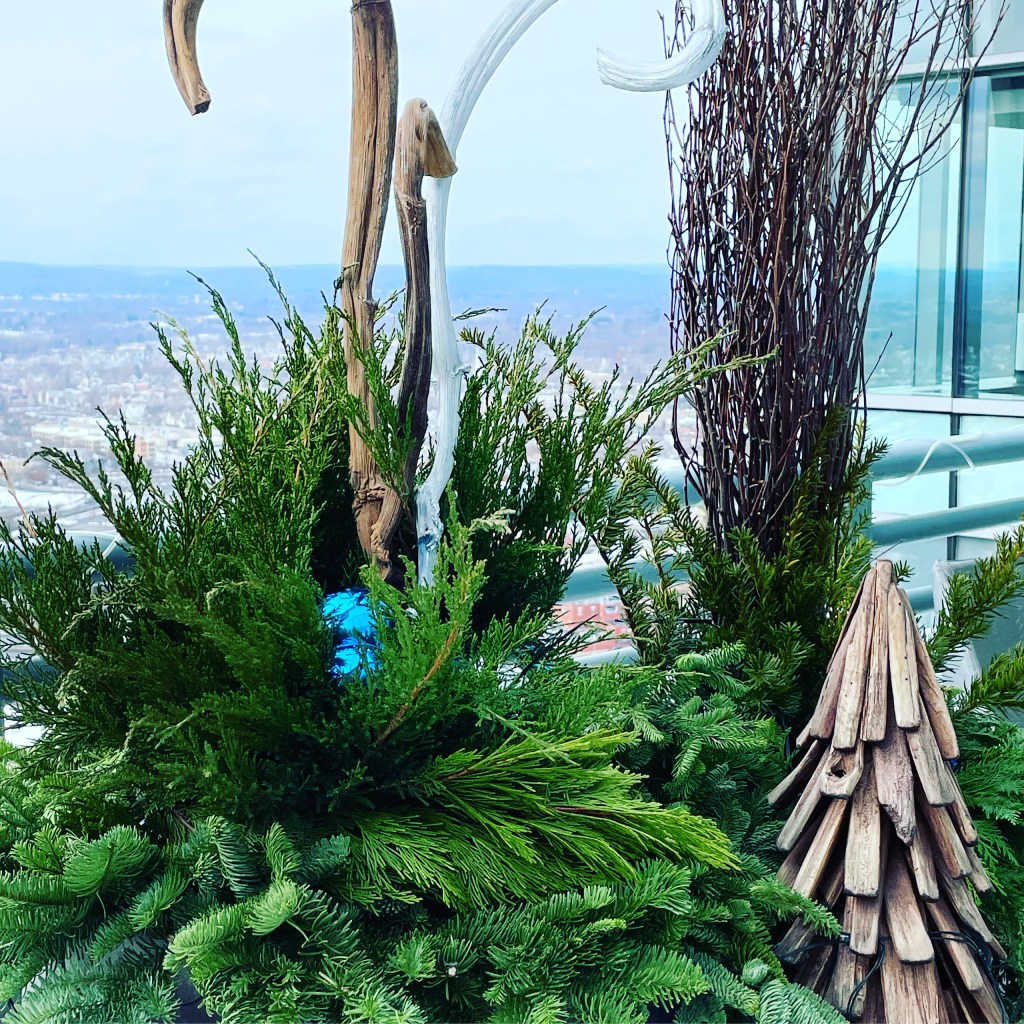
One year, I used these thicker curved stick things – what are they called? I can’t remember! I’d have to look up my notes, but when I spotted them, I thought how cool! These could be used natural or painted silver. So, using spray paint, I sprayed some silver to match this theme and left some natural brown. I thought they were so cool and could be put into planters on the balcony an upright element.
However, later, after the winter season was over, I discovered when these got wet from the snow, they totally flop over! If you look to the left, by the outdoor chair, you will see those curly sticks flopped right over. The moisture penetrated the curvy sticks and made them just flop over. So this natural element was a fail, unfortunately.
When the snow covered these installations of holiday features, it added a magical feel to the high-rise during the winter months. They can see all of it thru large windows. It is surely better than looking at just nothing. I know the clients loved it because they told me so every year. And when we started adding some solar powered lights – wow, so pretty at night. The lights worked perfectly so long as they had a sunny day prior to charge them. There is no power out there, so it was fun to add some twinkle to all.
One year, I thought, you know I’m going to collect some birch and use those. Well, it took a while for me to think of using rebar (like the rebar used in foundations). It worked so great. The rebar is super strong, can be pushed or hammered into hard soil (most times, the soil was somewhat frozen in the planters) and the birch is natural and can take the outdoor elements! So, this was a theme that season, of birch, silvers, and blues.
Steve, that Elf Helper of mine, cut the rebar to my desired lengths, and we inserted them into the base of the birch pieces. They were heavy at first as the birch logs were not totally cured or dried out – so imagine we took these up and carried them in to use on the balcony. I really liked how these worked out, and if desired, could be reused the next season. Once they were pushed into the soil, it was very secure.
As a side bar, another big thing to think about on a balcony is the weight of everything. There are limits and so there is not only the total securing of items from elements, but the weight and of course, the look! Fortunately, these clients loved natural looks of things and so do I. BTW, we did not end up reusing these as we did a different theme the following Christmas.
Here’s a photo of the Birch logs before a big snow fall. They were very secure and with the lights at night, pretty! You can see the wreaths there and those are very large wreaths I made. Steve would step up on the planters to install them and my heart skipped a beat every time. We tried to use super big zip ties or cable ties to secure the larger wreaths but sometimes those snapped from the cold, so we ended up using thick wire. Steve had his technique down. I could not have done this part without him. And he is actually afraid of heights, so he never looked to the right at the view 38 floors below. Fortunately, the heights never bothered me up there – I loved the whole scene every time I was doing installations. To see the skyline, hear a hawk go by, and just the overall feel of the scene above and beyond was inspirational.
I so wished those thicker curly sticks had worked though – I really liked the natural feel of them as it adds a bit of height to the fresh greens I installed below. Wooden drift like decor trees worked out well – they can hold up to the outdoor various winter elements and I would secure them using rebar. As I did with the twig bundles you see near the wooden tree in this photo. Remember though, it was never as simple as just stick things into soil, like I would do with these types of decorations on the ground level at my home or elsewhere. Everything really needs to hold super well or risk damage or flying away. I would envy those installers of holiday pots and decor as they just stood there sticking stuff in the soft soil on Instagram feeds, because I couldn’t do it that way.
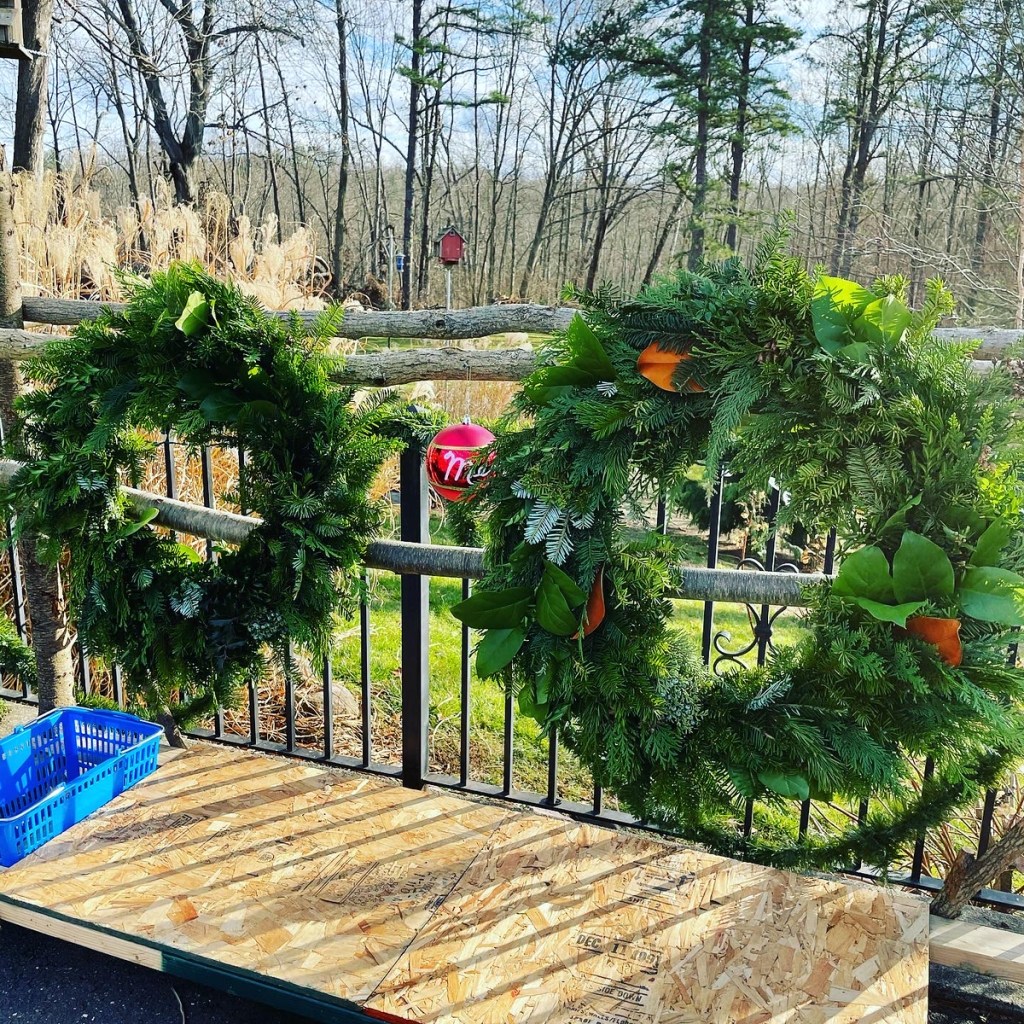
Pinecones weren’t too tricky to wire on. Greens were wired on greatly to secure them also. The steps I took to make items for a balcony that high up were more involved and required the hours prior. After making several wreaths for this winter job, I would place them up on tables in my garage and admire my work. Then go wash my hands that reached dry state from all the greens, gloves, and working in the cold, you name it. I loved every single minute, however. My passion for the greens and creating drove that part! Passion drove me to do it all.
One year, I had this idea of using round shapes and putting lights on them. I had acquired old antique rings and used those in the center with some wooden wavy white sticks and the dripping down solar lights. This was a year prior I think of the install above. Notice the wreaths are smaller. I started to realize the bigger wreaths were a better look overall. This theme was silver, white, natural, and magnolia leaves were used as well. Along with the shrubs and added greenery. I secured the three round wire rings with bent u-shaped rebar which was pounded in and the wiring of them together side by side helped as well.
This image above is at my house where I was in the midst of creating the wreaths – here they are without decor yet. I liked using magnolia leaves, but they were a bit pricey. I started to use lemon leaf (photo below) more so. Lemon leaf held up very well along with the mix of fresh greens such as balsam, fir, pine, and many more types of greenery. Each was hand-made by me, and I like the full fluffy look to wreaths.
In this photo of my Elf Helper with the wreath I made, the theme was green, cobalt blues, silvers and keeping it simple. Simple is good cause of all the wiring and securing required. Anything natural, from the natural world worked well. In this photo, you can see those silver open shell-like pods. What are they called? I don’t know but I scored those one year and I literally burned a hole thru them to secure the wire, they were hard like wood. I wasn’t the best bow maker, but I have a technique that worked well enough. Fortunately, the bows did well on the high-rise, with long tails to blow in the wind. They stayed in place and added a little touch of the theme’s color.
I wanted more of those driftwood brown trees used here, but I could not locate any more, and was able to acquire the off-white ones. Those worked really well. They can take the elements, don’t fade, and look nice. This particular year, we left center shrubs in from the fall in tall planters around the balcony perimeters, and I got smart with creating what I called “pot toppers” with various fresh greens and heavy-duty wreath frames, which I had to pull over the shrub. You cannot imagine what my “Crazy Cathy T” mind came up with! I was like, how do I get these over the shrubs without damaging the shrubs? Lots of measuring and then I used a pillowcase. Funny, huh? I put a pillowcase over the shrub and then pulled the pot topper over it to place on the rim of the tall planters. It worked really well. And the pot toppers stayed in place.
So many considerations took place on mostly how to make sure things don’t fly away. Each year, I came up with new ideas, out of the box thinking, and creativity. I hope the wiring of the ornaments and rebar will help you if you have a high-rise opportunity and want to decorate it for the holidays.
Thank you for visiting,
Cathy Testa of Container Crazy CT I live in the Broad Brook section of East Windsor, CT.
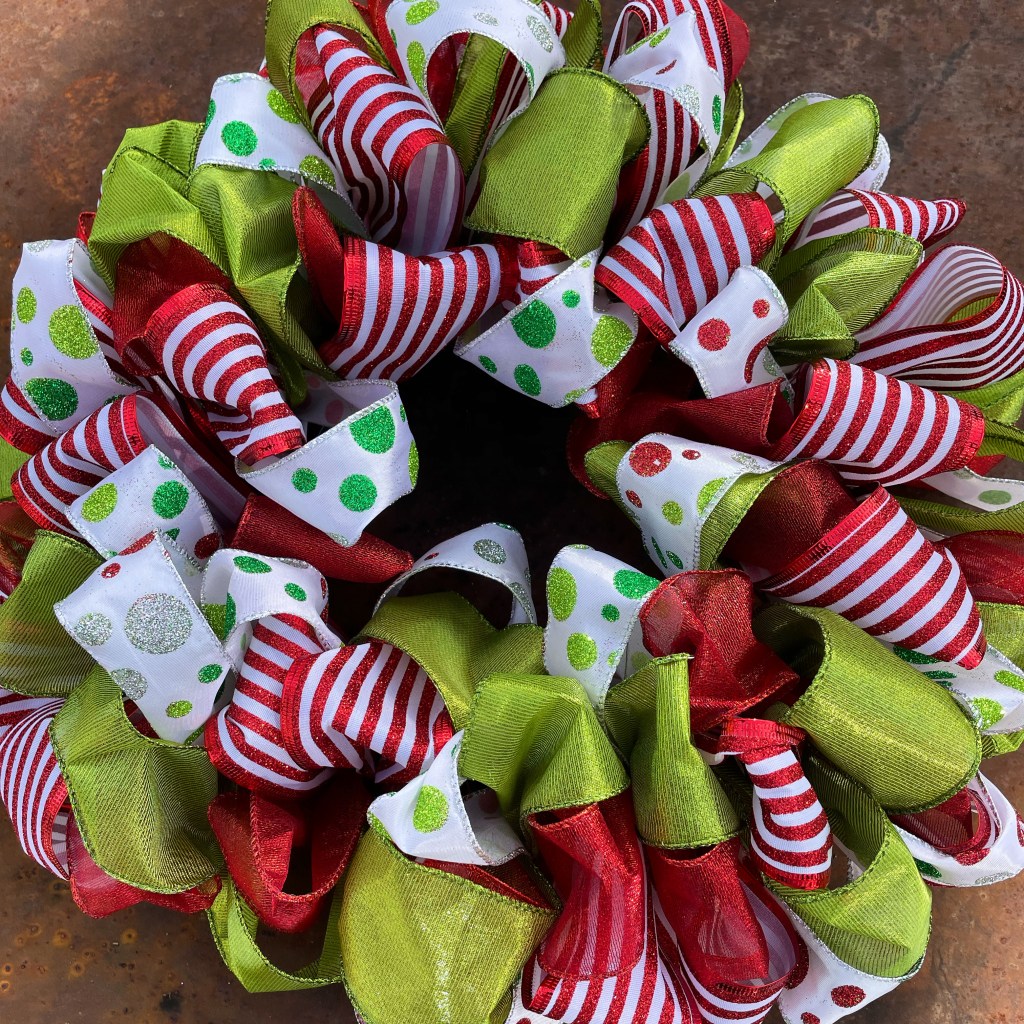
FYI, this year I am not making my greenery wreaths, but I have been creating ribbon wreaths as noted in the prior post. Here’s a photo of one I created below recently for a customer!
Yesterday I started the process of taking down my tropical Alocasia and Ensete plants from my container gardens and patio planters at home. It was a nice sunny day, and it is much more pleasant to work on them in the fall when the weather is not cold or too wet. These tropical plants must be removed and stored over the winter because they do not tolerate our cold winters here in Connecticut in pots and planters.
Here’s a photo of the plants I took out of the planters.
October 17, 2023 – Base of Alocasia plants (Upright Elephants Ears) and One Ensete (red banana plant)
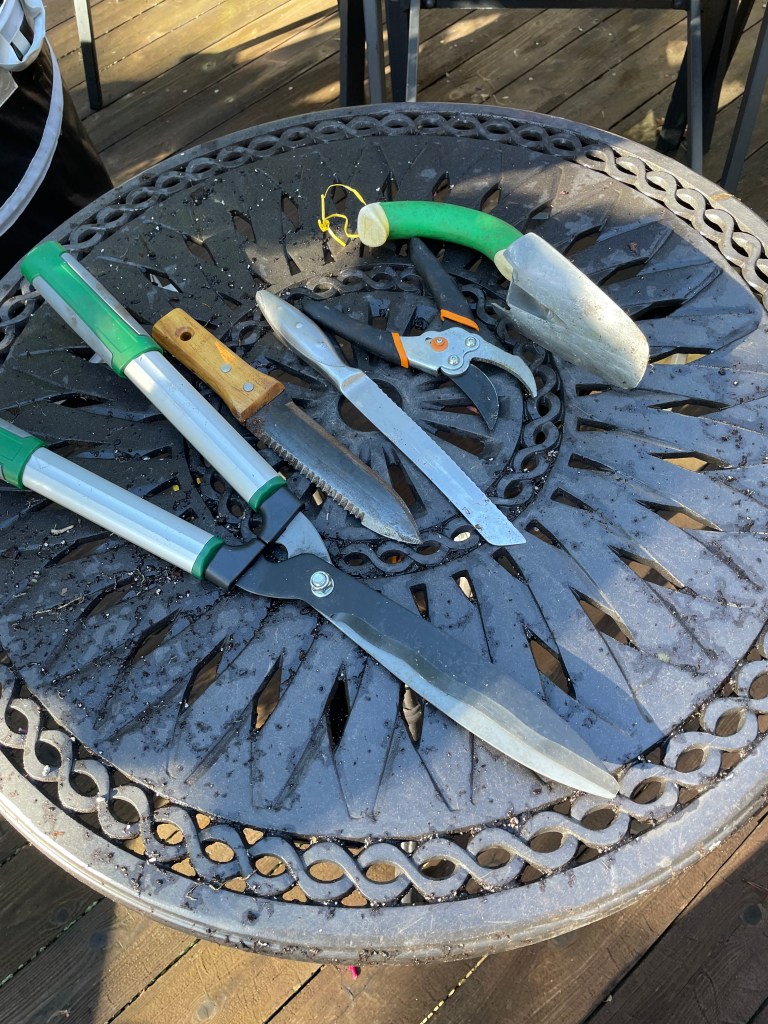
And here are my tools:
Tools Typically Used
Garden Sheers, Hori Hori Garden Knife, Kitchen Serrated Bread Knife, Pruners, Trowel, and Small Shovel.
Cutting off the foliage and stems
Cutting back the foliage is the first step and is relatively easy to do. Using the garden sheers or the kitchen serrated knife works perfect. I recorded several videos of me doing this and posted them on my Instagram page as well as my Facebook pages under Container Crazy CT if you wish to see how I used the tools to cut all the foliage back. Here are the links:
For the Alocasia (upright type), I cut off all the leaves with stem (petioles) attached about 6 to 9 inches from the base of the plant. After getting all the foliage off and tossing the items into the compost, the next step is to dig out the base of the plant. This is the area where the corm is at the base (often covered with furry looking or papery material and has the roots attached at the bottom), and up to where the petioles grow from and up to the green part of the plant. Sometimes you will see little round suckers forming at the bottom of the base. For the purposes of this post, I’ll refer to the whole thing as the “base of the plant.”
Base of Alocasia’s above
Base of Ensete (red banana plant) photo above
The components of the Ensete (red banana plant) are a little different than the Alocasia (upright elephant ears) because it does not form a corm per say as the Alocasia does. It is basically like a big stump, with the roots at the bottom. When I cut the leaves off the Ensete, notice I use a knife and cut away from the plant base to avoid nicking or damaging the trunk. Technically, it is called a pseudo-stem formed by the leaf bases but for ease of writing this blog post, I call it the base or the trunk when it comes to the Ensete (red banana plant).
Dig out, Upside Down to Drain, Air Dry
In both cases, the fleshy material can be damp and contain some water so after I dig them out, I lined them up upside down to allow water to drain before laying them on a table in the sun for a few days to dry out some more. If the weather is rainy, I move these into the basement to dry out on a table.
I will trim the roots somewhat so there isn’t as many roots as possible to deal when they are stored in a box. The boxes I use are cardboard with air holes made in them with a knife – slits basically. In a prior post, I talked about how I store the upright Alocasias differently than the regular elephant ears. In my experience, these upright elephant ears store better in a dry and dark state versus a damp and dark state.
I allow the plants to air dry and then I place the base (as shown above) inside a cardboard box that will not allow any light in, and I put the box in a cool, dark place in my basement. I will check them in a few months to see how they are doing. Storing my upright Alocasias this method worked very well last year.
In years prior, I had stored most of my tropical plant bases in plastic bins, with air holes drilled in the top covers, and in some slightly moist peat. This worked well for my Canna Lily rhizomes and regular elephant ears, but I started to see rot on the upright Alocasias and learned dry storage was better for those types of tropical plants. Either way, if you discover the bases are rotting in the boxes, it is best to toss them out. And try again next year.
Now back to how I dig them out of my planters.
The Hori Hori knife is my go-to tool first. I basically stick the knife straight down into the soil and dig around it (the base of the plant) to cut the roots under the soil. I’m careful not to hit the corm or any part of the plant below but I can hear the roots crack as I saw around them with the Hori Hori knife. Sometimes that is all it takes. If that doesn’t get it out, I use a small shovel to dig more around the plant and then I rock the base back and forth with my hands and eventually it comes loose from the soil.
Timing
You can do this process before or after CT’s fall frost, but again, when it is cold wet and frosty, sometimes the corms will start to rot in your pots, so I like to do this “take down” process before things are mushy and wet. It always works for me. I usually do this mid-October when are days are cooling down.
I do brush off or use a leaf blower or just my gloved hands to remove the soil around the roots and the base of the plant base as much as possible. By the way, gloves are mandatory for me – the sap from these can make your hands itch and it is difficult to wash off – so I always wear gloves.
Collapsible Bin – Very Handy
My sister-in-law gave me this bin this year and wow, I wish I had this for years prior. It is so handy. I toss all the foliage in there and toss into the compost.
Check the bases later
As noted above, I will check on the stored boxes of these periodically. Here’s a post I did last March when I check on them and they were doing well. You can see I used newpapers to make a bed for them and how the green is slowly fading on the photo below and eventually it goes dry.
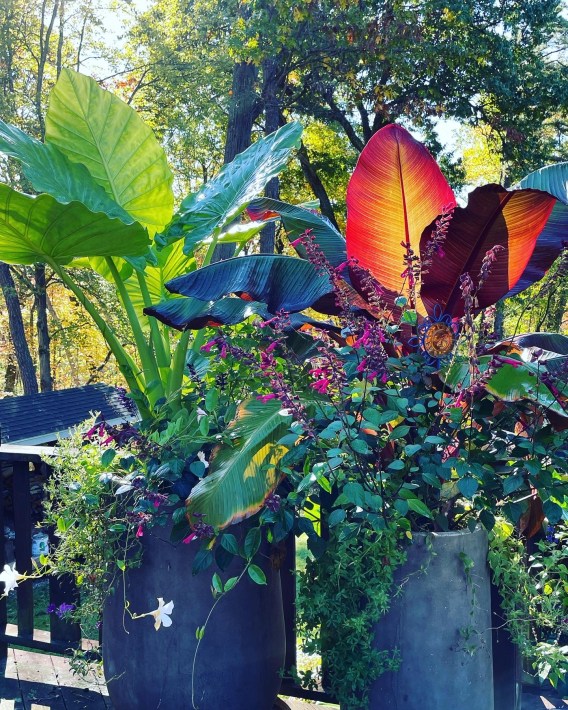
October photo of two of the planters (left Alocasia; Right Ensete)
As you can see, the flowers around the two tropical plants are starting to fade. The Salvias were still blooming (purple flowers), and I will miss those very much because two hummingbirds fed from them all summer. A bee or two was still visiting the blooms as well this month. They were so tall and beautiful. The White mandevilla was still offering some last blooms and the petunias faded pretty much. But the two tropicals still steal the show all the way into our fall season – why I love them so much.
The Ensete (red banana plant) on the right is a new one this year. I had stored a base of an Ensete for over 12-14 years but last year, I lost it, so I scored a new one this season. The Alocasia plants are from an original I got about 4 or so years ago and each year I get more from the pups and the repeat storing of the original. They are tricky to get growing in the spring though – and take a while to start from dormancy, but so worth it. Once they take off – they grow big.
Storing container plants is a way to save money and keep a plant growing larger as the base gets bigger each season. It’s a bit of a process but it went well yesterday for me. I’ve written my steps many times and just use the search bar to locate the posts.