There is no doubt mixing various fresh evergreens cuttings, snips and tips makes a beautiful wreath or kissing ball. It will add texture, color differences, and scents to your holiday creation – but using a single green, such as Boxwood, is also stunning because it creates a classic look and is easier to assemble, taking less time if you are in a hurry. And using Boxwood has some other unexpected advantages.
Six Advantages of Using Boxwood:
- No sap = No sticky hands
- Elegant dark green color = Classic look
- Faster Assembly = No need to wire batches
- Lighter weight = Easier to hang
- Easy to re-hydrate = If dry after harvest
- Can be Preserved = Lasts forever
Minor Downfalls:
- No fresh scent like Pine or Balsam
- One of the more expensive greens to buy
- May yellow a tad over time if gets wet outdoors

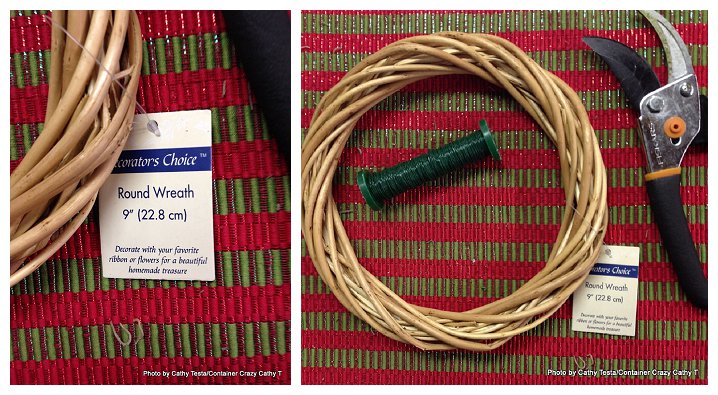
To make, you will need:
- Snips or pruners
- Green florist wire
- Boxwood greens (4-6″ cuttings)
- Wreath frame (13″ and 9″ used here)
- Ribbon (1.5″ width used) and ornamental decor
- Green zip ties (cable ties)
- Holiday background music (and perhaps a glass of wine)

Steps:
Prepare your batches of the boxwood greens first, cutting them at equal lengths. About 6″ tips were used. One of the other benefits, not mentioned above, is usually the boxwood pieces are full so you can easily get good cuttings of a decent fullness per each stem. For the 16″ wreath, about 12-15″ pieces are needed. The more you use, fuller the wreath. It is easier if you get them all lined up a ready before you start attaching to the wreath frame. For the 9″ wreath, about 8-10″ pieces are needed.
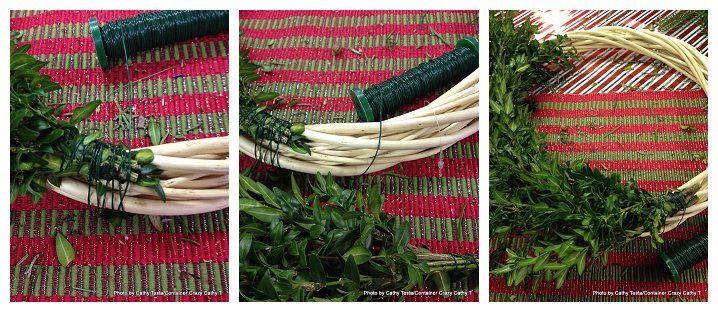
Wire the first piece of boxwood to your wreath frame with the florist wire. Tightly secure to the wreath frame. Once attached, move the wire down the wreath to the next position. You may have to twine the wire between the first batch and second batch on the wreath, but this is optional. It just makes the wire more smooth as you continue.
Be sure to put the next batch over the stems of the first batch so they are hidden well, and do not show.
Do not cut the wire as you work. Keep the roll going as you move across the wreath frame.
Continue around the wreath, spacing equally each boxwood piece, and being sure to cover the prior batches stems each time.
When you arrive to the final batch where you started on the wreath frame, tuck the last batch under the first batch to hide the stems.

Back Side:
This part is optional, but if you wish to hide the back part of the wreath frame, preserved Spanish moss works well. Heat up your glue gun and melt the glue on the back. Attach bunches of the moss around the back side. You could also attach felt, or some other decorative material. Because this frame is not green, it showed up a bit but still worked very well.

Bow:
Attach a piece of ribbon to the top of the wreath (about 10″ long). Make a bow and string the ribbon through one of the loops on the bow then pull tightly closed to attach the bow. This will attach the bow, and create a place to attach a hook on the back. You can either attach a hook to the bow ribbon on the back side, or attach a hook by using several zip ties. The hook can be attached in the beginning or at the end – because sometimes you will find one position of the wreath looks best after it is finished. Or if you have a place where it doesn’t look full, you may want to position the bow there to hide it.


Decor:
Go crazy or simple. For this wreath, some simple weather proof small decor apples were picked in and a dab of hot glue was put on the back side to secure each apple.
Cluster glittery ornaments right under the bow to hang in the center. Use a zip tie or wire to attach them to the base of the ribbon.
Because the Boxwood greens are a nice dark green, bright red looked amazing against this dark green color, so a bright red ornament was selected, along with two green ornaments. On the smaller matching wreath, only one red ornament was included.

Matching Wreath:
A second smaller wreath was made to match the first. This will be adorable for the recipient of these wreaths. And because the Boxwood greens is simple, having a second smaller wreath adds that special touch.

Re-hydrating or Preserving Boxwood Greens:
If you have harvested your Boxwood greens and they appear a bit dry, you can rehydrate them by soaking in water for about an hour, and then lay them out to dry on towels. Do not assemble the greens when wet – this will cause rot.
And did you know? You can preserve boxwood greens! Here is a link on the technique: Preserving Boxwood Greens by CraftingRebellion blog. Also, boxwood can be treated with Wilt-pruf to reduce drying of the greens prior to assembly.
Written by Cathy Testa