JEM’s Horticulture and Floral Design – Next Guest Instructors

2 Comments

The first time I attempted floral design at UCONN during my studies, it was awkward for me. I found it to be rigid and required a great deal of attention to balance, form, and structure. I remember my instructor was very formal and went over all the exact steps on how to do various floral design styles in each class which had to be followed in a very specific order. There was no playing around with the arrangement as we worked. It made me feel like I didn’t have the freedom to bend the rules.

Perhaps my frustration had to do with the feeling that I just didn’t have a natural talent for floral design, which is kind of odd to me because I enjoy putting together plants in container gardens and patio pots. For some reason, plants with roots attached versus plants cut from individual flowering stems, have always been easier for me. The process of selecting the plants by texture and color comes naturally as I insert them into a pot of soil, but floral design is a little different – because it requires a methodical approach.

However, I believe many people have a natural talent for floral design. They have an eye for how the parts come together in an arrangement – stem by stem. After all, when you arrange flowers in a vase or in glass container for display, you need to have each stem cut at certain length for the appropriate height and balance. The individual pieces must work together in form and function.

When I see beautifully arranged floral designs on the web, I always pause and admire the creator’s work, and that is exactly how I felt when I visited JEM’s Horticulture and Design’s website for the first time. Each floral arrangement made by the designers of JEM’s for various weddings were perfectly formed and assembled with really, really pretty color combinations based on various themes for each wedding they serviced – and I thought, their designs are traditional as well.

JEM’s Horticulture and Design

The art of floral design requires some basic skill to get started, which some people master over time, and I would have to say JEM’s Horticulture and Design has accomplished this. But, I didn’t know of them because I happened to browse their site accidentally. I met Jeff Mayer, owner of JEM’s, when I started my first nursery job after finishing courses at the University of Connecticut. At that time, he was new in the horticulture world, somewhat – but I was very new. We both had just acquired positions at a garden center and started chatting there as newbies. I was a career changer in my late 30’s, he was just starting his career in his early twenties.

Jeff and I started either on the same day or same week at the garden center. I can’t remember now exactly because that was over 8 years ago, but I remember we were learning our new jobs and getting acquainted with the regular long-time employees at the nursery.

As I got to know Jeff, he would sometimes offer me tips when I started drawing landscape design plans for customers of the nursery. He never mentioned to me that he had a degree in landscape design, but would try to help me whenever he could between moving quickly from the office floor to the nursery floor outdoors.

We also would joke about things from time to time, share plant passion comments during our daily work – and, I genuinely enjoyed Jeff’s company although he is half my age! Eventually we both moved onto different arenas in the plant world. We lost touch for a while, but we were both noticing our work online.

Fast forward to today. Jeff is a Head Grower of a very large grower based out of Cheshire, CT called CK Greenhouses. This is impressive. This growing facility sells to both to independents and big box stores – they process huge orders – into the thousands of plants.

In the winter time, Jeff has posted photos of their greenhouses filled to the brim with red poinsettias which is amazing to see as the miles and miles of bright reds, pinks and whites fill the scene. It’s incredible how many they grow there. And being a plant person myself, I know this effort requires horticulture expertise and talent.

One day last year, I decided to text Jeff to ask him a question about an insect problem I was having on a plant, and I took the time to tell him how I admire his progress in the horticulture world. He replied that he admired the creativity of my container gardens which he saw via my postings on Facebook. The bottom line is – even though I am not nearly as advanced as Jeff is with plant knowledge, we both seemed to find our niche in the plant world. And we both appreciate the differences of the working worlds we are experiencing today.

What I didn’t know was he and his wife, Mandy, started a floral design business in 2009. It started with their own wedding actually. It was the very first time they formally made arrangements, centerpieces, and corsages for a wedding. They decided to start offering their floral designs as a team and named the business JEM’s Horticulture and Design, with JEM’s being a play on their first names and sounding like “gem.”

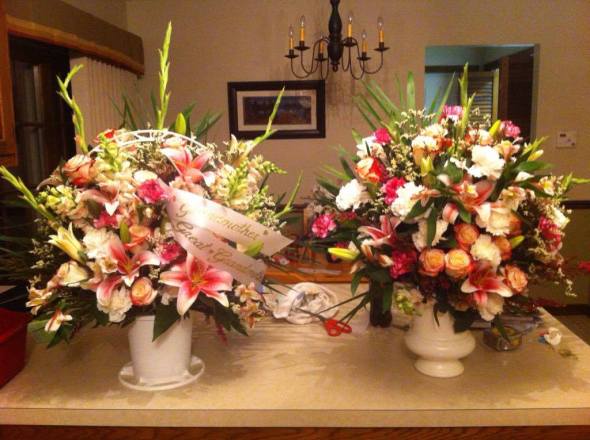
As you can see from this photo from their wedding day – they didn’t do a shabby job for the first time creating wedding arrangements in colors of the reds, bright yellows, and warm oranges to represent an autumn wedding date of October. Their adventure of providing floral services for weddings and funerals took off from there. They have serviced over 15 weddings to date, and as you browse their links on the website, you will see the various colors used for each theme and season.

Jeff is a graduate of The University of Connecticut with a degree in Horticulture and also a graduate of The University of Maine with a degree in landscape design. With his two degrees and experience as a head grower, you can imagine he has a wealth of knowledge about growing various plants, trees, and flowers. However, I didn’t realize what a talent he had for floral design arranging until recently.

Mandy, whom I met for the first time when she and Jeff met my husband and I for dinner, said she learned the skill of floral design from Jeff and their friend, Dory. Dory lives in Maine where Mandy is originally from, and it is where they delivered floral wedding arrangements for Kurt and Cindy, among other friends from that area. They designed the bride and bridesmaids bouquets as well as the centerpieces and arbor flowers. Personally, I absolutely love them – the whites, pinks and soft rose color are gorgeous in the photos shown from Kurt and Cindy’s wedding day.

Mandy describes herself as crafty but she said she doesn’t have any formal training in floral design outside of what Jeff has taught her, and her friend Dory who has a background in floral design also taught her – so there you have it – some people are gifted at floral design – and I think she is, based on all the arrangements they have done for friends and family ever since they did their own wedding arrangements.

jenny

Mandy has an eye for the colors and what would go nicely together, per Jeff’s description of her style. And she says, Jeff has the eye for texture and how to shape an arrangement. He is very symmetrical with his floral designs, something, which I noted earlier, I do not. This is something you learn and master, or perhaps have a natural ability for doing.

Jeff has done everything from small corsages to large arrangements. While he may appear as the master mind behind their floral design business at JEM’s, in just the one dinner meeting with Mandy, I was impressed with her talents and the way she spoke about everything we discussed. She is a very smart young lady and has a keen sense for business.

Funeral Arrangements by JEM

We had the best time talking that evening over dinner, and I probably was over-talking because I was so excited to talk plants, flowers, and workshops with them both – all the while, my husband, Steve, quietly listened and ate his Italian meal with no objections. He was probably admiring the connection between us as plant enthusiasts.

Floral Design Workshop

There are specific things to learn about floral design from how to cut stems, ways to store them, and how to prepare the water for long lasting pieces, and you may become a master or be like me, coming along slower when it comes to floral design – but I do know this for sure – creating as a group in a workshop energizes everyone attending and participating. It is inspiring to share a space, learn, and create – Thus, I was super thrilled when both Jeff and Mandy accepted my invitation to teach a class this year as part of Container Crazy CT’s “Nature with Art” class programs. This workshop is scheduled on Saturday, February 6th, 2016 in my Broad Brook classroom. Start time is 11 am.

workshop phot

We timed this workshop so attendees may make their floral design arrangement just in time for Valentine’s Day. This workshop is a great way to share time with your mom or daughter making your very own floral arrangement and taking it home to display, or to gather up some friends to create your arrangement.

Our feature flowers at this workshop will be Alstroemeria (Peruvian lily), spray roses (clusters of blooms on one stem), carnations, spider mums, mini carnations, daisies, and Ruscus (evergreen foliage). Additionally, attendees will have the option to buy a container at class (two types will be available) or bring their own of an 8” diameter. In addition, they will have the option of purchasing some special bicolor carnations, additional spider mums, and red roses. What more could you ask for?

I suggested to attendees currently registered that they may bring any embellishments they desire to dress up their floral arrangements, as shown on my Pinterest board. Bring it along, and we enjoy having Jeff and Mandy’s direction on everything at our workshop day.

To Register

We are so very lucky to have these two guest speakers on February 6th. There are seats still remaining. If you would like to register, please do so below, and confirm your seat by mailing in your payment ($45/pp) by January 15 to Cathy T’s Landscape Designs. The address will be provided after we receive your registration. We need to order the flowers three weeks in advance per my guest instructors, so don’t wait – We would love to have you to join us, but seats are limited – sign up today!

Family Photo

By the way, Jeff and Mandy have two beautiful children. They reside in Stafford Springs, Connecticut where their business is also located. Mandy also holds a degree in early childhood education from the University of Maine. She is a stay at home mom, and she and Jeff love combining their love of flowers, family, and home life.

Cathy Testa
containercathy@gmail.com
860-977-9473

“Stay Tuned for More Workshops! We are filling the 2016 Schedule!”

Bubble Photo with Logo

Why I love (and I mean LOVE) Container Gardening!

Leave a comment

Everyone who knows me, or has attended my container gardening hands-on workshops in the spring and summer months, is fully aware that I am nuts about container gardening. I love it. Even in winter as we stuff beautiful mixed evergreens into our pots to bring life and some color into the winter landscape – we are enjoying a form of container gardening.

Today, I am listing just some of the reasons why I love (and I mean LOVE) container gardening – and I think you should too:

It is easy, fun, and fast – Provides instant gratification! Even in winter, stuff in some greens, add some berries, and voila – You have a beautiful container garden on your front steps to welcome your holiday guests.

Cathy T Winter Pot

A Beautiful Barrel Stuffed with Mix Greens and Decor for the Winter

Container gardening takes less space and energy than in-ground gardening does to achieve success. It is instantaneous and provides lots of color and life to your yard. Just watching the plants and its visitors is good for your health. It makes you pause to view it all.

It is okay to make mistakes – This is how you will learn about plants. Plants in pots are more forgiving. You may easily fix mistakes quickly by re-potting or re-positioning the container to suit the plants’ needs, or the decor look you are attempting to achieve outdoors.

Deer can not jump onto your deck or easily visit your patio (hopefully) to dine on your plants in the containers and patio pots, and groundhogs have a difficult time reaching them too. Nice!

Your pets enjoy them – Cats enjoy them for shade in the summer, and they like to hide behind the planted pots when observing the birds or checking out the yard from different areas.

Cathy Testa Container Gardens_0019

Cat inspects the bees buzzing into a Mandevilla bloom. Little coco bowls with succulents make nice little decor on table tops.

If you have dogs, they usually like to sit by plants in pots to rest and relax after playing in the yard. They are less likely to tromp thru big pots of plants which are up high or elevated versus a level big garden inviting them to run over it and everything in it, or dig there. Setting up a garden to be pet friendly is somewhat challenging compared to plants in containers where you can monitor your little furry friends near your entertaining spaces by you, your home, doors, and entrances. Just be sure to keep any poisonous candidates out of your pots if they are the curious eating types.

Plant caddies (trays with wheels) allows movement with a slight push of the pot anytime I want, or anytime the plant wants, to be relocated if it needs more sun or more shade, a better home to view it from, etc. That’s flexibility. You don’t even need to get your hands dirty.

It is instantaneous – which is important in today’s world. Most of us want to enjoy beauty around us without too much time if we are busy with work and other fun things. Container gardening is quick, it is not too difficult to learn the how-to’s of Five Must Do’s by Cathy T – once you know them, it is simple and gratifying – and you end up being addicted.

You may use practically “any” plant – You are not so tied to your planting zones or rules because you are enjoying your plants for the summer season, you can use tropical plants and more. Don’t limit yourself to just annuals in the summer season, there are so many choices.

Drama is created with big and bold – Think different, big, unusual, and BOLD.  We like beautiful and showy backyards – and container gardening is a great way to achieve this BOLD look. Just one big plant which grows fast in a gorgeous pot will stop you and your friends in their tracks.

Copywrite Cathy Testa Concrete Planter

A HUGE container garden with showy tropical plants extends the season into Autumn (Photo Protected by Copyright)

You may create niches by grouping or staging various pots together. Potted plants will divide or connect spaces, they frame your view. It is an “extension” of your decor of your home and using some pots creates an additional room outdoors while entertaining your friends or being solo enjoying nature. The right pot can draw you out into your landscape to escape and veg’ out – something we all need to do more of, right?

Winter container gardens with evergreens dress up your outdoor space too – two pots by an entrance with greens, berries, golden or red sticks, is a way to say enter here and enjoy the holiday party. In Autumn, you extend your outdoor spaces with plants in pots that will remain until the first frost – they give so much those potted plants.

Not many bug problems or diseases in potted plants, and if there are any, you see them right away because your patio pots (and indoor house plants in pots) are usually near you. Potted plants have a more sterile environment as well, so the incidence of pests problems are less likely. If pests occur, the containers are easy to treat or quarantine.

If it fun to observe the cute visitors to your plants – hummingbirds, hummingbird moths, butterflies, bees, or even your mother in law admiring your patio pots! It helps your important pollinators – when you see bees visiting a flower, you will hear them buzzing as they go in and out to collect their nectar. It feels good to assist our little friends; we need them so lend them a hand by planting flowering plants in pots.

Bee on Turtle Head Cathy Testa

Bees enjoy a perennial (Turtlehead) flowers in a Container Garden

It helps your health – as you sit up close and personal enjoying your patio pots in your deck chair – you tend to relax, smell the aromas which calm your senses, and you take time to breath deeply – rather than think about all the weeds you have to pull from a garden bed. The distraction of admiring your potted plants in various mixed combination is a form of meditation which is very beneficial to your balance and harmony.

It is not too physically intensive, so if you have any issues with your back or knee problems, or digging in dirt in the ground with a heavy shovel is not your idea of fun, this type of gardening is for you. You may elevate pots or position them in a way for easy harvesting of veggies, herbs, and other goodness. Right outside your door – kitchen container gardens rule.

Cathy T Containers_0012

A pot on the deck by the pool – two pots say walk here to lawn area, etc.

You can hide problem areas in your landscape, or place beautiful container gardens on your steps or patio to utilize pots as amazing focal points, or test the scale of a plant to be planted in the garden by putting a pot there first. Plants in pots are functional art – they say, “Go here, step down there, look here, and stay here to enjoy life and nature.”

Mojito Ele Ear Cathy Testa-001

The amazing colors and patterns from an elephant ear – Colocasia ‘Mojito’

Textures and/or colors to be added to the garden later are easily tried out by using plants of them in a pot in your garden first. If you are unsure what to plant in your garden, put a pot there for a while and contemplate the look and feel of the plants’ style, look, colors, etc.

Lastly, you can create containers of lush plants, strategically place them on your patio or deck, and drink a margarita – now that is my idea of gardening and reducing stress.

And let’s not forget – during the winter, you can admire all the beautiful container gardens and patio pots you have arranged and grown from last summer as you browse your own photos or ‘Pinterest Pages by Cathy T‘ and Instagram photos – This will help you get through the winter months when there is more snow on the ground than anything.

Container gardening and patio pots are part of life today for adding beauty all around. Add a rain barrel to the area near your pots in the summer to use natural resources to water them. Keep an empty big barrel by a greenhouse or garage door to fill with snow during winter, and take it inside to melt onto the soil of pots of dormant plants being sheltered for the winter.

We all will enjoy container gardening as much as I do. I hope…

Cathy Testa
http://www.ContainerCrazyCT.com
860-977-9473
containercathy@gmail.com


Search Terms – A Look at Last Week’s

3 Comments

I thought it would be fun to share some of the search terms which were received last week on Container Crazy CT’s blog. Search terms are words or phrases people use on search engines like Google to find posts on my blog. The terms are not visible to the general public but can be seen via stats and such on the blog’s background pages by the blog owner only. I would never reveal anything private and luckily all of the searches are directly related to plants and, as you can see, decorating for the holidays which is appropriate for this time of year.

Banner 1-002

People are definitely searching for holiday decorating ideas, and many are asking about how to use mesh ribbon. Then there are the plant related searches, and last week, people were looking for information on Kalanchoe ‘Fantastic’ and Petasites japonicus, for example.

Some were looking for information on gardening techniques, such as “how to dismantle a garden” or “where to find Gingko trees in Connecticut” and information about “overwintering plants in the basement.”

Hopefully, they found what they were looking for, but if not, I thought I’d add some additional information here on some of their specific search terms:

Mesh Ribbon Projects_0002

The “mesh ribbon” search

As you can see, many folks are looking for information and ideas on how to use mesh ribbon.

Mesh ribbon has become super popular for its ease of use in the decorating world. It can be used to make a big, puffy, large show on a variety of crafting projects. With a couple of twists and turns, mesh ribbon makes quite the festive creation as it is added to wreaths, arches, and anything you can think of. I love using it.

I think the only downfall with mesh ribbon is when exposed to sunlight over a long period of time it fades. Otherwise, it is perfect and reusable each year so it doesn’t get wasted or tossed out – it can be disassembled as easily as it can be assembled and stores well in boxes after the holiday season is over.

Mesh ribbon comes in a wide variety of colors and patterns and can be found practically anywhere. It comes in every color imaginable. I’ve used it on the Fourth of July, Halloween, St. Valentine’s Day, and St. Patrick’s Day – it is easily attached to container gardens to add some bling.

4th of July Succulents ContainerCrazyCT_0001

One person searched the question on “if you can cut mesh ribbon?” And yes, you certainly can but be sure to use a very sharp pair of scissors.

For assembly to wreaths, I use zip ties to gather and pinch sections of the mesh ribbon together or you may use green florist wire. You may see how I did this on the following posts:

Three Easy Ways to Use Mesh Ribbon

This post above has been viewed quite a lot this month. People new to mesh ribbons are searching on how to use it, how to attach it, and looking for creative ideas.

You should also check out how I use zip ties to attach mesh ribbon to various crafting projects. Remember to use green or a dark colored zip tie so it doesn’t show between your decor, etc.

Using Zip Ties to Attach Mesh Ribbon

This post shows how I attached the ribbon on wreaths and other holiday decorative items. I find gathering it in spaces between each puff is easily attached when using zip ties. They are so handy on crafting projects and I attempted to show what I mean in the post above.

Snip Roots

The “overwintering plants in basement” search

I hope the person looking for this information was able to locate it on my blog because I’ve written and spoken about how to store tender tropical plants many times, but I think maybe the general nature of the search term words used implied they may be looking for what is needed in a basement to keep your plants there over the winter?

For starters, most basements are dark with very little natural light, so for plants that go dormant naturally in pots, a basement is a well suited location to move your plants in the winter. Canna and Colocasia (elephant ear plants) may be allowed to go dormant in their pots, and may be moved to the basement if your basement is frost free, stays cool, and you have some space to put them.

If you have plants which require a period of dormancy in order to bloom, along with some darkness and reduced watering, such as Clivia (which comes to mind because a nurseryman gave me one recently) or Amaryllis (Hippeastrum species) which is sold around this time of year and forced into bloom in time for the holidays, the basement is a good place to place them for their resting/dormancy period.

In addition, some bulbs, corms, tubers store well in dark, dry areas of the basement. It is important to note some underground storage organs like conditions a bit on the damp side, while others like it dry. Look up your type of storage organ (Dahlias, Canna, etc.) for which you are storing in the basement to determine which they like – dry and dark, or damp and dark.

By the way, Amaryllis do not technically require a resting period in order to bloom, but to control the blooming, many people will bring the plant inside after the summer season and store them in the basement. The plant should not be watered, as is with the case of Clivia, for a period of time before you bring it back out into a warm sunlight area in your home. So basements are perfect for plants like these two examples.

Basements typically remain cool but do not go below freezing which is another reason why they are so handy for plant storage. I put my boxed up Canna rhizomes by the basement door corner area on shelves and they seem to like this spot best (the sweet spot). Also, if you heat your home with a woodstove which is located in the basement, this can make the basement too warm for storing conditions, so bare this in mind. Or keep the boxed up underground storage organs far away from where your woodstove is located.

In the fall, I showed my workshop attendees exactly where I stored my boxed up storage organs so they got a feel of what I mean – each home is different, so you need to determine what you have and work with that (such as a cool basement, a cool closet or room in the home that is not heated fully in winter, a sunroom that is not heated, maybe your garage, garden shed, etc.). They need to be a place where it does not go below frost but is not too warm for growth.

ContainerGardenTakeDown_0037

The “how to winter a maurelli abyssinian banana” search

Oh gosh, I hope the person searching this topic found what they were looking for on my blog because I’ve documented the steps I’ve used which have been successful for many years on storing the Ensete ventricosum ‘Maurelii’ plant (red banana). Here are the links where you may find this information:

Storing My Big Red Banana Plant

This post above has the step by step process with photos. Storing takes place in late October or early November.

Overwintering Red Banana Plants

Red Banana Plant Revived Again

What should I do with my Container Gardens and Patio Pots?

In the fall season, workshops on the ‘how to’s’ are offered in my area of East Windsor, Connecticut. Each steps is demonstrated and step-by-steps workshop handouts are provided, especially useful for the attendees of my May Container Garden Workshops as a follow-up when the season comes to a close.

Plant Searches

It was interesting that Kalanchoe ‘Fantastic’ showed up twice in the same week. I’ll have to look around to see if the nurseries are offering it right now – This could be why there has been an interest in learning more about this plant known as a paddle plant. This variety has a fantastic coloring pattern to it of light green, creamy off white, and pink. Maybe folks are seeking it out because it is so pretty inside the home, and this plant makes a nice houseplant because of its look, easy care, and light watering routines, especially this time of year in winter.

Other plant searches were on Petasites japonicus, which is one I’ve written about due to its huge round leaves which are very showy in container gardens, and by the way, it can be overwintered in a shed. I’ve done it many times by moving the pot with a Petasites in it into the unheated shed before winter with success. This is a perfect plant for container gardens because they are a nuisance in the ground – aggressive spreaders. So in containers they are contained and controlled, plus their tough nature makes them easy to overwinter – they make it in an unheated shed every year. See Troublemakers Turned Stars post for more about aggressive plants which are stars in containers and patio pots.

The other plant searched for was a Salix (willow) which I don’t believe I’ve written extensively about on this blog – looks like it is time to do.

Of course, as I mentioned above, I would not share any searches which seemed private in nature. There was one odd one, and let’s just say, I’m glad it was not about me! It had the words: Crazy + Cathy. I’m crazy alright but only crazy about plants, container gardens, art, and of course – holiday décor this time of year. It is time to deck the halls…

Enjoy your week everyone,

Cathy Testa
www.ContainerCrazyCT.com
860-977-9473
containercathy@gmail.com

The Complete Search List from Last Week as typed by the searcher:

  • How to transport a tree in a pickup
  • Salix purpurea ssp. Lambertiana
  • Cans recycle garden
  • How to use mesh ribbon
  • Meshribbonrubanemaille
  • Dismantling a garden
  • Christmas decorating with mesh ribbon
  • Kalanchoe thyrsiflora fantastic
  • Can you cut mesh ribbon
  • Uses for buffalo snow
  • Christmas mailbox swags
  • How to assemble a fresh herb wreath
  • How to decorate with mesh
  • How to decorate a Christmas wreath
  • Instead of a traditional Christmas wreath
  • Overwintering plants in basement
  • How to make barbed wire wreaths
  • Fantastic kalanchoe
  • How to winter a maurelli abysinnian banana
  • Decorating with mesh
  • Nurseries in CT that sell ginko trees
  • Petasites japonicas
  • 20 facts about the coneflowers
  • What is the herbal plant that can cure
  • Decorating with wide ribbon
  • Petasites japonicas

Holiday Gift Cards and New Workshops

Leave a comment

Gift Cards and New Workshops

Hello everyone,

‘Tis the Season’ to get started for your upcoming holiday fun – So, here’s a heads-up on new items and activities I am super excited to share with you today. Container Crazy CT has new workshops being offered in 2016, gift cards available for the holidays, and more.

New Gift Cards

Container Crazy CT has new “Gift Cards” available for purchase. They are redeemable towards workshops, onsite consultations, container garden gifts, or seasonal plants. Perfect for the friends and family members in your life who enjoy DIY classes, plants, gardens, containers and art fun. The card has a beautiful holiday theme cover with a colorful container garden photo.

Greet Card Gift Card

A beautiful card with container garden photo

Returning Guest Artist

Laura Sinsigallo of timefliesbylauralie is returning as a guest speaker in 2016. We had such a wonderful time learning how to make her unique and eclectic wind chimes the last time she was here and she enjoyed teaching our group. As you know, Laura Sinsigallo has many talents from paintings to cute figurines for special holidays – she is a very creative person. Her program will be in April 2016 and the special Art Work to be made in class will be announced very soon.

Laura Sinsigallo with her painting - Out guest artist in April

Laura Sinsigallo with her painting – Out guest artist in April

Floral Design – New!

Mandy Mayer of jemshorticulture.com will be our new speaker at our 2016 workshops. I am so excited to have her join our list of guest artists. She designs beautiful bouquets and floral arrangements for weddings and special events. Her business is called “JEM’s Horticulture and Floral Design” located in Stafford Springs, and you won’t want to miss this workshop. We plan to have her program offered in February 2016. Stay tuned for details.

Photo by M. Mayer, Floral Designer

Photo by M. Mayer, Floral Designer located in Stafford Springs, Connecticut.

Kissing Ball Class

The first class is full, the supplies are ordered, and the workshop space is being adorned! So excited to have NEW and REPEAT attendees coming. If you were unable to sign up for this class, mini workshops are offered during the week following the first workshop date of 12/5. And don’t forget to bring your own florist wire and decor to adorn your balls, wreaths, etc. Looking forward to seeing you!

Special Orders for Wreaths or Kissing Balls

If you would like a handmade wreath or kissing ball, please don’t hesitate to ask. And don’t forget to visit my Pinboards and Instagram pages for inspirational ideas. It’s time to get your jingle on.

See you soon,

Cathy Testa
Enhance Your Outdoor Surroundings…
860-977-9473
containercathy@gmail.com

Repurposing Prescription Pill Bottles as Seed Containers

8 Comments

Recently, I decided to use the plastic pill bottles provided by my pharmacy for our prescriptions as small storage containers for my collected seeds. The pill bottles are small enough, have a label on them already which I can write the plant and date on with a sharpie marker, and the amber color of the plastic pill bottles are dark enough to prevent light exposure.

Pharmacy containers are made from light resistant plastic and meet USP light standards for light transmission and USP tight standards to protect the contents from contamination for pills, so I figure they must offer the same protection for seeds. Plus, it feels great to repurpose these pharmacy pill bottles rather than tossing them into the recycle bin.

ContainerGardenTakeDown_0012

Before taking seeds from plants that you want to try sowing next year, it is important to know that several changes take place in seeds as they mature and ripen on plants. Sometimes, you may notice the outer parts covering the seeds start to become dry and brittle. Eventually, as it dries, the seeds fall naturally from the plant or the coverings crack open to reveal the tiny seeds held inside.

Seed Coat Colors and Moisture Content

The colors of the seed coats will change as well as they mature. They may change from a light color to a dark color such as brown or black. But what you may not realize, since it is not visible to the naked eye, is the moisture content in the seeds reduce during their maturation process.

Some seeds need to retain moisture while others can tolerate a higher percentage of moisture loss as they naturally dry. It depends on the species of plant. Each is different. Fortunately, we can leave the moisture content percentages to the professionals as they know when to harvest their seeds for optimal germination.

Seeds may dry some more after harvest and/or before you store them in a container. If the seeds become too dry, they may not germinate the following year.

It is difficult to determine what is going on with the moisture content, but it is helpful to know because many people get frustrated when they sow a whole tray of harvested seeds – only to find out they won’t germinate. Feeling frustrated, they think they lack a green thumb, but it could be just the reality the seeds have gone bad because they did not mature fully on the plant before harvest, or because they were stored inappropriately.

Seed Collecting_0001

Seed Collecting_0002

You may notice seeds or their outer coverings are hard on some species of plants. A good example, which comes to mind because I just collected them, are Canna seeds. They are as hard as rocks or marbles. They need to be chipped in order for water to enter the seed when sowing them.

How Seeds Travel

In nature, animals will eat seeds and carry them to different places, the first being their digestive tract which will soften the seed coats as its pass through their gut. When released to the ground, the seeds will most likely germinate if the environmental conditions are right (light, temperature, water, oxygen, etc.).

Other seeds have interesting spines which become attached to animal fur, and our clothing when we do gardening work. This is another way in which plants modify their parts to make sure they are successful at getting off the plant and into the ground to grow.

ContainerGardenTakeDown_0007

An example of seed coverings that are spiny are the seed pods of Castor bean plants. When broken open, you see the seeds within but the outer parts are covered in spines. Another modification to seeds are the wings we see on maple tree seeds which make them fly. They are called ‘Samaras’ and are on ash and elm trees too.

Then there is the method of moving seeds by water – think coconuts. Even explosions are used by plants to burst seed coats open which shoot seeds out and about to disperse. Clever those plants are in their strategies. No high speed WiFi needed for them.

ContainerGardenTakeDown_0009

As noted above, if seeds are taken off plants too soon, they may not be fully developed. They may still germinate but the plant may not be of good quality or short-lived. Additionally, if seeds are not stored appropriately, they may loose their ability to germinate.

Storing Seeds at Low Temperatures

Seeds should be stored at low temperatures and low-humidity. You may have heard about how seeds can remain good for many, many years, even up to 75 years. This is true, but usually it is with the case of seeds with very hard seed coats. They will not germinate unless the seed coat is nicked, scratched, or chipped so it can take in water. Fires are another way in which hard seed coats are broken or damaged. Nature always finds a way.

Some people will keep their seeds in their refrigerators to keep them long term which works, but if the seeds have too much moisture content at time of harvest, the moisture inside the seeds may freeze. Moisture proof containers help this situation.

As for myself, I haven’t done much seed collecting over the years, just a bit here or there. I’ve stored them in envelopes before but this new method of using the pill bottles is handy and convenient. So far, it has worked.

Just a little tip!

Cathy Testa
http://www.ContainerCrazyCT.com
860-977-9473
containercathy@gmail.com

← Back

Thank you for your response. ✨


The Container Garden Take Down Process Begins

5 Comments

Hello Visitors,

I’m posting some misc photos this week of the work I will be doing here and there as I take apart my container garden plants. This is for the friends and workshop attendees who are probably ready to do the same – and I hope the information is helpful to you. As always, ask questions if you have them!

Tuberous Begonia

For the first time, I grew a tuberous begonias from tubers. They were started in early March indoors by placing the tuber’s hollow side up in moist peat. They must be kept warm and carefully watered to not over water or under water (keep moist). Shoots began to form, but it took a while for the plant to kick in and later produce blooms, but it was worth the wait.

Three of the plants were gorgeous and showed off orange flowers shaped like peony flowers (male flowers) and rose shaped flowers (female flowers) on the same plant. The stalks of these types of begonias are very fleshy and one plant leaned over from the weight of the plant by the end of summer, and from the force of the wind during last weekend’s rain storm.

I chopped off the top of the plant using clean pruners, and then tipped over the pot and got the soil base out carefully on a table. It was fairly simple to locate the storage tuber. I will allow it to dry a bit on newspaper then it will be stored over the winter in a cool dark place. These tubers should be checked to make sure they don’t dry out during this process in the winter months.

Tubers of these types of begonias must be dug up before our fall frost hits and dried slowly before storing them in peat moss at about 45 degrees F. Wish me luck – I hope to grow even more of these plants next spring!

Showing Steps of Taking Down a Tuberous Begonia

Showing Steps of Taking Down a Tuberous Begonia

Recycling the Soil

Recycling Soil for a Year or Two

Recycling Soil for a Year or Two

If you have attended my workshops in May on container gardening, you heard me go over the soil-less mixes and what I find has worked well over the years. I’ve also mentioned that reusing soil mix is not recommended, at least not for many, many years – and especially when you keep the mix in the pot with the plant. It just doesn’t retain water well or hold nutrients as nicely when it is worn out – BUT you can use it for a year or two, or put it into a compost pile, or sometimes – I will put it in a huge pot (like my big black pot with my red banana plant – see prior post on that). Putting it into bins like shown above is helpful. I remove all the foliage and make sure none of that it is the soil bin, and I put the cover on, but I also remove the cover from time to time to let it breath as the water condensates. These bins will be moved into my garage or growing room soon to stay over the winter and will be reused next year.

Castor Bean

Castor Bean Seed Pods

Castor Bean Seed Pods cut away from a huge plant!

If you are my neighbor or you drive down my road – you have definitely noticed the crazy size of my Castor Bean plants (Ricinus) at the end of my driveway.

A woman pulled in one day, drove down my long driveway to inquire what the heck was growing there. “She had to know,” she said.

This plant made me laugh every single time I left or returned home. It is massive! I’ll share pictures of it later.

This plant is easy to grow from seed. I got my seeds from Comstock Ferre in Old Wethersfield, CT this year. The plants reached about 12 feet tall at the end of my driveway. I also grew some in the ground in my backyard.

The leaves of this giant would be perfect to make leaf castings for birdbaths! This huge tropical can be impressive and comical, as mine was this season.

Just yesterday, I thought I better chop down one because it is becoming a hazard. It is blocking the view of oncoming cars as we leave our driveway.

As I cut it down with big loppers, my neighbor yelled out, “Cathy, What did you feed that THING?!”

Ironically, I gave it the ‘liquid blue’ only 3 times the entire summer, and it was only to the one growing in the pot. The other two grown by it’s side in the ground did not get watered or fertilized at all.

The potted one got watered daily however. I would fill a bucket in my car with water every time I drove out and stop to pour the bucket of water in the potted castor bean plant.

This plant gets huge stalks, which resemble bamboo. Its odd alien like flowers turn into seed pods with burrs on them, as shown in this one clump I chopped off yesterday. It did compete with other plants in the bed part though – my white lavender plants and bee balm were hurting later in the summer as the castor bean plants took over.

Castor beans do well in full sun – which the mailbox specimens were in most of the day, but they can take part sun too. The only other thing is that bed was filled with compost when it was edged with stone, so that is another reason why the plants probably did very well in the ground there too – good soil base.

And it is a fast grower, so if you decided to give it a try next year – take note of where you place it for it will take up space and compete for nutrients and moisture of other plants in the same bed.

Also, take note – all plant parts are poisonous. It is not overwintered by plant parts – but you may save the seeds to regrow them again next year. Or just see me in May.

Red Banana Plant with Two Coleus

Red banana plant with two types of Coleus

Red banana plant with two types of Coleus (Alabama on right, Icky Fingers? on left)

Okay, so I don’t always instantly remember the cultivar names, but on the right side is Coleus ‘Alabama’, which I love. And on the left side, it looks similar to the cultivar, ‘Icky Fingers’. These plants can be saved by taking tip cuttings and rooting them in water, then potting them up to save a small portion for reuse the following season. Or they may be cut back somewhat, dug up, put in a pot and grown as a houseplant over the winter by a semi-sunny window.

As for the red banana plant, I will be showing how to store what I call the “root base” of these plants at the October 17th session. This banana is a look-alike (not a true banana plant) but who cares, right?! This plant is gorgeous when it grows large especially. The leaves are broad and this cultivar ‘Maurelii’ (red Abyssinian banana) are reddish and lush colored with trunks of red coloring. They are relatives to Musa (true bananas) and I grow, overwinter, and sell these every year, obtaining stock from a local Connecticut grower.

These plants grow tall and large in our warm summers in big pots but must be overwintered since they are not hardy. You can move it indoors (if you have the space somewhere) — And remember, if you do move it indoors as a houseplant – do it before frost. Once it is hit by frost, the leaves turn black and to mush.

Or you can dig up the fleshy root base to store it over the winter in a cool place, just like you do with canna rhizomes. You can even store it in its container, if it didn’t grow too large, in a cool dark place until our spring arrives.

The steps on how I do this will be shown at my informal session on October 17th, Saturday. It is also shown on my blog post, step by step, from last October. I recognize you may want to take apart your’s at home now, so sharing all in advance as well.

Begonia ‘Gryphon’

Begonia 'Gryphon' Zones 9-11 - A Winner!

Begonia ‘Gryphon’ Zones 9-11 – A Winner

This begonia, at the base of this container garden, impressed me this season as a container garden filler. I ordered them from a local CT grower for spring, and sold this plant at my May workshops – and it turned out to be very impressive.

The leaves grew bigger than my hand, and the dark green leaves with little bits of white were showy – and healthy, all season. It was very reliable – and low maintenance. I just loved it.

It is considered a tropical plant – for zones 9-11, but is wonderful in our patio pots in during summer seasons. This type is best saved as a house plant. I will dig it out carefully with soil around its roots, and re-pot it into a nice pot to keep inside this winter. It should be kept by a brightly lit window area; not full harsh sun, but bright area inside the home. Be aware of drafts by windows in winter as well.

Lining Them Up

Lining them up

Lining them up

Besides moving 3 wheel barrel full loads of compost, which sat on my driveway all summer, I moved the pots which were carried down from my deck last week by my nephew and his friend to be lined up like soldiers. Somehow, they look taller here than they did on the deck all summer. I will decide which to tackle today and which to keep as demo’s for the workshop on the 17th.

Check-in tomorrow to see what gets done this afternoon.

Thanks,

Cathy Testa
containercathy@gmail.com
(860) 977-9473

← Back

Thank you for your response. ✨


What Should I Do with My Container Gardens and Patio Pots right now?

1 Comment

You – like me – probably thought you better move in some of your deck pots as a result of the gusty winds and cooler temperatures hitting us right now.

I decided to spontaneously text my brother and nephew yesterday –> “Want to make a quick $20 bucks? I need some help moving my big pots from the deck.”

He immediately responded with, “How about right now?”

Well, long story short – It was a blessing they happened to be free at that very moment for about 30-40 minutes. They came right over. I quickly got my garden gloves on and moved some debris from an ornamental grass I had left lying on the ground in the way.

As soon as they arrived, Ross and Joe started picking up some of the medium sized pots in their arms and walked them to an indoor location for me.

I was washed over with relief as I watched them walk down my deck stairs with the pots hovering over the shoulders and my big plants bobbin’ over their heads.

When Joe picked up the Agave in my urn, I kept repeating – “BE CAREFUL, it is a weapon and the spines on the tips could take your eyes out.”

When showing Ross one of my prized plants – I pointed out a stem while indicating it is easily damaged. “I really don’t want it to break,” I said. He was super careful.

“Don’t drop the pots hard when you put them down – This can cause the pot to crack especially for pots that are thinner resin pots.” Another statement I was saying quickly because these two young guys were moving fast.

Ross asked several questions along the way. “Wow, what is this purple plant?” he asked.

“That is Persian Shield, and it is called, Strobilanthes,” I replied.

Strobilanthes (Persian Shield) is a purple plant - the color is fading due to cooler temps.

Strobilanthes (Persian Shield) is a purple plant – the color is fading due to cooler temps.

Ross then started taking photos with his phone before he picked up the next pot.

Tall pot toppled over already from gusty winds.

Tall pot toppled over already from gusty winds.

After all was moved into an enclosed growing space or onto my driveway for ease of taking them apart later, the guys wanted to pose by my big red banana plant in the backyard. This plant will be part of my overwintering demo in two weeks (and may be published in a catalog. More on that later.).

What To Do with Your Pots Right Now

Some of your tropical plants in container gardens and patio pots (banana plants, Canna, elephant ears) are still safe out there however. The temperatures are in the 40’s to 50’s degree range, and with the 30-35 mile hour winds, it will feel like we are hovering in the mid to lower 50’s. It will feel cold but we are not getting frost.

The gusty winds will tear leaves of big banana plants probably and the cooler temps will make some of the leaves start to turn yellow. Plus, all the cold rain will cause dampness around your plants. This will make your pots heavier as the soil gets soaked.

Some of your tall pots may fall over from the winds. My tall red pots with towering Canna plants already did – so if you are concerned with breakage of pots or plants, move those to a sheltered location.

Even though, I am offering a session on October 17th to demonstrate how I store the root bases of red banana plants, and how to store Canna rhizomes and elephant ear corms (bulbs), I’m shooting off some tips right now quickly.

Ross and Joe with the Stemmed Plant in Center

Ross and Joe with the Stemmed Plant in Center

Tip # 1:

Get help – if possible. The best part of my 3 amigo’s spontaneously helping me yesterday is they refused payment when they were done. I almost cried. I suggested some cocktail treats – and they responded with, “Yah, let’s go to Broad Brook Brewery soon.” If you can’t get help, use a handtruck to move heavy pots – and take your time. Try not to rush, bend those knees, etc. If a friend is helping you, please remind them to be careful to not rush – this results in hurting your back or straining something when moving heavy pots.

Coleus 'Dipt in Wine' is stunning still, taking cuttings of the tips with stem and leaves will save them.

Coleus ‘Dipt in Wine’ is stunning still, taking cuttings of the tips with stem and leaves will save them if you don’t have a growing location inside.

Tip #2:

Coleus – If you have some in pots, take some tip cuttings and put in water in a cup or vase. This is a way to save a bit of the plant. It will root eventually and you may pot it up in a small house plant pot to keep over the winter.

Agave in Urn - Watch those spines by your head, Joe!!

Agave in Urn – Watch those spines by your head, Joe!!

Tip #3:

For succulents – as I have said in the past, move them inside the house. They will get wet now for sure – and it can rot the tender foliage because the temperatures have dropped down. Get them inside the warmth by a window and let the soil dry out.

By garage, will be taken apart this month at my session.

By garage, will be taken apart this month at my session.

Tip #4:

Move your big pots into a garage if you don’t have time to tend to them right now. They won’t get totally soaked by the rain if you plan to dissemble them later this month.

Alocasia was moved inside, see the leaves turning color - they want to stay warm.

Alocasia was moved inside, see the leaves turning color – they want to stay warm.

Tip #5:

Leave the pots right where they are outside. It is colder out but not a frost situation yet. The plants will change color and look a bit off, but if you are planning to chop the foliage down to remove the underground parts from the soil for storing over the winter, then it is okay if the foliage gets a bit of cold damage. However, if you want to take it in as a house plant, I say do it now.

Fern and Colocasia (Elephant Ear) moved inside.

Fern and Colocasia (Elephant Ear) moved inside.

Reminder: I’m primarily speaking about Canna, Banana plants, and Elephant Ears for this post for those in container gardens in my CT Zone (Broad Brook/East Windsor). The cold temps will signal the plants that dormancy time is coming. If you want to keep any of these as inside house plants – moving them in now is a good time to do so because the foliage will get damaged a bit from the cold and winds. We may see warmer days again, but the plants won’t get as stressed if moved inside. If you want to store the root bases, storage organs, corms, bulbs, or rhizomes, it is okay if the plants get hit by frost later this month. (Angel Trumpet (Brugmansia) plants should not be hit by frost.)

The big red banana plant (Ensete) to be part of demo day.

The big red banana plant (Ensete) to be part of demo day.

That’s all for now. If I think of anything else later, I will add it on. If you have questions about a specific plant, just fill out this contact form below.

← Back

Thank you for your response. ✨

Thank you,

Cathy Testa
860-977-9473
containercathy@gmail.com

Earlier photo of the big red banana plant (Ensete genus)

Earlier photo of the big red banana plant (Ensete)


NEXT UP: How to Overwinter or Store Plants from Your Container Gardens

Leave a comment

In about five weeks or so from today, it will be time to disassemble and clean-up your container gardens and patio pots, which includes overwintering or storing your plants to reuse/regrow the following year.

Smaller Pots

I already started doing some of this work – starting with smaller pots and window boxes that had lettuce and cucumbers growing in them. My first step is removing any tidbits of stems from the soil, pulling it away with my hands. Then I dump the soil on a table and break it up with my hands. The soil gets placed into a big plastic bin because I plan to grow more lettuce, parsley, basil, and kale this fall and winter in my growing room – so I will reuse this soil. I think it is important to break up the soil to revive the air spaces. Big plastic bins work well for these types of pots for me for the soil storage. They are easy to move and keep things tidy. The empty window boxes and small pots get washed a bit by using my garden hose, and if they don’t clean up easily, a bit of soapy water is used. Cleaning is an important step in the process to avoid any disease transmittal and to maintain the life of your containers and window boxes.

Tropical Plants

In October, either before our frost hits plants or immediately after, I put away my Canna and Banana plants (Note: Some tropical plants should not be hit by frost before moving them inside or storing the storage organs or root bases). I plan to demo my process of storing plants from container gardens and patio pots on October 17th and will be offering it as a demo day. Anyone whom wishes to witness the process is welcome to come to my house at 10:30 am. A small attendance fee applies. If for some reason the cold weather arrives earlier however, this may get moved to October 10th – I will keep you posted if you sign up (see the Contact Form below).

Seeing is Believing

Seeing is believing, and seeing is learning. Many friends prefer to see how this process is done to learn it – but you may also read the how to’s in my prior posts. For example, when I stored my red banana plant one year, every step was documented with photos (and yes, this is the same red banana plant I’ve been posting photos of this summer, growing in my big black pot this year). It was a very cold day at the end of October when I documented the process, requiring a thick pull over and warm gloves, but I enjoyed every minute regardless, because it was worth it. This particular plant has been regrown in a container for the past 4 years. It just keeps getting bigger and showier.

STORING MY BIG RED BANANA PLANT POST

Holding an leaf and cut off top of my red banana plant.

Holding an leaf and cut off top of my red banana plant.

Perennials in Pots

This year’s theme for my Container Garden Workshops in May was perennials in pots. So, if you have some in your containers, you may start any time from now until the end of October to start moving them from your pots to your gardens. Transplanting perennials is best done in the spring so they have time to establish, but it will work out fine if done in the fall for many hardy and tougher perennials – I’ve done this many times with container plants – and they survive. There are other ways to overwinter them (leave in the pot and move to a sheltered spot such as your garage, or sink pots into the ground). But you may do this now or up to end of October before the ground starts to get too cold to work in. I’ve moved perennials even in early November with success. More will be discussed on the demo day too.

Base of Canna Roots

Base of removed soil mass from a big pot

Succulents

One thing I have emphasized in my workshops is moving succulents (cacti like plants, Jade plants, Agaves, Aloe, etc.) into the home before it gets too cold during October. Think of days when we start getting some cold rain falls and the nights begin to get cooler. I find when the foliage of cacti like plants or succulents get hit by cold wet rain and the soil stay damp, they start to rot. Sometimes I move them inside before this type of weather pattern begins in the fall. While these plants may still survive a bit of chill before it gets really cold, it leads to trouble. For example, I have a beautiful Jade plant in my red head planter, I plan to move it in soon.

Red Head with Jade

Red Hed with Gem Dangling – Gets Moved Inside before Chills – Photo by Joyful Reflections Photography of Ellington, CT.

Save Your Pots for Winter Decor

Another good tip is pots with soil are handy in the winter if you wish to stuff them with live evergreen cuttings and stem tips as a winter themed decoration on your deck for the holidays. So, empty all the plants, but leave the soil in the pot, store it, and when the “Holiday Kissing Ball and Evergreen Decorations” workshop comes up in early December, you will find this ‘soil filled pot’ handy to insert your green decor. The 2015 dates for these fun holiday workshops are December 5th and 12th. See the link for all the details or click on Nature with Art Class Programs on the blog’s top menu bar.

Barrels in-front of Joe's Fine Wine & Spirits by Cathy T

Evergreens in a big container garden for holiday displays

October Demo Information

If you can’t make the demo day noted above (and see more information below), you also have the option of hiring me by appointment to show you how to disassemble and save your container garden plants. We will work together.

Have Me Do It for You

And the thought occurred to me recently, if you wish to hire me to do it for you – feel free to ask! As I know days are busy and you may have difficulty getting to the task yourself. But book me soon, time is running out fast. An hourly rate applies (see below).

Instagram screen of my big red banana plant

Instagram screen of my big red banana plant above photo.

Storing Tropical Plants Demo/Workshop

Date: Saturday, October 17th, 2015
(Note: If frost arrives early – this date “could get moved” to the weekend prior, October 10th)

Time: 10:30 am to 11:30 am (end time may run over a bit)

Location: 72 Harrington Road, Broad Brook, CT 06016

Cost: $8 per person (pay at session)

In this session, Cathy T will walk her property and demonstrate how to take down tropical plants from various container gardens to show you how to store (over winter) the plants for reuse the following season. You will learn which tools to use, what products to store them in, and misc tips on the how-to’s.

If you wish to see the process to learn the hands-on how to, this session is for you – and especially for attendees of Cathy T’s May Container Garden Workshops.

Plants to Be Demonstrated: Red banana plant (Ensete), Canna, Elephant Ears (Colocasia), and Angel Trumpet (Brugmansia).

A cart filled with tops of summer plants after the summer season is over

A cart filled with tops of summer plants after the summer season is over

Private Appointments:

Available at $25 per hour where I work with you to store your plants from your container gardens. To schedule, email containercathy@gmail.com.

To sign up, complete the form below:

← Back

Thank you for your response. ✨

Watering your Container Gardens and Patio Pots on Very Hot Days

4 Comments

During my Container Garden Workshops, held in May every season, I go over watering tips. It is a science and an art – and folks get a little concerned about how to water. One of the best tips is to stick your finger into the soil a few inches down or up to your knuckle, and if it is moist AND the plants look fine, you are probably okay. If the soil is dry and it’s a very hot summer day, it is time to water.

However, we are now in the month of August, and the soil in your patio pots may be a little harder/firmer, the plants may have consumed the soil mass somewhat, and this month can be one of the hottest points of the season, thus our watering routine becomes a little trickier.

To make your plants last well into autumn, it is important to remember to water appropriately when we experience “very hot days” that are well into the 90’s – such as the past two days we just experienced.

Here are 10 tips for those types of hot days at the end of the season:

Join the Early Birds – Get up early to water, if possible. As soon as it is light enough outside to see (providing you are an early riser like the birds) – water your plants before the sun fully rises. On hot days, like we just had which were up to 90 degrees outside, as soon as the sun was above the tree tops, it got hot quickly. So out I went in my PJs to water. There are so many woods around my property, the neighbors did not get frightened, thankfully. If you are able to do the watering routine early, it will keep you cool, plus watering in the morning is usually best for the plants too. It enables the plants to take up what they need before the soil moisture evaporates as the day warms up.

Skip the Heavy Watering Can – Attach a watering wand to your garden hose and drag it to your container garden locations. It is way easier than using a watering can which requires constant refilling and carrying. Also, while you are at it, if you have any extra watering cans or water bottles, place them near your pots and fill them with water at the same time for the next day’s watering to save a step or water on the fly. Another good choice is installing a rain barrel on your deck or patio to capitalize on rain water harvesting to use for watering your plants. I like to recycle the big cat litter jugs as containers to hold water when I need to water container gardens not reachable by the garden hose. They are large and easily washed out before the first use.

Fill watering cans or recycled jugs and set aside to have next day for watering on the fly

Fill watering cans or recycled jugs and set aside to have next day for watering on the fly

Relocate the Plants to Shade – I actually did this on Tuesday; I moved a couple of my big pots to a shadier location because it was that hot out. It helps with water loss from the soil and the shade will cool the leaves of the plants. Use a hand-truck if you have one to do the moving of the pot in order to avoid injury to yourself. It may be a pain to consider moving your pots, but in my case, it was worth it for one or two.

Use Your Eyes – Look for any plants which are potentially distressed, as in weeping, leaning over, or have leaves which are dropping or wilting. They may be experiencing drought or lack of moisture in the soil. Treat those plants like 911 candidates. When we have high heat like this – go water them first because when moisture in the soil has reached a point where it cannot meet a plant’s need, the plant may die. In these situations, the plants cannot easily recover from their water loss. In the trade, this is known as a ‘permanent wilting point’.

Dip in the Pool – Not the plants but YOU if possible. Okay, perhaps this a luxury because you may not have a pool or the time before heading to work, but if you have a lot of patio pots and container gardens, make sure to take a break to cool yourself off too if you start to sweat profusely out there – I know I did even early on Tuesday morning. Make sure you are hydrated first, or take a break by going inside if you get too hot after visiting all your plants.

Capitalize on Patio Umbrellas – Open a few up if you have them near your patio pots to cast some shade above them. Even the most heat and sun loving plants will appreciate this on hot days like we’ve just had. Especially if it is very sunny out too. While most sun loving plants can take it – if we have a super heat wave, the shade of the umbrellas doesn’t hurt for a day or two.

Snip Off Scorched Leaves – If you have some leaves with dry brown brittle areas, or leaf scorch on the edges, use your “clean” sharp pruners and snip them off. No sense in having a plant expend energy on a bad looking leaf with damage. Plus, around this time of year, August, many plants may look a little tattered anyways, so do some cleanup if you can at the same time as watering.

Water Your Feet – If the sun is so hot, the surface of the deck or paved area where you may have placed some of your patio pots and container gardens is too hot to handle barefoot, water your feet as you walk around – it may not help the plants but it will help you stay cool and feels good. Kind of like your own watering treat!

Direct water to soil, not on foliage of plants

Direct water to soil, not on foliage of plants

Water the Soil, not the Leaves – One of the most important tips is to direct your watering wand or watering can to the soil, not the leaves. Sometimes if the hot sun hits a leaf surface with water droplets sitting upon them, it can magnify the situation and cause brown spots on your leaves from burning/magnification. Also, water sitting on leaves on humid days can lead to fungal problems or diseases. Showering the tops of your plants will not get the moisture penetrated into the soil mass where it is most needed.

Gazing Ball Cracked, Watch Out for Hot Days and Cool Water on Glass Decor

Gazing Ball Cracked, Watch Out for Hot Days and Cool Water on Glass Decor

Watch Out for Glass Décor – A gazing ball cracked in one of my container gardens when the cool water hit the hot glass surface on a very hot day while watering recently, and it, unfortunately, cracked. This was a first for me so maybe a bit of caution there for any glass décor on an extremely hot sunny days in your patio pots and container gardens.

A cart filled with tops of summer plants after the summer season is over

A cart filled with tops of summer plants after the summer season is over

By the way, if the soil is shrinking away from the sides of your pots – you may be under watering in general; the soil is too dry, or if you are watering a pot which has held the plants for several years (as done with many house plants), maybe it is time to re-pot it with new fresh potting mix soil for potted plants.

Old Potting Soil Is Hard to Rewet

Potting mixes cannot hold moisture well after several years and are difficult to get moist (rehydrate) again over time. If you see crust on the top of your soil, this is usually a sign it is time for an updated soil environment for the plants. The soil has become like an unusable sponge that just won’t retain water anymore, it is exhausted. Take the time to repot it – you will be impressed with the results.

Yellowing Leaves on the Bottom of the Plant Can Be From Ovewatering

Conversely, if the bottom leaves of your plants are turning yellow, this can be a sign of over watering. Overwatering is not better, there needs to be a balance. And if your plants are in a shady cool location, they may require less watering routines, such as every other day instead of every day for those in hot sunny locations. And of course, the type of pot can make a difference in rate of evaporation (e.g., clay is very porous and dries out faster, black pots heat up faster in the sun, glazed pots can get hot too, etc.)

Watering Draining From the Bottom for Hanging Baskets

Many references will say to water your pots until the water drains from the bottom, but I don’t agree on this necessarily for really BIG pots (approximately 25” or over in diameter with about a 2 ft. depth or deeper.) Big pots hold a lot of soil mass, it won’t drain from the bottom immediately as you are watering, like you would see with a hanging basket.

When watering your hanging baskets, watering until it drains from the bottom is needed because they dry out fast. For really big pots, you want sufficient moisture but drowning them is not the answer.

Allow the Soil to Dry Somewhat Between Watering – Let it Breathe

Also, another important note is you should allow the soil to dry between watering routines. There needs to be a balance because the plant’s roots need both water and oxygen. If the soil is constantly wet all day long, this can lead to problems, even root rot over time. Think wet feet in sneakers, not a good situation. Good soil mix specifically for container gardens and patio pots helps to provided the balance in the root area from the start of the season, which is one of the “Cathy T’s 5 MUST DO’s for Success“.

Bottom line, there is a ‘yin and yang’ to watering plants, but you will get it sooner or later – and more of this is covered every year in my workshops because it is something of utmost importance to my attendees and the plants in their beautiful container gardens.

As the fall approaches when the days start to cool and are shorter, the watering routine is reduced and eventually subsides. You won’t need to water every day as you have been doing in the summer months. Things will calm down and soon it will be the time to take down your container gardens.

Storing Tropical Plants Demo in October

By the way, my demo day on how to take down plants for winter storage is posted under the “Nature with Art Class Programs” on this blog’s menu bar. It will be held Saturday, October 17th, at 10:30 am to 11:30 am in the Broad Brook section of East Windsor, CT. You may sign up via the links above where you will find the “contact form” or by visiting my business Facebook page. Private sessions at your home are available also. The session is listed under the EVENTS. Just click to sign up.

Thank you,

Cathy Testa
960-977-9473
containercathy@gmail.com

P.S. Watch out for spiders – They seem to be hanging around quite a bit lately!

Spider Hanging Around on Faucet

Spider Hanging Around on Faucet

The “Don’t Do This” List for when you Plant your Container Gardens and Patio Pots

8 Comments

During my container garden workshops, I’ve seen some things attendees will do as they start to assemble their container gardens and pots. It is not intentional on their part. They are so excited to get started selecting plants and putting them into their container gardens after my talk that they will move quickly and do some little things I try to catch them on before they continue. It reminds me of things they should not be doing because it can harm the plants or make the container look unbalanced.

So, I decided to create this list – and will share it at my future workshops too. Here are the things you should not do as you put together your container gardens and patio pots.

#1) Do not fill the pot to the rim with soil mix.

Filling the pot with soil mix up to the rim of the container will cause the soil to spill out when watering, or the water might roll off the top somewhat. There should be about a 2-3” space from the top of rim to the top of soil line. If the water is not flowing well into the soil, it will not permeate down to reach the plants’ roots, plus it looks a little odd to have the plants sitting at the very top of the pot. Aesthetically, they are better placed a few inches down. Additionally, the base of the plants are somewhat protected if they are not exposed at the very top – reducing things like toppling over due to wind, etc.

#2) Do not press down hard on the soil after you have inserted the plants into the container.

Out of habit or belief the plants should be pressed firmly into the soil, I’ve seen attendees do this at my workshops. They will push down on the soil, sometimes very hard, after they inserted the plant into the pot. This is not a good idea because you are compressing the soil which may reduce the air pockets required for oxygen in the soil to be used by the plant’s roots. Unless the plant is very top heavy or was root bound (thus a little weighty on the bottom), avoid pressing down hard on the top of the soil after planting. If you need to press, do so lightly and gently. You don’t want to smash the roots or crush the base of the plant by pushing down hard onto the soil.

Dont Do Photos for Blog Post3

#3) Do not grab the plant by the leaves and tug it from the starter pot.

When you take the plant out of its growing pot to put it into your container garden, use one hand to place over the soil at the stem base, and the other hand to turn it over carefully so it slides out of the growing pot. Try to not pull or tug at the plant by its leaves or stems. If the plant has been growing in the pot for a while, it may not slide out easily. Squeeze the growing pot a little to loosen it up or roll it gently on a table. Conversely, if the plant has been recently potted up in its growing pot, the soil may fall away from the root ball as you take it out because the roots have not grown into the new soil yet. Be careful to not damage the plant or its root system as you remove it to put in your container garden. If the plant is extremely root bound, and it is impossible to remove it from the starter pot, cut the pot at the bottom about 1” from the base to remove the closed end of the pot, and then push the plant’s root ball and soil through to remove it. A Hori-Hori garden knife or a razor knife works well for the cut.

Dont Do Photos for Blog Post 2

#4) Do not put a plant with circling roots directly into the container garden.

When roots are tightly circling around the root ball, this is referred to as girdling. The plant has been in the growing pot for a while, and the roots have nowhere to go except to encircle the root ball as it hits the sides of the inner pot. Do not put plants with tightly bound girdled roots directly into your container garden without first detangling the roots by hand if possible. If the roots are so tightly bound (really tight like they are hard to pull away or tease apart), you may use a clean sharp knife or pruners to cut them apart by cutting here and there. The roots need to be released, so to speak, to move freely and easily into the new fresh soil of your container garden.

Dont Do Photos for Blog Post

#5) Do not put the plants into bone dry potting mix.

When you container garden, you should lightly moisten the soil mix before you put your plants into your container garden or patio pot. Otherwise, the moisture in the starter pot will be drawn into the dry soil in the container garden thus taking it away from the plant’s roots. If the soil mix is dry, use your watering wand to moisten it – the key is to moisten, though – not to waterlog the soil, or turn it into mush. Just wet it a bit and then take your hands and mix it around lightly so the moisture is distributed. This will help the plants to adjust easily from their growing pot to their new beautiful soil environment.

Dont Do Photos for Blog Post4

#6) Do not put dry plants into the container garden without giving it a drink first.

It is a good habit to water your plants in their growing pots before putting them into your container garden or patio pots – preferably the night before, or the morning of, or at least a ½ to 1 hour before you assemble your container garden if its soil is “bone dry” in the growing pot. Another tip – be sure to water everything in after you finished assembling your container garden – but the key is, again – don’t over water. You want everything to settle into its new environment in a well-balanced slightly moist but not waterlogged state. Do not walk away before doing this final step. And direct the water at the soil line, not on the foliage if possible, with your watering wand or watering can.

#7) Do not put your plants in full harsh sun right away.

If your plants were grown in a greenhouse and not transitioned to the outdoors yet, you need to “harden-off” your plants. This term means to move the plants, or better yet, ‘transition’ the plants into the great outdoor sunlight carefully – otherwise, they may burn. Be sure to harden them off first if grown in a greenhouse by placing them in shade to part shade for a day or two. In many cases, hardening off is not required if the plants you purchased were already outside at the nursery. You will know if your plants were not hardened off first when you see the leaves turn white if you put them directly into sun – as is the case with houseplants or plants you overwintered inside, they must be hardened off first as well when you move them outside.

Dont Do Photos for Blog Post5

And finally, another tip – when I plant my container gardens, I tend to make pockets in the soil mix to insert each plant. In other words, I don’t fill the pot half way with soil (like I’ve seen done), place or position all the plants, and then backfill around the roots. I personally believe the pocket method makes the plants more comfortable and allows the roots to make easy contact with the new soil in the container. But that’s being a little picky perhaps – all I know is this method has worked for me for years.

To see photos of the above “Don’t Do’s”, please visit my Instagram feed or Pinterest boards where I show examples, or better yet, take one of my workshops in the future to learn and see hands-on more tips by ContainerCrazyCT.

Thank you,

Cathy Testa
860-977-9473 (cell)
containercathy@gmail.com