Flashback Friday – Golden Head Planter with a native Autumn Fern

Leave a comment

For this week’s Flashback Friday

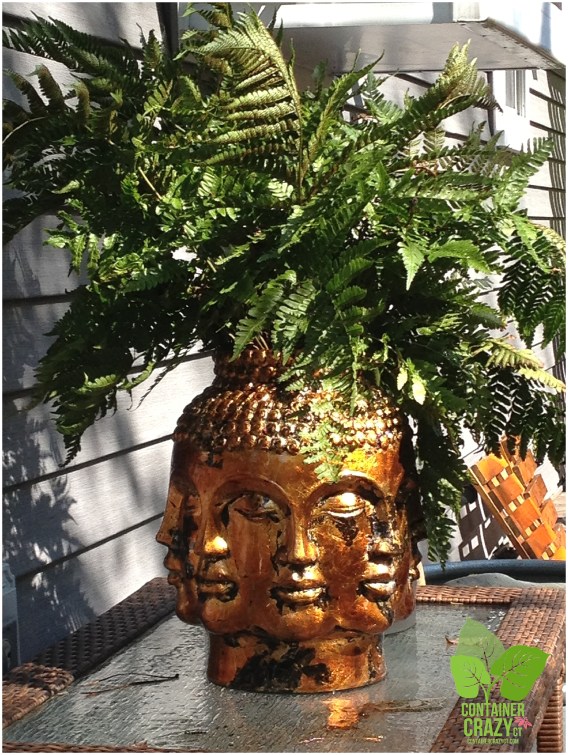
Brilliance Autumn Fern in a Golden Head Planter

Dryopteris erythrosora ‘Brilliance’
Zone 5-8/9; Perennial and Native

Head Planters ContainerCrazyCT_0001

In season, this fern’s upright fronds remain a dark green color, as shown in the photo above when it was growing in the container during the early 2012 summer. The beautiful golden face planter with splashes of black was a find from the Pottery Barn store. Knowing it would glimmer in the summer sun, there was no hesitation to get one. Placing a fern in it was a good choice because the planter did not have a drain hole, and this fern can take moist conditions. I did not want to risk cracking this pot so a drain hole was not drilled into the bottom, as typically done so the roots may breath and not rot from overly wet soils. However, ferns can withstand moist conditions with appropriate controlled watering in pots. If I felt the soil was too wet from a rainfall, I would tip the pot to let the excess water drain out.

Head Pots (1)

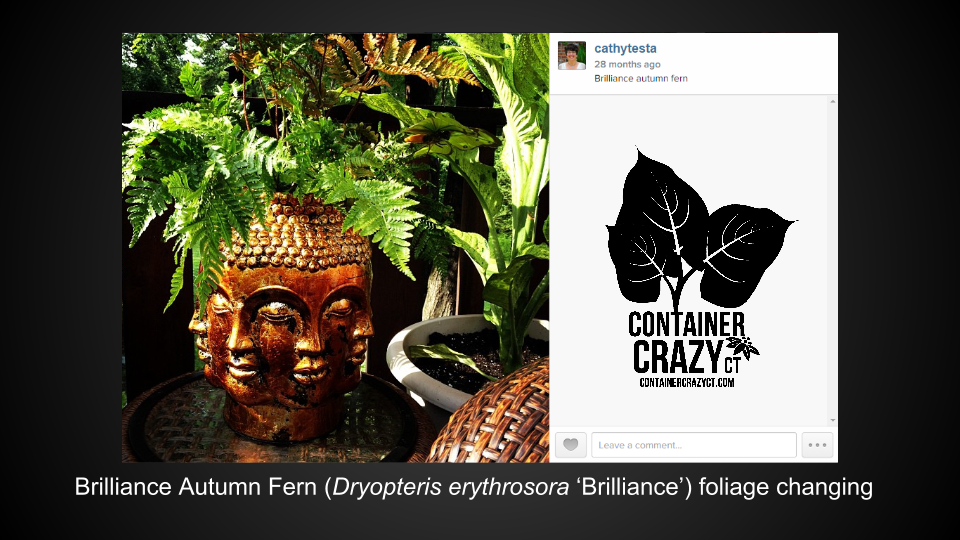
The fern’s name includes the word ‘Autumn.’ I’ve read this is because when the plant is young, it is a copper color, but it also takes on highlights of copper later in the summer season. Here it was moved to a shadier spot on my deck that season because this fern prefers dappled shade.  It was easy to grow in a container garden (or head planter). Some perennials will return in stored containers – which is a topic I will be teaching in detail in the 2015 season when two Container Garden Workshops are scheduled in May.

Head Pots (3)

The golden color of the head pot is really rich.  As it was sitting next to another container garden with mixed plantings, including the thriller – a dark leaved Colocasia (elephant ear or taro), which was the cultivar, ‘Diamond Head,’ the effect was gorgeous. Colocasias are plants I plan to include in my plant ordering list every year. I love foliage and love how the big leaves toss from side to side in the wind and the plant will last all the way into the fall season, up to the last frost date, plus they are easily stored over the winter for regrowing every season here in my Connecticut planting zones (5-6).  By the way, the plant with yellow and red leaves in-front of the elephant ear is called Amaranthus tricolor – it was noticed during a “Walk and Talk” Pond Garden Tour last summer in my friend’s planter near her three-tiered water gardens which everyone seemed to like it and asked what the plant was. It really stands out in the right situations and has a unique look to it.

This particular Colocasia cultivar was not too big for its pot, even though its leaves reached about 3-4′ tall, because it has a compact habit.  While the Autumn Fern is a semi-evergreen perennial (hardy to zones 5-9 – and native), the elephant ear is a tropical type plant (not hardy to CT), but hardy to zones 8/9-10.  The Colocasia is a sun to part sun/shade plant so the exposure was fine next to my beautiful and elegant golden head planter with faces all around it.

So, again, the two pots near each other in a shady spot on my deck was a good combo for they enjoyed the shady mornings and dappled sun later in the day.  By the way, Autumn Ferns are deer resistant – good for gardens with deer eating issues. Most ferns grow best with a high organic matter content in the soil when grown in the garden.

Head Pots (2)

The following year, I planted a succulent in my golden head pot, a Kalanchoe. But, because I was unable to drill a drain hole, I inserted the plastic pot it was in into the golden head pot so water could drain freely below it without creating a overly wet base.

Kalanchoe plants prefer the opposite exposure of ferns.  They enjoy sun and dry soils, able to withstand drought like conditions, within reason, in a small pot. Ironically, the leaves on this plant also highlighted some copper to red coloring on the edges. Matching plants to pots should not be exact matches (what I call matchy-matchy) but connect to the pot somehow perhaps in a subtle way – as done with this fern and succulent because the pot of golden to copper colors highlighted the copper tones of the plants used – it just worked – at least for me – I loved the look!

Why Use Head Planters?

Head pots make heads turn – When used in your gardens as art, or in special pots as decor elements in your outdoor spaces, and inside the home during the winter season.  And when you change up the plant in a pot – you change up the feeling, look, and affect of the pot or planter itself.  A big fern like plant gives it an exotic hairdo style, a smaller succulent may keep the head pot looking tidy and neat – it is fun to play with and – thus – I will share more in my ‘Flashback Friday’ posts about my head planters of other styles soon.

Happy Friday Everyone – T.G.I.F.

Cathy Testa
http://www.ContainerCrazyCT.com

“A Blog to share Container Garden Passions and Nature Combined with Art”

For more information about this fern shown in my new Flashback Friday posts, see the Missouri Botanical Garden Plant Finder.

Evolvulus glomeratus – One of the Blues in Nature with a Surprising Twist

8 Comments

Last November, I spoke to a group of Advance Master Gardeners at the Tolland County Extension Center about design compositions for container gardens and how to achieve growth success.

My session was broken up into 5 modules, which was certainly more than enough to cover two hours of talking, and it included information such as how to carry the elements of design learned with container gardening to small gardens, and methods to extend the growing season by utilizing sound gardening principles, as well as my own “5 Must-Do’s” for growth success in container gardens.

To begin my lecture, I wanted to share a story. The idea being, by sharing my story of a container garden installation I did for a wedding client over the summer, I could explain how many factors came into play to meet the bride’s requests.

Elements Circle - MG Class

My goal was to discuss the different elements required to meet a client’s needs in the container gardening world, such as plant knowledge, plant care, experience with various plants, and of course inspiration – for one requires inspiration most of all to succeed. Without inspiration, I told the audience, there is no passion behind your work and design compositions.

And, I also added the element of “experimentation.” This is certainly needed and gained over time. In the plant world, no matter which field you decide to work in, experimentation is an important element.

So, my story of assembling, caring for, and eventually delivering container gardens for my new bride client over the summer continued.

One of the first things the bride told me was her color theme when we discussed her desire to dress up her planned outdoor space with container gardens for their wedding celebration.

Color is of utmost importance for all weddings, but when she told me her three bloom color choices included cobalt blue, a little ping of concern went off in my head.

I was immediately concerned with this particular flower color because blue, in general, is uncommon in nature. Thus, I began to explain this to the bride, but also assured her we could incorporate some garden art and mesh ribbon to provide the punch of cobalt blue, as well as seek out cobalt blue pots. 

Evolvulus

During my talk to the Advanced Master Gardeners, I put up this slide above.  The text within it is from the website called, mnn or mother nature network. As you can see, “there is no true blue pigment in plants.

Ways to Get the Blues

The bride was very understanding of the blue flower color dilemma when I explained to her plants in container gardens are unlike plants used for floral design. Floral design flowers are harvested, cut and stored in refrigerated facilities to be kept perfect up to the day of assembly.

Plants in container gardens are living, ever-changing, and would require care and attention up to her wedding celebration date which was the very end of August – just another factor to consider, for the weather in August in Connecticut could be hot and humid.

But as I said, the bride was very understanding and wished to proceed – and so did I for I certainly had the element of “inspiration” in my spirits and was extremely excited as well as honored to be hired to do the job of installing container gardens for her special upcoming event.

Having plant knowledge enabled me to easily decide on several blue toned flowering plants to use, as well as her other color choices, which were lime green and white.

Evolvulus glomeratus was just one of the blue blooming plants I decided to use – but this plant in particular was new to me – thus, it was an “experimentation.”

Evolvulus (4)

I spotted it at a local garden center. Its low-habit, pretty blue petals with white centers, and the fact it was noted to bloom from June to frost, made it a perfect candidate for my goals.

When asking a very young sales lady what she thought of this plant, she assured me it would bloom all throughout summer – which was of key, and one of the attributes I was looking for in this project’s plant candidates, because the wedding outdoor celebration was to be held on the very last day of the month in August.

So, although I knew very little about this plant, an annual in our Connecticut planting zones, I decided to take a few starter pots of them to get them growing into larger specimens over the summer months, and take a leap of faith that this new plant to me, Evolvulus glomeratus, would be a good performer for my purposes as a filler in the container gardens.

On top of not knowing much about the plant, it did not have a plant tag in its pots when I purchased them, but ironically, a friend planted one in her yard and I noticed it when visiting her – so she let me take a photo of her plant tags that day.

I always say, plant tags don’t come with warning labels, and there was something missing on this tag which affected my plans.

Evolvulus (5)Everything listed, such as “blooming til frost, no deadheading necessary, and easy care” fit the bill for my needs to meet the client’s expectations, but it had a habit which surprised me one day, as I browsed my stock to check for any insect problems or concerns.

Evolvulus (6)

Imagine my surprise when one afternoon I discovered the flowers were rolled up as tight as tiny cigars! Upon researching it via the Missouri Botanical Garden’s Plant Finder website, a site I mentioned to the Advance Master Gardeners as a very useful resource for plant research, I saw it noted in black and white – Flowers usually close up at night and on cloudy days.

“Ack!” I thought. “Oh no, these are growing so well; their blue petals are so pretty and it’s low habit is perfect as a filler plant in the wedding container gardens, but now what?!”

I decided to email a hort friend, whom maintains gardens for several clients, asking if she ever used it, and her response was, “Yah, the tag said it would ‘blow my mind,’ but to be honest, it really didn’t. I didn’t like it as much as I expected.”

The moral of my story, that day as I spoke to the Advance Master Gardener group, is there are so many considerations required when putting container gardens together for client installations. I needed the plants to be long lasting, tough, have a bloom period at the end of the season, be resistant to insects or other plant related problems, and serve the correct role in my container gardens (thrilller, spiller, filler) for this special client. The “elements” spoken of earlier all came into play.

Evolvulus (7)

When I realized the flowers on this plant with blue blooms had the potential to close up on cloudy days or at night (and the wedding start time was late afternoon), I had to make a decision. And, my decision was to proceed with using them regardless. Risking the blooms rolling up would be something I would have to take. After all, there were many other reliable plants in the container gardens which met the bride’s color choices based on my knowledge of the plants. I knew the other plants used based on her other two flower color choices of lime green and white, along with other blue flower plants, would perform well. The show must go on – and Evolvulus glomeratus (noted as a non-vining morning glory like tender perennial, or referred to as “me-me’s” by the young lady at the nursery where I picked them up) ended up being the perfect filler.

Evolvulus (9)

After venting about it on Instagram, I proceed with my project of caring for all the plants until assembly and delivery time. After all the fretting, planning, caring, and obsessing, it was all worth it because I will never forget the reactions of the bride, groom, and mother of the groom, when I opened up my trailer filled with lush container gardens for their event. It was just like being on a reveal show. Their reactions being so positive, I felt I achieved my goals as best as I possibly could considering all the elements required to get the job done.

Evolvulus (8)

Cathy Testa
http://www.ContainerCrazyCT.com
(860) 977-9473 (cell)
containercathy@gmail.com
Broad Brook, CT

Evolvulus (10)

To learn more about Cathy Testa’s Container Garden Rental Services, see the menu bars above or click here.

Cathy T’s next speaking engagement is at the Farmington Garden Club on Monday, February 9th, at 11:30 am. Location: Farmington Main Library, 6 Montieth Drive, Farmington, CT. Topic: Incorporating Decorative Edibles in Mixed Container Gardens and Cathy T’s “5-Must Do’s for Growth Success”, along with Trending Talks.

Check back in to learn more about the other plants used in this design – They will be shared on this blog!

Thank you!

Flashback Friday – Coco Bowls with Succulents

6 Comments
Coconut Bowls Turned into Adorable Decor

Coconut Bowls Turned into Adorable Decor

Flashback Fridays – NEW!

It is fun to look back on memories, and thus, I thought – Why not share some of my prior photos of blog posts from earlier days. Some of my blog pages get buried (i.e., I don’t think everyone knows if you click on a menu bar’s title, such as Container Garden Services, a whole page appears of photos of my container gardens.)

Coco Bowls from The Big Island

For today’s ‘Flashback Friday,’ I selected the photos of coco bowls obtained in Hawaii a few years back. Little succulents, such as Hens and Chicks (Sempervivum), were carefully inserted into the coco bowls. A single hole was drilled into the bottom of each bowl to allow water to drain out.

Coco bowls with bling

Coco bowls with bling

See these cacti plants above – Well, guess what? – They are still growing in the coco bowls after, I think at least 4 years. For the life of me, I can’t recall the name of the plant – but I will come across it in my books in no time to share with you, but this plant has as sharp tips as you can imagine on the tips – Literally, it could be a weapon.

Update: I located the plant tag for the Agave in the two coco bowls shown above: Agave schidigera ‘Shira ito no Ohi’ — No wonder I couldn’t remember! That’s a long cultivar name. A century plant, and I do believe they could last a century.

Cocobowls

Cocobowls

At the show, this is how I displayed a grouping of them. They sold very well. And, I could not part with a few for myself. The bowls themselves are a treasured item because it is a natural material and from a place I visited on a special journey several years back, on the big island of Hawai’i.

Coco Portulaca

Coco Portulaca

Portulaca was put into one as well, but the hens and chick plants and other various succulents really fit better and looked better, in my opinion. You may wonder how I watered them due to the plants top portion eventually covering the top of the bowl, and basically all I do is hold the coco bowl under the faucet and position it so the water runs into the bowl as much as possible, then let the excess drain out.

ePublication

The coco bowls are truly amazing pots; they don’t rot, last a long time, are adorable to show and even hold. I wrote about our entire adventure to the island and posted it on my original website at the time of putting these together. It is rewarding to look back at the memories, especially the “lava” boat story at the end of my e:Publication. Check out the photos – what a blast.

So, that’s it for my new ‘Flashback Fridays.’

Hey, fellow garden bloggers – Want to join me on this idea?  Share your Flashback – I’d love to see it.

Cathy Testa
http://www.ContainerCrazyCT.com
860-977-9473
containercathy@gmail.com

Have you been to the Chicago Flower Show?

4 Comments

Got a question for my fellow garden and plant related bloggers out there –

Which Garden Shows have you been to, if you don’t mind sharing?  And have you ever attended the Chicago Garden Show held in March at the Navy Pier?

Reason I ask, is I read some not so pleasant reviews about the Chicago Flower Show – and just wondered, if you have attended, did you find it of value, could you rate it or give some insight to what it was like – and what to expect?

As far as flower shows go, I’ve been to:

Philadelphia Flower Show – HUGE – I spent two days each time attending, and stayed in an adjacent hotel – perfect!  This show is spectacular but tiring – on your feet for hours with thousands of people (so if you don’t like huge crowds, forget it), but a super treat if you don’t mind hours of viewing with tons of passionate fellow gardeners (check out the Man Cave at the show there if you go – rest your feet and watch t.v. guys!). My hubby took me to this show, and and we make it an adventure – taking the train from home, and visiting other local attractions in Philly. Fortunately, the train stops in a town next to us – so, we didn’t mind the journey from here to Philly at all – it was fun. The Philadelphia Flower Show entrance always amazes me – there are moments at that show I will never forget – huge, gigantic aw-inspiring displays and a HUGE wine tasting event – everything is absolutely grand at this one. To see my post in 2012 of my visit to this show, themed tropical and Hawaiian style, click HERE.

Love going to the Philadelphia Flower Show when I can!

Love going to the Philadelphia Flower Show when I can!  Photo from my 2011 Visit to the show.

The Hartford, CT show – known as the “CT Flower and Garden Show” – Of course, I can not miss this one – it is in my area, and I know some of the speakers, and take my gardening friends along.  It is very nice, and well-done, like it – but no where as big as Philly – one of the largest in the world I believe, so to compare the two – well, that’s not appropriate, but I would recommend this show to anyone.  It has speakers each show day on an upper level above the show floor exhibits – all free presentations, and very nice landscape displays with a balance of vendors.  So it is not too commercially oriented, and offers a great deal to see and enjoy in the middle of February. Many Connecticut nurseries showcase there, and there are restaurants in town to enjoy along with other features in Hartford, CT (e.g., The CT Science Center in downtown Hartford, CT). To see a post about my visit to this show, well, you know – click HERE.

Rhode Island Flower Show – It is held the same time period in February as the CT Flower and Garden Show – and that kind of irritates me!  Of course, you could do one and head to the other, but still, I just wish they weren’t on the same exact dates. Still haven’t been to this one. It’s on my list however.

Boston Flower Show – I’ve attended this one three times, once via bus with a group of CT hort people, and twice with a friend. It was loads of fun cause its held in a CITY and the food choices at nearby downtown restaurants are wonderful (if you go, check out Boston Legal Seafood “Harborside” where you can sit at tables facing the water – food is outstanding). The Boston Flower Show is bigger than Hartford’s show, and has a very nice balance of plant related displays as well as garden related vendors. It’s a keeper, especially when you can book a hotel room which is walking distance to the event so you can go back and forth to unload you fun gardening purchases. To see my post when I visited this show in 2013, click HERE.

BUT WHAT ABOUT CHICAGO’s SHOW – DO YOU RECOMMEND IT???

Anyhow, my intent was to get some specific feedback on the Chicago show – If you have attended, what did you think of it – how would you compare it in regards to size, etc.?

Did it offer plenty of plant related displays and information, or was it more commercially oriented – like having things non-related to gardening and plants?

In the windy city – gosh, it can be very cold in winter – so to trek out there – for me would require a flight, hotel, and all that blues music in surrounding venues – thus, interested VERY MUCH in your feedback – Comment Away!! Thank you!

Cathy T of ContainerCrazyCT

P.S.  The show in Seattle, WA looks AMAZING, titled the Northwest Flowers & Garden Show.  I fell in love with their FB posts on it last year, their seminar topics were incredibly well done and seemed in sync with the current gardening trends and times, BUT talk about far for moi to travel to do that one — It is across the country for me from Connecticut, but heck – side trip to Hawaii??

Perhaps some day!! Wink-wink.

Me in 2010 at the CT Flower Show as a CT Hort Society Volunteer.  Don't you just love the green vest!  Their display won awards, every year at this show!!

Me in 2010 at the CT Flower Show as a CT Hort Society Volunteer. Don’t you just love the green vest? Their display has won several awards. I love the big red banana plant in the left corner in a container garden (Ensete)!

Quick Monthly Pic of the 2014 Year

2 Comments

January – A visit to a garden center reveals a tray of lettuce growing happily in a warm greenhouse.

Spotted at a Greenhouse in Old Wethersfield, CT - Comstock Ferry

Spotted at a Greenhouse in Old Wethersfield, CT – Comstock Ferry

February – A walk on my father’s property in the bright winter sun, wearing a silly hat – just for fun!

Cathy Testa_0004

March – A beautiful Amaryllis burst open its white blooms. The scent of its presence fills the room.

One more shot

One more shot

April – Two lovely birds meet on a perch. The puffs of their feathers and little o’ chirps.

DSCN3187

May – A photo was posted of an orchid cactus bloom. So vivid against the blue sky.

Goofing w Camera_0002

June – An attendee graciously poses with her pot – the May class was fun, we learned a lot!

An Attendees Creation at the 2014 Class!  Gorgeous!

An Attendees Creation at the 2014 Class! Gorgeous!

July – A group of us gathered to hear about a homeowner’s pond gardens. Walk and Talk Garden Tours first year.

Attendees Listening to Talk by Rhonda

Attendees Listening to Talk by Rhonda

August – A hummingbird moth visits a butterfly bush during another Walk and Talk Home Gardens Tour.

Sphinx Moth on Butterfly Bush Blooms

Sphinx Moth on Butterfly Bush Blooms

September – A shot taken mid summer in-front of some pots – being prepared for a special event.

Cathy Testa at Home

Cathy Testa at Home

October – A group of attendees getting into their mix as we learned how to make Hypertufas as part of the Nature with Art Programs offered by ContainerCrazyCT.

ContainerCrazyCT Hypertufa Making Class_0006

November – A view of my chicken coop covered with Kiwi vines and surrounded by mixed plantings.

Chicken Coop Pen at Cathy T's

Chicken Coop Pen at Cathy T’s

December – A winter container garden installed at a local business. One of many with fresh greens and decor.

Container Garden Dressed Up by Cathy T at Carol Jean's Hair Salon

Container Garden Dressed Up by Cathy T at Carol Jean’s Hair Salon

What will 2015 bring?  Check in to see…

ContainerCrazyCT.com

2014 in review for this Blog! Thank U Followers, Friends, and Clients. Happy New Year to You All.

2 Comments

The WordPress.com stats helper monkeys prepared a 2014 annual report for this blog.

Here’s an excerpt:

The concert hall at the Sydney Opera House holds 2,700 people. This blog was viewed about 31,000 times in 2014. If it were a concert at Sydney Opera House, it would take about 11 sold-out performances for that many people to see it.

Click here to see the complete report.

Mini Snowman in a Jar with Buffalo Snow

Leave a comment

This is a fun little project – great to do with kids or young adults and I thought I would re-share it today! It’s not too late to decorate!

Cathy Testa's avatarContainer Crazy CT

When babysitting my nephew, it hit me that I should keep some of the baby food jars on hand for an upcoming project – but I didn’t know what that project would be.  Perhaps the jars would be used to store some small items, or maybe I’d make a candle holder out of them, or they could have just ended up in my supplies for a long-time and not be used.

However, because my holiday decorating and fun juices are still flowing, I decided to create little decorations by using them to house a mini snowman.  These little decors could be easily used as ornaments (just attach a string on the top to hang) or as seating nameplate holders at a holiday table.  Whatever the use, sometimes its those “little” embellishments that are the most fun.

Mini Snowman Jar_0005

Here are the items used:

  1. Buffalo Snow (found in bags in retail stores)
  2. A…

View original post 497 more words

Thank You – Feeling Blessed Once Again for The Support of Clients, Friends, Family

7 Comments

Last night, I posted on Facebook a photo of my Christmas tree, not yet fully decorated, while noting that I was very tired indeed. My schedule from spring up to this day has been filled with activity related to plants and container gardening, and during this time of year, decorating the home for the holidays with fresh evergreens and decor.

But, as I sat down last evening, it hit me. I was feeling pretty exhausted from lots of activity, but happy all the same. This year was filled with classes, Walk & Talk Garden tours where friends offered their gardens to be showcased free to anyone interested in attending, plants sales, and container gardening installs. Sometimes I will push myself to do events and I’m definitely driven by the fact I enjoy what I do but it is mixed also with ups and downs of emotions, meaning I get so excited (an up!), then sometimes I worry about the details (the downs!)

Worrying about details can be counter productive because there is so much you can not control in the gardening world. Plants get bugs, they may fail, or look weak – but I always want the best of the best so I will stress, look over my stock, scout and make sure all are doing fine – for my annual Container Gardening Workshop, as an example in May – or for the greens used this month for my annual Kissing Ball and Holiday Creations Workshop in December. I always want every thing to be just right – or as perfect as possible.

I got so hyped up at my last class, I thought I was going to faint when I was going over details with the attendees before they started making their kissing balls, wreaths, and holiday arrangements with greens. It kind of reminded me of the panic which set it when I did my first tv gig.  I was “soooo nervous.” I literally thought I may pass out before the start of my talk.

But I still did it and do it – Why? I sometimes think, why did I say yes to something that made me so nervous?! The answer to that question is obvious – because I love doing anything related to plants and container gardening, and while I may not be the most polished speaker in the world – I wouldn’t miss a chance to share what I know when asked, and so I proceed, even if the situation is a little out of my element or nerve wracking. After many talks now, it is not as difficult as it was when I started being asked to do talks – and I love doing them, even when busy and racing around with various activity.

This year, I was honored to be asked to speak to the Advance Master Gardeners Group in Tolland, CT for a session in September on Container Gardening Design, Care, and More. Then, my stupid laptop had major issues, so major in fact that I had no time to finalize my presentations, so I started getting nervous.  I begged the Master Gardener Coordinator to reschedule me – and thus, she did – to November 19th.  She kindly agreed (Thank you Deb P!).

If someone would have told me – you will be speaking to Advance Master Gardeners in November during the evening when temps were somewhat cold and we are approaching the winter season – which is not necessarily container gardening season – I would have thought it nuts, but I spent over 2 hours sharing a great deal of knowledge I’ve gained over the years as a container gardening fanatic and as an installer of container gardens as a business with my audience.

I thought about what I could offer that would be different – and some of it was the different types of tools for design which people may not consider, which I use all the time in my inspirational pool of … well, of, I don’t know the right word there – but what I mean is I try different stuff and tools that may be nontraditional when I design containers and gardens to gain inspiration and more.

And the response by the Master Gardener audience that evening during my presentation made up of 5 modules was amazing, they didn’t want me to stop talking. They commented on the documentation I provided too – saying they don’t get that much in other talks, which I took as a complement.  And two ladies approached me after the talk saying they want me to come visit them at their location south of Hartford. I jotted down their contact info – and then off I went to get busy with my evergreen orders and classes for December – so I still haven’t called those two ladies back yet (I will, I will – I promise!).

Another thing that surprised me was a request to do my edibles container gardening talk in February!  The group said of course, they would love to hear about edibles in container gardens during the winter – so that is up next, after a rest over the holiday week coming up and maybe a little more right after. And after having the luxury to do plant orders for next spring – which is a fun activity – and I’m excited (a big up!) about that as I take my knowledge and experience to select the best plants for next season’s Container Garden Workshop theme – which is going to be about powerful perennials in container gardens.

In addition to the Walk & Talk tours, I held many container garden talks this past year with a special focus of combining edibles in mixed container gardens as “design” elements (meaning their beautiful features – not even the fact they make a good snack when you admire your container gardens), and ‘nature with art ‘ classes with guest speakers, and offering my Big Container Garden Workshop at my classroom location in Broad Brook, CT for the first time, and – lets see, talks and visits at various Farmers Market and more – well, the activity was non-stop. It kept going – all good news!!

This is not to imply, however, that I’m as busy as I could be – I want more work and hope you will consider me for your container gardens in the upcoming season – Oh YAH!  Thanks to the homeowners and business people whom hire me repeatedly every year – you make me so happy – you do not know. When I’m at your home or business installing your container gardens, I think to myself – I’m sooooo happy doing this!! I’m so happy doing this!!  I could do container gardens 24 x 7 allll day long and be happy – why, I guess it is my passion!!

So – anyhow, not to babble – which I know I am at the moment, this post is just to say thank you to everyone supporting my efforts as part of my business, called Cathy T’s Landscape Designs, and my blog called, Container Crazy CT.

Oh, a friend just asked me on Sunday, when she came by to purchase some holly greens for her containers at home, why I changed my business name to Container Crazy CT?

My business name is still the same, but my focus is less on garden design and more on all service offerings related to container gardening – all things container gardening – installs, classes, and more – and offering monthly classes where nature is combined with art with guest speakers, and offering garden tours.  I’m doing less of the landscape design work specifically, but do offer general consultations on gardens or landscapes. I’ll update my blog on all my 2015 service offerings in the new year.

You know, at the beginning of this year – I wrote 5 goals on my black board in my office — You know how they say, write a dream board or goal board, and it will happen?  Well, all of my goals, except one, happened! The one that didn’t, I had put an X on it and said wait til 2015.  It was about transforming this blog into a more professional format, which I hope to do in 2015.

As for the other goals I listed, well, if you want to know what they are – contact me, I will tell you.

Happy Holidays Everyone!

It is time for bit of rest (and gift shopping and cooking for me) – I’ll be back very soon…

Cathy Testa
860-977-9473 (cell)
containercathy@gmail.com (email)
http://www.cathytesta.com
Blog: Container Crazy CT

Bottling Intoxicating Scents of Fresh Evergreens by Making Potpourri

Leave a comment

Last year, I made up a few of these adorable mason jars with fresh cut evergreen pieces and bits – and am re-sharing as an idea for hostess gifts, or even table name place seating idea. A fun idea and easy to do! Cathy T

Cathy Testa's avatarContainer Crazy CT

Sweeping up the floor of my classroom after an Evergreen Creations Class, a thought occurred to me.  I should collect some of the smaller cut pieces which fell to the floor to make potpourri.

And it was then I remembered, I picked up some mason jar covers at a Vintage Bazaar this summer with a precut pattern in them. They will be perfect.

Using some mason jars I had in stock, I filled the jars with bits and pieces of the greens. It was amazing how quickly the scent permeated from the jar.

Most people enjoy the scent of freshly cut evergreens – especially because it brings back memories.  Scent being one of the most powerful to remind you of something from the past.

The Cornell Cooperative Extension has an article on their website which states the feeling of evergreen aromas perfectly.

“Of all the memorable aromas of the…

View original post 1,204 more words

My First Square Wreath Done!

9 Comments

Greeting Fellow Visitors,

Making a square wreath is a little more challenging as compared to a typical round wreath because of the corners and how you should keep the greens symmetrical to maintain the square look of the frame – but it is just as much fun as any project working with freshly cut evergreens.

Steps to Make a Square Wreath:

First, decide if want to batch your bundles of freshly cut greens by the “same type/variety” or by a “mix of each type” per bundle.

Mix of Fresh Cut Evergreens

Mix of Fresh Cut Evergreens

Because I wanted to see how it would look if I cut and batched the fresh evergreens by same type, this is the option I used to make my first square wreath.

However, I also love the look of bundles when a mix of each cutting or snip of the various greens are batched and bundled as well. It just depends on your preference or style.

Types of Evergreens Used:

Shown above, from left to right, are Holly, Berried Juniper, Silver Fir, Fraser Fir, Cedar Coned, Boxwood, and Golden Arborvitae.

Highlights of the Evergreens:

  • Holly – Very sharp leaves, and more of a decor touch – I only used 2 batches of those.
  • Berried Juniper – What is a wreath, kissing ball, or centerpiece without a touch of the berried Juniper? The soft, blue tones add a contrast and like the Holly, I made only 2-3 bundles of this to add as a highlight.
  • Silver Fir – Thick stems, one sided long soft needles (meaning the underside color is softer), and smells amazing when cut!!
  • Fraser Fir – Very long lasting, a must in any arrangement, traditional – just like Balsam, but Fraser is what I had available this season.
  • Cedar Coned – I love, love, love the golden color of the little cones on the tips – and it really shows up against darker greens, like the Boxwood. This type tends to drupe or dangle, so use care where you position it.
  • Boxwood – This is another fav – because it is so classic, a rich dark green color, small ovate like leaves, and a bonus is they don’t make your hands sticky while you work.  It’s a dark contrast of green to use in the design and a nice base, such as the Fraser Fir or Balsam.
  • Golden Arborvitae – Soft, flexible yet so beautiful – it has patterns of golden yellow in the green, and really so pretty to add as another element. Like the Cedar, it is a little softer and pliable.
  • Pine – Also smells amazing when cut, very sappy, and thin, long, flexible needles, nice next to coarse greens. Think thick foliage next to fine.

Cutting the Snips for Bundles:

So, cut a few of each at all the same length (4-5″ or 5-6″) and wire them together tightly at the cut end with green florist wire. Use sharp pruners and wear gloves, otherwise, you will have a sticky mess on your hands, and lots of lotion required afterwards.

Prepared Bundles:

Here are several bundles prepared. It is easier and faster to work if you have all the bundles ready to go, then you can lay them out on top of your frame to see how they would look before attaching them individually on the frame.

Bundles Prepared

Bundles Prepared

Think about putting the lighter colored bundles next to darker ones. For example, dark green Boxwood next to the light blue of the berried Juniper or the softer Golden Arborvitae. However, in the end, I don’t think it much matters, as all the beautiful freshly cut evergreens on the wreath usually look amazing!

Dark Green Boxwood

Dark Green Boxwood

14″ Wire Frame Used:

A heavy-duty double-wire 14″ square frame was used for this wreath. The durable frame is usable year after year, which is why I highlighted it at my class on making kissing balls and other holiday creations last weekend.

14" Wire Frame Used

14″ Wire Frame Used

Shown above are several of the bundles attached.  You can see there are two bars along each side of the frame.

Options are to wrap each bundle directly over the middle of those two bars, or to stagger them on each edge of the double bars. If you have a paddle of florist wire, wrap the stem end to the wire, then continue for each bundle without cutting the wire from the paddle.

Working Way Around

Working Way Around

Or you can cut wire as you go – either way works – but the key is to wire tightly. Wrap, pull tight, wrap a few times more to ensure it is secure.  The Silver Fir, as an example, can be heavy as well as a batch of drooping Cedars, so be aware of their weight for each bundle.  Boxwood and Fraser Fir are lighter thus may not require as much wiring.

Golden Arborvitae Used in the Design

Golden Arborvitae Used in the Design

As you approach each corner, think about the placement a bit so the square form is maintained. It also helps to watch a good holiday movie or listen to holiday tunes, and if your day is lightly snowing!

Snowfall that day in Broad Brook, CT

Snowfall that day in Broad Brook, CT

Here is my first ever made finished square wreath without decor and ribbons. The little red berries are double-ended on a wire and easy to attach. The look here is natural and likable, but decor was added after this step.

Square Wreath with Red Berries Attached

Square Wreath with Red Berries Attached

Adding Decor:

This step is really based on your preference. I made a bow to match the color of my white and red holiday decor colors at the house, and inserted picks of white snowflakes. Zip ties are what I use to attach a hanger on the back.

Bow on the Left Side

Bow on the Left Side

Silver Snowflakes Added

Silver Snowflakes Added

All Done!

Here it is all finished and hung on my door.  When my hubby arrived home, he said he liked it and that it smelled good too. And, when posted, many friends “liked it” which was very nice too – Thank you!

All Done!

All Done!

Want to Make Your Own ?? – Now’s Your Last Chance at Cathy T’s!

I’m holding a mini-session tomorrow, Saturday, Dec 13th from 9:00 am to 12:00 noon. If interested in attending, contact me via text or call: 860-977-9473 or email containercathy@gmail.com. Cost is $30-35 based on item you elect to make. Options: Kissing Ball, Candle Centerpiece, Round Wreath – or, of course, a Square Wreath!!!  Location: Broad Brook, CT.

This will be your last opportunity to Make Your Own, but if you don’t have time, and need a decor element made for your home, custom orders are accepted.

TGIF Everyone,

Cathy Testa
http://www.ContainerCrazyCT.com
860-977-9473
containercathy@gmail.com
http://www.cathytesta.com

← Back

Thank you for your response. ✨

Visit Cathy T’s Pinboards on Holidays to see many, many inspirational ideas of working with evergreens!  Click the Pinterest Icon on the right side bar of this blog.

To see examples of Cathy T’s Container Gardens Stuffed with Evergreens – See her latest posts and pinboards.  Ho-Ho-Ho-Horticulturist!!!