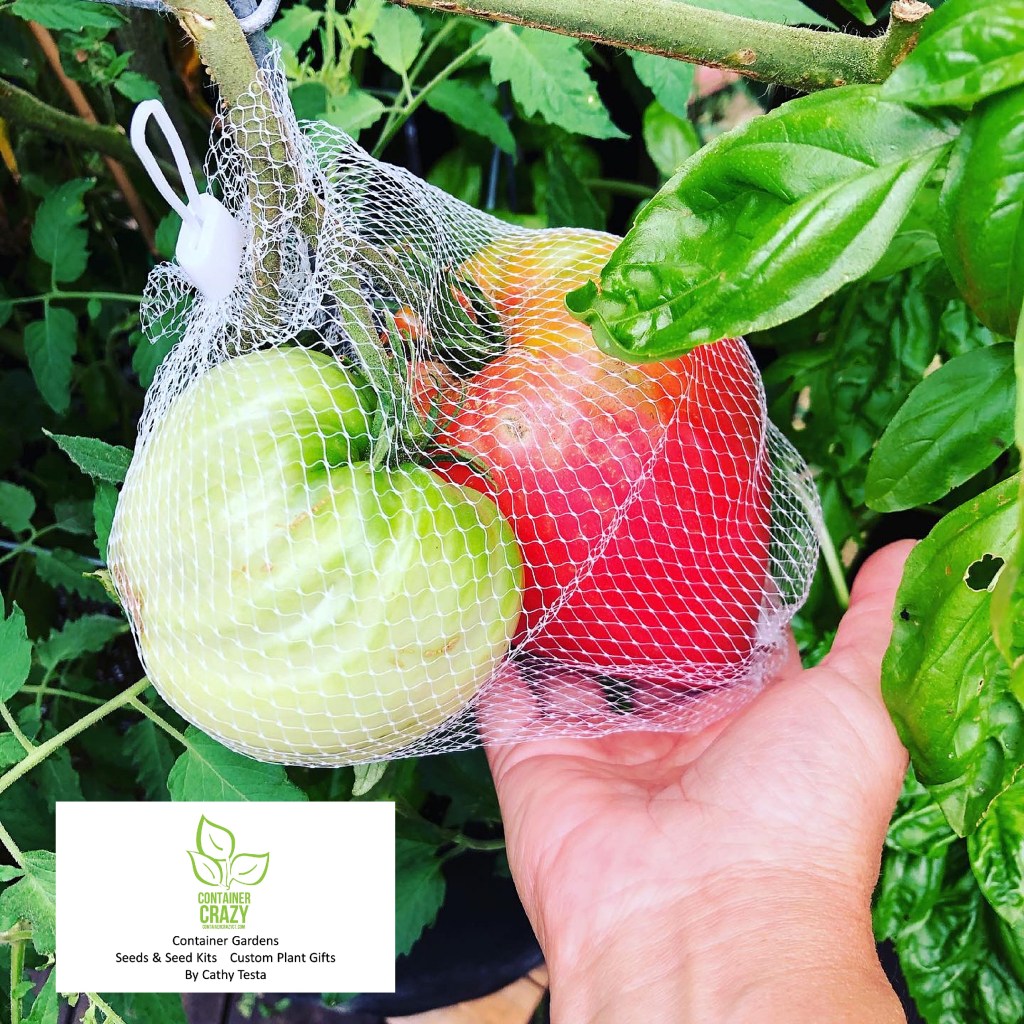
The squirrels discovered my beautiful Upstate Oxheart tomatoes on my deck last year and out of frustration, I decided to net them with plastic fruit type netting. You can see from this photo, the tomatoes are huge. The seed packet details these as “a stunner: huge, heart-shaped, and delicious fruit,” all of which is very accurate.
GROWING FROM SEED
I have grown these from seed the past couple years and I was super impressed with the yield, sizes of the fruit (2-3 lbs), and exceptional light but favorable sweet taste. Additionally, they really do look like the inside of a heart when you slice them open. Both my husband and I enjoyed eating these beauties, and it didn’t take long for a squirrel to spot them up on my high level deck along the railing last season last summer at the peak of their tomato’s ripening phases. They ripen to a rosy pink color.
FABRIC GROW BAGS
I grew them in my black fabric grow bags last year and the plants grew large and some of the branches hung over the railing of the deck. Each time I’d witness a fruit starting to turn slightly pink, I started to worry about a squirrel discovering them – which they did and that was starting to get really annoying. Nothing is more frustrating then seeing a big bite out of a huge tomato just about to ripen to maximum perfection! Ugh!
DID THE NETTING WORK?
Did the white plastic netting, surrounding the fruit only, work? Kind of. I didn’t see them munch on them in the nets, but I also got accustom to taking the fruits off the plant before they were fully ripened so the squirrel wouldn’t have a chance either. Then I would let the tomato fruit finish ripening on the counter. This worked just fine for this type of tomato – meaning it ripened with no big issues right on the counter.
WHEN TO START THE SEEDS
I didn’t order new seeds of this type this season because I still have some packets left from 2020 and they are still very much viable, but I probably will not sow all of them, or if I do, just a limited amount this year because I am excited to try new types of tomato and have new 2021 seed for the newbies on my seed sowing list.
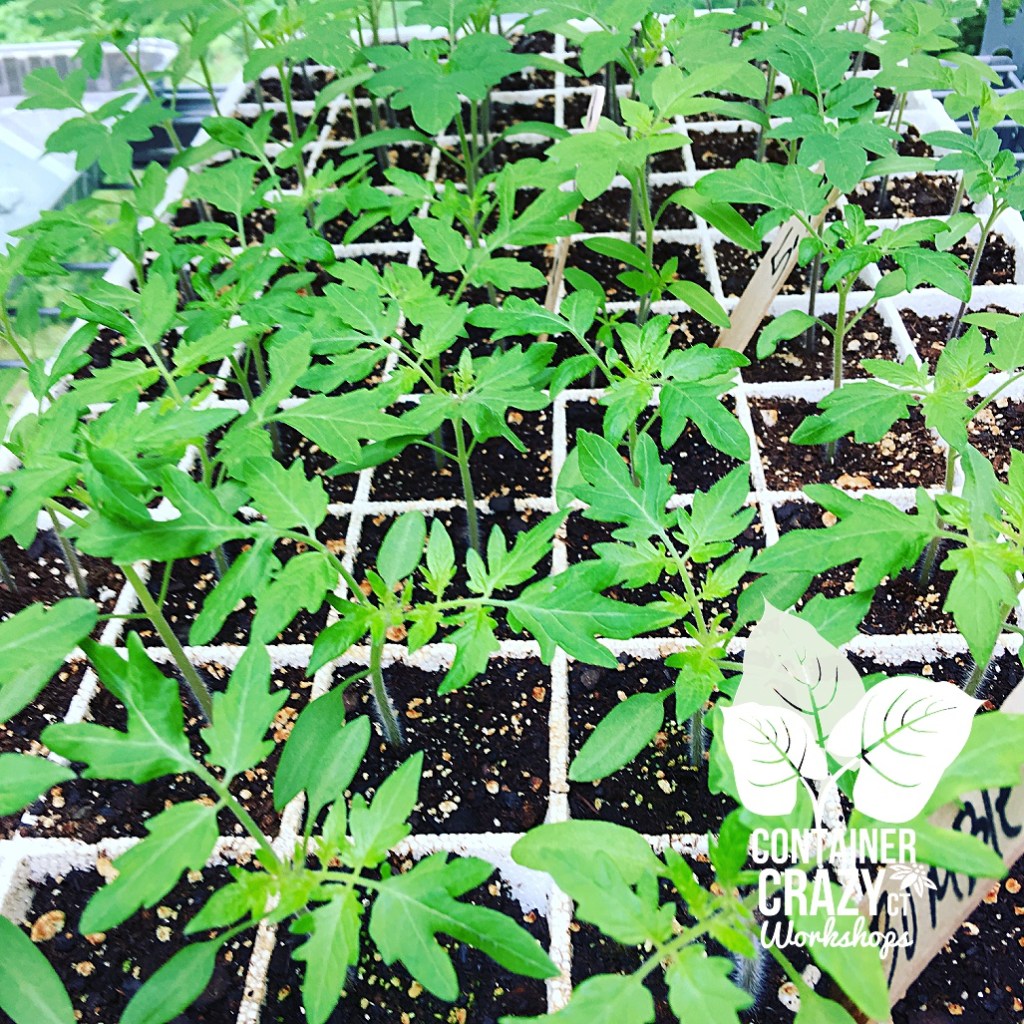
But this type of tomato needs to be started early. The upstate oxhearts seeds should be started 6-10 weeks before our last spring frost date. Last year, I started them at the 10 week mark, but this season, I’m going to wait to start them a little later. I found they grew quite large in the greenhouse and some needed to be potted up into gallon pots, so I made a note to maybe start them more like at the 8 week mark and see how that goes.
HARD WIRED MESH IN A BIG POT WORKED
The squirrels seem to be more aware of my goodies the past two years. The year prior, I grew the upstate oxheart tomatoes in a giant black plastic pot, which is 3 feet tall, so kind of my waist height. I inserted 3 feet long bamboo poles into the pot along the top rim and then surround the whole thing with hard-wired mesh. That definitely kept out any critters, like squirrels or groundhogs, but it was difficult for me to “reach in” to get the tomatoes. However, it did prevent any unwelcomed diners from visiting the fruit. The pot also was located in a place that was a job to drag my garden hose to it to water, but it worked at keeping critters away! In fact, I found those really big pots to be useful that way – they can’t easily climb up the pot and into the big pots, but for those in grow bag last year, on my deck, squirrels would sometimes jump from a tree limb onto a deck railing to go investigate. We decided to trim back some trees near the end of the deck to make it more difficult for them.
SQUIRRELS WON’T STOP ME
The whole issue of squirrels visiting the tomato fruits is a big problem it seems for many, but for myself, I know it won’t stop me from growing tomatoes again this year. One neat thing that happened with the plastic mesh (shown in the photo above) is a cross-cross pattern appeared on the skin of the fruit. It developed a pattern! That was interesting.
I suppose I will keep testing more techniques to keep the squirrels away. I read that hot pepper spray may work, and there are probably some products on the market. But for now, my strategy is a) not to give up, b) pick the fruit before it is fully ripe, c) yell at the squirrels, and or d) grow them in that super-sized pot again that is so high up and wrap the whole thing in hard type of mesh wire. Gosh, the things we do for fresh juicy tomatoes.
WHEN THEY RIPEN
Upstate oxheart tomatoes ripen 84 days from transplanting the seedlings into your pots or gardens. They are indeterminate plants so they will keep growing taller and produce fruit continuously. Pruning or staking them is necessary or letting the branches (vines) topple over my deck railing worked well. The plant can reach up to 10 feet high. It sprawls out and around and when I grew them in that big black pot I mentioned above, the hard-wired mesh I put around it served to help support it as well. The fruits, which can grow to 3 lbs sizes, are heavy so that extra support is helpful.
COMMENTS Please! If you enjoyed this post – please comment by clicking the red block on the top. I would love to hear what you have used to keep squirrels way from your tomatoes in the summer.
Yesterday, I hand-delivered my first two Seed Sowing Kits to a friend, Wendy. She has attended my workshops in the past, and always enjoyed being here to make plant related creations and learn about plants. She was a regular attendee for a long time.
Most of the time, Wendy attended my workshops with her 20-something daughter. I always enjoyed watching the comradery between Wendy and her daughter, Ashley, at my plant related workshops.
This is Wendy!
When they attended my annual Holiday workshops, they always dressed very festive with colorful holiday tops and hats. Always fun, fun. They have different personalities but both very much enjoy, what they call, “Crafting.” Wendy has a more care free style of crafting and creating, and Ashley likes symmetry in her designs.
They became my Mom and Daughter Holiday Models! You can see why – I love this photo.Ashley and Wendy 2019 – The final year I held my Annual Holiday Workshop
But Wendy also has a young son, Nathan. He is seven years old, and it turns out, he really enjoys gardening and planting things. Last summer, she shared photos of him with his seedlings, vegetable plants, and other items related to gardening. He is rather cute and it is fun to see him in their photos with his plants.
So, Wendy, turned out to be my first customer of my Seed Starting Kits this year, and she lives very near me too. I included a Kid’s Seedling Handout where her son may track his sowed seeds week by week. She actually ordered two kits so they can make it an exercise together. And, although it is only February, and the sowing doesn’t begin till March, this gives them both the opportunity to look over everything in the seed sowing kit and make plans to do this activity together. The kits include potting mix, seed sowing trays, seeds, tools, and several instructional sheets as well as a planting calendar specific to the seeds they selected to be in their kits.
Seed Sowing Kit Bags
Because so many kids are home today due to COVID (and perhaps a snow day from school or at home schooling), these kits are great for Moms or Dads with kids who would like an activity to enjoy soon. It is something, frankly, to look forward to. We all know the month of February may feel long, well, maybe not for kids if they are playing outside in the snow! But for me, I get anxious for spring during the month of February.
This month, I am offering FREE delivery of my Seed Sowing Kits to people local to my area in Broad Brook, CT. Or adjacent towns too (Ellington, Windsor Locks, Enfield, for example.) The details about the kits are on my site called WorkshopsCT.com. If anyone is interested, they may send me an email or text to get the list of the seeds I have available and more information if any you have any questions. It is primarily warm season vegetables (tomato, cherry tomato, hot peppers, heirlooms, herbs, flowers, etc.). All certified organic seed source is used. I hand pick the types I like each season – always switching it up to taste new goodies! I also offer videos available from Facebook on the how-to’s as I sow my own seeds so anyone purchasing the kits (or seed packets if they prefer) may view the videos to join along to learn how to sow their seeds with other tips as the plants grow.
The kits come with all needed to start sowing your warm season vegetable plant of choice
I don’t have any kids of my own (except my husband, haha – just kidding!) so I really enjoy when I see kids succeed at gardening via the stories and posts by parents or grand-parents who have reached out to me for plant related items. I guess in a way, it gives me a chance to witness how the kids enjoyed growing their own plants, from afar.
One time my young nephew, Mitchell, came into my greenhouse, and I have to say, he asked some great questions. He also suggested I move my huge spiny tipped Agave to another area because he got pricked by a spine of the plant as he walked by it. He asked or I should say suggested, “Auntie Cathy, why don’t you move this over there?!” LOL, I thought. But he was right, I’ve gotten attacked by that big Agave too at times.
I always treat my nephew, Mitchell, to a freebie plant when he visits, but this past year, there haven’t been many visits because of COVID, but I hope that this spring or summer, some of that will be improved if COVID ever calms down. I am planning to drop off some seedling items to him and his Mom soon. His younger brother seems to enjoy “watering plants” with the garden hose, as I witnessed last summer too – via a post!
Anyhow, Mitchell likes plants, and I love that he shares a passion of his Auntie’s passions. He asked me specific questions on care when I gave him a cacti plant once, and he truly inspects them. I thought, this kid is a plant lover. He asked me if the small succulents I had in 2″ pots were from that big Agave that he suggested I move.
Good question, I thought. I responded with, “No, they are not from that plant, but they do look similar and have similar growing characteristic and needs,” which we discussed further, but then his focus was on another plant as he decided which he would like to take home. Too cute. He also seems to sense when I like a particular plant of the group displayed. He is smart! He knows that I have my favorite plants in the greenhouse. He watches me and then says, “I want that one.”
My sister (his Mom), Rosalie, told me later, you know he yelled at me when I said you should water that plant Cathy gave you. Mitchell responded, “No! Cathy said not to water this cactus too often.” That made me feel like he listened and he learned something new. Again, too cute. If he wasn’t interested in plants, he would have ignored it altogether.
Think Ahead – get your kits now for sowing in March
I hope that anyone who gets the Seed Sowing Kits from me this season will learn new things too, especially if they are sowing with their kids. I hope it adds some fun to their day. I can’t wait to see how Nathan does with his seeds later this season, and see new fun photos.
And, by the way, seed sowing is enjoyed at any age. It is truly a great inspiration to see a seed sprout and grow into a full sized plant to enjoy the harvest from in the summer.
The quick answer is, if you live in my area of Connecticut, usually early to mid-March for some plants. But each type of warm season vegetable has a bit of different timing as to when to sow the seeds indoors ahead of the planting season. And the best way to double-check those timings is by looking at the seed packets and/or following specific seed sowing guides.
For beginners, it may feel overwhelming to do all the planning homework on when you should start start sowing your seeds for your favorite tomato or hot pepper plants. But knowing when to start is key. Many people start by buying packets without really knowing the timing, and that is sometimes a mistake if the seeds are not ordered on time and/or if they don’t realize the growing requirements of the plant itself.
If you start sowing seeds indoors too early, things get messy. The plant will be too large and root bound before you are able to safely plant it outdoors (after frost in May). If you start too late, you are basically not giving the plant enough time to produce fruit (and that would be a major disappointment).
I think what is even more important than knowing when to sow the seeds indoors, is when to get your supplies ready.
Last year, with the onset of COVID, people discovered many seed sources were so bombarded with orders that the seed sources were sold out or delayed due to shipping issues associated with COVID. This may result in a major problem, you definitely need the seeds on time to start them on time.
This issue, however, actually allowed me to sell seed packets and seed sowing kits I had already assembled for an upcoming farmers market talk in early spring last year, which was also cancelled due to COVID.
I quickly let everyone know I had them available and people came by to pick them up from me via zero-contact porch pick-ups. The whole process was a fun adventure for me and people told me they enjoyed not only my seed selections but my instructions and guides.
In my opinion, you should really start to think about the whole preparation process right now in late January or at least by early February.
Why? Because you need several items to sow your seeds: seedling trays, seedling mix, and a set-up (place in the home with sufficient light) or you may even need to purchase grow lights to hang over your seedling trays.
I’ve created 3 guides which I included in the packages for anyone who buys seed packets from me or seed sowing kits. Each guide is a bit different.
One guide is a chart which shows when to sow the seed, how many weeks it will take for the plants to be ready, when to plant it outdoors safely. It is a nice one-pager for reference.
Another chart I provide is a new one I created this year, which is also a one-pager and it shows “the weeks before frost” specifically for the seeds I am offering this season. If you wish to learn which seeds are available, just email or text me (see below information) or visit http://www.WORKSHOPSCT.com.
In other words, each type of plant must be started a number of weeks before your last spring frost date. My “weeks before” chart lists shows the 10 week mark, 6-8 week mark, 4-6 week, 2-4 week, etc. For example, some hot peppers are started 10 weeks before, which is early March (when to sow).
Lastly, a chart I provided last year was an actual “calendar month by month.” It is similar to wall calendars. I’m still thinking about if I should do this one again, or just use the new “weeks before chart.”
But the general point is – all of this information took lots of time for me to assemble for you to make it easier for you to do your sowing.
My seeds are primarily focused on warm season vegetables such as the tomatoes, cherry tomatoes, hot peppers. I hand-pick new varieties each year based on their uniqueness, taste, and if they are heirloom, etc. I also pick out parsleys, basils (3 types), and chives, etc.
I also created a chart for young kids which is a way to record the progress of the seeds. I’m liking this idea more and more to include with anyone who buys seeds and/or seed starting kits from me for their kids to use as additional education tools.
Photo sent to me by a mom – she was hardening off the plants she sowed from my seed kits with her daughter
Another reason why planning is so important is because plants growing indoors from seed need to be hardened off before you put them into container gardens or patio pots (or gardens) after frost in the spring. This process occurs one to two weeks before you plant them outdoors permanently. It is a process to acclimate the seedlings to the outdoor environment.
Once of the best parts of offering the seeds and sowing kits is that I hear feedback from buyers of how wonderful their harvest is – and yes, sometimes there is feedback of issues (the dreaded tomato hornworm). But that is all part of the learning process.
A couple of my buyers have children. I absolutely adored when one mom sent me a photo of her daughter holding a huge Upstate Oxheart tomato next to her face. These tomatoes plants grow huge tomatoes, and it was super fun for them. And they sent me of a photo of a tomato on a kitchen scale weighing 2 lbs. too. They were thrilled, and it still brings a big smile to my face knowing my help got them into growing and enjoying their new hobby.
So cute!
The more I hear of the kids with their parents or their grandparents (the cool ones! LOL), the happier I am that they experienced the sowing process together. This year, I picked a really compact and tiny tomato variety that I think will be much fun for kids (and adults).
But it all starts when you decide to give it a go. Here is a tip sheet if you are considering it for this season.
Cathy Testa 860-977-9473 containercathy@gmail.com Located in Broad Brook, CT By appts, pick-ups, mailings, and drop offs See more at http://www.WORKSHOPSCT.com
I picked up my bags of potting mix soil early this year. It felt even a bit crazy, to be driving to go get them, when there were very cold temps outdoors that day, yet, it was a very sunny winter day and I was enjoying that part of it. But I did pause to think, “Am I getting these too early?”
Last year, I used more bags of potting mix than I expected, and I am constantly potting up plants, moving succulent babies into small pots, repotting larger plants, then comes seed starting soon where both my potting mix and seedling mix is used in trays. I also use some in my container installs later in the season, and it is kind of endless. I even repot houseplants for people from time to time. So, I need potting mix, and lots of it.
One thing I have noticed a lot lately, on various Facebook group pages related to gardening, plants, and interior houseplants, is the constant frustrations by people, some are newbies, some are not, on how they get fungus gnats in their houseplant pots inside their home. Everyone suggests a remedy they have tried from putting cinnamon on the soil to using hydrogen peroxide, misquote bits, and other home remedies. Whatever their remedy is, there is a growing (no pun intended) frustration with issues such as fungus gnats in the pots of plants and it has to be difficult for people to accept, especially when it gets out of control. They want to succeed and keep their plants healthy, but they encounter something like this and it drives them nuts.
No growing mixes are immune to fungus gnat infestation, but fungus gnat numbers can vary among growing mixes. Adults are strongly attracted to microbial activity in soil/media. For fungus gnat management, avoid immature composts (<1yr old), including composted pine bark mix. Mixes with any compost are usually more attractive to fungus gnats than pure sphagnum peat. Good sanitation is vital.
Fungus Gnat Biology and Control J.P. Sanderson
I thought this statement above from the Cornell fact sheet by J.P. Sanderson was key, especially when he wrote, “no growing mixes are immune to fungus gnat infestation” and also the part about mixes with compost are usually more attractive to fungus gnats. In other words, to me anyhow, the more sterile and clean the mix, the less likely you will get the dreaded FGs (fungus gnats) in the potting mix when the conditions are right for them to start up in the pot (such as moisture and temperature).
For monitoring adults, yellow sticky traps placed horizontally at soil level are most effective. However, fungus gnats can be monitored along with most other flying greenhouse pests by positioning yellow sticky traps vertically just above the crop canopy.
Fungus Gnat Biology and Control J.P. Sanderson
Many times, on these gardening Facebook pages, people will say, “I use those yellow sticky tapes” to get rid of them, but in my opinion, those do not get rid of them – they MONITOR them. As noted above, these are useful to keep track of the amount of a FG infestation you may have and they also should be placed relatively close to the plant’s surface area. If you have a yellow sticky cards filled with them and you see FGs flying all around your kitchen, you definitely have a major problem. Usually the best place to start is thinking about the potting soil mix you used in the first place, and also your habits on how often and much you water your plants in pots inside the home.
“However, the primary reason why fungus gnats are abundant in homes is related to changes in moisture levels associated with the growing media of houseplants. Fungus gnat adults are highly attracted to moist growing media. Furthermore, as the growing medium ages or degrades it tends to retain more moisture, which will also attract fungus gnat adults. In addition, decreased day length and cooler temperatures slow plant growth and water usage. If watering practices are not altered….
But one reason I pulled this quote from the article above (in the black box) is because I feel I see more of the FG problem in the winter as well. As they are pointing out, three things occur: the FGs like moisture and they note growing medium (potting mixes) sometimes hold onto too much moisture (meaning if in a pot for years and it doesn’t drain well for whatever reason), and lastly, plants tend to slow down growth in the winter months inside the home, so less moisture is being used up by the plants now in the winter months (so it stays too damp and maybe even too cold).
Cathy T (me) in my greenhouse
Another article noted that people notice FGs more so in the winter because they are inside with their plants, versus the plants perhaps being located outside during the summer, or you are outside more in the summers than winter. Houseplants in particular grow slowly and roots may not take up as much moisture such as a big tropical plant would in the summer outdoors. You get the idea. But they are pointing out, you may just notice them more in the winter months than summer.
Whatever the reason, these FGs are a real PIA to people. And they ain’t pretty either when you get into sowing seeds in a few months for your warm season vegetables, such as tomatoes, in your seedling trays. So, it is critical you pick the correct seedling mix in the first place. And have the right temperature, environment, clean pots, and good potting or seedling mix, in this case when you start your seeds. Perhaps correct is not the right wording, you want quality seedling mix.
Usually my number one rule, when you go to buy potting mix or seedling mix, is to be sure you are purchasing fresh mix that is in good standing condition in the bag. If the bag is a mess, at whatever location you are getting them from, I’d stay away. I’ve talked about this in the following post:
When I see people upset that they can’t get rid of the FGs in their planted house plants in pots (from these posts I’ve been reading), and they feel they’ve done everything right, such as let the soil dry out on the top (since the FGs prefer moisture), they bought reputable potting mix from a reputable place, they keep their pots and areas clean, their pots have drain holes, they been careful with watering, and they are truly trying to be the best plant parent they can be, I feel their pain. Why, oh why, can’t we count on potting mixes in the retail market place to be problem-free?!
I remember once telling a guy at a garden show years ago that when I get my greenhouse I’m going to keep it super clean, and he laughed and said, bio-diversity is just as important. True I’ve learned, and no matter how clean, you just can’t sometimes prevent nature from stepping in. That is true.
And I agree with the above article too, if the soil is too damp, AND cold, and in winter, I think there is more of an issue with FGs (fungus gnats) appearing. The best thing you can do is ACT on it immediately when you see the little buggers flying around your potted plant.
However, I do everything I can to start with good, quality potting mixes. And I see that question asked often on Facebook gardening like group pages, well, what is the BEST mix?
Oh boy, that one gets all kinds of responses. I know which I like and which I don’t. I don’t get any paid advertising on my (this) blog at all, so if I listed them, it would not be for the purposes of gaining that but I also sometimes don’t want to list them because they can seem like the best, and whack, you get FGs anyhow!
One year, I offered a Seed Starting Workshop and we decided to test various seedling mixes. Each attendee had 32 cell trays and we split up the rows by using a different seedling mix per row. We used some of my professional potting mix and other potting mixes on the market, and two different types of “seedling mixes”. One type of seedling mix, for some reason, completely failed. The seedlings in those rows were so tiny and did not grow much. All the other rows were just fine. All was sown at the same time and in the same growing conditions, and I was watering the seedlings after the class for a few weeks for the attendees. I was so excited that I even thought of testing out the various potting and seedling mixes in this experiment without knowing the results would show us a really good example of how you might think a mix is great (and I did think the brand and place I got from was reputable) but it failed. Why? Hmmm. One thing was that mix did have more heavy components (bark) even though it was listed as “seedling mix.” As per the note in the first listed article above where they said mixes with more compost are more attractive to FGs, so the mix was heavier and probably a bit more compost like. Where all the other mixes were primarily sphagnum peat moss and perlite.
Seedlings in Cathy T’s Greenhouse
I never went back to the retail store to say, hey, we used this mix – and it really didn’t work well compared to the others. But what would the store owner say? He’s probably think I was a nut job. Not knowing, I’m Cathy T. LOL.
For years, I’ve been saying, I’m going to write a full blog post about potting mixes and which are the best (in my opinion based on use). And make it very technical, but I still really haven’t done that. I always just repeat what I’ve always said, use a fresh bag of quality potting mix (or seedling mix if sowing seeds) and follow these watering instructions (provided with my kits or in my workshops, etc.) and all should be fine.
I think probably the most important thing is the potting or seedling mix needs to be fresh, sterile, and well-draining. Mixes with additional components are sometimes too heavy for container gardening, seed starting trays, and patio pots. It also greatly depends on what you are growing (seeds versus a perennial plant). Heavier potting mixes are needed for certain types of plants. But I’m generally referring to seedlings right now and smaller plants, or those in smaller pots, such as houseplants being a good example.
As you can see, it is a hard topic to narrow down.
Because I am vigilant at cleaning my greenhouse and keeping watch of my plants, and my pots, and picking up debris, using good potting or seedling mix to start with, I rarely have a potting mix issues or major fungus gnats. However, recently I had one big succulent plant in a single 6-7″ pot, and I saw them, saw those FGs flying around that particular plant, and I immediately put a yellow sticky pest trap card near the surface of the succulent plant on a little stake inserted into the pot, and yup, I knew right away that plant had an issue when I checked that card one or two days later. There were quite a few FG attached to it in places. I tried treating it, the soil, with various methods. Then I checked again, the problem was not going away. What did I do? I repotted the whole plant into new fresh potting mix and even a new fresh pot, and I’ll keep watching. I did it because I love that big succulent, and it was worth it to redo the potting of it, at least it was worth it to me. Plus I didn’t want it to spread to other plants.
Because this topic is big and is difficult to write about, I’m going to stop writing right here and continue more on this later. It is time for my second cup of coffee!
BTW, my seedling kits come with my professional well-draining fresh potting mix (the one I trust) and planting instructions, growing charts, when to sow timing, seedling trays and seeds! If you are local to my areas, check out my offerings on www.WORKSHOPSCT.com. I am offering free delivery to areas near me!
Last year, when I was showing my seed packets for sale and my sowing process, a friend who was interested in both asked me, “How many seeds are in a packet?“
This seems like a reasonable question to ask, especially if you haven’t tried sowing seeds before. In general, for the seeds I sell, there are about 25 seeds in the tomato and cherry tomato seed packets, except for one I offer called, Upstate Oxheart tomato. It has only 15 seeds per packet. Why? The tomatoes are nearly seedless and that is apparent when you cut a Oxheart tomato in half – and yes, it is shaped just like a heart – amazing. There are hardly any seeds in the actual tomato. This makes a challenge for the seed producers, so I always am sure to sow those seeds carefully as I don’t want to waste one – these tomatoes are big and juicy.
Oxheart tomatoes are not only huge! They are nearly seedless.
The same is about true for the hot pepper plants I’ve sown and grown, about 25 seeds per packet, and cucumbers. But plants like parsley will have 200 seeds, same with the basils, and they are smaller seeds than the typical tomato or hot pepper seed in size. In fact, they are so tiny that I am unsure how anyone could plop one tiny seed per a seed cell tray filled with seedling mix. Often, I will scatter seeds over the top of the seedling mix and lightly dust it with fine seedling mix to cover them. That is the case with how I handle parsley and basil seeds. Same with some lettuce mixes. I call it the ‘scatter’ method and I show exactly how I do it via my video’s. Videos are provided to my purchasers of seeds and seed kits, by the way.
Most seed companies will identify the number of seeds per pack, but other companies may just list the net weight on the packet or envelope. Some will provide this information in milligrams.
Seed sizes vary. Hot pepper and tomato seeds are about the same size, but larger seeds, like those of cucumbers or a moonflower, for example, are much larger and easier to handle. Larger seeds are great to use if sowing seeds with young children learning for the first time how to sow seeds. Think pumpkin seeds too.
I obtained Celosia seed one year. This is a flowering plant producing colorful fuzzy flowers, but the variety I selected is a mammoth type. It grows up to 60″ tall and you need to start the seed early indoors. When I opened the packet, I couldn’t believe how tiny the seeds were. There are 200 seeds per packet. Can you imagine sowing 200 seeds and having 200 of those plants?! So, I’m sure there is a method to sow seeds which are super tiny, but I decided to fill a square flat tray of about 3.5″ deep with the soil mix and just scatter the seeds on top. It worked. They germinated and then I carefully pricked out the seedlings when they were ready into 3-4″ pots to continue growing them. I have to admit though, I am not sure if this was the best or recommended method. To give you an idea of how small the Celosia seeds are, the packet indicates that there are about 600,000 seeds in 1 pound.
I often use the scatter method with lettuce mixes too, and will sow them in small long window box types of containers, always being sure to drill drainage holes in the bottom if there are none. I find for lettuce mixes, parsley, and basil, this scatter method works perfectly. It is important to scatter them as evenly as possible and you don’t need a whole packet to do this (unless your window box is huge). For example, one type of lettuce mix I sow has 500 seeds per packet. I often use half of the seed packet or less per container. Then I lightly top the seeds with fine seedling mix and let it all grow. If you want to prick out each individual tiny seedling later, you may do so to put them into larger pots (or the next size pot up) for the basils for example. Some may find the scatter method wasteful, but it works for me. Because you may harvest lettuce mixes, parsley, and basil repeatedly from the plant by cutting some off and just letting it regrow, I find this is suitable.
A larger seed popping up from the mix
Another time, I grew Panther Edamame Soybeans from seeds. The seeds are large, similar to cucumber seeds (but round), they are easy to handle. I was so excited when I grew these in patio pot containers on my deck. Because it is just me and my hubby at home, a couple plants was sufficient to get a handful of edamame beans to put in a bowl, add some water, and micro-wave to heat them up and then I toss some sea salt on them and eat the beans right from the pods. Yummy. They have a nutty flavor and these seeds may be direct sown into the ground or your patio pots if you want, versus starting them early indoors before the planting season. The packet holds about 100 seeds.
Some seeds need special treatment prior to sowing them, but tomato and hot pepper seeds are not one of them, but others like the moonflower needs to be nicked before you plant them. Otherwise, the hard seed coat prevents water from entering the seed for germination to start easily. When handling a seed that requires nicking (scarification), it is easier if the seed is bigger; it helps a lot as you attempt to make a nick in it without damaging the interior of the seed (the embryo). Many seeds with hard coats need to be nicked with a file, sandpaper, or a tool. Some may be soaked in water first. It is best to research the seed before proceeding and follow the recommended method. I have never seen a tool specifically for nicking hard coated seeds on the market (I think if someone invented it, it would sell like hotcakes). I read once that commercial growers use acid, something we surely can’t play with! Some hard coated seeds with crack open if you soak them for 24 hours.
Do you sow a whole packet of seeds? Let’s talk tomatoes, if you have 25 seeds in the packet, should you sow them all? Some may say yes because if any of them fail, you will have extra’s. Some will say no because are you really going to plant all 25 of those tomato plants? And if you did sow all of them, remember, you have to move them from the seed cell trays at some point into a next larger size pot and may even have to move them into a 1-gallon size pot before they go outdoors. This requires more pots and more potting mix.
Photo from Cathy T’s greenhouse – couple seasons ago. Can see the scatter method in the window box type planters.
One thing I love about the seed packets I get and sell is they are an envelope within an envelope. Each packet has a envelope (white) containing the seeds, and it has all the planting details on the white envelope. The white envelope is inside an outer separate envelope with even more plant information, and it is a colorful art pack made with a thicker type paper. It is almost like a little sleeve to protect your seeds within. I like that because if you don’t use all of the seed, you have a protected package to store them in.
Fox Cherry Tomatoes coming up – One seed per cell was used
Storing is another topic but when well stored, the seeds will remain viable based on the seed type and all of that, and the number of years is different based on the type of seed or plant. Look it up if you are concerned and use up all the seed if it is a type that doesn’t remain viable for more than one year. Parsley is an example. Parsley seed should be used in year one. At least for the type of parsley I have been sowing.
The next question that followed how many seeds are in a packet, was of course, ok, “How much soil (seedling mix) do I need?”
That is a good question! I love questions! LOL. The seedling mix often comes in an 8 quart bag in retail locations. I will put about that amount into a big bowl and add some water (I think it was one cup but I will double-check) and then very lightly stir it to moisten the mix. You don’t want mud or mush, you only want to lightly give it moisture. In fact, don’t pour the whole cup of water in there initially, pour some water, and mix and feel it in your hands. I often sow seeds in 32 cell plastic black trays with 3-3.5″ depth. I like that size plus they fit nicely on my seedling heat mats. I use about 8 cups of soil per tray, I believe. I will check my notes! Your containers or seed trays should be filled with pre-moistened mix or medium (as they refer to it) before you put your seeds in the trays. You may also moisten the mix in a plastic bag if you don’t have a bowl handy. Another method is to put the dry soil into your seed trays and set it in a base of water so the water will wick up into the mix prior to sowing your seeds. I don’t do this method however. I mix the soil with water like a cook does in the kitchen in a big bowl and it works for me. The seed kits I offer has mix, trays, and instructions as well.
By the way, I like the plastic trays because they are pathogen free and reusable. I have had issues with peat pots before. For some reason, they tend to grow mold on the sides. I tend to stay away from those now, however, if you use peat, I’ve read you need to moisten the pots first and never to reuse the peat pots which would be difficult anyhow because they fall apart. Peat pots are great for plants which do not like their roots disturbed (cucumbers) so you place the peat pot and the plant right into the ground when they are ready for outdoors. And I have never used compressed peat pellets. They are just not for me, perhaps because I always have soil mixes on hand. In fact, I got all my soil bags already last week. I wanted to plan ahead. More on the soil and potting mix world later, that is a big topic. Sowing starts in March so I am preparing ahead right now in January – and you should too!
Thanks for visiting.
Cathy Testa 860-977-9473 containercathy@gmail.com See http://www.WORKSHOPSCT.com if interested in seed packet purchases. Location: Broad Brook, CT Part of East Windsor, CT
I was starting to worry that my seeds may be delivered late because I keep reading on various gardening websites about people experiencing shipping delays. One lady, in fact, made a joke that she has been stalking her mailman waiting for her seed delivery, which made me chuckle!
Well, my seed order arrived yesterday, and I’m thrilled. When my husband walked in from work, he said, “Your seeds are here.” He had grabbed the box from the mailbox for me.
I immediately opened the box and scanned the many seed packets. All there except one type which hopefully will show up or the charge will be removed from my invoice. So, I thought this early morning, I would just write a bit of what I do the minute I get my seed order in.
Of course, open the box and review the order. Count the packets and make sure all are in the box and in good condition. Enjoy the moment – I do!
Now, this am, I will take out one set of each type of packet I ordered (BTW, these are primarily tomato, hot peppers, herb seeds, and a couple of flowers). Because some of the sowing and growing instructions are “inside the seed packets” and not on the back of the seed packet envelope, I will keep one set of the packets for me and read all the instructions carefully (now, don’t wait). I think key is learn about the growing habits or needs of that plant a bit – don’t over look it, especially if you are totally new to trying sowing of seeds indoors before the growing season.
Take out my Planning and Growing Calendars and verify I counted back the number of weeks correctly for each type of plant. Remember, one type of tomato plant maybe slightly different than another variety. So one may say 6-4 weeks before your last frost date in spring to start sowing the seeds indoors, or it may indicate 8-10 weeks before. For example, for a few years now, I’ve grown Upstate Oxheart tomatoes. They are a type that indicate 10 weeks before, but another tomato, like my Bumble Bee cherry tomatoes, are indicated at 6-8 weeks before our last frost date. Thus, I will review Planning Charts I created to verify all, such as one chart I created which indicates “when to sow your seeds indoors based on the last frost date expected in mid-May in Connecticut.” If you have general charts from various sites, compare those with the instructions on your specific seed packets. And be aware, do not use “days from transplant” if this is noted on your packet – this is not the same “as days or weeks before frost.” The days to transplant is the number of days once the seedling is transplanted into your gardens or outdoor container gardens, fabric grow bags, or whatever place you want to grow them outside. It indicates when the plants will produce fruit or mature.
Trays on heating mats. Note I tested various seedling mixes in these trays. See the color differences?
I also will day dream about how amazing these plants will be and remind myself that spring is only a few months away. Hang in there, January can be a tough month. I focus on the upcoming weeks to prepare. Some things to do now are get your growing pots and seedling trays ready (I prefer 3-3.5″ deep cell trays for proper root development and plastic because the stay clean, pathogen free, keep the soil consistently moist, and are long lasting and reusable), take out your seed heating mats and clean them up, and think about getting seedling soils before March. I usually pick up soils mid-February but I am going to get them early this year. I want to be ahead of the game. As noted in my prior post, get “seedling mixes” or “sterilized potting mix for container gardens or patio pots” to start you seeds. Avoid heavy soils which may be amended with compost as you don’t need that at the seed sowing stages. The lighter the soil, usually the better, and no dirt from the ground. Look for fresh bags, avoid cheap mixes that may be too old to take up water (meaning from dollar type stores if they look old – they may be new and just fine – just be aware). You want potting mixes made with peat, sphagnum peat moss, vermiculite and perlite if not using seedling mix. Seedling mix is finer (not as dense as container or potting mix) but both will work. Do not use mix labeled as “garden soil” or for the garden. Keep the bags in a safe dry place till use.
Store my seed packets after I have all reviewed and organized. Then wait till early March to start sowing in general (again, these are warm season vegetables (tomatoes and hot peppers) that need to be started indoors in seedling trays/cells and then transitioned to the outdoors after frost to harden off.) Hardening off is all about acclimating the seedlings you have started indoors to the outdoor exposures and temperatures gradually on the right days (shady area then gradually to sun, not too windy, not cold, and watch for shade which may not exist if trees are not leafed out yet, and only for a few hours each day, etc.). This is usually the week or two weeks before Memorial Day for me.
Key dates: Jan (get ready and order seeds early), Feb (get organized), March (start sowing), April (monitor all your seedlings), May (start potting up-moving the seedlings from your cell trays into larger one size up pots), Mid-May (start hardening off outdoors gradually), May at Memorial Day (all safe to plant outdoors).
Storing the seeds. They must stay dry and cool. No humidity, don’t put in freezing temperatures or in a hot place, like a sunny greenhouse. Keep them in a cool spot away from moisture. I put mine in metal lunch boxes! They are the perfect container. I also just happened to go to a vintage market last weekend, and found these really old lockable long boxes (steel bank safe deposit boxes) and thought, these are perfect for storing my seed packets. The metal lunch boxes or tin boxes also tend to stay cold. I put them in a room in my home that doesn’t heat well under a table away from any heat sources. In general, if you store the seeds appropriately, based on the types of seeds, they may last 3-5 years, however, some seeds are short lived and should be used the first year (i.e., parsley). The ideal conditions for storing seeds are cold (but not freezing), dark, dry places. Be aware of storing them in basements (humidity), garage (too cold or hot), greenhouse (can get too hot), and anywhere where moisture could be an issue. I have read you may store seeds in refrigerators but I have not tried that out yet.
Okay, so I don’t have much time this morning to focus on writing a post so I apologize if a bit sloppy writing and any typo’s I’ve missed! I want to get to my seeds and this is also a time where I start preparing my tax paperwork (yes, in January) so that I don’t have to focus on taxes when I want to be playing in my greenhouse in a month or so.
I will be posting things like this for those interested in my seed sowing steps. Perhaps if you are new to seed sowing indoors before the planting season, you find some of my experience here useful.
If you search the web, you will find a plethora of sites offering many articles, step by step instructions, growing charts, and tips, but will any one link or article give you all the simple answers you need to start seeds indoors? Probably not.
Think about this – there are millions of vegetable plants you may grow from seed in our world. How could anyone sum it all up in one fell swoop?
When I started growing vegetable plants from seeds, the desire to do so was sparked by the love of art packs from a particular seed company. The art sparked my interest and then I started to buy seed packets. I was interested in unique tomato plants and flashy hot pepper plants, rather than the traditional types I ate growing up on a farm. Maybe I got overloaded with the same types of tomatoes from when I was a kid, I don’t know, or maybe it is my love of art and creativity that got me into the different, unique, interesting varieties because they are like a work of art to me. A colorful purple tomato to me is cool. Or a pepper shaped like a UFO – that rocks! Plus you get to eat them and they taste delicious.
Need I say more? This is a photo from last season!!
However, I have spent countless hours reading seed sowing books, reviewing growing charts, looking up frost dates from different sites and all of which seem to give a slightly different answer, and determining what supplies and seeds are best for my area of Connecticut, and then I spent hours putting my own guides together. I guess, in some ways, it is good that I am an organized person and an over-thinker! Maybe I looked at too much, because my head would spin. After all, you could just buy a pack of seeds and plop them into soil, and it would sprout – but would it be successful?
Today, I want to try to share some of my seed sowing considerations in a random casual fashion:
#1) Start small and pick easy to grow plants. So, what veggie plants are easy, what grows like weeds? Hmmm, well, that is a tricky question. One may say, well a pumpkin seed is sure to pop up from the soil or a cucumber seed, but do you like pumpkins, do you have space to grow pumpkins in containers or a garden? They sprawl out for miles (well, for many many feet) and so that may not be the best choice for you. And cucumbers, well, they vine up and down and all around, but they don’t like their roots disturbed, so even though they are easy to grow, they have considerations if you start seeds indoors and then transplant. In my opinion, some herbs are easy to grow, like parsley, or mixed lettuces seem easy, or some basils, but even if they are easy, they all have unique personalities to consider. For example, basils like warmth. If you put them out too early when cool in the early spring, they don’t like that and won’t flourish. Cherry tomatoes are easier than regular tomatoes in my experience. No matter what – you will get tons of cherry tomatoes from one plant – it is amazing! Parsley is easily and it likes a bit of the cooler weather, unlike the basils.
Shown in this photo, Thai Basil (top left), Sacred Basil (top right), Curley Parsley (bottom left) and Genovese Basil (bottom right). Easy to grow herbs, as seen last year!
#2) Get the tools ready. Do you need a grow light? Many people will argue you do. And it does increase your success at sowing vegetable seeds indoors. But what is success? A perfectly straight upright seedling? Maybe. Maybe not. After all, I know many people who grow seedlings in seed trays set on their old fashioned heat radiators in their home, and the seedlings leaned towards the window for more sunlight, but they made it – and make it into their gardens. However, as you learn more, you start to consider the options of getting a lighting system so it increases your success and makes for healthier seedlings. As for myself, I have a greenhouse which provides sufficient lighting when the sun is out. In early spring, on many days, there are cloudy days. So far, I’ve gotten by just fine without grow lights. As I learn more, maybe I will get grow lights to add to my set up, but it is not going to be this season. Anyhow, what I’m getting at, is at a minimum, think about the tools you will need to sow seeds and start to pick up your supplies based on what you think you want to grow. BTW, I do use heat seedling mats to encourage germination of the seeds and to increase the start of healthy roots. This I have found helpful to invest in. That is a tool you may want to consider ordering now.
#3) Soil mix – This IS critical. First, for the ultra beginners, you should know that you can not sow your seeds in dirt from the ground for vegetable plants you need to start indoors in seedling trays ahead of the growing season. Believe it or not, when I offered seed kits last spring, one person thought you could put dirt from the ground into your seedling trays. They said my instruction sheet enlightened them and they had no idea dirt was a no-no. So, when you go out to get your soil for sowing seeds indoors, get bagged seedling mix or sterilized potting mix for patio pots. Either will be fine. The seedling mixes are finer than potting mixes, usually fresher since it is going to be seed sowing time soon, and perfect for tiny seeds to make contact with the seeds, etc. If you don’t want to deal with that, and want to sow seeds in the dirt, pick vegetable plants that you may directly sow into the ground after all chances of our spring frost and when the garden soil is workable. But you need to determine which plants you can sow directly into the ground, things like beets, for example. Some plants prefer to be directly sown into the ground. If you pick this option – remember, you have to prepare your garden area ahead as well.
A tomato seedling that was potted up into a larger pot by Cathy Testa
#4) Timing. This is another critical factor. All plants grow at different rates. Some take longer and some are faster. They need a certain number of days or weeks before they produce fruit. If you start your seeds too soon, they will be outgrowing your starter pots, getting root bound, start to struggle for the moisture it needs, and even start flowering, which leads to fruit (and for ultra beginners, flowers are where the fruits are produced. I don’t mean to sound rude or condescending, but if you are new to the world of gardening and plants, and didn’t know this – don’t feel embarrassed. I didn’t either when I was a kid and I grew up on a farm!). So, say you sow your tomato seeds too soon, then they grow larger and larger indoors, and then you need to put them in a bigger pot, and then they get flowers and then, you want to put the plant outside but it is still too cold out – it may even freeze one night if the temperatures drop down. You could loose the flowers from the cold temps, now you will have no fruit. Potentially, all your seedling work is lost. The same goes for starting seeds too late. If you start too late, your plant will sprout, it will grow, and you will think, awesome, and, now I can put it into my gardens or containers in spring outdoors, fine, but then you wait and wait and wait after its been growing in the garden, and it is almost early fall and you still don’t have any peppers. You started the seeds too late indoors. Peppers take more weeks to produce their peppers for some varieties (as an example), they have a required longer growing season. Timing is a critical thing. Get yourself a seed sowing calendar, look it over, and count back the number of weeks it indicates on the seed packet (or inside the packet) as to when to sow your seeds indoors. You count back from your last frost date in spring which in Connecticut usually falls around mid-May. If you end up buying seeds from me or a seed kit, I already did all this timing homework for you in my charts and calendars based on the seeds I will have available for sale.
#5) Okay, what else is needed? I guess it is Determination + Enthusiasm. Last year, we had the start of the pandemic and lots of things were short in supply (including some foods), AND as we all know, people were home so they had time to start their own gardens. The enthusiasm to start sowing your own seeds for your own amazing vegetable gardens was very high, and many people came to me for advice and for seeds or seed kits. Everyone was so enthusiastic, I just loved it. The pandemic even created a seed shortage by seed companies because so many people were trying to grow their own for the very first time! But, growing plants from seeds is not like making brownies for the first time. You read the directions on the box, set it in the oven after mixing all as directed, and you are successful, and you eat the brownies. Sometimes in the plant world, there are factors out of our control. So, you read the directions, you sow the seeds, but then all of a sudden there is an issue after planting them outdoors and they’ve been growing for a while. Say it is blossom end rot or a tomato horn worm, and ack! You are bummed!! But if you are still determined, you will succeed. So you take on the challenge, fix it if possible, and then you reap the rewards of an amazing tomato harvest or pepper harvest. And it feels good, it tastes good, and it is right there at your finger tips. Oh, again, that makes me remember something, I think cherry tomatoes are easier to grow from seed than regular tomatoes, so that is another tip for beginners. Usually you get lots of cherry tomatoes! Like tons of them! Did I say that already?
Heirloom Tomatoes I grew from Seed!
Will those of you who gave tomato and pepper growing from seed last season give it a go again this season? Yes! I know you will. I know there are some of you that so enjoyed it, you are on board. But maybe not, maybe you thought all these considerations were too much, too many things to think about, and if you don’t like to water plants, talk to them, and treat them like a cherished pet dog that needs care, well, then maybe you won’t. That’s okay too. The choice is yours and if you decide to make that choice again this season, and get seeds and/or seed starting kits from me, I promise to be your cheerleader and encourage you as well as give you as much information as I can about how to start sowing seeds indoors based on my experience.
My annual ritual, for as far back as I can remember, is to start planning out my yearly calendar on the first week of January. I will take out my past year’s calendars actually, and look at all the activity I’ve written on each date and transpose the important items to my new calendar.
Last year, I purchased a formal fancy book calendar planner with many pages and sections because I had a great deal of goals to outline and try to balance. Things like setting up workshops, teaching a class to a school, setting dates for my container garden installations at clients, and sowing seeds. The book style calendar was new in addition to the wall style calendars I use to plan other activity. For example, I keep a separate calendar just for seed sowing and noting dates along the way of the plants’ progress, etc.
But this year, I’m feeling very “COVID confused.” I pulled out my new wall 2021 calendar yesterday morning to start this process. I sat there at times just thinking and feeling off balance or not sure what to notate. At times, I don’t even remember not noting some things from last year’s changes because it was a confusing year and because of how much the pandemic changed our calendars and timing in 2020. What I mean is, I would sit there and think, “Didn’t I write that or this down?” But at times, I missed even noting an important date down on my 2020 calendar. I guess calendaring just went out the window as I and we all dealt with unforeseen changes to our daily and weekly routines.
Looking at 2021 – Feeling COVID Confused
In fact, when I looked at my 2020 wall calendars, most of what is written on some key dates are the words, “Cancelled.” We all know what that is about. It started with hearing about the pandemic, then seeing that as hopeful as we were, we would have to eventually cancel in-person or group activities, like my plant related workshops.
My book style 2020 calendar turned into nothing more than a place to collect dust on my home office desk. I remember, I even typed out a separate list of dates to be sure to plan carefully so I would not wear myself out and make priorities on the most important business items of the year. But that typed out list was meaningless. It is like wow, I couldn’t even follow my grand plan last season, although I was busy and had many work related activities continue, it did not follow a “plan or calendar.” It followed the pace of what occurred, versus what was planned.
Then it felt like someone pulled a prank on me. None of that “book style 2020 calendar” was followed. However, I still kept my small business going, and in fact, some of my business actually perked up. That’s another story for another time, but I don’t always buy a “book style calendar” and last year I did – and it was almost like the feeling of “a joke.” I didn’t even use it! Someone pulled a prank on me. That someone, or something, we all know is the pandemic that showed up in our lives.
As I look at my first 2021 new wall calendar, and started to do this annual “ritual” of writing past dates or key dates on the calendar, I started to feel very confused. I call it “COVID confused.” I literally felt like lost.
I didn’t really feel like I had a clear head. I even thought to myself, “Well Self, Just pretend nothing has changed and proceed as normal.” Not sure that is a smart idea though? We all know nothings normal now.
However, fortunately for me, much of what I have done for my small business has been “on my own” anyhow, and much of it can be planned without interaction of others, at least the items I grow and sell. I thank the Nature Gods and whomever blessed me with the notion to build a greenhouse for that. Working solo in a greenhouse saved me last year. And so did the people who supported me with their Zero-Contact Porch-Pick-ups during the pandemic year which started in 2020.
Photo around Thanksgiving Time 2020 and Added Words in 2021!
If I am honest with myself, I made the decision to cancel offering workshops before this pandemic arrived. I was thinking about doing so. Part of that is because I think maybe my age. It is such a huge effort to put on workshops. And I also developed tinnitus (ear ringing) which is 24 x 7 in my ears/head, which started about 3.5 years ago, and it hasn’t improved. It messes up my sleep and stress makes it louder. I started to feel as though I didn’t have the energy required to put on my workshops, and with a pandemic, forget it. There was no way I could take that risk of spreading a virus in my workshops, and my mind was not ready to do online courses, etc.
Another reason I thought to not do those workshops anymore, even if they brought me so much joy at times, is that everyone and their brother (and, sister?) are offering workshops now. When I first offered them over 10 years ago, they were not that commonplace. It was my unique way of reaching the plant lovers in my passionate plant world.
Then I saw “cookie cutter” workshops happening by big companies and hiring non-experts to teach them in SOME CASES, in my opinion. I don’t really care for cookie-cutter. I like personalization, uniqueness, and convenience for my attendees. I worked hard at all of that. Now workshops were being held in bars and filling and they were paying more than what I charged. You can see where I’m going here.
Anyhow, so for my calendaring ritual, I knew, those “cancelled” workshops don’t even need to be on my 2021 calendar this year – so strike that from my list. They say, never say never, so I won’t but I don’t think I’ll be offering my workshops again. Or if I did, it would be some new format or style, but I don’t know what that is at all at this point. As I said, I’m COVID Confused.
I think a lot of us will feel “confused” this year on how to proceed. I know I’m not alone in that aspect.
I’ve been using an app called Calm for about 6 months now. I absolutely love it. It offers “sleep stories, sleep music” and many other meditative benefits. Every morning, before I get up, I do a meditation offered in their daily Calm series. This morning, they discussed “looking within” instead of looking outside of yourself when trying to find yourself or answers. I thought, “Hmmm, let me ponder this.”
I know that within, I absolutely felt joy when offering seeds, seedlings, and installing container gardens for clients. These are definitely going to continue as part of my small business offerings. I also know I absolutely love making custom plant gifts. But this year, things will change in regards to the Planning, Preparing, and Pace. Some will stay the same, but some will change. If the new strain of the virus spreads and things get worse again, the pace will change, the planning may change, but I still will prepare as best as possible.
#1) That making fresh holiday wreaths and custom gift orders totally helped me get thru the tough times of the pandemic. #2) That I still feel lonely when I wrap Christmas presents. #3) That I am a late shopper but you are able to get good deals at local shops because of that. #4) That I don’t like to bake holiday cookies, but I sure love eating them. #5) That I still don’t know how to make this year’s Christmas Day special for just Steve and I due to the pandemic. #6) That I am going to feel bored on Christmas Day, I think. #7) That no matter what, I put on Christmas pounds this month. #8) That I bring smiles to people’s faces with special unique custom creations. #9) That I love working with holiday greens. And I especially loved packaging holiday greens boxes. #10) That I am very motivated when into a work related holiday project even in blustery cold outdoor temperatures. #11) And, that I love holiday decorations in our home even if it is mainly for just the two of us (since we have had no indoor guests here all month, again due to the pandemic.)
Well, some of this list may sound depressing. I hope I don’t get the blues after Christmas day, cause as noted on #1, making wreaths and holiday creations for people, really truly absolutely got me through this month. It allowed my brain to go to a happy place, create, watch holiday movies or listen to holiday music, while I made wreaths and such. Making these holiday items for a month truly kept me sane. Thank you so much for all your orders and enthusiasm.
Cathy T holding a wreath she made (on a nice sunny day!)
In regards to #2 (wrapping presents) and #3 (holiday shopping), I did my first trek out to holiday shop just yesterday. I discovered that I am so busy before Christmas making holiday items for orders, that I usually end up going out for last minute gift shopping for family or friends of my own just before Christmas, but one thing I did this season was stuck to going to local places to shop and it was quiet in the stores, all the holiday items were marked down to 40%, and I got a nice hot cappuccino from a local bakery with cookies to go, which one cookie I snuck out of the package to eat in my truck while driving to my next destination.
But on #2 (lonely wrapping presents), this year I felt especially lonely when I got back home and immediately started wrapping presents. I didn’t even take a rest and got to it immediately. I felt lonely I guess cause I know I won’t be in the room when they open them. Isn’t part of the fun watching people’s expressions as they unwrap the gifts? And being kid-less myself, sometimes holidays feel lonely. I wrap and wrap for so many, but sometimes it doesn’t feel like anyone is wrapping for me. Parents are lucky. They always will get a gift and the joy of watching their kids open presents. For me, that is non-existent. There I said it. I don’t mean to be a sap (sorry). I guess that is probably why I just enjoy the smiles of people’s faces soooo much when they pick up a custom holiday gift I made for someone special in their lives. And it also taught me there are way bigger problems in life than my silly moments of holiday sighs. Gosh, one nurse I met, she has seen some very sad situations. Very sad indeed. And I think, we need a National Holiday for Nurses after the pandemic is over. Truly, I think that is needed.
#4) That I don’t like to bake holiday cookies, but I sure love eating them.
There is no doubt, there is nothing better than biting into a fresh, soft, yummy, fully decorated homemade or bakery made holiday cookie. And folks, my mother in law made the best, hands down. One time, when I just started dating my husband, I hap hazardly made some sugar cookies to bring to their house on Christmas Eve. It was I think the first time I attended her amazing holiday dinner on Christmas eve. She is the type of woman who picked recipes from a fancy cooking magazine, now I can’t recall it, darn it, anyhow, she made food to perfection. So when I arrived at the door and handed her a plate of odd shaped, not too good looking, sugar cookies with a happy attitude, not being any the wiser at that time, she took it and brought it to the kitchen. Later, I discovered them kind of tucked into a corner, which was no surprise when I saw the most magnificent display of the most heavenly cookies you ever seen in her living room. She had a gift, let me tell ya. At her elderly age, she doesn’t bake as much, but I sure do miss her amazing, soft, decadent cookies. Yesterday, I got some at a local bakery to try to make up for that, and I also spend time admiring the photos on Facebook of everyone who bakes amazing cookies at their homes, which you all are posting a lot right now. My mouth waters. Yummy.
#5) That I still don’t know how to make this year’s Christmas Day special for just Steve and I due to the pandemic. #6) That I am going to feel bored on Christmas Day, I think.
I know #5 and #6 sound depressing. It has always been “just the two of us,” but we also attended family gatherings here and there for Christmas too, and this year, well, that is a big no-no due to the pandemic. And it will be pouring rain all day on Christmas Day, they said on the news last night – Ugh! What will we do all day? We already watched quite a few holiday movies. And we can’t even decide right now what we should make for a meal. At first, we thought let’s order from a favorite restaurant, then we decided, well, maybe not. Well, tomorrow will be sunny and gorgeous so we are going to do some gift drop offs and try to make THAT day special. Maybe, since he will have the day off, we will figure out our meal plan for our Christmas Rainy Day, and pick up items on the road tomorrow. Because, today, I have to do some more last minute shopping still.
#7) That no matter what, I put on Christmas pounds this month.
Oh yah, the holiday pounds, let’s not even discuss that. It goes back to #4. You get the idea there. I used to say it was because I become Mrs. KB Claus, but now I guess it is Custom Cathy Claus. LOL. Those of you who know me best, know what I mean! LOL.
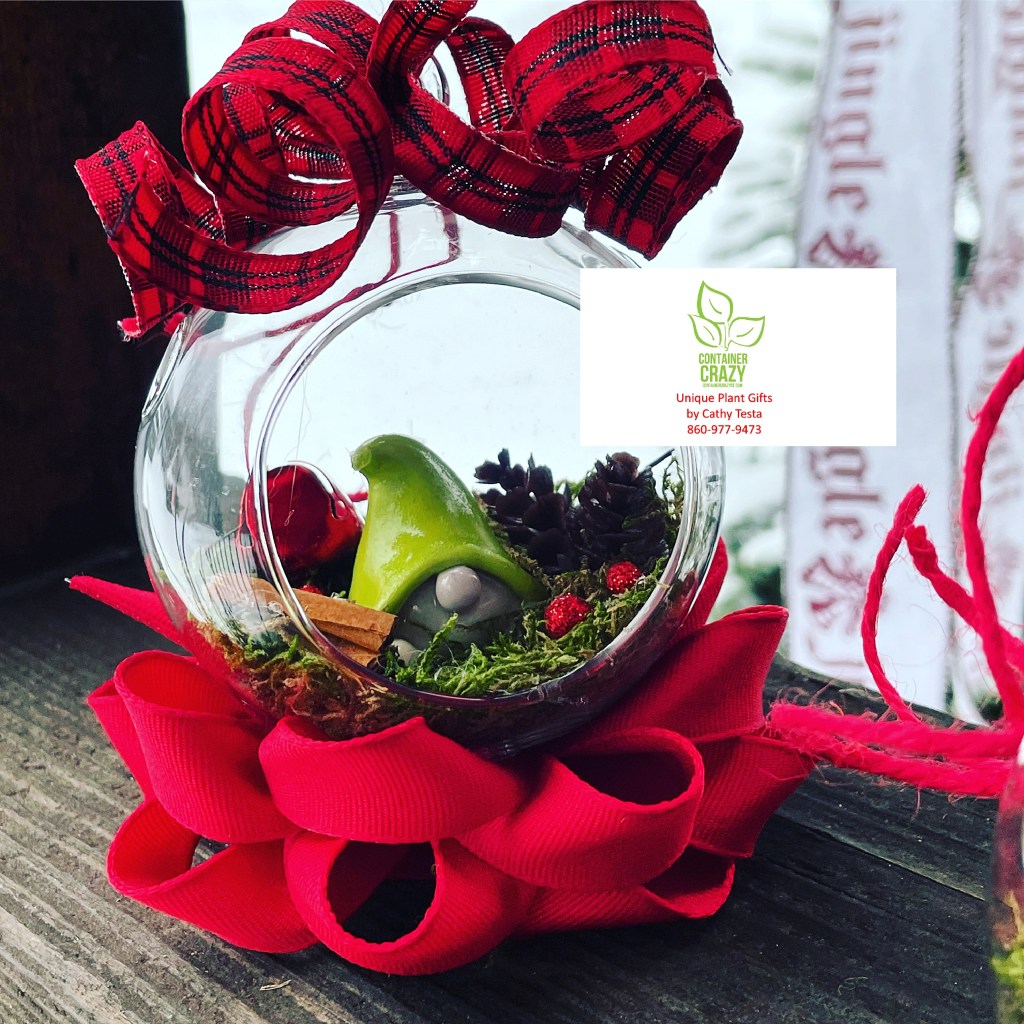
My Gnome Globes Made People Smile!
#8) That I can bring smiles to peoples’ faces with special unique custom creations. #9) That I love working with holiday greens. And absolutely loved packaging Holiday Greens Boxes for customers this year!
Oh yah, that kind of goes to point #1. I love seeing smiling faces when people pick up my holiday creations. That is really the true meaning of Christmas right? Bringing smiles to people’s face, and I learned I really love working with holiday greens, and LOVED packaging greens for my Holiday Greens Boxes this year (which was a new offering). It felt so good to do that – the fresh aromas, the mix of wonderful greens, where people could create with at their own homes, etc.. That is something which totally gets me into the spirit, at least it did all this month, and it will continue to do so as I look at the greens around my house, like the kissing ball hanging by my door, the pot of holiday greenery, the big wreath I hung outside on the fireplace wall. I just love the smell of the fresh holiday greens and I love the nature of it all. And I am happy for those who got greens, they could create at their own home as well.
Box of Greens for Customers was so fun to package up!
#10) That I am very motivated when into a project even in blustery cold outdoor temperatures. #11) And, that I love holiday decorations in the home and outside even if it is mainly for just the two of us.
Oh yah, I remember one year working on the barrels which I fill with greens at local package store, the owner came out to say he couldn’t believe I was working in the frigid cold temperatures that day. It was super cold, but there have been days I don’t care that it is cold, well, I care, but I can endure super cold temperatures outdoors when creating with holiday greens to decorate a special place or business. I am not sure why. I would whine like a baby otherwise probably about the freezing cold temperatures, but when I am creating, I usually push through the chills and make sure I bundle up as much as possible, and I do try to go on good sunny days. We did have some mild temp’s earlier this season. However, you have to be careful because your holiday motivation can make you forget the fact you could get frost bite or catch a cold, or whatever, thus it is important to warm up between stuffing greens into holiday planters and pots outdoors at residences, or at home, etc.
And #11, decorating! Oh yah, we did decorate a bit less this year, got a small tree for inside the home, but you know what, we still LOVE decorating for the holidays. It really does bring a warm feeling to your home, gives it a bit of the Christmas or Holiday magic to your surroundings, and there is nothing better than staring at glitter and gold. I didn’t unpack as many boxes or adorn as many rooms in the home as year’s past but it was an absolute must to decorate. I’m sure everyone knows it isn’t just for their guests, it is for them, to be in the moment and spirit.
Happy Holidays Everyone. Only 3 more days to go…
Cathy Testa 860-977-9473 containercathy@gmail.com
A Little Pine around my White Bird House – Even the Little Touches Count!
Our first big snow storm arrives tomorrow, well, technically tonight, so I guess that means we will be dealing with snowplowing our driveways, cleaning up our cars, shoveling, and wearing warmer winter clothes, but it also brings some nice things.
Nice? Yes, nice things.
Like how the snow covers up the ugliness of our brown landscapes of winter and how the snow decorates the outdoor holiday lights with snowy white accents, and even the after thing which happens the day after a snow storm, like how icicles will be dripping and glistening in the sun, or perhaps you will make a snowman or go snow-shoeing. There are some nice activities, that is, if you like snow.
However, preparing for the storm is usually some pre-work for all of us. For example, rushing off to the grocery store to get food so we can at least have some yummy meals while cooped up inside during the storm, or getting the snow plow prepared or scheduled, and moving any last minutes items from the outdoors to inside to protect from the storm, or covering up big planters in my yard I STILL haven’t gotten to. Geesh!
Cathy T’s Ho-Ho-Ho Holiday Globes!
It also will give me the opportunity to continue creating with my fresh, wonderful, beautifully scented holiday greens! I am still creating small holiday planters and a few gift items, and if you are local, and have a last minute holiday gift needs, please look me up. All are custom made and arranged pick-up style. I also create various small hand-held gifts which are great quick pick-ups for gifts. All I need is one day’s notice to make it custom for you.
Planters with Mixed Greens and Decor by Cathy Testa
I will be home all day today (after grocery shopping in the morning) if you wish to pop by for any last minute gifts (all hand made by me and unique as featured in my posts, Instagram feed, and on my Container Crazy CT Facebook business page). My cell is 860-977-9473. Feel free to give me a quick text.
Holiday Globes by Cathy Testa of Container Crazy CT
I’m also marking this date, today, 12/16/2020, as the first big snow storm coming to town. Just think, only a couple days ago, we were outside without heavy winter coats or hats. Today my fingers will be freezing within minutes while I gather up supplies to make my next custom order. And I probably will have to be super cautious when walking across my large driveway to get things tomorrow. This Connecticut weather is crazy. But we will endure, like we always do.
I hope where you live, you are not dealing with this big snow storm, unless you enjoy some of those “nice” things noted above.
Thank you,
Cathy Testa Small Business Owner Container Crazy CT Broad Brook/East Windsor, Connecticut 860-977-9473 cell
Adorable Moss Ball with Hand Dipped Small Candle and Accents by Cathy T.