

There are many tender tropical plants which I overwinter each year around this time of year in October. They are either dug up and packed up in a cool, dry, frost free place, moved into my home as a houseplant, or moved into my low-temperature greenhouse for the winter.
Today, I will share how I overwinter my newest favorite tropical plant, Alocasia macrorrhiza or Alocasia macrorrhizos (Jumbo Upright Elephant Ears).
Here is a photo of me standing by it around mid-September 2020. It is quite tall and an impressive specimen showcasing dark green huge leaves, big enough to serve as a patio umbrella.

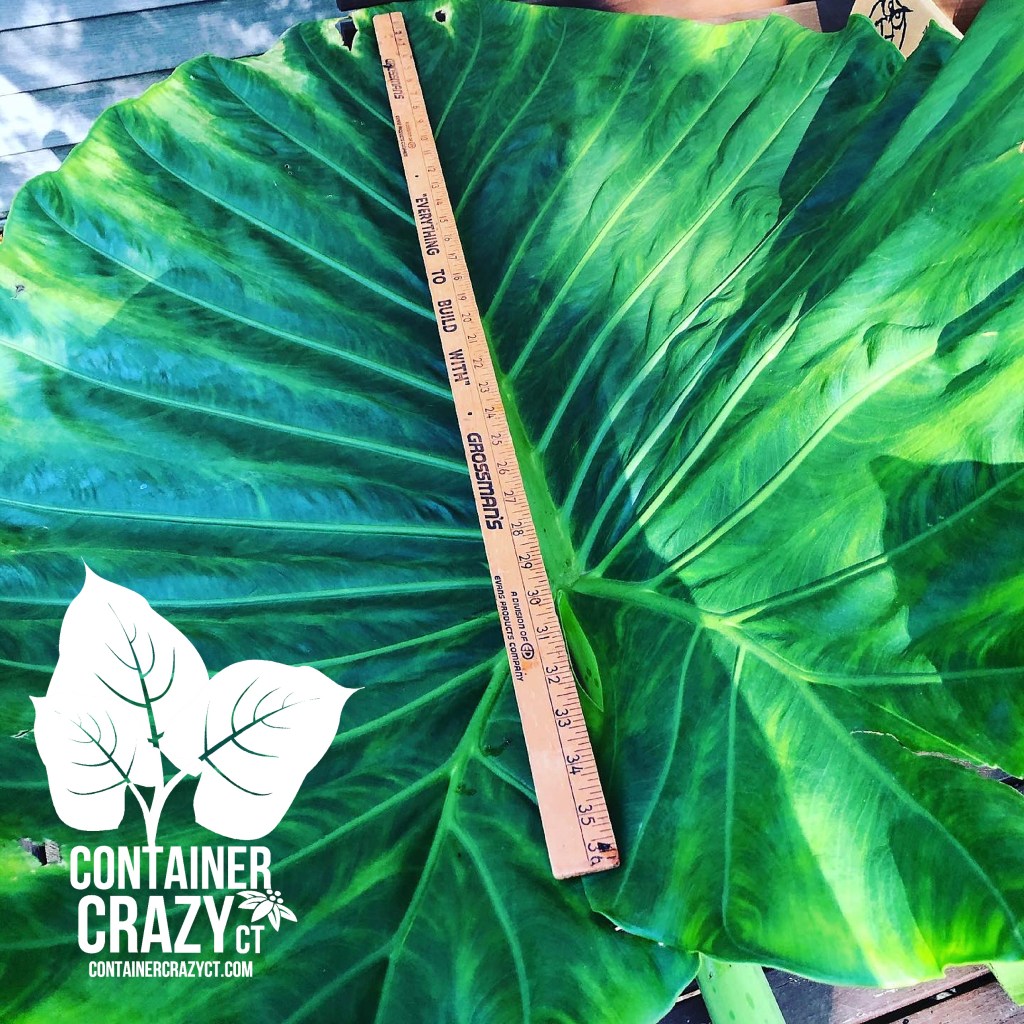
Each leaf reached just slightly over 3 feet long from tip to the start of its rigid stalks, which were also 3 feet long. Thus, the plant towered over us at 6 feet tall total. The width of the leaves reached about 2-2.5 feet across.
This plant is not winter hardy here in Connecticut, so it must be removed from the planter to store the tubers (or rhizomes) for the winter. This may be done after the plants get touched by a light frost (which will damage the leaves and make them turn yellow) or immediately after a hard frost (which will completely kill the top parts of the plants and its foliage.)
I prefer to move them in before frost for two reasons: (1) It is not cold out and easier to work with the plants. And (2), sometimes if you leave the tubers in the soil too long, when they get cold and wet this time of year, rot may actually start on the tuber before you dig them out. The tuber will be soft if any rot has started. BTW, the tuber is referred to as a rhizome as well. For the sake of this post, I will use the term “tuber.”
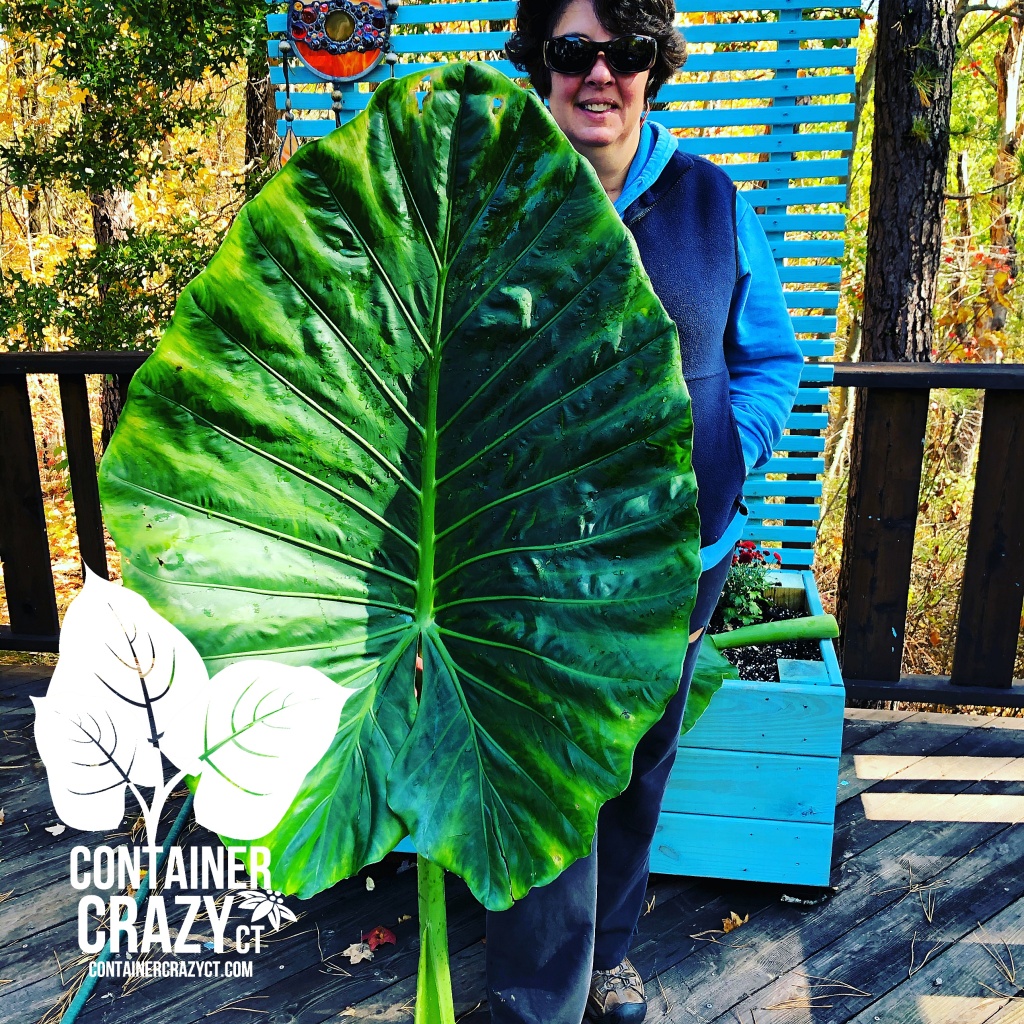
While working this weekend to continue my overwintering chores, I asked my husband to take a photo of me with a single leaf to show the shear size of this dramatic foliage plant. I obtained the tubers in 2019. That year, the plant grew more clumps of leaves, but this year, in 2020, the plant grew much taller stalks and bigger leaves. I always tell my followers and customers, the bigger the bulb, the bigger the plant.

If the plant in your container or patio pot is small enough, you may bring it into your home for the winter, or even into a greenhouse. However, I typically choose to store them by digging up the tubers, after cutting off all the foliage, and storing them in my basement, which is unheated but does not freeze.
The location is key. You need to consider the place you are putting them. A cold closet in the home may work. You need to experiment the first time you do this and hope for the best. A garage (unless it is attached and gains some heat from the house), does not work. The tubers would freeze and die.
Okay, here are my steps:
(1) Chop off all the foliage. You may use either a sharp long kitchen knife or a machete, which I often use the machete when it is a very thick stalk or stump. Just be sure your tools are clean to not transmit any disease or insect problems. I usually start with removing each leaf stalk individually, then cut across the whole stump area if it happens to be large.
(2) Dig out the bottom part with the tuber from the soil. Do this by digging around the plant with your shovel or garden trowel and pushing down around in a circle. You should hear the roots snapping as you are cutting them during this process. Then lift the whole clump together out of the soil. Try to be sure you are not breaking the tuber below the stump area.
(3) Lay the bottom parts in the sun. The bottom part of the plant will either have a visible tuber, or not. Either way, lay them in the sun for a minimum of one day to dry (and/or cure, as they say). Sometimes, I let them sit in the sun for a few days but do not leave them out if you get a hard frost after digging them out. If the bottom piece you dug out is thick and fleshy, turn it upside down to allow the excess water to drain out. These plants hold lots of water. You may gently brush away any excess soil or use a garden hose to blast off the soil, but sometimes I prefer not to add any more moisture to them if I can help it.

(4) Snip off any long roots. Notice in this next photo how long the roots reached. Because the soil was fluffy and dry in my planters, I actually pulled the roots out of the soil because I wanted to see how long they were. They almost reached the bottom of the gray tall planters. The reason I snip off the roots is to eliminate as much fleshy material from the pieces. Fleshy, wet materials may rot in the storage box.

(5) Put the stumps (for lack of a better word) and or tubers into a storage box and cover it with peat moss. Sphagnum peat moss may be purchased in large square bales or in bags in smaller amounts. It is a natural and organic ingredient that absorbs moisture and aerates around the tubers in the box. Pour some of the peat moss in the box in the base, lay the tubers and stumps on it, and then pour dry peat moss over and around them. Do not over do this. You are only lightly covering them with the peat moss. BTW, the peat moss is reusable every year. It lasts a very long time.
(6) Place the box in a cool, dark, dry location that doesn’t get below freezing and is somewhat unheated. Such as my basement. If placing the box on a concrete floor, place a tray or something to elevate it a bit off the floor because as that floor gets cold in the winter, it may create condensation in the storage box. My basement does get some woodstove heat from time to time, but the woodstove is way at the opposite end of the basement from where I store my overwintering boxes. And the woodstove is not used all winter, just on some nights. So the area where I put all my overwintered plants in boxes stays colder. It has become my sweet spot for this process. It is okay to stack your boxes on top of each other. I use plastic bin type boxes with a lid. Do not use clear plastic boxes, use those that will eliminate any light. Sometimes I have drilled holes into the lids to allow some air to enter. The tubers tend to stay dry but just slightly moist by the peat around it – but not wet. Do not store them in a very wet state. This will lead to rot. If your basement is too hot and dry, they will dry up and shrivel and may just rot away to a dry state which is not usable. If your basement is super cold, the tubers might freeze and die.
(7) Label the box with a sharpie marker, date it, and note what you stored so you will remember in the spring. If the tubers make it, you may recognize them, but if they don’t, you will be wondering what you stored, at least I have, because I store many types of container garden plants over the winter months.

You have other storing or moving options as well. You could just move the pot with the plant into your basement and hope for the best, but you may not have the space, or the muscle power to move a big pot. And usually a big pot is too big for a home. But that is another option to mention. If you move the entire pot with the plant into your basement, you will need to monitor it for insects and add water to the plant, but at a very minimal fashion. You are not watering it like you would during the summer season.
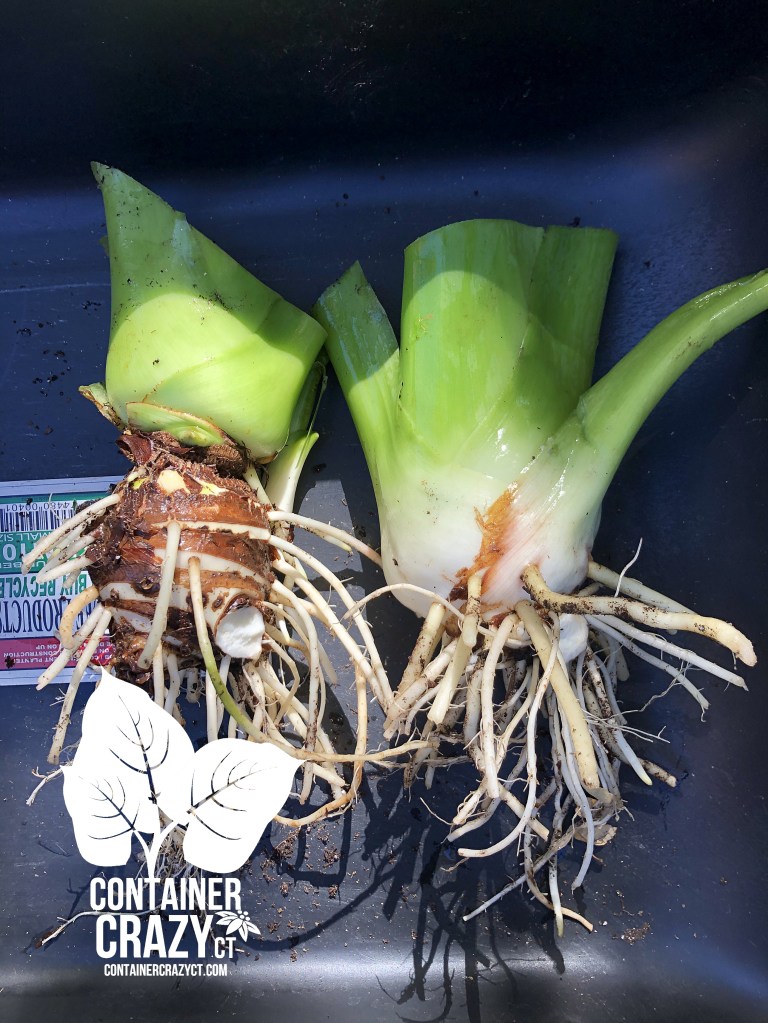
In this above photo, the tuber on the left is covered in brown papery like material, which you leave on there. However, on the photo on the right, you really only see a stump. Storing either works for me.
This storing process allows the plant to go into a dormant state. They will not grow in the dark boxes and will usually do fine. When spring returns, you may bring them out of the darkness by starting them in smaller pots inside the home to awaken them. They should not be planted outdoors in your patio pots or container gardens again until all chances of spring frost has passed. These tender bulbs will bring back repeat performance year after year by following my steps above.
If you found this post helpful, please comment below or share my site with others.
Thank you.
Cathy Testa
Owner of Container Crazy CT
Broad Brook, CT 06016
860-977-9473
containercathy@gmail.com
Other sites: www.WORKSHOPSCT.com and www.ContainerGardensCT.com
Container Garden Designer, Plant Lover
and a little “Crazy” about plantings in containers!
Currently taking orders for custom Succulent Topped Pumpkins. They are created with live succulent plants, fall or Halloween decor, and are amazing on real pumpkins. They are low maintenance, easy care, and last for months. Porch Pick-ups and some deliveries arranged. Inquire for current prices. 860-977-9473 texts are welcome.

