Amaryllis

3 Comments

When accompanying Steve, my husband, to pick up bird seed last weekend, I noticed the store had amaryllis bulbs on sale (at 50% off actually, so they were a real bargain).  It took only seconds for me to include two in our checkout because I was inspired by a visit to a greenhouse in Old Wethersfield, CT recently where seedlings were popping out of trays, and bulbs were growing in bulb vases.  A couple of herb seed packets were tossed into the shopping cart as well.

amaryllis_0001

When I arrived home, it hit me. I finally have a great use for a nice green glass container I picked up at a vintage show last summer.  It is a littler larger than what the instructions indicate for amaryllis bulb growing (a pot size of no more than two times the diameter of the bulb is recommended), but I proceed regardless.  The bulb was already sprouting a shoot, which I could see via the window air hole in the box, so it was underway and would only continue to grow once given the right temperature and light conditions.

amaryllis_0002

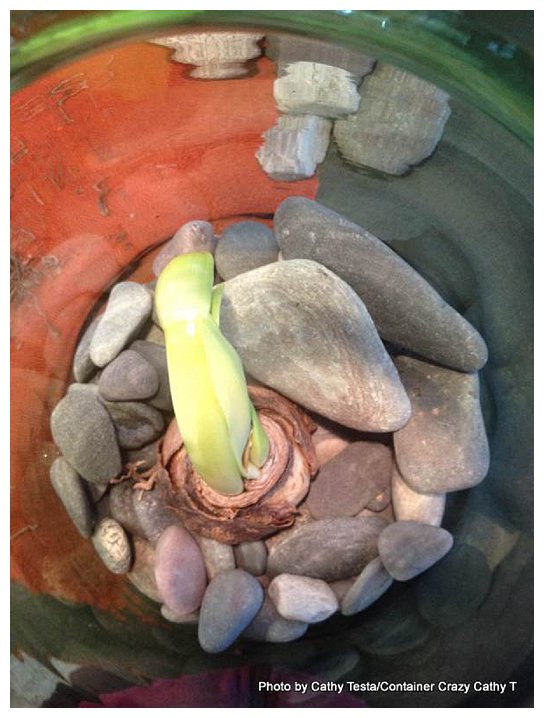
The amaryllis box included a plastic pot, some soil mix which was rather dry and would require re-hydration with water, and instructions on the box’s exterior cover.  The pot and mix were set aside as I started to arrange various river rocks in my green glass container at a level of about four inches.  My goal was to make a nice indentation or sitting spot for the base of the bulb, and test the bulb’s position before removing dead roots and adding water.

Before setting the bulb in its final position, the brown roots, which were rather dry, were removed carefully by hand.  These can rot in the water.  Any roots which were slightly white remained.  Because even the white roots were very dry, I’m not sure if they will take but new roots should assume command once the plant begins to recognize a water source, light, and temperature conditions as it continues its growth out of dormancy.

amaryllis_0004

As I set the bulb upon the stones, I carefully tucked the white roots in crevices between the stones.  Once I was satisfied the bulb was balanced and checked that the shoot would be able to exit the top of the container, I added stones around the bulb’s top portion.

Instructions indicate, if you elect to grow your amaryllis bulb in water versus soil mix, to be sure to keep the top third of the bulb exposed and water added at a level of one inch below the base of the bulb.  I don’t think you need to be super exact with the inches and all that jazz, just follow the rule to not allow the bulb to sit in water and all should work out fine.

A sunny windowsill is best for an amaryllis bulb to grow, but I placed mine on the north side because this is where my green glass container is best suited – so it may be a little cooler there with less direct sun, but it will grow regardless – just at a slower pace.  As for the room temperature, it must remain above 60 degrees Fahrenheit.  No problem for me as I can’t take any temperature lower than that in my house during the winter, even with a loaded wood stove in the basement!

amaryllis_0005

I’m looking forward to watching the shoot elongate, turn green and eventually reveal a beautiful showy red bloom within a few weeks.  I guess the only downfall of growing these in water versus soil is the bulb is usually tossed because it doesn’t restore well.  However, having a green thumb, I will attempt to store my bulb and redo the entire process again at the right time.  A period of dormancy is required for about two months for the plant to regrow and bloom once again.

Detailed Planting Instructions

amaryllis_0003

Useful Links:

White Flower Farm with Video Growing Instructions:

http://www.whiteflowerfarm.com/cgi-bin/track/f36bb2ea+growing-amaryllis-bulbs.html

Missouri Botanical Garden Plant Finder Plant History and Details:

http://www.missouribotanicalgarden.org/PlantFinder/PlantFinderDetails.aspx?kempercode=a457

The United States National Arboretum, How to Make your Amaryllis Bloom Again:

http://www.usna.usda.gov/Gardens/faqs/AmaryllisBloom.html

amaryllis_0006

Now onto my herb seeds.  Several small terracotta pots have been washed (via a wash cycle in my dishwasher) and are waiting for soil mix and my herb seeds.  This is next on my little to do list.

Cathy Testa

Decorating your Mailbox for the Holidays with Greens

Leave a comment

Just a very quick post to show you the evergreen swag made by a class attendee this weekend for her mailbox.  I’ve offered this option in my class for two years, but this was the very first taker for this particular item.

The other attendees made kissing balls, wreaths, and candle centerpieces.

And now, I have to say, “I’m hooked!”  on these mailbox swags.  It came out beautiful, and I must make one for my mailbox if I get the time soon.  It’s lovely.  Great job attendee!  You know who you are.

Evergreen Creations_0003

The swag requires a special frame and evergreens of course and some time.  The technique is covered in my class on the how-to’s.

More photos and tips will be posted on my Evergreen Creations Classes to share with you.  Especially now with the holidays fast approaching.

But in the meantime, if you are local and wish to join a day class tomorrow, December 10th, 12:30 to 2:00 pm, contact me at 860-977-9473.  Location:  Senior Center in Broad Brook, CT.

Stay Tuned,

Cathy Testa

P.S.  You do not need to be a senior to attend the class noted above.  Thank you.

← Back

Thank you for your response. ✨

Three Easy Ways to Use Mesh Ribbon for Holiday Decorating

8 Comments

Project No. 1: Grape Vine Wreath with Mesh Ribbon and Decor

This is super easy to do, and no glue gun is required!  Select mesh ribbon (or Ruban en maille in French) with the colors you like and just make sure your decor colors work well with your ribbon choice.  This project can be done in less than an hour easily.

Here is what you will need:

  1. One grape vine wreath (20″ size was used)
  2. 4″ and 8″ green zip ties (a.k.a, cable ties)
  3. Roll of Mesh Ribbon (20.5″ width was used).  Length is dependent on how big you want to make the puffs.
  4. Your choice of matching ornaments (holiday balls, florist picks, etc.)
  5. One large tin decor (snowman face with hat used)
  6. Sharp scissors or snips

Mesh Ribbon Projects_0002

First step is gathering the end of your ribbon and attaching it to the wreath.  Zip ties work extremely well for this. They are strong, easy to connect, and durable.

Mesh Ribbon Projects_0001

Once you have your starting end attached to the wreath and secured tightly by pulling the zip tie closed (left above photo), determine how big you want your puffs to be.  You will be gathering the ribbon at the next interval (right above photo), and how much you space each interval is dependent on how big you want that puff to be, or you can place your zip ties at even intervals/spacing first so you can judge before you start attaching the next puff.

Mesh Ribbon Projects_0003

NOTE:  For the interval places you will attach the ribbon, be sure you do not pull the zip ties completely tight at each interval as you pinch and attach.  Leave a little slack because at each interval, you will attach your decor items (so you need some gap or space at the zip tie to attach the decor items after you are done.)

Move to your next gathering location.  Gather and pinch the mesh ribbon at the next spot, and attach with the zip tie (loosely closed).  It helps if you insert the zip tie first at your next position, so it is ready for you.  You may also want insert the zip ties before you start attaching the ribbon at intervals to estimate the spacing so it is at equal intervals for each puff you will make on the wreath.

At the last tie, leave a long strip of the mesh ribbon to serve as your tail ends.  Using the scissors, cut it in half length wise, so you have two tails.  The length of the tails is up to you.

Mesh Ribbon Projects_0005

Now it is time to attach your decor.  Florist picks, decor with stick ends, and regular holiday ornaments are easy to secure.  Grab another zip tie, and slide it through the ball hook end, then attach it at the intervals to the zip ties used to secure the ribbon.

Mesh Ribbon Projects_0004

Position a large focal point element where you feel it is well balanced and easily secured.  In this case, a snowman with hat was used.  The hat tip had a hook on it so it was super easy to use the zip tie (my favorite attaching mechanism!) to the top end of the wreath.  At the base of the tin, luckily the back had a little hook too.  (P.S. Holiday tins and decor shown in these projects are available at my December 7th Evergreen Kissing Ball and Holiday Creations class!)

Mesh Ribbon Projects_0008

After you have all the ornaments on and other decor, go around to pull each of the zip ties tightly closed to get everything secured.  Snip off the tail ends of zip ties that are sticking out.

NOTE: The florist picks with a shiny silver gold flakes and the red leaves were very easy to insert because of their wired ends. Just tuck them in and secure with the wired end. Or just stick in the pick end (like on the snowflake) into the grape vine wreath.  

The grape vine wreath base works great for this project, but you could use other types of wreath frames.

Mesh Ribbon Projects_0007

Hang on your door and enjoy!

Mesh Ribbon Projects_0009

Project No. 2: Big Ball Bunch with Mesh Ribbon

This is something I did last year, but this year, I decided to try it out with the mesh ribbon.  I love hanging this ball bunch from an overhead light fixture at my entrance.

Items need:

  1. Large weather resistant holiday balls
  2. 4″ and 8″ zip ties (a.k.a., cable ties)
  3. Mesh ribbon (20.5″ width used)

Mesh Ribbon Projects_0011

The first step is connecting all the balls together.  Zip ties are awesome for this (gotta love those zip ties!!).  Run a tie through each end of the individual balls and then attach them together with a central zip tie.  You may want to hang them somewhere after to access if you like the look of how the balls are positioned before you attach the mesh ribbon.  The balls are gathered together but not super tightly because you need those gaps and wide open areas of the ties to pull through the mesh ribbon in your next step.

Mesh Ribbon Projects_0010

Cut a length the ribbon to get started.  It is difficult to judge how long you want that length to be cause you will be tucking and inserting it into the zip tie between the big balls based on the look and size you desire.  I started with like a 4 ft length, and cut more later as I worked.

Mesh Ribbon Projects_0012

Gather the starting end of the mesh ribbon and tighten the top of one of the zip ties to secure the starting point. Once secured, move a few inches down to the next gathering point.  Again, how many inches is up to you – how big do you want that puff to be. Once you know, pinch and gather, and use a zip tie around that point to secure the pinched area (top right photo). And then from that point, bunch up your next gathering point on the ribbon with a zip tie and pull it through another zip tie that is on a ball.  Repeat the process, and tuck and pull the ribbon around the balls to form the look desired.  Leave a tail end to hang from the base to cut in half length wise when done.

Mesh Ribbon Projects_0013

When all completed, remember to add a zip tie to hang the whole bunch from.  Here it is shown hung on an overhead light structure.  I wish I could have taken a better photo, because the cast of the shade was making the photo dark – but in the sunshine, this big bunch of balls with beautiful mesh ribbon is so sparkly.  I just love it!  And it is so easy to assemble.  This project took only about 30 minutes or so.  Very easy.

Mesh Ribbon Projects_0014

Project No 3: Urns with Big Red Ball and Mesh Ribbon

So since I was on a roll, I thought I would dress up my two urns outside.  Again, super easy with the mesh ribbon.

Items needed:

  1. Container of your choice, filled with soil
  2. Stakes (bamboo pole used)
  3. Loppers to cut bamboo stake
  4. Big Holiday Ball (needs to have an open end or hole)
  5. 4″ and 8″ zip ties (a.k.a., cable ties)
  6. Mesh Ribbon (20.5″ width used)
  7. Wire (ends of coat hanger wire used)

Mesh Ribbon Projects_0017

Step one is cutting the bamboo stake to the desired equal lengths.  Insert the stake into the soil.  Position it in the center.

Mesh Ribbon Projects_0015

Attach the beginning end of the mesh ribbon to the stake with a zip tie tightly closed so it is secured to the bamboo stake.  Then wrap the ribbon around the pole to create another “puff”. Keep repeating attaching each puff to the center stake/pole.  After you have your puffs in place, use the wire to push the mesh down in the center so it is level. You can bend the wire into a U shape to do this.

Mesh Ribbon Projects_0016

Insert the ball to the top of the stake end.  Later, I plan to add live evergreen cuttings and tips.  It’s got a thriller or focal point (the ball), a filler (the mesh ribbon), but it still need something else to spill around it, which will be the live evergreen cuttings later.

Mesh Ribbon Projects_0018

Mesh ribbon is so incredibly easy to use.  It beats struggling with regular ribbon and it creates such a nice large and showy display.  You can make the puffs as large or small as you like.  There are endless uses for mesh ribbon during the holidays.

And if you select a mesh ribbon with a little sparkle, it will shine in the sun too.  My recommendation is you get a roll at least 10 yards long – you will use it – believe me – because it is so much fun meshing around.  For these three projects, I used approximately 15 yards of ribbon total.

Mesh Ribbon Projects_0019

Written by Cathy Testa

New Page: Color Wheel My World

Leave a comment

The new page has begun to flourish with color tips and links to examples for your container gardening creations.  Need help with color schemes for your container gardens next spring?

Well, visit this new page often.  It will be updated with tips I’ve used over the years.

Photo courtesy of FreeDigitalImages.net/Sailom

Photo courtesy of FreeDigitalImages.net/Sailom

What to learn about ROY-G-BIV?  Never heard of it?

You probably did as a child, but may have forgotten this easy tip to remember color combinations.

What to see examples of amazing complementary colors, visit COLOR WHEEL MY WORLD and click on the links.  I’m putting this information there for YOU.

There will be more – Split Complement, Triads, Monochromatic, Analogous.

More to follow …

Cathy Testa

Repurposed Pots

1 Comment

Here’s just one example of a container garden pot type you can use – Repurposed!  Do you know what this is?  It is the drum to a washing machine, and it makes a great pot for your plants.

photo (92)

See my new page, CONTAINER GARDEN POT TYPES, to learn more about the pots used for container gardening with some tips along the way.

Visit regularly – it gets updated often with new ones.

Cathy Testa

Storing My Big Red Banana Plant

16 Comments

So It Can Return Again Next Spring

Storing Red Ban Plant_0010

Ensete ventricosum ‘Maurelii’ is a return visitor at my home.  I have fallen in love with this tropical red banana plant for so many reasons, but what has impressed me more than anything else, is how large it grew this year in my monster cement planter.

Although I’ve included this type of red banana plant in my container gardens before, I’ve never seen one grow this big so fast.  It reached a height of 8 feet tall with large leaves growing to 7 feet long and 1.5 feet wide.  It was at proportions I didn’t expect, but was very happy to witness.

As each new leaf grew and unrolled from its center throughout the summer, and even into early fall, I was in awe of its massive presence – and ability to stand so tall. By the end of October, the plant had a large fleshy trunk of a 1 foot diameter.

Planted on the eastern side of my home, the morning sun would rise to greet it every day.  By noon, dappled shade cast down upon it from the forest trees nearby.  And by late afternoon, its large showy tropical leaves with red coloring were wonderfully backlit by the afternoon’s setting sun.  I am not sure which part pleased me most, but each stage was worth taking pause in my day to enjoy.

There were so many times I took photos of my big red banana plant in the planter that it became a bit obsessive.  Even though it was difficult to get a good shot because of the glares and shadows – and its sheer size, I still clicked away taking as many as possible throughout the season.

I showed my big red banana plant to my family, visitors and unexpected guests when they were here.  Heck, I even made them pose in-front of it for more photos.

Later in the season, I finally broke down and did what I pondered doing.  I hired a professional photographer to take a few good shots.  The sounds of the camera clicking furiously made me feel as though I gave the ultimate red carpet attention to my plant.

Alas, the plant got hit by our first frost of fall on the evening of October 25th.  The next morning, I knew my guest would be leaving for a long winter’s rest. It was time to take it down and store the root base so it could return to visit again next spring.

Storing Red Ban Plant_0012

STORAGE STEPS FOLLOWED

First, a quick and easy haircut.  All of its gorgeous long leaves, now darkened by the frost and wilted, were cut off with large pruning shears and tossed in a pile.

Storing Red Ban Plant_0002

Second, using a bow saw large enough for the wide stump, I placed the blade about 12” from the base and began to zig-zag across.  “Timber,” I said, as the top portion fell to the ground with a loud thump. (To see a video of the cut, visit my HOW TO VIDEOS page.)

Storing Red Ban Plant_0001

Next was the careful removal of the root base from the soil.  Using a shovel to go around the root mass and cut the roots in the soil, I carefully lifted the large base with a couple of firm tugs.

Hand-pruners were used to trim the long roots as a way to eliminate additional soft fleshy material that may have the potential to rot in the storage box.

Storing Red Ban Plant_0014

With a soft brush and my gloved hands, I cleared away the final soil residue on the root base, making sure it was fairly clean and ready for its next step.  I also re-trimmed the cut end to be level and clean.

Storing Red Ban Plant_0015

In a nice sunny spot, I turned the root base upside down and placed it on a milk crate to drain of excess water for one solid day.

Storing Red Ban Plant_0008

Then was the box selection – a new home.  Inserting a light weight plastic bag into it, filling it with bedding material of peat moss, I then carefully laid the heavy root base in the center on its side.

Finally, covering it almost completely with more peat and loosely closing the bag. I shut the box and labeled the outside with the date, plant type, and a smiley face.

Red Ban Boxed_0001

The last step was moving the box to a cool dark place in above freezing temperatures in my basement.  And then I said a little prayer. (You know, because it doesn’t hurt.)

THE STORAGE PRAYER

Oh Banana Plant – You were so sweet

So now I lay you down to sleep

Please come back or I will weep

Enjoy your restful place of keep

Until I reawaken you in twenty-six weeks

Storing Red Ban Plant_0003

STORAGE PRACTICAL TIPS

Be careful to not dent, cut or nick the root base.  These can create wound places, serving as an invitation for mold to set in.

Take measurements so you will have a record of how large the plant grew and can compare notes in the following years.

Use clean, disinfected tools during the process to avoid transmitting any diseases to the plant.

Try to do the breakdown job before significant rainfall if possible.  It makes it easier to move from the soil.

Don’t wash the root base with water to remove soil. It only makes it wetter.  You want the base to be slightly moist but not soggy because this can rot in the storage box.

Reuse the peat moss every year – it last a long time, and is an excellent material to store root bases.  It holds moisture lightly and helps maintain a balance of air too.

After removing the root base, turn it upside down to allow water to drain out before storing it, but don’t let it get too dry.

Use a cardboard box with vents or spaces to allow some air circulation to set in.  You don’t want a box to seal tightly and leave moisture inside where it will rot the root base.

Select a plastic bag that is very light weight, like those used in grocery stores.  Close the bag lightly.  Do not tie it off – allow some breathing room.

Red Banana on Left with elephant ear corms on Right

Red Banana on Left with elephant ear corms on Right

THE STORAGE LOCATION

You want to find a location where it remains cool, but not below freezing.  Some references indicate a temperature range of 35° to 45° F.  I put mine in the basement by the door where it is coolest, but I also place the box on a bench so it is not in contact with the cold cement floor where condensation can possibly cause the box to get wet and then stay too damp.  If it gets frozen, your root base is going to die.  If it gets too warm, it will start to grow again.  You want to make sure it is just right.  For me, that spot in the basement seems to be the sweet spot.

FINAL NOTE

The storage prayer is optional, but I believe this helps.  And when you open the box next spring, you will hear the angels singing when you see your banana plant made it just fine to be your return visitor in your container gardens every season.

Written by Cathy Testa

P.S. More will be shared about my big red banana plant (highlights, professional photo shoot, guest visitors, companion plants, and more).  This is to be continued…Stay Tuned.

The FIVE MUST DO’s for Successful Container Gardening

4 Comments
Images courtesy of FreeDigitalImages.net.

Images courtesy of FreeDigitalImages.net. (top left to right: Zirconicusso, Criminalatt, and Marin.  Bottom: James Barker and Simon Howden photographers)

A new page has been added to this blog where I share with you The Five Must Do’s for successful container gardening.

In all my container gardening talks, I go over every one of them and why they are so important – but now you can read them HERE on my blog.

You will find if you do all five, your container gardens will thrive, look amazing, and make you extremely happy.

So often, people will skip one or more of the steps, and they wonder why their plants are not doing well or growing poorly.  Once they follow my 5 MUST Do’s, they never look back again because their plants will thrive and grow so well.  Doing The 5 MUST Do’s is – well, a must!

Hope you enjoy the new page, accessible from my top menu bar under CONTAINER GARDENS.

Stay tune too – more tips are on the way.

Thank you,

Cathy Testa

A Frosty Start to October 26th in Broad Brook, CT

2 Comments

And my plants felt it!

First Frost_0012

On the evening of October 25th, we received a drop in temperature around midnight, and it was only in the low 30’s around 6:00 am the next morning.  In fact, when checking Timeanddate.com, it reported the lowest temperature at 32 °F on October 26 at 5:53 AM.  That’s chilly. And my plants outdoors felt it.

Birdbath frozen with fall leaves

Birdbath frozen with fall leaves

So when I went outside around 8:00 am yesterday morning, it did not take long for me to realize I would need to go back into the house to get a felt hat, warm gloves, and heavy wool top to do my work of the day, which was taking down my big red banana plant in my large cement planter along with various elephant ears and Canna plants.

Elephant Ears and Other Tropicals Curled up

Elephant Ears and Other Tropicals Curled up

All of my tropical plants remaining outdoors were drooping downwards and heaped over from the effects of getting hit by their first frost of our autumn season.  And other plants had white and feathery frost patterns on their leaves.

Annual Thunbergia, a Blackberry plant, and Castor Bean

Annual Thunbergia, a Blackberry plant, and Castor Bean

Some leaves looked as if dew had frozen in time.  Tiny balls of clear ice could be seen on the undersides of the curled up leaves of elephant ears.  This was the pretty side to the frost on some plants, perhaps the only pretty side.  While other looked just horrible – particularly my tropical plants which can not survive below freezing temperatures.

Mojito elephant ear curled up with crystals

Mojito elephant ear curled up with crystals

They were all curled up, wilted over, and turned mushy overnight.  Liquid within their plant cells froze into ice crystals and ruptured.  This damages and kills the top part of the plant, but the underground storage organs, such as rhizomes and corms, can be stored over the winter.  Unfortunately for tropical plants, they do not have a way to protect themselves to survive frost.  However, their underground storage systems go into a semi-dormant state immediately, and can be moved to a cool but above freezing location over the winter inside the home.

Seed pods of Castor Bean frozen hard

Seed pods of Castor Bean frozen hard

Gazing ball with Mandevilla blooms and foliage

Gazing ball with Mandevilla blooms and foliage

Thus, it was definitely time for me to get the rest of my tropical plants stored for the winter season by digging up the underground storage organs or root balls and putting them away carefully. I could not put this process off any longer.  It would take most of the day and I managed to get it all done.

Canna by house not as bad as others

Canna by house not as bad as others

Ipomoea, elephant ears

Ipomoea, elephant ears

Written by Cathy Testa

P.S.  Stay tuned.  I will be sharing ‘how to’ overwinter tropical plants, but in the meantime, visit my HOW TO VIDEOS page to see some tips and tricks.

Holding an leaf and cut off top of my red banana plant.

Holding a leaf and cut off top of my red banana plant.

New Page: Container Garden Pot Types

Leave a comment
Photos by Cathy Testa

Photos by Cathy Testa

Do you ever wonder if a particular type of container garden pot is worth the investment or how it helps or harms the growth and habit of your plants?  On this new page, I share my experience based on my use of various pots over the years.  See Container Garden Pot Types listed under the Container Gardens page on the top of this blog.

You will find terra-cotta, wood, concrete, and more listed and posted routinely.  There are so many choices and the options are limitless. Containers are the shoes to your plant’s roots.  And roots remain healthy and strong when growing in the right environment.

Containers and patio pots hold the soil and moisture, but the type of material from which they are manufactured can vary the temperature, water retention levels, and evaporation rate – so knowing a bit about the pots’ impact can help you make decisions on what to use for your plants.  You will want to also consider the size, drainage capability, durability, and overall look of the container or pot you select.

Finding a pot to suit your home’s exterior or interior is also a consideration.  There are many styles, colors, and sizes to choose from.  When you select the type to fit your decor, it results in an even more impressive display for your plant combinations.  It all starts with the pots.

Written by Cathy Testa

New Page: Troublemakers Turned Stars

Leave a comment
Photos by Cathy Testa

Photos by Cathy Testa

We all know everyone has a good and a bad side, and so do plants!  Thus, I’ve added a new sub-menu to my blog called Troublemakers Turned Stars.  Visit this page and my Pinboards to see more images and photos of the plants discussed.  If you have questions, just let me know – I’ll share my plant experience to date with you – or perhaps you have a story to share how the plant caused you some trouble in your gardens or landscape.  But the point of this information is many plants which are troublemakers in the garden have the opposite effect in container gardens and patio pots. They turn into star performers – so why not use them to capitalize on their bad side?  You will be amazed how useful and attractive they become.

PETASITES

Photos by Cathy Testa

Photos by Cathy Testa

WISTERIA

Photos by Cathy Testa

Photos by Cathy Testa

Photos by Cathy Testa

Photos by Cathy Testa

BAMBOO

Photo by Cathy Testa

Photo by Cathy Testa

See my Page, Troublemakers Turned Stars, to read the details, why the plants are problems or a nuisance in the garden, yet turn into star performers in container gardens and patio pots.  More will be added routinely to keep you ‘posted.’

Written by Cathy Testa