Yesterday, it began. My first disassembly of a canna lily in a pot to store the underground rhizomes for the winter.
This process may be done anytime between now (September) up to our October frost. Frost may occur anywhere from early to late October in my area of Connecticut (Zone 6).
Because I want to get a head start on my work of overwintering various tropical plants, I did this one yesterday.
It was in a black nursery pot which was inserted into a metal decorative pot. I usually, as a rule, don’t do this – I usually plant the plants into larger patio pots, but alas, I was just too busy and you can see how the rhizomes and root ball area grew so large, it started to burst open the black nursery pot!

I used large pruners to cut the foliage off first, then worked to remove the black pot out of the silver pot – it was tricky!

Since the pot cracked open, I used regular kitchen scissors to cut the pot so I could get the root ball out. Then the real work began, trying to take this big rootbound mass apart.
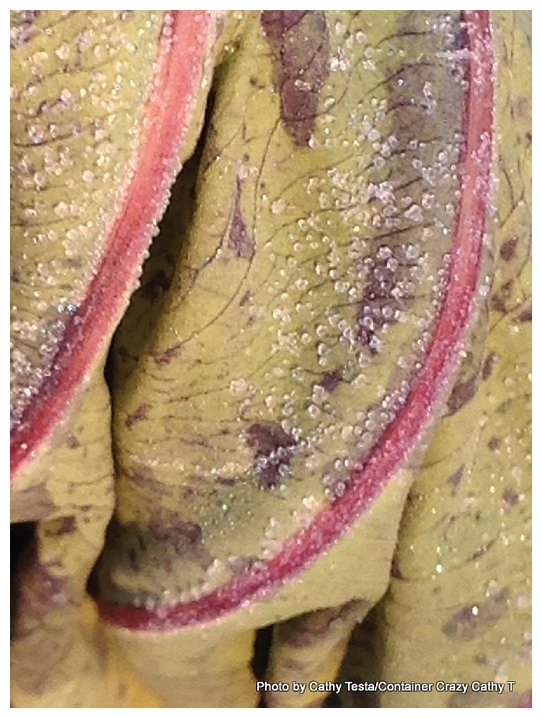
First, I cut it in half. The rhizomes are usually about 6-8″ from the top and I do my best to not cut any of the rhizomes, but if you do, do not panic. It usually won’t totally harm the rhizomes. However, you do want to avoid too many cuts because cuts are areas where rot or insects can set in later. I also cut off the bottom half of the soil by slicing it off but am very careful not to cut into the rhizomes. Sometimes you may see where the rhizomes are once you start removing the soil areas here and there around it.
After cut off the bottom half of the soil off, cutting below where I think the rhizomes are located, I keep trying to remove soil by hand, with a soft brush, with tools, being careful to not nick the rhizomes.

I usually use a hori-hori garden knife, but I decided to just grab a large kitchen knife to do the work, first slicing it in half. After that, I used my hands and a small butter knife to chip away at the soil mass. I was careful not to cut into the rhizomes. Then after, I took the hose and blasted it with water to remove as much soil as possible. You need a strong spray so this hose end worked perfectly, minus the mosquitos attacking me near the hose at that moment!

Because the roots were so tightly bound up, the hose was really helping to wash away the soil. I really wanted to separate this mass because over time, if they stay in a big clump like this, they just don’t grow as well or produce as many flowers.

After the soil is washed away, it allows for more ease to try to pull apart the rhizomes by grabbing the stalk and tugging. In some cases, they will pull away cleaning without breakage. (Note: The larger clump I am still going to try to break apart after it dries more in the sun.)
I will let these sit on a table for a day or a few hours, and then store them in plastic storage bins in my unheated basement with peat (see type below). I will show the bins later but they are standard plastic storage bins with covers. I drill small holes in the covers to allow air circulation (important). Also, I think shorter horizontal bins work better than deep bins. You don’t want to bury them deep, just enough to cover the rhizomes with peat to help them stay cozy, hold light moisture, and stay dry. All a balancing act.
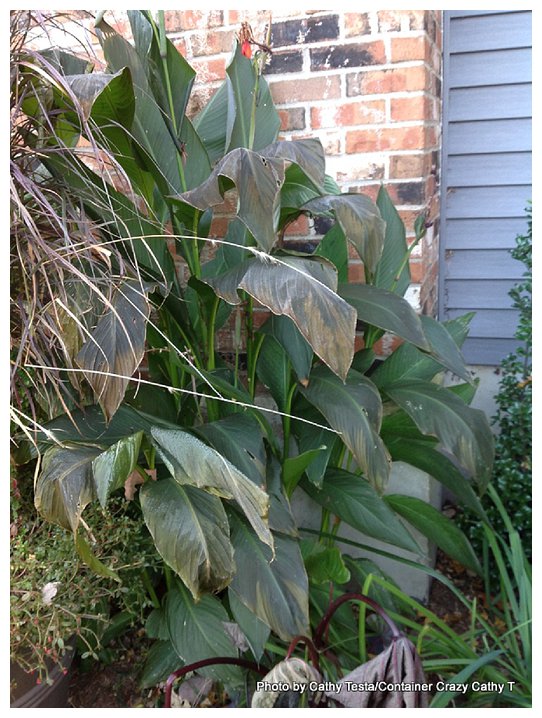
This is what the canna lily looked like before. It is one of the tallest varieties I have and I want to save some of these rhizomes in good shape. Of course, can I remember the name of it right now? No! LOL. Am I getting old? It will come to me. It is actually not that healthy looking in this photo. It got stressed from being root bound. Next year, it will look much much better. You can store the whole root if you want and I’ve done that before, but it was time for this canna lily to receive more attention so it will grow better from individual rhizomes next season, plus I’ll get more plants that way!
So the one I took down is the far left one. See the one on the right in the blue pot. That one was repotted in spring into that larger pot from a nursery pot. It will probably be easier to pull apart when I work on that one next.
Basic Steps:
- Cut off the stalks of foliage. Use clean, sterilized tools.
- Take the root ball out of the pot. Cut off the soil mass “below the rhizomes.”
- Take off as much as soil as possible around the rhizomes and roots. Use tools like your hands, soft brush, butter knife (I did), to scrape away soil but be careful not to nick the rhizomes or cut them. A garden hose with a strong blast really works well.
- Break apart the rhizomes carefully by grabbing hold of the stalks and pulling. Sometimes they pull away easily. If they don’t, keep trying to remove soil, let it sit out and try again when drier.
- Let sit out to dry and cure. (A few hours or a day or two).
- Store them in bins with peat (or people have told me they use newspaper but I prefer sphagnum peat moss that is sold in big square bales. It is reusable year after year so I keep the peat in the bins after taking the rhizomes out in spring time.)
- Make sure the location you store them is a cool dark place with no chances of freezing. (35 to 40 degrees F is the recommendation). My unheated basement works well by the door inside.
- Next spring, plant the rhizomes in a standard nursery pot (1 gallon size) and use good professional potting mix to get them started again. Plant the rhizome about 6-8″ deep in the pot. March is a good time to get them started. I do this in my greenhouse but you can do it by a window in the home where it is warm, etc. Before my greenhouse, I placed them on the floor in the pots by a kitchen slider window.
- Grow them in part to full sun when it is after our spring frost time. Usually the same time you may safely plant your tomato seedlings outdoors. Remember, put in shade first for a few days to acclimate.
- The photo below is of a bale of the peat moss. It is not the stringy peat you see in hanging baskets – it is the brown peat that you may break apart in a wheelbarrow if you buy a big bale. I reuse it for years if there are no issues in the bins. It is long lasting.

Before or After Frost Timing
From my years of doing this routine, you may do this either before or after October’s frost. If you wait till frost, the foliage will be blackened from the frost. The frost and colder temps probably helps to put them in a dormant state this way, but I always have done it before frost with no issues in September. If you wait till frost, it is just colder outside and sometimes wetter – and messier.
See my prior posts on this topic (search Overwintering or Canna lily in the search box). Some are linked below as well.
Thank you and enjoy your weekend!
Cathy Testa
Container Gardener and Designer
Broad Brook/East Windsor, CT
Today’s date: Sat, 9/11/2021
Today’s forecast: 75 degrees F mid day, sunny with some fluffy clouds – yes!
860-977-9473
“Containercathy@gmail.com”