Fresh Cukes, Fresh Sprouts, Fresh Tea

Leave a comment


Patio Snacker Cucumber

It is amazing the drinks and fresh meals you can come up with when you have just a few successful edible plants growing in container gardens!

I’ve been super impressed with the Patio Snacker cucumber plant growing in a large container garden on my deck this year. It has been growing so well and producing lots of nicely sized cucumbers with little to no problems experienced thus far.

I sold many of these plants in May at my Container Garden Workshops and some at early Farmers Markets, and I hope my attendees are having similar success with their plants.

This cucumber plant is designed for containers, which is why I selected them from my grower’s list.

It stay short and vines, but not too aggressively. With a small wooden trellis or typical cone-shaped metal tomato cage, it stays in place.

With mine, I used a tomato cage, but later, as I witness the little tendrils trying to grab onto things, I strung up some twine from the trellis to my gutters. It won’t grow up that high, but it has moved along the twine.

It is a fast grower and started offering crunchy cukes early in the season – so, I was pleased as they started to grow from the flowers. I have been harvesting about 1 to 2 cukes daily from the plant, which I share with my husband. The skin is very dark green and a little firm but not tough.

As for watering, I water it well every morning, as I do with my tomato plant. When I say well, I hold that watering wand over the soil for a good while, letting the water seep into the soil and get down in there – it is hard to explain how long, but I’m sure I put a minimum of two gallons of water via the hose and probably even more than that for these two plants – they soak up the moisture every day – you can tell if not watered enough when the tips of the plants’ stems weep in the late afternoon.

Last nite, my husband almost gobbled a cuke down before I had the chance to tell him I wanted to combine it with my freshy grown sprouts and fresh tomatoes.

Unlike the cucumber and tomatoe plant, which are growing in big pot outdoors, the sprouts are grown inside the home – so I’m looking forward to growing sprouts year round, even in winter.

Tomato ‘Juliet’

Another container candidate which has impressed me greatly is Tomato ‘Juliet’ which I obtained from a Connecticut wholesale grower for my May workshops.

It has been growing beautifully on my deck in a large container (22″ in diameter, about 2 ft deep – same size as the cuke’s pot) since late May.

When people come over, they are stunned at the amount of green tomoatoes I have on the plant and its shear size. It is a monster now.

The clusters of plum or roma shaped tomatoes are ripening up now here and there – and again, shared with my husband.

It was funny when we spotted the first ripened one, which I offered it to him, but he actually cut it in half for us to share – very sweet of him.

The tomatoes are clustered on the plant and are about twice as large as typical grape tomato as for the size of each of them.

I’ve fertilized the plant about twice with fast acting liquid tomato plant food (soluble mixed in water) but other than growing it in a large pot (which I always recommend at my workshops), providing good healthy, well-draining soilless mix specifically for container gardens with ‘some compost’ added, slow release fertilizer at the time of planting, and “daily” good soaking of watering in summer, that is all I’ve done.

What I particularly like, besides the size of this indeterminate (always growing up) tomato plant, is the plum tomatoes are perfect. I mean perfect. There isn’t a blemish on them, they are firm and very tasty.

Tomato ‘Juliet’ was noted as an “All American Selections winner” on the plant tags, and I would say, it deserves this award. It has been easy to grow and is perfect for container gardening. Glad I selected it this year – and it will go on the “keeper’s list.”

Soil Sprouted Greens

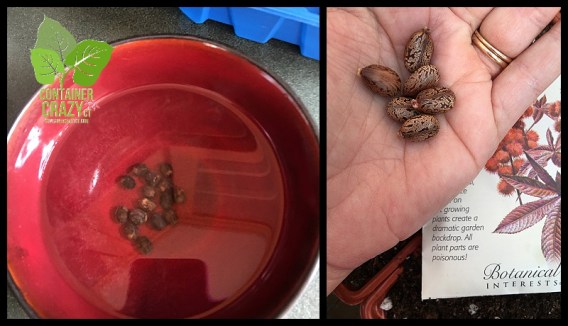
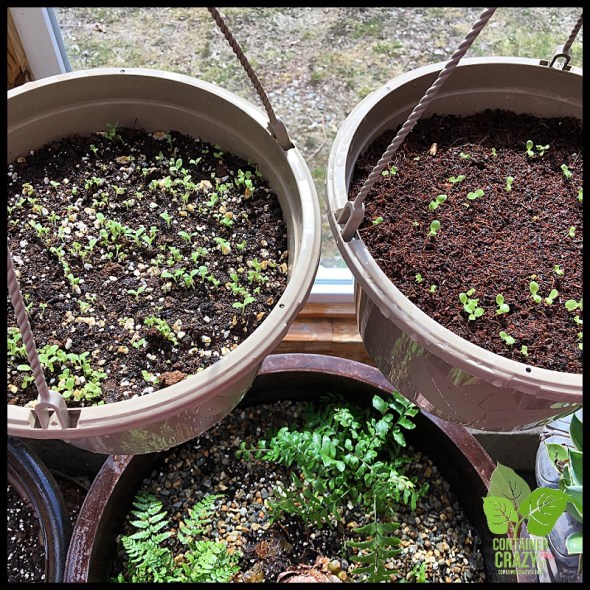
Over the past couple months, or I should say in early spring, and now again in late summer, I’ve been testing out the process of growing soil sprouts.

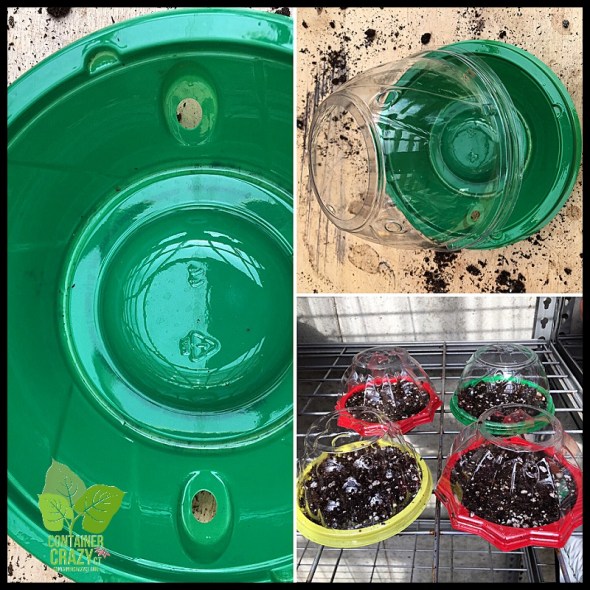
This is different than how you grow micro-greens – My sprouts are not grown in jars, but in small trays, and take only 5-7 days from start to eating, as compared to micro-greens which I hear and read take about 20 days or so.

There are lots of benefits to growing sprouts this way, which I plan to thoroughly go over in my workshop on the process, but let’s just say I’m hooked.

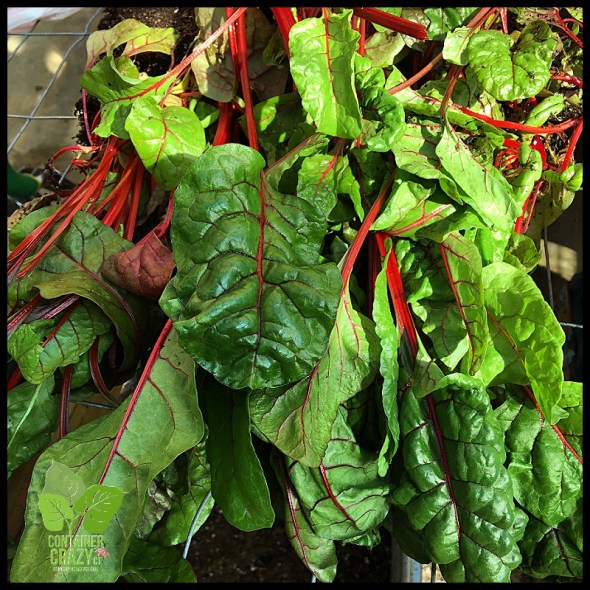
The flavor varies by type of seed used, and some are bitter, hot and spicey, or mixed and sightly mild flavored – but I do know this – they are wonderful as a salad, in a salad mix with fresh lettuce, as a topping to sandwich meats, and in soups!

They are simple to grow and you can have them available – fresh every day. My goal is to set up the workshop so you have a “kit” to get started, learn every step and the key information about the sprouts and why they healthy and what not to do too so you are successful, etc.

This is the first time I’ve grown them, and sometimes I think – wow, I didn’t realize I would like them so much, and luckily, my husband loves the sprouts too! He asks me now, when are you doing another batch?!

Growing Soil Sprouts Workshop

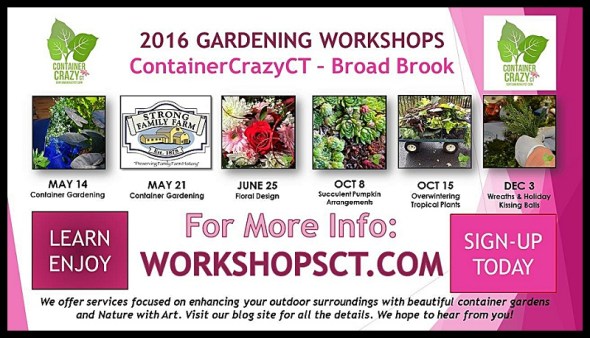
The workshop on this will be held in November and is noted on my www.WORKSHOPSCT.com site. Please sign up if you are interested so we can gauge the amount of supplies we will need. Looking forward to having you join us!

Sun Brew Tea Jar

Lastly, I got into a cute project yesterday – brewing tea in a mason jar. I twined up a jar with flexible soft wire tie material used in gardening and filled the jar with cut up lemons, fresh mint from my container, a dash of honey, and voila! It stayed in the sun for two hours which was plenty of time to infuse the flavors for pouring over ice.

It was the perfect companion to our mixed sprouts salad with fresh tomatoes and cuke, and some cheese from last Saturday’s Farmers Market in Ellington. It all made me look a lot healthier than I am – LOL, we loved it.

Happy Thursday Everyone – Friday’s Coming!

Cathy Testa
860-977-9473
containercathy@gmail.com

This blog is all about sharing the passion of growing in container gardens and patio pots – and this includes edibles! 🙂


Bugs, Drought, and Out and About

2 Comments

Hello Everybody!

Yes! The heat has “officially arrived” in Connecticut and I’m sure you have noticed how your plants react. They may be stressed from lack of watering – or under attack by insects.

For starters, you may have seen more critters eating foliage or even flowers this time of year. My method for dealing with this is watching and looking over my plants as I water them, a daily routine. Inspect first and identify the problem when you are out and about.

Just recently, I spotted an amazing caterpillar on an elderberry plant and it is eating the foliage daily, but you know what? I decided to let him be because it appears he will turn into a beautiful and large silk moth per my research. See my Facebook posts or Instagram feed for photos of him. However, if he tries to move to other containers, he may be a goner. I hope he will stay where he is on this plant. I have been taking photos daily.

I also spotted but holes in my rhubarb plant – this bummed me out more because my rhubarb in my big pot is spectacular. I LOVE the large showy leaves, reaching at least 12″ in size, but an easy method to dealing with the damage, clip them all off cause new growth arises on this plant continually – and so, I did the BIG haircut on it yesterday. I have not been able to “see” the problem insects yet on this plant – so, not sure it is Japanese beetles- out this time of year, or if another culprit. If you can’t find the bug on damaged foliage, try looking at night. It could be a night visitor.

As far as Japanese beetles, they definitely have been on my Canna plants in one spot, ugh. I hate that – I see them and their damage, so I will probably do the same routine as the rhubarb, and not reach for the spray but be patient because they do not stay all summer. Just cut off the damaged leaves and hope for improvement. Try to stay patient.

One day, I spotted woodpecker pecking at the round spiny pods of my Canna plant. He left some large holes in it – and he was either after something in the pods perhaps, or he was just confused. I have a big sunflower right next to it and they were visiting the flower head for the seeds.

Anyhow, my main thing is to try to determine which insect (or animal) it is before proceeding with steps to remove them or deal with them with sprays. This year has been critter month. We have many chipmunks this year – I’ve seen posts by friends on Facebook too of this problem. They even broke down a rock wall at my neighbor’s property, they are everywhere. I found one in our cloths dryer vent – one day, a scratching noise was happening as I was loading, and thought – what is that?! Well, yup – the poor chipmunk somehow made he was down the tube and got trapped. Yuck.

This time of year, especially with the heat on the rise, will encourage more insects. I also believe, the more plants you have, the more visitors you get! Shake the leaves to see if anything falls off, look at the underside of the leaves if you see holes or round specks of foliage damage, and look inside the plants, meaning push the stems or leaves aside and look into the plant’s areas if you have a full container garden with plants with problems. I did this the other day and found two snails. If you have a very badly infested plant in your container, cut it all the way back to the base – many will regrow from the base with new fresh growth. Toss the infected plant parts into the trash.

Another issue is yellowing on my red banana plants – ugh. I have been trying to really narrow this down – was it the new compost I used this season? (which I was told is organically certified), is it a lack of nutrition – when these plants show signs of weakness, you may want to start adding fast release soluble fertilizer weekly – but usually, when I have good soilless mix, a big pot (like this one above), some good compost – I don’t get this yellowing I’ve experienced here in this photo – which is a 5-6 year plant I put out every year. Perhaps it is STRESS of no rainfall – which we have not received much of – note the dry grass everywhere. Or it could be “too much watering” because the compost may have reduced the drainage ability in the soil, so I cut the yellowing leaf off, reduced my watering in this case to every other day, and so far, no more yellowing. But rest assured, I keep investigating these issues – and I’m testing out new products this year which I will share at my container gardening workshops in May of 2017 with my attendees.

See the bit of asparagus poking out of the foliage of this mixed container garden, the other day I found tiny black caterpillars on it – so I just cut those stems off. Haven’t seen them since. This container has repeat ‘plants’ in it. The blue flowering Ceratostigma (Hardy Plumbago) is a perennial and it has been in this pot for 3 years now. Talk about a nice filler. And the Colocasia is also one which I had overwintered and it is getting really full now.

I also noticed some plants in my landscape with a bit of yellow tones and stressed looking – and it can be a sign of struggle due to lack of rainfall. At least, this is my suspicion. Plants and gardening always keeps you challenged, learning and finding solutions. This year’s challenge has been managing insects and learning about new fertilizers.

FOAM PUMP FERTILIZER

For example, there is a new fertilizer on the market that is a foam pump. You just pump and put it on the soil next to the plant, and then water it in. I tried it out on succulents – and the color on my succulents improved within a week. However, I read “stress” can induce color changes in succulents but the timing was too near the application. I think the fertilizer improved the growth on these right away. Notice this photo, even the Jade plant got red edging on the trim of the leaves. The pumps are cool cause they are easy to apply and measure – reminds me of pumps of hair foam styling products! Read the directions always when using fertilizers or insect sprays, and remember to follow them appropriate. Less is more in some cases, overdoing applications can harm your plants.

Again, I will be sharing all the products I’ve tested out this year at next year’s workshop. There are many new items out there – including new organic types. I also show and tell products at the farmers markets each week.

NEW WORKSHOPS ADDED

Speaking of workshops, I just updated my WORKSHOPSCT.com blogsite with a Soil Sprouts class, and I will be sharing this information tonight at the Windsor Locks Farmers’ Market at the town’s public library located on Main Street. The market is held every Tuesday from 4 to 7 pm on the lawn in the back area of the library. I’ve really enjoyed being there the past couple weeks, and will be there again next week too.

For tonight’s market, I will be selling some alpine plants, great for rock gardens, crevices, and may be used to cascade over walls, and in rock garden scenes of unique container gardens. Sedum ‘Coral Carpet’ is one of the plants I will have available – this is great in rock gardens, and they are very drought tolerant – great for this type of weather we are experiencing, and also a beauty in hanging succulent balls – which is a new creation this season. And a new workshop for next year too!

I mentioned drought in the title of this post – because it seems we are experiencing one – the water is low in our rivers, the plants are not getting much natural rainfall, and this can be rough on plants. I’ve been watering my plants in my container gardens daily, sometimes twice, but remember – don’t water log your soils, allow it to breath between watering, and do the finger test if you are unsure. Insert to your knuckle to see if the soil feels moist or dry and observe your plants habits and look for insects, of course.

Enjoy your day everyone!

Cathy Testa
860-977-9473
containercathy@gmail.com


Ellington Farmers Market invites Container Crazy Cathy T

Leave a comment

Good Morning Everyone!

We had wonderful warmth and sun yesterday, and a nice rainfall is happening today which is providing everyone the perfect “setup” for the upcoming Memorial Day weekend – when many people start to plant their vegetable plants in their gardens – and of course, in container gardens and patio pots!

Most gardeners follow the rule of planting on Memorial Day because we are finally safe from frost and the soil is warmed up for our warm loving plants. This is especially true this year because of the our cool spring. Everyone is anxious – including our plants.

EFM Black Pepper Better Image

BEAUTIFUL BLACK PEARL PEPPER PLANTS – WONDERFUL IN MIXED CONTAINER GARDENS

Edibles and Fruiting Shrubs in Container Gardens

Thus – This weekend’s free talk on “Edibles and Fruiting Shrubs” in Container Gardens at Ellington Farmers Market is perfect timing. I will be at the big “square” gazebo (there are two gazebos on the site) from 9:00 am to Noon – and the talk will begin at 10:00 am.

I plan to go over tips on how to use fruiting shrubs in patio pots and also planting mixed container gardens with herbs and other wonderful various plants.

Thyme, pepper plants, tomatoes plants, banana plants, mint, fennel, oregano, rhubarb, Goji shrubs, blueberry shrubs, Sambucas Elderberries, cucumber, and many more will be available for purchase too. Will have select tropical thrillers and some flowering perennials and even succulents.

Don’t miss out – now is the time to grab them while they are hot.

EFF Blueberry Pot

Location of Ellington Farmers Market:

Arbor Park
Arbor Park is located Main Street in the heart of town. Arbor Park offers a safe area to walk. The Farmer’s Market is held in the park on Saturdays from 9 a.m. to Noon.

EFM Lemon Thyme

HEALTHY AND HAPPY LEMON THYME – FILLERS IN POTS – AND SNIP AWAY!

DIRECTIONS

1-84. Get off exit 66; proceed up the road towards rt. 30; turn right onto rt. 30; take immediate left onto west road (Vernon police dept. on your left).  Follow past Garden Barn, Walgreens, and Big Y.  Turn left onto Main Street (Light where Kloter Farms and Valero are located) Arbor Park is about 1/2 mile down the road on the right.
From Broad Brook Area – Take 140 to Ellington Center, get to Main Street and you will see the park on your left before Kloter Farms. There are signs indicating where to go for parking which is located in the back area of the market grounds. The big square gazebo is on the street side where the talk will begin promptly at 10 am.
Hope to see you there! 
Cathy Testa
Check Out Cathy T’s Feature in GoLocal’s May Issue
EFM Pepper Flowers

Pepper Plants in Flower – Ready to plant and produce for you!

Container Garden Design Winner

2 Comments

It is the day after Container Crazy CT’s first container gardening workshop of the season and I’m excited to announced our Container Design Challenge Winner.

Congratulations to Stacey!

Container Garden Workshop_0001

There are several reasons why Stacey’s design was selected as the prize winner.

First, she used a different technique to structure her design than the typical T-S-F discussed in class, where she put her big Ensete (red banana plant) thriller to the back side rather in the center of the pot.

Second, she correctly divided a perennial which had a densely packed root system, as we also discussed during our presentation on things you should do with plants which are girdled or densely packed before planting them into your container gardens.

Additionally, she selected varied heights of her plants for balance, such as the perennial which will also bloom later in the season, and she incorporated different textures.

Stacey also added what I would say fits the “chiller” plant category also discussed in our workshop – The Oscularia deltoides. This new succulent definitely captures visual interest and has the additional advantage of serving as a ‘spiller’ when it will reach out over the pot’s edge as it grows.

Also, the chiller echoes the colors of the Coleus via it’s stems, AND echoes the colors of the base of her pot.

Container Garden Workshop_0005

Back side of Stacey’s Container Garden

And another bonus – Stacey’s pot was the “perfect size” – large enough based on my recommendations on sizes, and also beautiful.

She mentioned to me how she drilled her drainage holes in other pots at home and even gave me a tip on how to handle urns which can be tricky to add drainage holes to.

As I’ve said before – My attendees become experts and I start getting jealous of them – Great job Stacey!

Your prize is a terrarium – Contact me for pick-up! You may select one with a cow, rabbit, or cat decor. They are a $40 dollar value.

Terrariums Mothers Day_0004

Colorful Bunny in a Terrarium

A Close Second

Everyone does amazing jobs with their selections of plants for their container gardens – but we want to mention Ashley’s herb drawer. She was on a mission to create an herbal mix – and she added creative touches into her adorable herbal drawer. She brought along kitchen utensils and marked the herbs’ names on them and inserted them into the soil.

 By the way, my assistant, Amelie, whispered to me, “Ashley’s Mom is going to win.” – because her Mom, Wendy, incorporated butterfly decor in her pots, so Wendy, just want to let you know, Amelie was voting for you.

Speaking of assistants, I’d like to thank my husband, Steve. He worked in the yard before everyone arrived, then he assisted with carrying bags of soils, pots, and handled drilling. He went above and beyond – would you believe after everyone left – he had the energy to put away all the tables, chairs, and patio umbrellas which he also had put out early in the morning. Not sure where he got all that gusto but I can tell you this – he passed out on the couch the minute he put his feet up.

Container Garden Workshop_0004

Steve advises Joyce on the checkout procedure.

Upcoming Plant Care

Apparently, we may have a dip in temps – AGAIN! Wow, this spring is an odd one – so my advice is watch the weather forecast, and if it gets low, down to the low 4o’s or below – either move the pot to a sheltered place if possible, or very carefully cover the plants with a “light” bed type sheet – use poles to create a tee-pee if necessary. Remove the sheet as soon as the sun is up the next day. This is important for the tropicals in particular. Perennials are fine, and some annuals, but use caution. I hope after this last dip – we can relax and let our container gardens grow. Also, everyone was told to water in their containers as soon as they got home.

Thank you – Cathy Testa

Starting Seeds – A Few Tips

2 Comments

Seed Starting

I was asked by a farmer’s market recently if I would like to teach a class on seed starting, but since it is not my “specialty” (not yet anyways), I turned down the offer, but I do play around with seeds this time of year. It is a great way to feel the plant scene around you before we are able to put plants outside.

Seed starting is fairly simple, but some things can go wrong. Before you get discouraged, remember that sometimes (although this doesn’t happen often), seeds can be bad, especially if you purchased them at a store where they were ridiculously cheap and perhaps very old or were damaged which caused deterioration of the seeds.

Another reason for failure is using the wrong kind of soil mix. Seedling mix is very fine and should be used. But, with that said, I’ve been using coconut coir to start seeds as well, and it is going along well.

Results of my coir tests will be discussed at my first free container gardening talk at the end of the month on March 26th, Saturday, at our local book store on Main Street in Broad Brook and at my workshops this season.

Seed Starting_0001

Peat Based Potting Mix on Left. Coconut Coir Mix on Right.

Seed Trays

3-in pots, seed pans, or small plastic seed trays may be used to start your seeds, or any container that has good drainage holes. Grocery store items like plastic containers previously containing cherry tomatoes are fun to use, especially because many have air holes in the covers attached, serving as a mini greenhouse. They are fun for kids, and may be used for tiny seeds projects and then transplanted. For other seed starting projects, I use large Styrofoam seedling trays with many partitions or cells which are not detachable. They are reusable year after year and long lasting. Look for them by the name of “Speedling” trays; they are great if doing many seeds at a time. You need a tool to remove the seedlings from each cell however. And of course, there are many kits available for seed starting which include a catch tray and clear plastic covering.

Seed Starting_0003

Grocery Store Containers – Fun – Good Idea for Kids!

Sprinkle or Scatter Method

My favorite method of sowing seeds is sprinkling them on top of the soil seedling mix in hanging baskets or medium to large sized pots depending on the seed/plant type. And then taking some of the soil mix in my hands and very gently sprinkling it over the top to lightly and thinly cover the seeds. This has worked out nicely for for plants like lettuce, spinach, Swiss chard, kale, parsley, and basil – and it is so easy. Remember, to sprinkle the seeds as uniformly as you can, as to not over crowd the seeds, but you don’t have to over think it with the leafy vegetable types.

I will start larger sized seeds in small 2-3” pots. I’m giving it a go with Canna seeds this spring, which are as hard as marbles (see black seeds in photo below). I collected some from a plant outdoors last October. They are tricky to get going though. They must be soaked 24 hours (and some references indicate to boil the water), or scratched so water may enter their very hard seed coats. Now, imagine me trying to file seeds the size of jelly beans with a filing tool from my husband’s garage. It was not easy as they kept popping out of my fingertips like black bullets. Sand paper is another way to accomplish this process, known as scarification. We will see if my seeds germinate. If they do – I will jump for joy.

Castor bean seeds are another type I collected last fall. They are large sized, similar to kidney beans. I collected the prickly pods from my plants. Each pod contains 4 seeds, but I discovered as I opened them up, the seeds caved into themselves and were not viable. They became overly dry somehow and there was nothing to them. I collected seeds from some of my perennials too. I test them out to see how well they do, and take it from there. And, by the way, I re-purpose prescription pill bottles to store my seeds over the winter.

Seed Starting_0002

Soaking Canna Seeds (Left Photo). Castor Bean Seeds (Right Photo).

To moisten the seed mixture after the seeds have been sown, I always make sure to use a very gentle watering can to shower it softly, and tend to move the watering can back and forth over the soil mixture. A mister bottle is another method for moistening the soil mix. Just be careful to not pour water from a fully open spout because light mix will float or move the seeds about, disturbing them.

Labeling

I label all, no matter what is used, because I will be sure to forget later. My favorite labels are white plastic, waterproof, and easily written on with a sharpie. I take a second step of noting the type of seeds sown on a calendar which I keep in my grow room. It helps to refer back if they don’t come up in a few weeks and determine how many days have gone by.

Covering

Your seeds will germinate faster if you cover the top of the pot or trays with a clear tray, or use those types of trays which come with a clear cover. It definitely helps to keep the mixture evenly moist – but you have to watch for when the seedlings start to shoot up and touch the top of the cover. If there is lots of condensation on the top cover, tilt it to the side to allow air in or remove excess water from the cover, or take it off completely for a couple hours. When condensation hits the tender new leaves (baby leaves known as cotyledons), this can rot them so it is good to keep watch over the trays from time to time as they germinate and begin growing.

Temperature

Seeds require warm temperatures – at least 65 degrees F to germinate. The tender types need even more warmth so if you are trying to start seeds in a cold room, and they don’t come up – this is another potential reason why – if it is not warm enough, you may require a heat mat to place under your seed trays. A friend gave me one, and it gently warms up the trays of soil. Some people will place their seed trays on the top of heating units in their home if they have the style to do so – and this can work as a heat mat. Either way, warmer soil definitely gets them going faster. The mats are easy to plug into an outlet and use. Search for them online.

Seed Starting_0004

Swiss Chard pulled from a pot – Was growing over the winter months.

Timing 

Always look at the seed packages for the weeks or days needed til germination and work backwards on your calendar. This is what I did with my Canna seeds. I wrote down the date I wanted to get them started with hopes they will be ready by spring time. If your seeds are not coming up, take a look at the time required (days until germination) on your seed packets, and if it is a challenging seed, it is worth to wait a bit longer if you don’t see them come up – you may find they are late bloomers (no pun intended). But one thing is for sure, there is something super rewarding when you see them come up from the soil to greet you.

Pricking Out

This is a real term used in horticulture. When you see the first two to four seed leaves appearing on each, they are ready to be moved (or pricked) out. Transfer the seedlings to small pots with multi-purpose mix. This does not have to be done with seedlings like lettuce in hanging baskets. The leafy vegetables continue to grow great in pots. I love doing Swiss chard in medium to large sized pots. They grow so beautifully and full that sometimes I don’t want to harvest them. Smaller sized window boxes are another type I use to start seeds for lettuce and herbs. Mix lettuce packages are lovely to look at and eat.

Grow Lights

Seeds need water, light (but not strong sun), air and warm temperature to germinate. If you do not have a well-lit area, many people will purchase grow light systems. After you transplant your new seedlings to bigger pots, do not put them into harsh full sun, because that can be too hard on them. They should be protected from direct sun. I sometimes use shade cloth around my new seedlings. And remember, all new plants require hardening off. Transition them carefully and good luck!

For a version of this post in a Newsletter format, click this link:

Spring 2016 Newsletter

Upcoming Workshops

We are excited for the upcoming workshops planned. Two dates are available for the May workshops on Container Gardening featuring edible plants – and of course, all the showy tropicals and exotics we include each season. Sign-up’s have begun, so don’t delay!

Note: Strong Family Farm is hosting one of our workshops – They are located in Vernon, CT on West St. If you can’t make Workshop No 1 on May 14th in Broad Brook, the Strong’s session will be an excellent option, and you may visit the farm’s large pen filled with chickens too. It’s a great farm with lots of activity happening every year.

Registration is available online via our new sister blog site: www.WORKSHOPSCT.com.

Seed Starting_0006


Cathy Testa
containercathy@gmail.com
860-977-9473

Happy St. Patty’s Day!

Seed Starting_0007

Happy St. Patty’s Day (Containers Dressed Up for a Business Client – Couple Seasons Ago!)

Up Next: Garden Presentation on 3/26

Leave a comment

Hello Everyone,

As you know, spring is just around the corner – one week away on March 20th.

If you want to get prepared early – Join us for this FREE presentation on the 5 Must Do’s for Growth Success with Container Gardens (and Patio Pots).

Swing by the Book Club Bookstore & More at 100 Main Street in Broad Brook on Saturday morning, March 26th, 2016 at 10:30 am.

March 26 Flyer

This slide show style presentation will go over each of the keys to success, and dig into (no pun intended) as to why they are critical for growing healthy and lush plants in your container gardens and patio pots.

Additionally, we will go over some new items (or maybe not so new – but new to you) which will help you to make determinations on which soil media to use in your patio pots. Today the options are endless for organics and fertilizers – If you need help in figuring out what to use, this presentation will give you some tips.

If you haven’t heard me speak before, this is your opportunity – and its FREE. Come in for an hour of a nice talk and visit the bookstore’s offerings at the same time. We will have some gardening items for sale ready to dress up your Easter table, like fishbowl sized terrariums and ceramic bunny plant scenes.

We hope to see you -and if you can’t make it – please don’t forget to check out our workshops for 2016 at this special new workshop blog site called:

www.WORKSHOPSCT.com

Thank you,

Cathy Testa
860-977-9473
containercathy@gmail.com

ContainerCrazyCT is all about sharing the passion of enhancing your outdoor surroundings with container gardens and art inspired by nature. We offer workshops year round where you learn, have fun, and take home your creations. See our new workshop site above for more information, and don’t forget to save the dates. Cu soon.

Bookstore Clear Coned Plant_0024

Store front of the bookstore in Broad Brook!
We like to support local small businesses in our community.


Coco Coir – A New Potting Media

2 Comments

Some people may say coco coir (made from the husks of coconuts) is relatively new on the scene while others may state it has been here for a while – but one thing is for sure – it is an alternative for potting up your plants or starting seeds, and it is growing in popularity.

When I spotted some coir blocks being showcased at the CT Flower and Garden Show last weekend by FibreDust LLC, I was sure to step up and hear what the young gentleman was saying about it.

Coir Tour_0007

As he continued to talk about coir and how to use it to my friend, I noticed another person walked up and was observing. My senses told me, this person is the owner of this product, so I walked up immediately and shook his hand to introduce myself.

There was probably an air of excitement in my voice because I want to learn more about coir. It is being added to potting mixes (as an alternative to peat moss). You may also use coir in its straight form, sold in compressed blocks which are soaked in water to expand for use as a potting media. Once expanded, it looks almost exactly like peat (as shown above in the photo taken at the garden show).

During my garden presentations on container gardening, I highlight some of the new options for potting mixes on the scene, and there are many to choose from – it can feel overwhelming at times, but it is all good news because many new potting mixes are geared towards sustainability and incorporating organic materials, and coco coir is one of them.

As I discussed the benefits of coir with the distributor of the coir product, Sam Ahilan, President of FibreDust LLC, decided to invite me to see how they process their coir product at his facility in Cromwell, Connecticut. And of course, I responded immediately with a yes to his generous invite.

Facility Tour

This is what I saw yesterday at their facility located in Cromwell:

Coir Tour_0001

Shredded coir bundled up for distribution to customers were first on the tour list. There were many ready to go sitting on pallets awaiting the skid loader. These are processed via a large production machine, shown below, where coco blocks are shredded and water is added.

Coir Tour_0006

Here it is nice and fluffy for bundling up in the bales above. Sam was kind enough to have the machine turned on by his crew to show me how this is done in their production facility. I have to say, being a container gardening lover, it was difficult to not reach my hand in to feel the coir – it is very light, fluffy, airy, and soft – and it looks very similar to peat.

Coir Tour_0002

Sam is working with a local grower of tomatoes to grow tomatoes in his coir cubes. Here they are lining up their cubes and getting them set for irrigation and planting soon. Fortunately, for me, the sun was shining so it was a moment of “ah” in a greenhouse. Nutrients are added to the coir later in the process as the plants grow. The grower told me he has people taste the tomatoes along side of homegrown tomatoes in the garden, and many can not distinguish the difference. I wanted to tell him, I would have to do a taste test with my father’s home grown tomatoes, but I believed him. Why not? They are being grown in the warm sun of a greenhouse with correct temperatures and in a growing medium which has the similar qualities of peat.

In another larger warehouse space are miles of coconut fibre based products – from mats for landscaping or basket lining purposes to cubes for potted plants. Coir is used in many fashions, and not sold just in blocks or cubes. There are small round disks available to start seeds, which if you are into seed growing, I’m sure you have seen before.

Coir Tour_0004

I asked Sam to hold a sample of a coarse form of the coconut husks which may be used as to increase pore space per Sam. I took many more photos, but I plan to share those at my garden talks and workshops this summer, so I’m saving some for my attendees. This is just a sneak peek!

More About Coir

As I noted above, coir is becoming popular because it can be used as a substitute or alternative for all peat moss based soils, reducing the use of valuable wetlands where sphagnum peat moss is usually harvested and used as a base in many potting mixes. Peat moss is more porous than coco coir and has been used for centuries in the gardening industry for its stability and consistency for growing plants.

However, I wish to note that I don’t think using peat moss is totally all bad and why I feel this way is discussed during my garden presentations – I believe the key is finding a balance, trying out new products which are more sustainable, and testing how they work for your gardening needs to see the results for yourself.

Coir also has attributes such as a good water to air ratio, which is needed in container gardens and patio pots especially because oxygen is required in the root zone for plants to grow. Healthy roots are a result of a balance of water and air, another topic highlighted in my garden presentations.

And speaking of water, coir holds water well, which may be good for reducing watering routines in patio pots – but as I mentioned, I prefer to test it out because it drains and dries out slower too. I will see how coco coir works for me with my container gardens, and share my findings with you along the way. This is one of my goals this year in particular.

Per my readings about the coir products on the scene, the pH is usually neutral, but because the source of the product varies, it should be checked, at least for high production scenarios. Also, nutrients must be added to this product as your plants advance in growing. Unlike some potting mixes for container gardening which often have a pre-charged slow fertilizer added to the soilless mix for you.

One really cool thing about using coir, is they are taking a waste product from the production of other coconut based products, such as doormats and brushes, and reusing it in a new way. It is always a good thing and a bonus when we accomplish the goal of renewing a resource. I don’t think anyone would disagree with that.

And because coir is compressed to reduce shipping costs, and is easily restored to a fluffy consistency, it saves on shipping expenses, thus reducing more waste. Additionally, it stores well for a long time and all it takes is some water to expand it into a huge portion for use in your pots – if not as a straight growing mix, but maybe as a filler, again something I’m testing out this year. It is great for starting seeds too.

One thing I also like about the coco blocks used as a potting soil (called Sponge Ease) is how easily they are to carry, store, and use. They come in 7 x 7″ blocks (small enough to fit in a purse!), but expand to an amount substantial enough to fill a small to medium sized pot (10 quarts) by putting the block in a bag and filling it with 3 quarts of water. Plus they are packaged with biodegradable labeling, again reducing waste like the big plastic bags which are used for soilless mixes.

You will most likely see these coco coir products in garden supply magazines, some nurseries, even perhaps your grocery store – and of course, for sale at my workshops on container gardening and patio pots, where I will demo the whole process and how to use this potting soil. If you would like to purchase some, feel free to contact me (email is below).

Oh, and by the way, coco coir is used with hydroponics growing systems (growing plants in liquid – sometimes with some soil media and sometimes without) – which is another whole subject I’m exploring – Why? Because hydroponics is a hot topic today too, but it is a bit complicated or requires some solid knowledge of the how to’s.

Bottom line – It was a real treat to see the coco coir production process, various growing coco coir products, and meet the President of FibreDust LLC. I appreciate Sam giving me the tour yesterday, and will share more all with you this spring and summer. Stay tuned.

Cathy Testa
http://www.ContainerCrazyCT.com
860-977-9473
containercathy@gmail.com


Workshops – Make and Enjoy! What’s Coming UP.

1 Comment

I promise to get back to posting about plants very soon! But, I want to take a moment to let you now of the workshops on the 2016 Calendar. They are listed below.

We kick off the year with Floral Design scheduled for this Saturday. Can’t wait. I will share photos of our floral creations the week following.

After that, I will be at a local bookstore for an Authors & Artisans’ Event in Broad Brook. See the date and link below. Garden journals and mini plants will be available for purchase, plus floral arrangements by JEM’s. Swing by to see this quaint bookstore on Main Street and visit with local small business owners. Learn about their services and more.

However, the pace doesn’t stop there – Next is the Hartford Flower Show. If interested in car pooling from Broad Brook on Saturday, February 20th, reach out. We have a small group forming. It helps with sharing parking fees and we learn from each other as we walk and talk the flower show floor.

That’s the start of the year in February, but – wait there’s more. My annual workshops kick in from there where we “learn – make – and celebrate combining nature with art”.

For photos of prior workshops, visit my Pinterest board. We hope you will join us this year – we love meeting new friends at these events and classes.

WORKSHOPS BY DATE

February 6, 2016 – Saturday – 11 am to 1 pm
FLORAL DESIGN with JEM’S HORTICULTURE AND FLORAL DESIGN
$45 pp

February 13, 2016 – Saturday *
Authors & Artisans Valentine’s Shopping Event
Book Club Bookstore & More in Broad Brook, CT
10 am – Free to Attend

February 20th – Saturday *
Group Meet Up: Flower Show in Hartford – 9 am
Meet in Broad Brook; Car Pool

May 14, 2016 – Saturday, 11 am to 2 pm
CONTAINER GARDEN WORKSHOP – Edibles, Herbs, Veggies, and More!
$15 pp (plus cost of plant purchases at class)

May 21, 2016 – Saturday, 11 am to 2 pm
CONTAINER GARDEN WORKSHOP AT STRONG FAMILY FARM, Vernon, CT
Registration Fee TBD

May 28th – Saturday *
CONTAINER GARDEN TALK – HOW TO’S AND DESIGN TIPS
Ellington Farmers Market
Free to Attend – At the Gazebo at the Market

July 23rd – Saturday, 11 am – 1 pm
NATURE WITH ART CLASS PROGRAM with TIMEFLIESBYLAURALIE
Theme: Working with Wine Bottles! More Details Soon.
Registration Fee TBD

October  – Date to Be Announced
PUMPKIN CARVING & PUMPKIN STUFFING WITH FLOWERS AND SUCCULENTS
Stay tuned!
Registration Fee TBD

October 15, Saturday, 11 am – 12 pm
OVERWINTERING TROPICAL PLANTS
$15 pp

December 3rd, Saturday, 11 am – 2 pm
THE 7TH ANNUAL KISSING BALL & HOLIDAY CREATIONS WORKSHOP
Fresh Mixed Greenery, Wreaths, Kissing Balls, Candle Centerpieces
$38-$40 pp

December 7th, Wednesday, 5 pm – 7 pm
WEEKDAY WORKSHOP: KISSING BALL & HOLIDAY CREATIONS WORKSHOP
$38-40 pp

***

All workshops are located in Broad Brook, CT unless otherwise noted above.

*The items listed with asterisks are not workshops, but special events of interest.

And see our Side Bar menu on this blog for Garden Talks at various garden clubs in our surrounding towns too.

Thank you – Cathy Testa

What a Month!

Leave a comment

And what a year ahead…

2016 will be filled with exciting new workshops and garden talks, but I have to comment on what a wonderful past month or so it has been installing container gardens for business clients with greenery and festive fun, holding the big “Kissing Ball and Holiday Creations” workshop with 35 attendees this month, and making wreaths, kissing balls, evergreen garlands, candle centerpieces, swags, and more for clients all month long.

These photos of my Instagram feed say it all.

It’s been a pleasure serving you and I’m looking forward to the new year!

IMG_0041

Thank you again everyone, and have a Festive Holiday and Christmas.

Only two more days to go!

Cathy T


Why I love (and I mean LOVE) Container Gardening!

Leave a comment

Everyone who knows me, or has attended my container gardening hands-on workshops in the spring and summer months, is fully aware that I am nuts about container gardening. I love it. Even in winter as we stuff beautiful mixed evergreens into our pots to bring life and some color into the winter landscape – we are enjoying a form of container gardening.

Today, I am listing just some of the reasons why I love (and I mean LOVE) container gardening – and I think you should too:

It is easy, fun, and fast – Provides instant gratification! Even in winter, stuff in some greens, add some berries, and voila – You have a beautiful container garden on your front steps to welcome your holiday guests.

Cathy T Winter Pot

A Beautiful Barrel Stuffed with Mix Greens and Decor for the Winter

Container gardening takes less space and energy than in-ground gardening does to achieve success. It is instantaneous and provides lots of color and life to your yard. Just watching the plants and its visitors is good for your health. It makes you pause to view it all.

It is okay to make mistakes – This is how you will learn about plants. Plants in pots are more forgiving. You may easily fix mistakes quickly by re-potting or re-positioning the container to suit the plants’ needs, or the decor look you are attempting to achieve outdoors.

Deer can not jump onto your deck or easily visit your patio (hopefully) to dine on your plants in the containers and patio pots, and groundhogs have a difficult time reaching them too. Nice!

Your pets enjoy them – Cats enjoy them for shade in the summer, and they like to hide behind the planted pots when observing the birds or checking out the yard from different areas.

Cathy Testa Container Gardens_0019

Cat inspects the bees buzzing into a Mandevilla bloom. Little coco bowls with succulents make nice little decor on table tops.

If you have dogs, they usually like to sit by plants in pots to rest and relax after playing in the yard. They are less likely to tromp thru big pots of plants which are up high or elevated versus a level big garden inviting them to run over it and everything in it, or dig there. Setting up a garden to be pet friendly is somewhat challenging compared to plants in containers where you can monitor your little furry friends near your entertaining spaces by you, your home, doors, and entrances. Just be sure to keep any poisonous candidates out of your pots if they are the curious eating types.

Plant caddies (trays with wheels) allows movement with a slight push of the pot anytime I want, or anytime the plant wants, to be relocated if it needs more sun or more shade, a better home to view it from, etc. That’s flexibility. You don’t even need to get your hands dirty.

It is instantaneous – which is important in today’s world. Most of us want to enjoy beauty around us without too much time if we are busy with work and other fun things. Container gardening is quick, it is not too difficult to learn the how-to’s of Five Must Do’s by Cathy T – once you know them, it is simple and gratifying – and you end up being addicted.

You may use practically “any” plant – You are not so tied to your planting zones or rules because you are enjoying your plants for the summer season, you can use tropical plants and more. Don’t limit yourself to just annuals in the summer season, there are so many choices.

Drama is created with big and bold – Think different, big, unusual, and BOLD.  We like beautiful and showy backyards – and container gardening is a great way to achieve this BOLD look. Just one big plant which grows fast in a gorgeous pot will stop you and your friends in their tracks.

Copywrite Cathy Testa Concrete Planter

A HUGE container garden with showy tropical plants extends the season into Autumn (Photo Protected by Copyright)

You may create niches by grouping or staging various pots together. Potted plants will divide or connect spaces, they frame your view. It is an “extension” of your decor of your home and using some pots creates an additional room outdoors while entertaining your friends or being solo enjoying nature. The right pot can draw you out into your landscape to escape and veg’ out – something we all need to do more of, right?

Winter container gardens with evergreens dress up your outdoor space too – two pots by an entrance with greens, berries, golden or red sticks, is a way to say enter here and enjoy the holiday party. In Autumn, you extend your outdoor spaces with plants in pots that will remain until the first frost – they give so much those potted plants.

Not many bug problems or diseases in potted plants, and if there are any, you see them right away because your patio pots (and indoor house plants in pots) are usually near you. Potted plants have a more sterile environment as well, so the incidence of pests problems are less likely. If pests occur, the containers are easy to treat or quarantine.

If it fun to observe the cute visitors to your plants – hummingbirds, hummingbird moths, butterflies, bees, or even your mother in law admiring your patio pots! It helps your important pollinators – when you see bees visiting a flower, you will hear them buzzing as they go in and out to collect their nectar. It feels good to assist our little friends; we need them so lend them a hand by planting flowering plants in pots.

Bee on Turtle Head Cathy Testa

Bees enjoy a perennial (Turtlehead) flowers in a Container Garden

It helps your health – as you sit up close and personal enjoying your patio pots in your deck chair – you tend to relax, smell the aromas which calm your senses, and you take time to breath deeply – rather than think about all the weeds you have to pull from a garden bed. The distraction of admiring your potted plants in various mixed combination is a form of meditation which is very beneficial to your balance and harmony.

It is not too physically intensive, so if you have any issues with your back or knee problems, or digging in dirt in the ground with a heavy shovel is not your idea of fun, this type of gardening is for you. You may elevate pots or position them in a way for easy harvesting of veggies, herbs, and other goodness. Right outside your door – kitchen container gardens rule.

Cathy T Containers_0012

A pot on the deck by the pool – two pots say walk here to lawn area, etc.

You can hide problem areas in your landscape, or place beautiful container gardens on your steps or patio to utilize pots as amazing focal points, or test the scale of a plant to be planted in the garden by putting a pot there first. Plants in pots are functional art – they say, “Go here, step down there, look here, and stay here to enjoy life and nature.”

Mojito Ele Ear Cathy Testa-001

The amazing colors and patterns from an elephant ear – Colocasia ‘Mojito’

Textures and/or colors to be added to the garden later are easily tried out by using plants of them in a pot in your garden first. If you are unsure what to plant in your garden, put a pot there for a while and contemplate the look and feel of the plants’ style, look, colors, etc.

Lastly, you can create containers of lush plants, strategically place them on your patio or deck, and drink a margarita – now that is my idea of gardening and reducing stress.

And let’s not forget – during the winter, you can admire all the beautiful container gardens and patio pots you have arranged and grown from last summer as you browse your own photos or ‘Pinterest Pages by Cathy T‘ and Instagram photos – This will help you get through the winter months when there is more snow on the ground than anything.

Container gardening and patio pots are part of life today for adding beauty all around. Add a rain barrel to the area near your pots in the summer to use natural resources to water them. Keep an empty big barrel by a greenhouse or garage door to fill with snow during winter, and take it inside to melt onto the soil of pots of dormant plants being sheltered for the winter.

We all will enjoy container gardening as much as I do. I hope…

Cathy Testa
http://www.ContainerCrazyCT.com
860-977-9473
containercathy@gmail.com