My First Jumbo Boston Fern

Leave a comment

I’ve purchased various ferns many times over the years, some for outdoor shade garden growing such as the Maidenhair Fern, and some as fillers in my container gardens, such as the adorable small round leaved Button Fern. I love Maidenhair Ferns for their delicate stems and unique growing style, and I liked Button Ferns for their contrasting bright green color against the darker tones of other plants in mixed container arrangements. I also have rather enjoyed Staghorn Ferns, grown on boards or other hanging structures, for their unique display. I also love using various smaller ferns in hanging baskets mixed with other green foliaged houseplants, as shown in my gallery on Smugmug. However, typical Boston Ferns were not on my personal fav’s list, until last year.

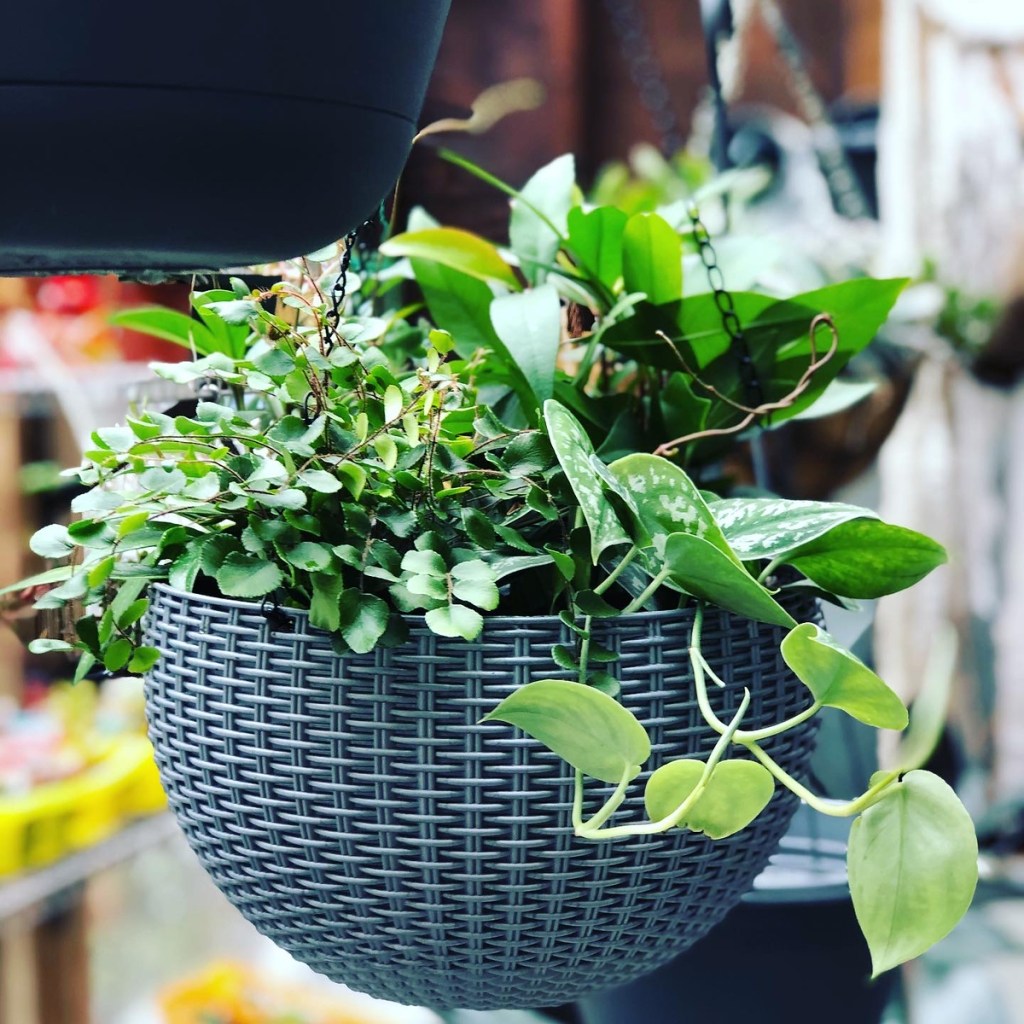
Photos above (left to right): Gray hanger with mixed houseplants and a button fern; Outdoor Barrel planter with rubber tree and button fern; Hanging basket top view with button fern and other houseplants.

Typical Boston Fern

I purchased a typical Boston looking fern on a whim as I was entering a grocery store when I saw a bulk of them recently delivered and sitting outdoors at the front of the store. (Tip: Look them over – Do they look healthy? Was it a recent delivery? Or are they stressed? Also remember to look under the leaves, or in this case, under the fronds to see of any rot or insects (look for white fuzzy looking spots which could be mealy bugs), or in the case of ferns, don’t panic with ferns if you see brown symmetrical dots on the undersides of the fronds – those are naturally occurring spores on “some types” of ferns and are not insects! However, overall, these looked great at that moment of spotting them.)
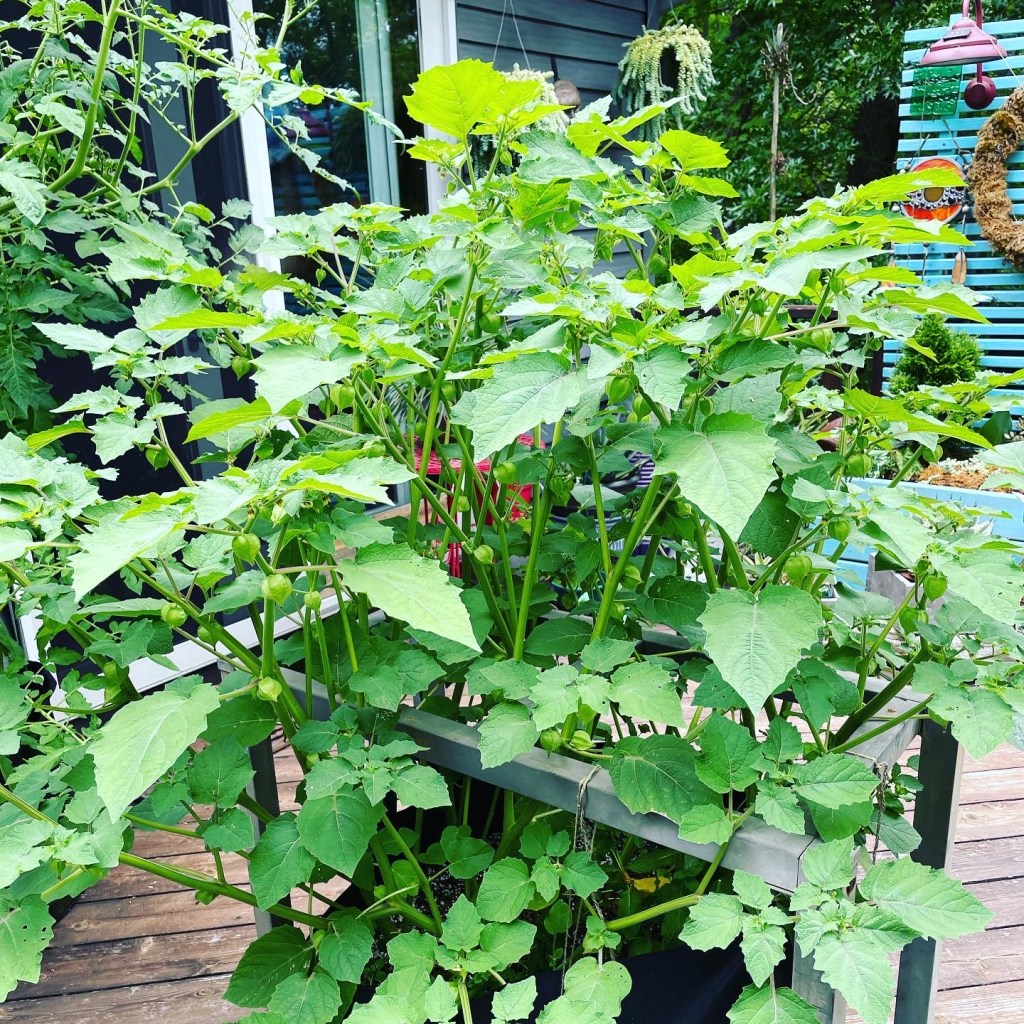
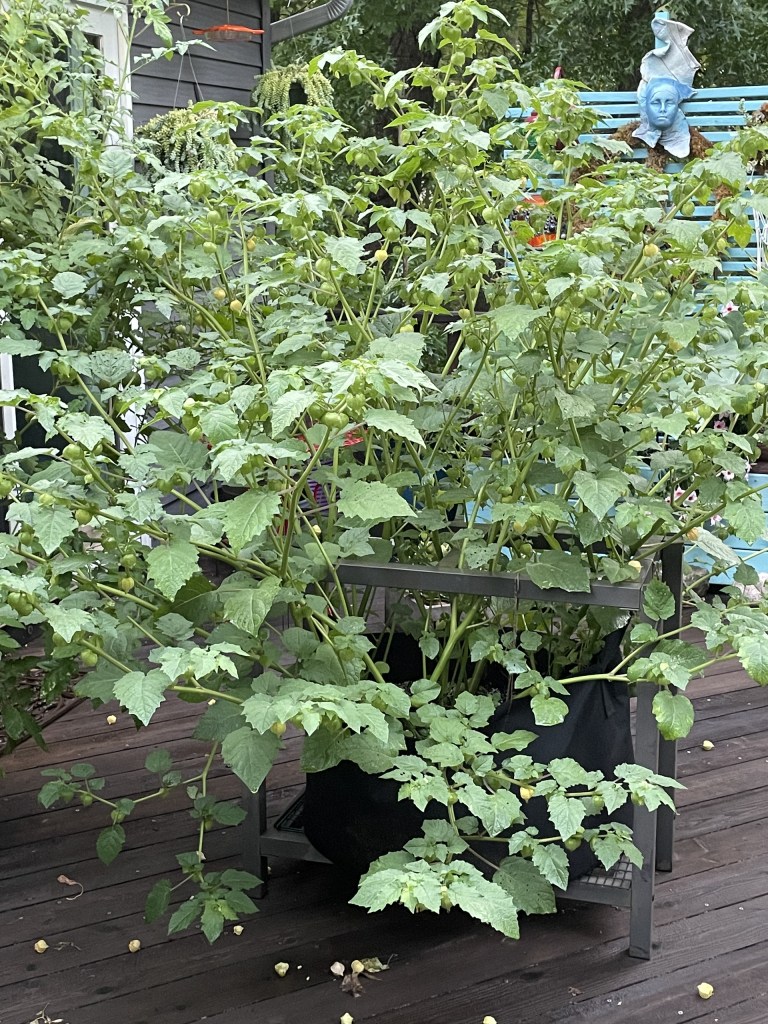
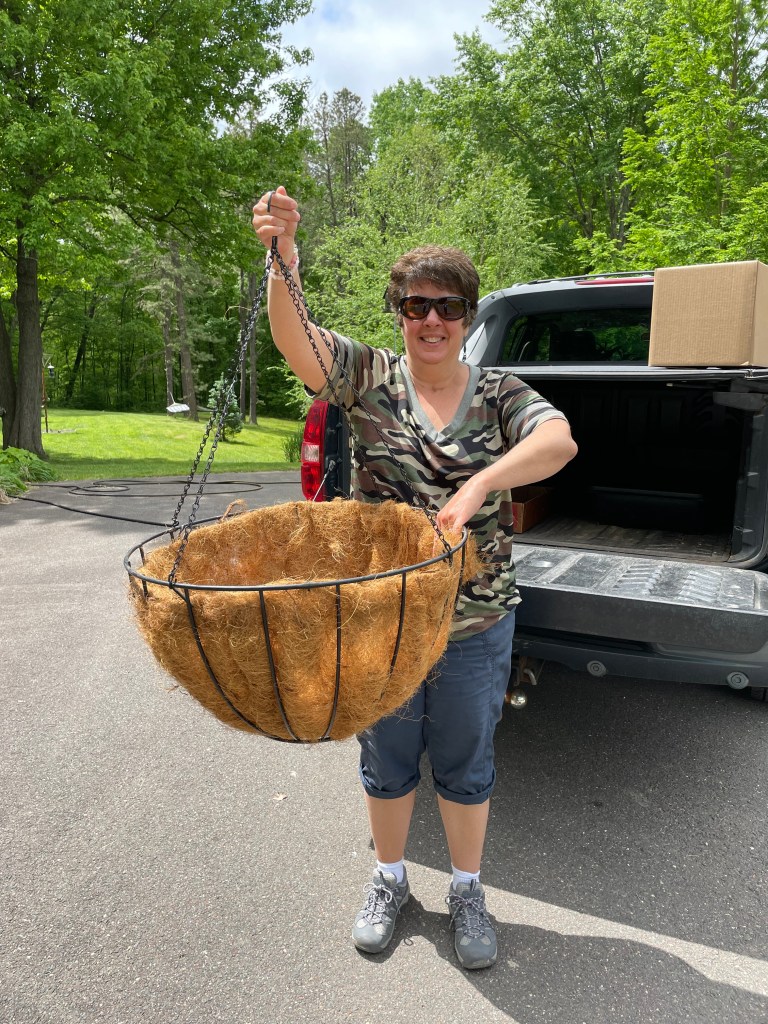
Jumbo Boston Fern

Looking closely at the label in this photo, it indicates it is a Jumbo Boston Fern. I didn’t realize that until later as this fern grew rather large in one summer season. The reason I thought I should get one is because I had read that someone overwintered them easily in a low-temp greenhouse so I thought this is a good candidate for overwintering, similar to my Agaves, which don’t mind some lower temps for a few months and can ride it out till summertime in my low temp greenhouse (Note: I live in Connecticut Zone 6b).

Boston Ferns (Nephrolepis exaltata) are a commonly known plant and people typically display them in hanging baskets inside the home or on porches in the summer. Because ferns like humidity, they can be tricky to keep healthy over the winter inside a home, but so far, the one I purchased last season which is hanging in my low-temp greenhouse, is looking pretty good and well, “hanging in there” for the time being.

Location

I decided last year I would hang it from a big maple tree in my backyard when I scored this super big hanger at a nursery. Using standard potting mix and adding some balanced slow-release fertilizer in the potting mix, I planted it and cranked it up via a cable system my husband installed for birdfeeders from the tree’s branches. We hadn’t been using it for feeders anymore due to pesty squirrels, so now it was the perfect set-up for my new Jumbo Boston Fern.

Because ferns prefer filtered light, and many come from a natural habitat of shady forests or trees in moisture loving places, growing under a tree was a good location. Plus, it was so large, along with the hanger, it was enjoyable to view this big hanger and plant from my deck. At one point, a bird tried to create a home on the side of the planter, creating an entrance in the moss, but soon the bird realized this was not going to work because of the watering. I felt badly but I figured he or she would get the message and move on which he or she did.

During the winter, the location of this fern has been inside my low-temp greenhouse. Fortunately, the hanging baskets hanger and chain is strong enough to support it – it grew two-three times the size of the original plant by the end of the summer.

Grew Fast and Larger

The plant grew from a standard hanging basket size to a monster size. I had forgotten it was labeled as a “Jumbo” Boston fern so true to its name, it got jumbo size for sure. It is so heavy I feared the hanger would not support it in the greenhouse, but my trusty husband assured me it was fine. I also read that ferns have shallow, fibrous roots that fill the surface of containers quickly, so pots should be as wide as they are deep (which is the case with the big hanger I scored – I think it is about 2 ft wide on the top and it is certainly large in the bottom. It has plenty of growing space and by the end of the summer, it almost filled this big hanger.).

Watering and Moisture

To water it as it hung from the tree was not too difficult. I would just take my hose from the deck and point a strong spray of water to it and do that at least once a month. Boston ferns like constant light moisture and I enjoyed watering it as needed. I could have added some peat moss to the potting mix, but I felt that may make the whole thing too heavy, so I only used regular potting mix (as noted earlier). During this winter, as it hangs in my low-temp winter greenhouse, I have been careful not to water it too often because I don’t want it to rot. I have not misted it but one day, when the sun was out and the greenhouse was very warm for a winter day, I showered it with water from the hose, wetting the fronds, inside the greenhouse knowing it would enjoy a mist of showering moisture which would dry by end of the day due to it being a sunny day. I would not have done that on a cloudy winter’s day. Otherwise, I have watered it only occasionally in the greenhouse, and water spills out the bottom draining well. Note that these ferns can be messy indoors, dropping or shedding bits of the drier fronds, and plus watering it makes a big spill so in the greenhouse, that hasn’t been an issue for now. I will have to clean up shedding from the floor before spring, so it doesn’t create other problems in the greenhouse but otherwise, it has been fine. Some common places to hang this type of fern indoors may be a bathroom which is usually cooler and has some humidity but again, hangers can make a mess when watering, etc.

Temperature Inside and Out

I read the temperature preference of Boston ferns is below 60 degrees F at night indoors and during the day about 70 degrees F indoors. In the summer, they adapt to a range of temperatures of 80-85 degrees F during daytime outdoors. My winter greenhouse is kept at about 50 degrees F and so far, it has adapted well. Note though however we have had a mild winter so far. Some of the fronds have dropped a bit of dry pieces, but otherwise it is showing signs of life and is staying healthy. I will have to watch out for when temps ramp up in the greenhouse when spring arrives so I do not burn the leaves and may have to move it to a shadier spot (maybe under a shade cloth in the greenhouse, or under a protected shelf) before transitioning it outdoors in late May or early June. Right now, it is hanging fairly close to the ceiling, and I realize this may be too hot when we gain more sun in the springtime. Again, references indicate most ferns grow best in normal or cool room temperatures (difference of about 10 degrees F between day and night mimics the conditions they experience in the wild). Dry heat, which occurs in homes during the winter, is not preferred by ferns.

Fertilizer and Propagation

References in some of my garden books indicate that Boston ferns should be fed every two weeks with a balanced house plant food mixed at half the normal strength. I did not do any feeding of that nature last year, but we will see how it does this year, and perhaps will do so. I don’t believe in over feeding plants and try to determine their needs based on conditions, experience, and growth. Also, from what I read, divisions of the plant from the parent clump may be done in springtime so I will look to see if I can divide it then as needed.

Thank you for visiting!

Cathy Testa
860-977-9473 (texts welcome)
http://www.ContainerCrazyCT.com (you are here now!)
www.ContainerGardensCT.com
www.WorkshopsCT.com
https://cathytesta8619.smugmug.com/ (Cathy’s Photo Galleries)

Date of this post: 3/1/2023

An Obsessed Container Gardener
A Container Garden Installer
A Plant Lover
A Nature Lover
A “Can’t Stop Taking Pics of Plants Person!”

Button Fern in a Mixed Planter
The size of the Jumbo Boston Fern before I planted it in the bigger hanger last summer.

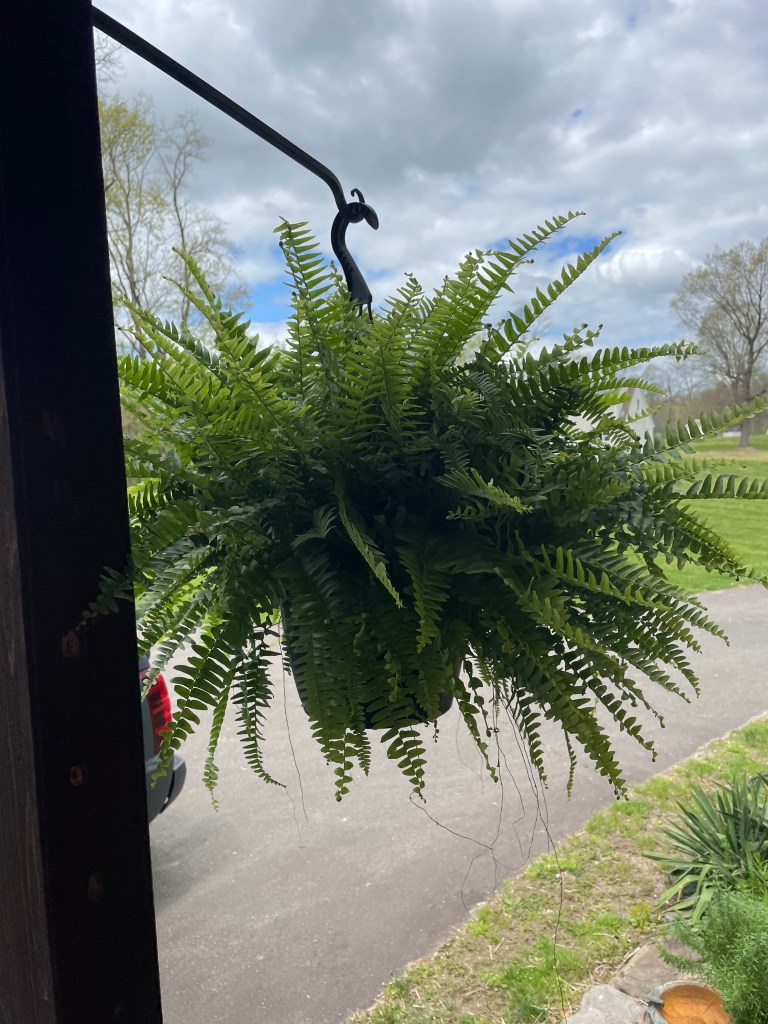
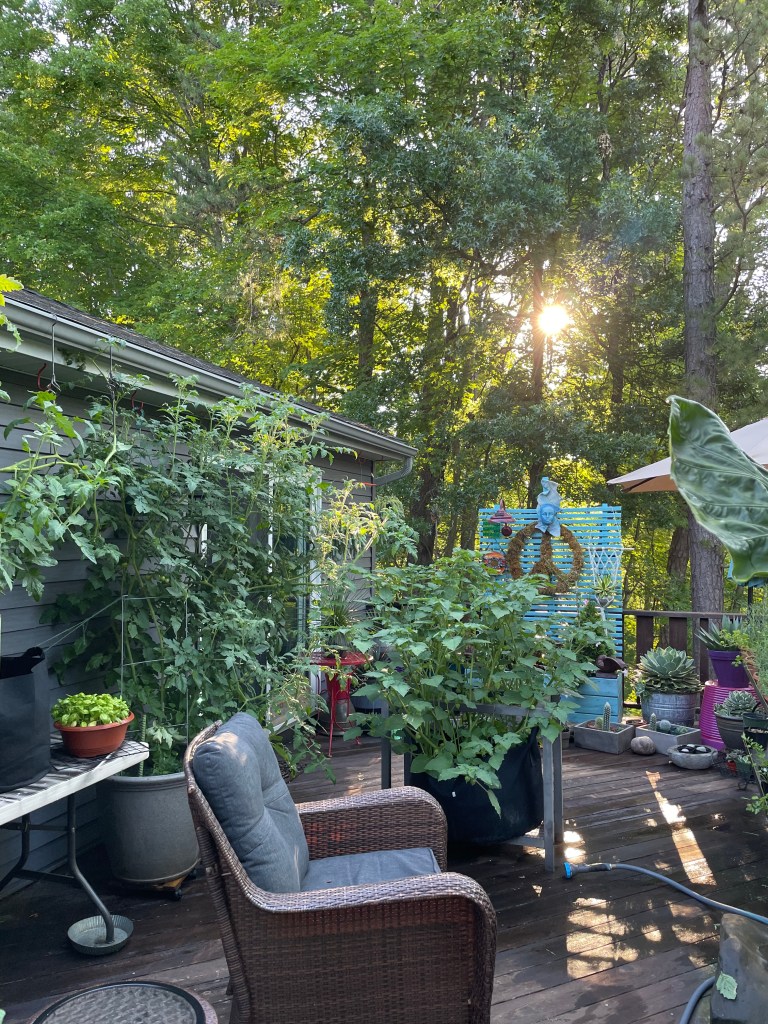
The photo above is what this Jumbo Boston Fern looked like when I first got it. Then it grew two to three times larger!

The fern today in the greenhouse during winter 2023.

Growing Ground Cherry Plants from Seed

Leave a comment

Last year (2022) was the first time I tried out Ground Cherry plants, grown from seed, and I rather enjoyed the sweet fruit produced on the plant from summer till autumn.

They were easy to grow, but the seeds can be slow to germinate, and it is recommended to use a heat mat to start the seeds, which I did.

The packets for the type I grew, called Aunt Molly’s Ground Cherry, indicates you should start the seeds 3 to 8 weeks indoors before your last spring frost.

The document above is one I put together last year, using some photos from the web when I was letting people know I had seed packets available. The photos below are from my own photos as I grew this plant on my deck last year.

Flower and Fruit

This is a great photo of the flowers and fruit forming. The flowers were tiny (like the size of a dime coin) and somewhat pretty with the dark edges. The fruit grew to about the size of a larger blueberry or smaller marble on my plants. I expected them to be bigger, but they were not. However, they were very tasty and made a nice snack, and there was always plenty of a supply dropping from the plant when they were ready.

Plant Size and Shape

Even though this plant is a relative of tomatoes, it seems more like a distant relative – the leaf shape is different, and the growing habit is more of an upright to sprawling bushy look – so it has spreading out habit. I noticed the plants grown in my cousin’s community garden plot spread out lower than the plant I grew on my deck in a 15-gallon fabric grow bag. The plant was about 24″ high and wide. And it prefers full sun conditions like tomatoes do to grow best.

Fruit is Ready when Falls to the Ground

The husked fruit starts to drop to the ground, and that is when you know they are ready. This makes it a great exercise plants, bend down, reach up! I found the fact I grew it on the deck to be handy. I didn’t have search around below and it was obvious where the fruit landed. However, my cousin’s plants in a garden had some straw below the plants, so it was difficult for them to locate the ripe fruit. After a while, I knew when the fruits were about to drop by the look of them and timing and would pick some from the plants before they fell off. The papery husks are removed before eating. The flavor is like a citrusy pineapple flavor (at least it was to me).

With the chair in this photo, it gives you an idea of the size of the plant. I didn’t really need to stake it. The branches did not flop over. A chipmunk discovered the fruit later in the season and I let him have his fill because I had eaten plenty of the fruit over the course of the summer, into early fall. It was one of the last plants I disassembled from my deck once the season was over. It lasted a very long time.

Interesting Insect

I noticed some holes in the leaves and discovered the culprit. This insect carries poop on his back – yup, as a camouflage. I cannot remember the name of it, but I know I looked it up last summer. I also sprayed something (again, can’t recall) but I also just tolerated the little buggers. They were tricky to find. They didn’t ruin the fruit, so it wasn’t too difficult to tolerate the weird looking insects.

Easy to Grow and Produces Fruit for a Long Time

This plant was very easy to grow. The fruit is very sweet, and I ate them as a snack when I would be outside watering plants, or whatever. They may be used in jams and such. I have tasted larger sized ground cherries from a farm once, they were about the size of cherry tomatoes, so I was surprised these were much smaller, marble sized. They have a seedy consistency inside as well, but I loved the flavor. It was an unusual plant as well as an unusual flavor. The packet indicates the fruit is ready 70 days from transplant. I still have some seed packets available if anyone nearby is interested ($5/pack). Each packet contains 50 seeds. I think they are worth growing. Kids like them too – since they are lower to the ground, they are easy for kids to pick up while out in the garden with you.

The botanical name for Aunt Molly’s Ground Cherry is Physalis pruinosa.

Thanks for visiting.

Cathy Testa
Plant Blogger
860-977-9473
Broad Brook/East Windsor, CT
See me on http://www.WorkshopsCT.com and http://www.ContainerGardensCT.com too!

Have a great weekend!

Growing Your Own Tomatoes and How to Start

Leave a comment

Growing your own tomatoes is one of the most rewarding things you can do if you love the flavor of fresh tomatoes. Each bite brings joy – seriously.

But where do you start?

Well, probably the first things are you need the seeds, and of course the growing supplies, but you also need to have an understanding of timing – when to start your seeds so they are ready in time for planting outdoors after frost periods in spring – so for us in CT, to make it simple, outside safe planting is late May (usually Memorial Day). Note: Areas of CT have different scenarios but in general, Memorial Day is usually when it is warm enough and induces great starts of your tomato plants.

I was trying to think of when I started my own journey of growing tomato plants from seed. I think it was spurred when I saw seed packets with artful packaging that I decided to buy some of those packets and get started studying and researching on the steps involved to grow them. I did lots of reaching online, got books, you name it.

I don’t think learning all the aspects of seed growing is necessarily difficult, but it does take some time to learn all the nuisances around seed growing. Like, for example, if you start sowing indoors too early, you will have plants too big and realize you can’t move them outside yet because it is too cold in early spring, then you are struggling with how to care for them inside. If you start too late, your plants may not produce tomatoes in time during the summer and you would be disappointed.

If you search this blog site, you can find more details about my process. Here are some links below.

Note: February is a good time to plan, because some tomato seeds are started in March.

When To Sow Seeds: https://containercrazyct.com/2021/01/29/when-to-sow-seeds/

How Many Seeds Per Packet: https://containercrazyct.com/2021/01/26/how-many-seeds-per-packet/

Easy Seeds to Sow are Lettuce Seeds: https://containercrazyct.com/2021/02/18/easy-seeds-to-sow-are-lettuce-seeds/

Seeds Arrived on Time: https://containercrazyct.com/2021/01/20/seeds-arrived-on-time/

All You Need to Know About Starting Seeds: https://containercrazyct.com/2021/01/15/all-you-need-to-know-about-starting-seeds-indoors/

Planning Ahead is Required If you Wish to Grow from Seed: https://containercrazyct.com/2019/02/21/planning-ahead-is-required-if-you-want-to-start-plants-from-seeds/

Tomato Seedling Stages: https://containercrazyct.com/2021/02/15/tomato-seedling-stages/

I probably have more posts about seed growing on this site, just type the word “seeds” in the search bar, and they should pop up. Or you may want to type in the word tomatoes.

I do all of my growing of the starter plants (grown from seed) in large grow bags, large patio pots, etc. But we do want a “real garden” of the ground here someday, which will be a big job because it will need to be fenced in. We have a river behind our house, and it attracts lots of wild animals, etc. I love container gardening and have been very successful growing tomatoes in pots – they just should be large enough pots and watered and placed in sunny areas, and oh yah, have drainage!

This year 2023 – some things are changing:

I have decided I am not going to grow my tomato plants – for those of you who buy them from me – read that again, I am NOT going to grow them. It has to do with the fact that I have a trip planned right when it is the most important time to monitor the tomato starter plants. Someone said, hire someone. Well, not going to happen. LOL. First, I’m too small to hire anyone really. It would be too expensive, and second, my babies (the tomato starts) need ME. And I would probably stress about it and not enjoy my trip. Things like watering, inspecting, checking for any critters, opening the greenhouse doors on good days, rotating, all of that takes time and I usually visit my plants twice a day when I grow from seed at the time I’ll be traveling.

So anyhow, I was browsing some photos of my tomatoes (the fruit) from last season, which made my mouth water, and caused me to want to share the photos so you have an idea of the seed packets I have in stock at this time. Should you be interested in buying seed packets, you know where to find me (referring mostly to locals who buy my plants typically). If someone wanted a bunch of packets mailed, ask and I’ll let you know. I also will give you additional information, like planting tips and guides.

Say hello to Goldie.

I grew this one for the first-time last year (2022) and wow, wow, wow. Goldie heirlooms have amazing flavor. Some who bought plants from me said it was the BEST one ever. It is an heirloom. Sweet flavor, melt in your mouth flavor. Because a squirrel or two discovered my plants on my deck in my pots, I did pick some early and let them ripen on my kitchen counter and that was totally fine. They know when they are ripe and take bites! So, a lot of times, I started to just pick them before they were completely Golden.

You can see in this photo of me holding one, it is not completely golden color yet. Heirlooms are cool, they have the odd shapes, and they are tasty.

Note in the background of the photo above are Long Island Cheese Pumpkins – I grew those for the first time this year with the help of my cousin who put some plants in her community garden. Mine were in pots. It has a shape perfect for my Succulent Topped Pumpkin arrangements in the autumn season, but they are also grown to eat in pies and soups. They must be direct sown or started early.

I have seed packets available for both – the Goldies and the Pumpkins noted above.

Fox Cherry Tomatoes above – These I have been growing for a few years. They are bigger cherries, noted for being able to easily put on a skewer to grill. Also, a popular favorite by folks, plus cherry tomatoes grow easily and produce tons of fruit. For beginners, try cherry tomatoes.

In this above photo, you see the Fox Cherry tomatoes next to some of the Goldie heirloom tomatoes as I picked them. And also in this yellow bowl is a Cherokee Purple Tomato. Also, a wonderful heirloom and early producer. Purple-hued, very nice coloring and as yummy as the best of them.

In the background, you can see some of the Ground Cherries (papery husk) which I also grew on my deck in a huge grow bag, wow, those lasted into the fall. They are a snacking one for me. I was grabbing a handful and eating away as I walked away. Those have a very pineapple like flavor. A chipmunk discovered my ground cherries and I let him have a ball with that, as there were plenty on the plant. Ground cherries tasted like a non-guilty candy snack to me. Interesting flavor and sprawls out as it grows.

Green Zebra – This one no one seemed interested in. I can see why – tomatoes with green and yellow patterns, but to me that is the fun of growing – trying new varieties! Just like vacations, I like to adventure to new places and see new things – same with my tomatoes, I guess. This one has a tangy like flavor and I love mixing colors and flavors so it was very cool one to try.

Tiny Tim Tomato – These fits small pots easily and are grape-like sized fruit, but last year, they grew larger fruit at times. We had a drought type year, and my plants went nutso producing fruit on my Tiny Tim pots in patio pots that were probably 10-12″ in diameter. I put the pots on high back chairs, so the squirrels or chipmunk did not bother them. Look at the clusters on these plants! They were filled big time last season. This one says to start early too on the packet.

Paul Robeson Tomato – I will have to locate the photos of this one but I also have packets available of Paul Robeson tomato seeds, they have a beefsteak size with amazing flavor and the fruit resists cracking. The color is orange to purple.

Bumble Bee Mix Cherry Tomato – I also have seed packets for these and will find a photo later to post. They are striped with yellow, purple hues, orange. Same size as Fox Cherry. Prolific producers as well.

For more information on the seed packets, just email or text me (see numbers below).

Also, remember, February is getting ready and then March is starting to sow “some” varieties, others start later.

Going to the Flower Show in Hartford this year? It starts on 2/23/23 which is next week, Thursday. That’s also a good time to get seeds or information packets – sometimes they hand out little seed starting charts for free. There will be plenty of growing supplies there to check out as well. Have fun if you go!

Thank you for visiting.

Cathy Testa
Blogger, Plant Lover
860-977-9473
DMs on Facebook under handle of “Container Crazy CT”
Texts on number above.
Also, on Instagram under the handle of “Container Crazy CT”
Feel free to email me if you want – I’m old fashioned and still use emails! LOL.

See my other websites too:

www.WorkshopsCT.com
www.ContainerGardensCT.com

What Will the New Year Bring?

2 Comments

I don’t know!

As I sit here on December 30, 2022, I really don’t know what the new year will bring. Every time I think things will return to normal, it doesn’t.

Hopefully the new year will bring “new” things! We shall see.

No Tomatoes in 2023

Bad news first – I don’t think I will be growing my tomatoes this spring. Boo! I know!! But a potential trip will be timed exactly when I would be tending to the sprouted seeds, and I just can’t leave them be when I’m away. Taking care of new baby plants is time consuming, a daily activity of checking and monitoring them, and since I work solo, I don’t think I can grow them in 2023. When growing from seeds, there is so much involved in the “daily nursery aspect.” I open doors, close greenhouse doors, inspect the plants to make sure they are healthy, I move plants, put some under grow lights, move some, I monitor them – sometimes twice a day to maintain just the right moisture, and then there is the potting up phases! That definitely will be an activity missed in 2023, but maybe I can use that time to do some repair work in the greenhouse since it won’t be filled with seedlings. On the plus side, I will be having some type of seed packet sale – so stay tuned if you like heirlooms.

New Offerings?

Sometimes I ponder what new activity could I add to my small business offerings. I know the “organic” things which come to mind spontaneously cannot be forced! It is like it has to happen naturally. Like when you are standing in the shower, and some idea just magically pops into my head. That is usually how it happens. Hopefully a new idea will surface. There have been many in the past, like when I got totally consumed in growing sprouts in the home, remember that?!

Continue Summer Watering Services

I know I want to continue my new “Watering Services” in the heat of summer when people travel. I took care of a few gardens for homeowners and also watered a community garden plots last summer. It felt good to care for plants while someone was traveling and knowing they could relax knowing their plants would be fine and especially because mid-summer is a big harvest month. You need to water at that time, and this service is on my list to continue in the summer of 2023. If interested, look me up next summer, and I will be sure to send out reminders as well.

Container Gardening, of course, will Continue!!

Container gardening is always number one and I will continue to install patio pots, planters, dish gardens, and more at specific sites as best as I can. I’m getting older so lifting is getting harder. At least with container gardening I do not have to dig in the ground but lifting bags of potting soil mix or lifting pots and nursery pots is a thing. I need to work on building up strength so I can continue my passion with container gardening. And knowing to take your time when lifting, using hand trucks and thinking it through helps a great deal so you don’t strain anything.

Camper Style

We bit the bullet and got a small camper last year and absolutely loved it – but only got to use it once or twice, so next year, we hope we can adventure with that more during our off time. Got a recommendation for locations you love in the US for camping? Let us know. I never imagined I’d be a camper girl, but the relaxation of it and not worrying about flight problems, well, that sold me and my hubby. So, for the fun list – this will continue between work.

Seasonal and Holiday Decor

I can’t imagine going thru the fall or winter season without continuing some of my creations, such as the Succulent Pumpkins and my Holiday Wreaths. They were so fun to make this past year, and I thank you again for all your orders. It was a fast-paced Holiday and so much fun to create and handmake all the wreaths, garland, etc. I love the wreaths I made for myself too.

But More??

What more could I do with my business? Got a suggestion? Let me know. I know people still, once in a great while will ask if I still do workshops, and I don’t. I just don’t know if I could do those again, but who knows, right? We really don’t know what the future will bring. However, my stamina for the work involved in workshops faded. It was almost like throwing a baby shower or mini wedding event at times, as I did a great deal to set it up and make it happen, not to mention managing all the plants before after and during. Anyhow, it was good when they were happening, but as I get older, I find it more challenging to organize and run the workshops.

Hopefully the new year will be good to us, and we will discover new happenings which make us happy. I know working with plants keeps me happy and cheerful.

Have a great New Year’s Eve and Stay Healthy,

Cathy Testa of Container Crazy CT
http://www.ContainerCrazyCT.com
http://www.WorkshopsCT.com
http://www.ContainerGardenCT.com
Located in the Broad Brook section of East Windsor, CT

First Fluffy Snow

Leave a comment

Yesterday was our first fluffy snow fall, which I have to admit, made me happy. I can picture the soft white snow on the items I made for many holiday orders this year at people’s homes, such as Kissing Balls hanging outdoors, Patio Pots filled with holiday greenery, Garlands, Wreaths, and more. The snow is also a great way to add some moisture to the greens on the wreaths and such.

The past two weeks were extremely busy. As a one woman owned business, with a very helpful special Elf Helper, my hubby, we did it – installed and created holiday scenes for everyone. Today, I hope to make a nice big Boxwood Wreath. I show all my photos on my Instagram page under Container Crazy CT handle.

I want to take this morning to say THANK YOU to all the people who hired me to work on their holiday scenes and patio pots, and also to all who ordered a Wreath, Kissing Ball, or Garland this year. It puts me (and hopefully them) into the holiday spirit. I finally got to do some of my own outdoor decorating yesterday a little bit before the snow started to fall. But it is a real treat and a special thing for me to create Holiday Items for people – THANK YOU AGAIN FOR YOUR SUPPORT – and pick-ups.

I also have to admit, I do stay inside a lot when people pick up their orders cause I’m so busy and can’t talk too long, plus I really really didn’t want to catch any colds or COVID during my work of holiday crunch time. But I find the “Pick-ups” are extremely useful and helpful to people when they are also doing their own rush holiday errands and they may pop by to get their handmade wreath with fresh greenery and other items quickly (Grab and Go!).

Next on the list is making some unique holiday pick-up gifts which are great for last minute shoppers, me included! I haven’t shopped at all yet for Christmas gifts on my own to-do lists. I never have the time in early December.

Hope you are enjoying this snow fall – it sure looks pretty from my office window – I can say that!

Sincerely,

Cathy Testa
Container Garden Designer located in Broad Brook, CT
860-977-9473
containercathy@gmail.com

www.WorkshopsCT.com

www.ContainerGardensCT.com

http://www.ContainerCrazyCT.com (Blog – You are Here).

My Mangave Shoots Up A Bloom

2 Comments

I like finding cool and unique plants for my clients’ balcony gardens every season, so when I spotted two rather large Mangave plants at a local garden center, I had to grab them despite the price. I was excited to plant them in two large upright planters and I asked my husband to take a photo of me standing right behind the planters.

Cathy Testa with Mangave in front planter

The mask wearing was on purpose, to show a timeline history of my plantings, and this had to be when masks for COVID were still required. Anyhow, I wore a pink mask and I loved how the photo came out. We were still required to wear masks at this time so I think it was 2020, or 2019.

Mangave is a Cross between Manfreda and Agave

I’m a big fan of Agaves, so when I spotted an article about the new Mangaves, which I read about prior to finding the only two available at a local garden center, it elevated my excitement of getting them and planting them as a unique and dramatic specimen at this location. I love the outlines of the plant, the speckling on the leaves (spines), and the fact it was not something commonly found at that time.

Here is some background information about it.

As stated in the article linked above:

Taking the best from both genera, Mangave have the accelerated growth rate, spotting and softer spines from manfreda, mixed with the durability and large architectural forms of agave. Mangave hybrids bring the potential of hundreds of new colors and habits not previously seen among agave in a product that’s more grower-friendly, with a quicker finish time and less prickly spines.

As the principal breeder of Mangave, Hans is the perfect source for the story behind the succulent, his experiences with the crop and how he sees it contributing to the world of horticulture.

https://www.growertalks.com/Newsletters/View/Newsletter/?article=3103

Spines are not weapons, like with regular Agaves

It is true, the spines are less prickly than typical Agaves. In fact, spines on Agaves are so sharp, they could be used as a weapon! And the spotting patterns on these new Mangaves are very interesting on the spines, and it has a wonderful architectural form, and yes, they grow fast! My two specimens were already rather large so I knew they must have been growing somewhere at a growers for a while before making it to a local garden center in my area to be offered for sale. In fact, when I spotted them at the garden center, they were sitting on the floor in their large nursery pots under a bench, as if almost hidden from sight, near other succulents and cacti. I lifted them into my shopping cart at warp speed, let me tell ya. I knew I had to have them.

They served as wonderful candidates all summer long at the clients’ site, and I think the only downfall to these plants is the spines are extremely flexible and soft, thus with one bump, the tips break off. I don’t like that aspect because it feels like a break to the overall form and architecture of the plant, so they are somewhat difficult to move, especially when you are moving plants up to a high-rise, but the effort was worth it. When moving them, use caution to not break any of the spine tips when possible, as I did the more I experienced observing, growing, and using this plant. It turned out to be more useful than I had expected.

September 21

In September of 2021, I noticed a bloom coming up on one of the Mangaves, which I had returned home earlier from the client site. Sometimes plants are taken back, and in this case, one of the Mangaves at the client’s balcony had started experiencing growing issues, so I took it home, inspected the roots, and sure enough, there was some type of pillbug in the soil. Because I cherished this plant, I removed all the soil and repotted it in new fresh potting mix that is well draining and more on the coarse side. Agaves typically don’t like wet soil, and I suspected the soil was probably wet prior to even planting it. I watched it for a while outdoors to see if it would improve, which it did, then in the autumn season, before frost time here in Connecticut, I moved it into my greenhouse. It was around that time, in September, that it suddenly started to shoot up a bloom stalk.

A Bloom Stalk Surfaces in 2021

When the bloom started, I was super excited about this and posted a photo to my Instagram feed (seen above). As some plant people may or may not know, Agave plants do not commonly flower. Some will bloom after several years, while others may take as long as ten years or even a hundred years to produce a bloom; this is why Agave plants are referred to as century plants. And the flowers will grow on the tip of a very tall stem, solo rising up from the middle of the plant, and the stem/stalk will grow super tall, reaching for the skies, or in my case, reaching for the ceiling of my lean-to style greenhouse. Knowing this, I was pretty excited to see how long it would take the flower stem (referred to as a candelabrum or wand for Agaves) to grow and how high it would reach in my greenhouse before it would produce flower buds. The stem (or wand if you wish to think of it that way), has no leaves on it and to me, it resembled an asparagus stalk.

Photo Taken As It Kept Rising

September 27

Within 7 days, you can see from the next photo how much the stalk rose from the center of the Mangave. It was growing up, and every day, I’d walk in to take a look, and I started to have to move it around because as it got taller, it was reaching the lean-to style of the greenhouse’s roof. I wondered if it would soon hit the ceiling.

Mangave flower candelabrum or wand

It got to the point, the stalk was so tall, I couldn’t get the whole thing in a photo. Here is a photo (above) where I moved it in-front of an old silver locker I picked up at a vintage shop, and it was about as tall as that cabinet by this point. As you can see, it definitely looks similar to an asparagus stem.

Very Top of the Stalk

Then the next phase was starting to reveal. Side shoots on the top started to form with flower buds. I knew I was in for a big surprise soon. And fortunately, the very tip of the stalk was not touching the roof of the greenhouse. It appeared I had just enough space to keep it inside for the rest of the winter.

Flowers Opening

The flowers started to feel like a fireworks show to me. That is just how my mind works when it comes to nature’s surprises. The flower clusters started to form to the sides of the main cluster on the top and as they opened, pollen was visible and I thought it was a shame as it would not be pollinated inside my greenhouse during the winter months, but just the same, it was a fun experience to witness all the buds opening over time.

By December, 3 months after I first noticed the stalk rising from the center of the plant, it had buds and the stalk was about 10 feet tall. In reviewing some of the posts I was sharing, around December 11th, it was 6 feet tall. Later in December, it grew to ten feet. By the following spring, I decided to chop off about 1/3 of the stalk and it was time to get it out of my way so outside it went. I put it on my deck, and to my surprise later in the summer, more side plants formed at the top of the plant’s flower stalk (where I had cut it off). It also produced many pups on the sides at the base of the plant, which I decided to use to top off my succulent pumpkin centerpieces; it made a nice spikey looking thriller on the top of the pumpkins.

Mangave used on the Succulent Pumpkin Centerpieces

This plant ended up surprising me in many ways and kept on giving. It did not die off as some plants do after flowering for Agaves, and retuned to my greenhouse yet again this fall. Not only that, I repotted some of the pups earlier, and they grew rather quickly into larger plants (as noted by the breeder above, Hans, they grow quickly).

Agave and Mangave plants make wonderful specimen plants, are beautiful in larger pots, and they handle full sun and don’t require lots of fertilizer, and they may be kept inside the home over the winter, if not too large, or if they haven’t grown a major flower stalk of 10 feet tall, and they over winter well in a low-temp greenhouse too from my experience. It is pretty cool when you start off admiring something and witness many returns and uses which were unexpected, like how I used them on my succulent pumpkin centerpiece creations this season.

I like collecting various Agaves and now Mangaves and will continue to do so. I find they are easy care plants and you can obtain various sizes and styles if you keep your eyes open for special finds!

Cathy Testa
Broad Brook, CT
860-977-9473
containercathy@gmail.com

Date of Post: 10/26/2022

Overwintering Elephant’s Ear Plants

5 Comments

Overwintering Alocasia (al-oh-KAY-see-uh) plants, dug up from a large cement planter in my yard yesterday 10/11/22.

Since this plant is not hardy in my Connecticut planting zone (6b), they must either be dug up and stored (tubers) in a cool, dry place. Alternative options, if the plants are small enough, is overwintering them as houseplants in small pots where you have a sunny room. Or just moving the pots with the plant in tact into an unheated basement and letting them go dormant, but check to add moisture to the pot’s soil from time to time, and check for any insects on the foliage if moved in the pot. In this case, I dug up the plants, removed the foliage, and air dried the tubers yesterday outdoors.

The Planter – Cement

Because yesterday was sunny and warm, I wanted to get to the elephant’s ears in this planter. I was already tired from being on my feet all day, so I rushed getting these out. Luckily for me, the soil is super soft in this big cement planter due to worms and just great healthy soil. Rather than cut all the foliage off first, like I typically do, I dug around the tuber areas in the soil to break free some roots and just pulled them out one by one from the plant stems.

10/12/22 Before Removing the Elephant’s Ears plants

The soil and exposure

The soil in this planter stays relatively moist and receives the east morning sun, so it primarily gets partial sun or dappled sun, it doesn’t get too hot in this area. I do not fertilize – literally – I do not in this cement planter. Over the years, I’ve added recycled soil (from other pots), maybe some compost, but not often, and it is possible some wood ash from the woodstove in our basement, that is used only occasionally, was tossed in there by my husband, but I asked him not to do that after a while (wood ash changes the pH of soils). It is apparent when I dig in the soil, it has worm castings and the soil is very soft and easy to dig into. This is why I was able to pull out the tubers with the plant on the top rather easily after I broke the roots around the base with a trowel. I didn’t even use a shovel.

I do, however, water this planter by using a garden hose from above and showering it every time I was out there watering my other patio pots above on my deck. We had a very dry season this summer here in Connecticut so I’m sure the tropical plants in this cement planter enjoyed the moisture I gave them. These tropical like plants like moist soils, part shade or some full sun. After getting them out, I laid them on the ground and got my machete, which I finally found where I had stored it!

Chop off the foliage, then lay in the sun

It was super easy to chop off the foliage and stems with my machete. One whack and it was done! Then I put them in a laundry basket to sit in the sun for the rest of the afternoon, later, I moved the laundry basket to my basement. It will sit there drying a while before I move them to bins or paper bags for the winter. Some references will say to wait until the foliage dies back or wait till the foliage is hit by frost to dig and store the tubers, however, I like to work on nice days and yesterday was it – sunny and warm. I store mine in the basement, in a corner by the door, which is an unheated basement but it does not go below freezing in winters. We have a woodstove at the other end of the basement, but it is only used on stormy winter days when we feel like it. We do not use the woodstove to heat the house, only to warm it up sometimes. This means those tubers in the corner stay cold, but they never freeze there. It must be cold, but not freezing, and not too warm either. If warm, they may get soggy or start growing.

Side Shoot on Right

Notice my logo on the left side of this photo above; do you see the brown original tuber? The plant this season grew from the side of this tuber (a side shoot) which is attached on the right. Sometimes there are smaller side shoots which you may pull apart to create separate plants and replant those side shoots. Also the green parts above the brownish tuber is this year’s plant and I cut it about 4-5″ above the brown tuber in most cases when I remove them. I usually leave the green plant (like a stump or root base) on there but I am not absolutely sure that is required, because when I received the tubers, there was just the brown dry tuber to plant.

After Photo

It probably took me only a half-hour to get those elephant’s ears (in this case, Alocasia macrorrhiza, known as giant elephant’s ear or giant taro) out of the cement planter. I was lucky I think it was easy. I know rain is coming tonight and some parts of Connecticut got hit by a quick light frost already, but no hard frost here yet in East Windsor, CT. When it is a true frost, all the foliage will blacken and flops over. Next is to get to those tall Canna lily plants on the ends of this planter dug out and store the rhizomes or the whole root base.

Note: A. macrorrhiza is hardy in zones 8-10 from what I’ve read, but here in Connecticut (zone 6b for me), they are not hardy (will not survive in the ground over the winter months). Also, when I dug these out – there was no rot on any of the tubers, which is good news. Sometimes, if I wait too long to dig these out, there may be rot spots on the tubers because of cold, wet soils later in October. This is another reason why I like digging them out now. I don’t want any soft rotten spots on the tubers, rot only leads to storage problems as the rot may continue on the tuber, which is what you don’t want.

Sit to dry out a bit more before storing

Because these plants get huge and are gorgeous, I had to take the time to save them. I will let those tubers sit in a bin, spaced out for air, probably for another five days before I store them. I have always typically stored them in peat in bins with air holes in the lids, but last year, as noted on prior posts, they rotted a little. I am going to try storing them in paper bags in cardboard boxes this year with air holes. Plastic bins can trap moisture and for some reason, it just seemed they were too wet last year (maybe I was rushing too much last year, and stored them too wet). I have found when my rhizomes for Canna Lily were too dry stored, they didn’t make it. I have always balanced a bit of moisture from the peat and air, but I believe the Alocasias prefer more on the dry side. Everyone has different techniques for storing from what I’ve seen and read over the years.

Prior was making pumpkins

Prior to doing all of this quickly yesterday afternoon, I made a few more orders of my centerpiece succulent topped pumpkins. They were so fun to make and took me a few hours – and my feet give me a hard time, now that I’m getting a little older, standing for hours can be rough. I even put foam on the floor – below my feet, but I felt it later. I tend to make these centerpiece arrangements standing up, and anyhow, these are what I made for some requests. It was a perfect day to do them – sunny in the greenhouse. It’s that time of year when I’m making pumpkin centerpieces and still putting away plants and supplies.

Succulent Topped Pumpkin Centerpieces by Cathy Testa of Container Crazy CT

If interested in a custom pumpkin, now is the time to order since it is pumpkin season. They last for months!

Thank you for visiting!

Cathy Testa
Connecticut Zone 6b
Container Gardener and Plant Enthusiast
Custom Creations for Seasonal Decor
860-977-9473
containercathy@gmail.com
www.WorkshopsCT.com
http://www.ContainerCrazyCT.com (you are here now!)
www.ContainerGardensCT.com

Stay tuned for more information on holiday creations for later in November!

Date of this post: 10/13/2022

Overwintering Alocasia 2022

1 Comment

This is part one – showing my process of disassembling my largest elephant’s ear plants from containers or planters. I purchased the tubers in 2019 for this Alocasia, which I refer to as an “upright elephant’s ear” because the leaves point upwards towards the sky. It is often referred to as a Giant Elephant’s Ear, Giant Taro, or Upright Jumbo). Official name is A. macrorrhiza. They grow from 71 to 96 inches (6-8 feet tall) from summer to frost and prefer partial shade. The leaves are very dark green, glossy, and impressive! It prefers partial shade but will do well in more sun with appropriate moisture. In my zone, it must be stored, but warmer zones, I suspect you may keep them outdoors or protected somehow.

2022
Cathy Testa holding two of the leaves

As you see here, I’m peaking behind two of the leaves. The leaves are at least 3 feet long with the stem an additional 3 feet as well. They tower above me in my planters and put on quite the big tropical show in summer. Now, on to how I disassemble them in preparation for our Connecticut winter months:

Definitely Wear Gloves

TOOLS

Gloves: Definitely wear garden gloves. These plants release a sap that will make your hands itchy – believe me, I regret when I don’t wear them. Even digging around the soil, I found my hands will itch later.

Hori hori knife: I really like this tool, heavy duty, serrated edge, perfect for cutting the roots in the soil around the base of the plant to release it. I find this to be one of my most useful overwintering tools.

Bin: A clean bin to put all the tubers and root bases in to let dry outside if it is pleasant weather, or inside if it is rainy.

A Large Kitchen Knife or Machete: I couldn’t find my machete, so a long, clean, sharp knife is a great back up.

Clean Up Tools: A leaf blower works to blow away dirt that will fall everywhere.

Ruler: Yes, measure those babies!

Large Knife

Cut away all the foliage by using the knife to slice each stalk off individually at the base of the plant. The main thing is to cut away from the plant so the angle of the slices are able to drain away excess moisture. At least that is how I do it. I’m also very careful to not nick surfaces with my knife tip – always avoid any damage while I work.

Slicing off each leaf at the base of the stalk (petiole) – stem – whatever you wish to call it!

As you slice off each petiole at the base, be sure to do a clean cut, avoid tears or anything which would allow entrance of mold or insects later on. A clean cut is recommended. If you mess it up, cut it again below where you just cut it.

Measure the leaves cause it is impressive!

I always measure so a ruler is handy, or measuring tape, and then take photos. Because sharing is caring – LOL. Everyone loves to see how massive these leaves get. It is fun to Instagram the photos!

Here are two of the biggest leaves above. It is too bad I am not set up to make leaf castings of these babies, they would make impressive art for the garden!

Close up of Slice

As you can see, the slice is downwards and away from the center of the plant. I slice each stalk individually and pile the leaves to the side.

All leaves removed

After removing each stalk, I use my Hori hori knife to cut around the base of the “stump” in the soil. As I push the knife around in the soil, I hear the crack of the roots being cut. Then I will push on the stump back and forth to help loosen it. Once I feel it is ready to be “delivered” from the soil, I start to pull it out – It always makes me feel like I’m a doctor delivering a baby – hahahaha. I have quite the imagination at times!

Cutting a circle around the base of the plant to cut the roots below
Out with more top sliced off

I will put it in the clean bin and trim the roots with clean sharp pruners or cutters, and slice the top off a bit if it still too big to fit into the bin. Leaning it upside down, or on the side to help drain excess moisture is helpful as well. Some folks may recommend not trimming the roots but I always have. New roots grow when it is replanted. My theory was less “fleshy” material the better. Fleshy material has the tendency to rot sometimes over the winter months.

After I got the massive big base out and laying out to dry, I worked on the planter next to it which had more off sets from the same type of Alocasia. I then let this dry in the house for about 6 days. Oh, I also removed as much soil as possible from the tuber areas. I used my gloved hands and kind of just rubbed or pushed off the soil. You may use a garden hose with water blast but that will only make the tuber wetter, so I didn’t do that. In the past, I have used a soft painters type brush to get soil off.

TIMING

In Connecticut (my planting zone is 6b) you may do this process either before or after we get a fall frost which could happen anytime now, but sometimes I like to start this while things are dry and temperatures are not too difficult to work in, so I started on these two planters last Thursday (9/29/22). It was a cool, breezy, day with little sunshine but that would be better than the rainy cold days expected the days following. The date if this post is 10/4/22 and no frost yet, but there are some talks it could happen this weekend, I hope not, cause I have lots more to do!

I placed the bin in the house for a few days and then moved it to a table in my basement. The next phase is storing them. For years, I stored all my tubers, rhizomes, corms in peat in bins with air holes drilled on the tops. But this past spring, I had rot on portions of my tubers. This year, I plan to store them dry in paper bags for some at least. I will most likely test the paper bag process and see the results. I will post photos of this soon. I also saved some mesh netting bags (like those used for Avocado’s in grocery stores) to put some tubers in.

Oh, when I took these apart last week from the gray planters, they had NO ROT anywhere on the tuber areas (brown area at the base) which is good news. No rot means they won’t have rot as they dry for a few more days. When I store the tubers, I will share it here as well.

The tubers need to be sored in a cool, dry place. I use my basement which does not drop below freezing but is unheated so it stays cool. It is recommended that you do not store them in plastic bags which would only trap moisture. If stored in a paper bag, make sure it has holes for vents. Again, for years, I stored them in peat moss in bins, but had rot issues this year in spring, and I didn’t want to loose these tubers of this super big Alocasias, now that I’ve regrown these plants each year. These particular tubers were from 2019 so it has been replanted 4 times now. A definite pay back from the investiment!

PLANT IN SPRING

Next year, after all danger of spring frosts, I will replant these Upright Elephant’s Ear tubers to grow again. Many tropical loving plants may be handled this way, such as Canna Lilies. For years, I stored my big red banana plant, Ensete, the same way as shown above. In fact, here is the link to the Ensete post if you are searching for it on my blog site: https://containercrazyct.com/2013/10/31/storing-my-big-red-banana-plant/. Unfortunately, I lost my big red banana plant this year in 2022. It was the first time it rotted too much.

NEXT OVERWINTERING PROJECT

Ack, I have to dig all of these up soon – anyone want to come help me?!

Canna Lily on ends with Upright Alocasias in the centers

Cathy Testa
Connecticut
A Container Garden Designer
Also make custom orders, grow tomatoes in spring time, make succulent pumpkins now in fall season, wreaths during the holidays! Thank you for visiting and your support.

DIASSEMBLY ALOCASIA QUICK STEPS:

Get your tools ready (knife, gloves, bin, hori hori knife, cleanup tools, etc.).
Cut away each leaf stalk at base cleanly.
Cut around base of plant in the soil area to break free roots with hori hori knife.
Pull out stump (base with the tuber) out of the planter, and let dry for several days to a week.
Store in an unheated, dry, cool area that does not go below freezing in winters.

Goldie Tomato is Staying on My Growing List

Leave a comment

This is the second year I grew Goldie Tomato plants from seed and I plan to keep it on the list. Those who purchased the starter plants of these this year have all reported they are one of the best tasting golden heirlooms they’ve had and I couldn’t agree more.

Beautiful Heirlooms

These heirlooms have the most perfect golden yellow color with no blemishes on the skin and grew from baseball to oddly shaped almost grapefruit sizes (or perhaps a bit smaller than grapefruit sizes).

Size of the Goldies

I like using the terms of other fruits and veggies to explain the sizes of my tomatoes. They do not get as big at the Oxheart tomatoes which I have grown in years past however (which were up to 3 lbs and a soft pink color when ripe and up to grapefruit or larger than grapefruit sizes).

In my container plants at home, my Goldie tomato fruit grew to about baseball sizes but friends showed me pics of theirs’s which were much larger – and shaped like the typical heirloom odd shapes where the tops may be bumping or ridged, and odd looking.

Goldie Heirloom Tomatoes in 2022

In the photo above, with 3 Goldie tomatoes in a bowl at my house, this shows the size but they do grow bigger. The are sweet golden, melt in your mouth flavor and texture. These are the type we easily sliced, put a tiny bit of salt on, and ate with a fork right to our mouths from a plate! Not even on a sandwich! So yummy.

Picked Early to Ripen in House 2022

In this photo above, you see what I try to explain about the bumpy ridged look of some of the tomato fruit of the Goldie (typical of many heirlooms). I picked this set early because I was going away for the weekend so I didn’t want the chipmunks to get them. They ripened very easily on the kitchen counter and I took a few with me on vacation too to eat while away.

Skins are Perfect

Perfect Firm Skins

One of the things about this tomato which impressed and impresses me is the fact the skins are perfect. They are fleshy inside but the skins remain smooth and firm. BTW, this is an indeterminate variety so they need staking, support, twine, whatever but the fruit hangs on tightly. The plants grow very tall, up to 6 feet, and I use twine to train them from my containers up to house light fixtures on my deck. They are considered a beefsteak fruit size, and will get soft to the touch somewhat if you allow them to ripen to a more orange color. However, if just placed on a counter, they seem to just retain a firm skin and never really bruised, etc.

Starting Seeds

I was a little worried when I saw a tad bit of brown on the bottom of the tomatoes in this photo above, but they did not get blossom end rot – thank God! The seeds are started indoors in my greenhouse about 6-8 weeks before our last frost date in CT and I then harden off the plants for my pick-ups by mid-May. If you think you will be interested next season, be sure to note my email and let me know to record your name. See below for more contact information.

Goldie ripening on the plants 2022

Every season, I try to add new varieties to my tomato growing list. I cut back on the number of plants I grew this year, only because the cost of all supplies and such have gone up, so I thought, try to restrain myself. That is not always easy to do when starting seeds.

Pretty Color

These tomatoes are very pretty in color – and I like mixing colors when making an appetizer with tomatoes so this one definitely added to the artists’ palette of beautiful sunny colors. For example, slicing and laying them down on a pretty plate with purple toned Cherokee Purple tomatoes was just lovely and made your mouth drool just seeing the colors and textures.

My husband joked with a friend about how I coddle my tomato plants when growing from seed. What he means is I’m constantly inspecting them, checking at least twice daily for watering needs, and looking them over. Scouting for any problems is one of the most effective management techniques of anyone growing tomatoes from seed. It allows you to catch any potential problems before they get worse. It may seem easy but there is lots of time that goes into caring for the seedlings from seeding them to watching them grow. I make sure to give air circulation, water as needed, inspect, and admire – and I guess my husband calls that “coddling.” Whatever, it means, I can assure you that man LOVES my tomatoes and he usually asks now if he may eat one because sometimes he eats them all before I get a chance, so now we have “tasting sessions.” After tasting the Goldie tomatoes again this year, we both agree this one is a keeper to grow next season.

Cathy Testa
Located in the Broad Brook section of East Windsor, CT
containercathy at gmail.com
Plant Blogger, Very Small Tomato Grower, Container Garden Designer and Installer, Holiday Creations with Plants, Plant Enthusiast, and basically a “One Woman Owned Small Business.”

UP NEXT IN OCTOBER!

Next on the list will be making Succulent Topped Pumpkins in early October by order. Here’s a reminder of what those look like.

For more information on my tomatoes or other items, see www.WorkshopsCT.com too.

Helping an Upright Elephant Ear Plant Stay Upright

9 Comments

When I saw that my biggest of my upright elephant ear plants was leaning to the side, I was very concerned because of a strong windy rainstorm predicted to arrive in Connecticut last Friday (8/26/22).

I decided to water the soil deeply in the planter even though we were expecting lots of rain with this storm because I felt the wet soil would stabilize the planter better and help to prevent it from toppling over. Then I kept my fingers crossed.

The day after the rainstorm, I looked it over and it was fine. It did not topple over but it was still leaning quite a bit and I had to think of a plan to stabilize it and help it grow upright. This was the first time I ever had to do this with an Upright Alocasia elephant ear plant, but luckily an old belt came to mind and I had some rebar available. This is what I did.

Helping an Upright Elephant Ear Plant Stay Upright

I’m not sure why I decided to plant the largest of my tubers in the smaller planter anyhow. I think maybe I was considering that it will grow very tall in smaller planter, and the taller planter would look nice with the huge elephant ear leaves sitting on top of their long stalks next to the lower planter to the side of it. Next year, I will make a note to plant it in the larger of the two planters I typically use each season for these Upright elephant ear plants. The rebar and belt seems to be working as a splint of sorts. As you can see from this above photo, the base of the plant is super thick and becoming heavy. I also remember, I probably didn’t plant the tuber deep enough. I was concerned about some rot experienced when I took them out of storage this spring.

Taking Out the Tubers From Winter Storage

Every year, in spring, I take out my elephant ear bulbs/tubers from the basement where I overwinter them in plastic bins (with drilled air holes in the bin covers) in peat. But this year, some tubers were damp and even parts were starting to rot. This has never happened before in the 10 plus years I’ve stored the tubers, bulbs, rhizomes, etc. of various tropical plants (Canna Lily, Elephant Ears, Red Banana plants, etc.) over the winter months here in CT. The basement stays above freezing but it does not have any heat so it stays cold enough usually to keep all the tubers in a dormant state.

Why did they go soft this time? I don’t get it – is it climate change, did the basement stay warmer than usual, it is because I stacked the plastic bins on top of each other (in the past, there was a shelf there and I stacked the bins on shelves), or was it the peat I used, which was a different brand? Maybe it was COVID. I decided COVID must have changed the whole pace of life? Did someone steal my green thumb?

Anyhow, I found the tubers of some of my upright elephant ears (the largest of the elephant ear type plants I replant every season) which were plastic bins inside plastic mesh bags (similar to what you may see in a grocery store) and laid “on top” of the peat (rather than in or buried in peat), did better. Maybe these types of elephant ear tubers are better stored dry? But some of those even had rots spots but not enough to not use them. I decided to cut off some rot spots and go for it.

Timing of Over Wintering Tubers

In thinking about it this morning, I remembered now, I decided to dig up and store the tubers from the plants on my deck a little earlier than normal, around mid to late September, in order to get a head-start on my various plant related tasks and work. Maybe I stored them too early? It is often recommended to wait till the plants get touched by frost and then take them down to store. This usually means the tubers will sense the cold temps and cooler soil, and go into a dormant state. Thus, this year, I will wait till October to pull the plants from the planters, chop the foliage off the top, and store the tubers. And I also will keep them more on the dry side for this particular type of elephant ear plant, as I wish not to risk loosing them again.

2022 Photo

Precious and exotic large lush plants

If you were to ask me when I started to fall in love with big plants, I am not sure I can remember when – it was years ago. In fact, when I went on my honeymoon over 31 years ago, I was fascinated by the big lush foliage of the tropical like areas of the Hawaiian island(s). We even ventured off a long, dirt road once and found a tremendously large elephant ear plant and people accused me of photoshopping the image. I stood next to it and was in awe, not afraid of snakes or whatever might be lurking below my feet!

2020 Photo

Reusable Year after Year

Another wonderful feature of using tropical plants (not hardy to CT and must be stored in winter), is the fact they are used year after year. With having good luck with my storage technique for so many years, it baffled me as to why I had some back luck with storing them this year (i.e., the rot spots). Anyhow, the photo above was when I planted the same bulbs/tubers in 2020. I think I had purchased the tubers of these in 2019 or 2018. They are also super easy to care for once they start growing in the planters outdoors, with relatively no problems, and with this year’s tropical heat all summer, they loved it. They tend to get the most full and larger by this time of year and into the fall season. Another bonus to growing them is they last all the way till end of October. BTW, they do get flowers and I successfully grew one plant from seed I collected last year. I made a baby from the seed of this plant for the first time ever. I’ll write about that some other time.

Taking Care of Them In-Season

I pretty much do nothing more than consistently water the elephant ear plants in their patio pots and containers, as they do appreciate good moisture. I also will cut off any bad leaves (because I don’t care for ratty looking leaves), and I might do a water soluble fertilizer application once or twice a season, but often times, it is not needed. I put slow-release fertilizer into the potting soil mix in the spring upon planting as well. In most planters, I use fresh potting mix for planters, but in really big planters, I usually remove the top of the soil portion and add fresh soil. I also fill the base of the planters with foam sometimes to reduce soil usage if it is a super large planter. This also helps reduce the weight of the planter if you wish to move it around. And most importantly, I admired the plants often which I think they notice.

Where to Place Them Outdoors

One side bar, be aware if you plant these big leaves next to any pointy tipped plants, such as agaves or cacti, as I did once, realize that as the leaves of the elephant ear plants move around in the winds, they may bang against the agave leaf tips, causing holes and damage to the elephant ear plant’s leaves. But other than that, you want them placed where they are showy, do not lean like mine did this season, and anywhere there is dappled sun or part-shade. They can also take full sun but more watering is required. Some days, during the heat waves this 2022 season, I opened a shade umbrella next to the planters to offer some relief of the late day sun, however, even that became an issue because the leaves got so large and tall, the umbrella was hitting the leaves as I opened the umbrella. A larger planter is best because of the shear size of the plants. My planters are hip height and the plants are towering over my head now at probably 6 feet tall with 3 feet wide leaves. It is magnificent.

Years prior – Stunning Photo taken by a Pro Photographer

Storing Technique for Winter

As I’ve written about several times on this blog, I typically store my bulbs, tubers, rhizomes for various tropical plants in low-level bins with peat slightly covering them, but I will adjust my process for these Upright Elephant Ear plants. The bulbs get larger over time and the bigger the bulb, the bigger the plant. Often, you will find side shoots forming, as I showed in a prior post when I separated them before. Here’s a photo from last year when I took the plants apart. Unfortunately, I lost some of these due to the rot situation I noted above. I document the whole process every year, so you may use the search bar on the right side of this site to locate past writings of how I store them.

I look forward to using these plants every season. I wish I could plant them on the high-rise balconies I service but they would bounce around too much in the wind up there, and require lots of water, especially during hot drought seasons, so they are not feasible there. If I could I would totally surround my yard with these big leaved showy exotic looking plants, I would. They make me think of escaping to another place, another world, and don’t we all enjoy that from time to time? Plus my cat loves to sit under the shade cast by the big, sometimes huge, showy leaves of these upright elephant ear plants. Cute thing – my 5 year old nephew told me he could see the leaves growing on them when they were moving in the winds, which I thought was so adorable. Maybe he will become a plant lover like me!

Well, that’s all for now. I hope you find this post amusing. When I take these plants down for the winter, later in October, I will be sure to show my process as I always do. And hopefully I won’t have any scares next spring like I did this spring. I actually lost the largest of my red banana plants this season. It was too rotted to plant and I had to bow my head and think, “Whelp, you gave me many years of happiness. Guess this year was just one of those gardening learning experiences, yet again!”

Thank you for visiting,

Cathy Testa
Container Gardening Fanatic
http://www.WorkshopsCT.com
http://www.ContainerGardensCT.com
http://www.ContainerCrazyCT.com
Located in Broad Brook/East Windsor, CT