

The FIVE MUST DO’s for Successful Container Gardening
4 Comments
Images courtesy of FreeDigitalImages.net. (top left to right: Zirconicusso, Criminalatt, and Marin. Bottom: James Barker and Simon Howden photographers)
A new page has been added to this blog where I share with you The Five Must Do’s for successful container gardening.
In all my container gardening talks, I go over every one of them and why they are so important – but now you can read them HERE on my blog.
You will find if you do all five, your container gardens will thrive, look amazing, and make you extremely happy.
So often, people will skip one or more of the steps, and they wonder why their plants are not doing well or growing poorly. Once they follow my 5 MUST Do’s, they never look back again because their plants will thrive and grow so well. Doing The 5 MUST Do’s is – well, a must!
Hope you enjoy the new page, accessible from my top menu bar under CONTAINER GARDENS.
Stay tune too – more tips are on the way.
Thank you,
Cathy Testa
A Frosty Start to October 26th in Broad Brook, CT
2 CommentsAnd my plants felt it!

On the evening of October 25th, we received a drop in temperature around midnight, and it was only in the low 30’s around 6:00 am the next morning. In fact, when checking Timeanddate.com, it reported the lowest temperature at 32 °F on October 26 at 5:53 AM. That’s chilly. And my plants outdoors felt it.

Birdbath frozen with fall leaves
So when I went outside around 8:00 am yesterday morning, it did not take long for me to realize I would need to go back into the house to get a felt hat, warm gloves, and heavy wool top to do my work of the day, which was taking down my big red banana plant in my large cement planter along with various elephant ears and Canna plants.

Elephant Ears and Other Tropicals Curled up
All of my tropical plants remaining outdoors were drooping downwards and heaped over from the effects of getting hit by their first frost of our autumn season. And other plants had white and feathery frost patterns on their leaves.

Annual Thunbergia, a Blackberry plant, and Castor Bean
Some leaves looked as if dew had frozen in time. Tiny balls of clear ice could be seen on the undersides of the curled up leaves of elephant ears. This was the pretty side to the frost on some plants, perhaps the only pretty side. While other looked just horrible – particularly my tropical plants which can not survive below freezing temperatures.

Mojito elephant ear curled up with crystals
They were all curled up, wilted over, and turned mushy overnight. Liquid within their plant cells froze into ice crystals and ruptured. This damages and kills the top part of the plant, but the underground storage organs, such as rhizomes and corms, can be stored over the winter. Unfortunately for tropical plants, they do not have a way to protect themselves to survive frost. However, their underground storage systems go into a semi-dormant state immediately, and can be moved to a cool but above freezing location over the winter inside the home.

Seed pods of Castor Bean frozen hard

Gazing ball with Mandevilla blooms and foliage
Thus, it was definitely time for me to get the rest of my tropical plants stored for the winter season by digging up the underground storage organs or root balls and putting them away carefully. I could not put this process off any longer. It would take most of the day and I managed to get it all done.

Canna by house not as bad as others

Ipomoea, elephant ears
Written by Cathy Testa
P.S. Stay tuned. I will be sharing ‘how to’ overwinter tropical plants, but in the meantime, visit my HOW TO VIDEOS page to see some tips and tricks.

Holding a leaf and cut off top of my red banana plant.
New Page: Container Garden Pot Types
Leave a comment
Photos by Cathy Testa
Do you ever wonder if a particular type of container garden pot is worth the investment or how it helps or harms the growth and habit of your plants? On this new page, I share my experience based on my use of various pots over the years. See Container Garden Pot Types listed under the Container Gardens page on the top of this blog.
You will find terra-cotta, wood, concrete, and more listed and posted routinely. There are so many choices and the options are limitless. Containers are the shoes to your plant’s roots. And roots remain healthy and strong when growing in the right environment.
Containers and patio pots hold the soil and moisture, but the type of material from which they are manufactured can vary the temperature, water retention levels, and evaporation rate – so knowing a bit about the pots’ impact can help you make decisions on what to use for your plants. You will want to also consider the size, drainage capability, durability, and overall look of the container or pot you select.
Finding a pot to suit your home’s exterior or interior is also a consideration. There are many styles, colors, and sizes to choose from. When you select the type to fit your decor, it results in an even more impressive display for your plant combinations. It all starts with the pots.
Written by Cathy Testa
New Page: Troublemakers Turned Stars
Leave a comment
Photos by Cathy Testa
We all know everyone has a good and a bad side, and so do plants! Thus, I’ve added a new sub-menu to my blog called Troublemakers Turned Stars. Visit this page and my Pinboards to see more images and photos of the plants discussed. If you have questions, just let me know – I’ll share my plant experience to date with you – or perhaps you have a story to share how the plant caused you some trouble in your gardens or landscape. But the point of this information is many plants which are troublemakers in the garden have the opposite effect in container gardens and patio pots. They turn into star performers – so why not use them to capitalize on their bad side? You will be amazed how useful and attractive they become.
PETASITES

Photos by Cathy Testa
WISTERIA

Photos by Cathy Testa

Photos by Cathy Testa
BAMBOO

Photo by Cathy Testa
See my Page, Troublemakers Turned Stars, to read the details, why the plants are problems or a nuisance in the garden, yet turn into star performers in container gardens and patio pots. More will be added routinely to keep you ‘posted.’
Written by Cathy Testa
UPDATES TO MY BLOG’S MENU
Leave a commentJust a quick FYI, I’ve been updating my blog with new menus and sub-menus. Click the links below or visit my blog to take a glimpse. Click on the menu bar to see new drop down menus! They are works in progress and will be updated with more information daily.
HOW TO VIDEOS:
https://cathytesta.wordpress.com/writer/videos/
TROUBLEMAKER TURNED STARS:
https://cathytesta.wordpress.com/container-gardens/stars-versus-troublemakers/
THRILLER – FILLER – SPILLER:
https://cathytesta.wordpress.com/container-gardens/thriller-filler-spiller/
CONTAINER GARDEN POT TYPES:
https://cathytesta.wordpress.com/container-gardens/container-garden-pot-types/
NEW CONTAINER GARDENING BOOK COVER:
https://cathytesta.wordpress.com/container-gardens/new-container-gardening-book-cover/
Check in for more…Stay Tuned! Cathy T

Photo: Bitstrips Source
Four Tools Used to Make Carving Pumpkins Easier
3 Comments There is no doubt carving pumpkins this time of year is all about tradition and fun. So when my husband and I decided to carve our designated chosen pumpkins this weekend, I took out some tools which I use to make the process easier.
A Power Drill
A Metal File
A Hammer
An Ice Cream Scoop
Steve just needs a sharp knife!
As we enjoyed the rays of the autumn sun and a few specialty fall cocktails, we began our carving ritual. It didn’t take long for Steve to utter the words he repeats every single year, “Uhm, let me see. What face should I do?”
Well, folks – while he makes that statement every single year, he always just goes with the traditional triangle eyes and nose with a smile face. It cracks me up. And it takes him only a few minutes to get his pumpkin carving job done.

Meanwhile, I had no idea what I was going to make for a face on my pumpkin, but I suddenly remembered a bag of mixed beads and jewelry pieces I bought at a warehouse sale, and thought – Oh yah, now I have a use for those! But of course before the bling and decor, I had to clean out the pulp and I find an ice cream scoop to be the best for this process. It is strong enough to scrape the inside edges and take out big chunks of the pulp. Steve is in charge of separating all the seeds, which he proudly does every year because he likes to bake them.


The power drill is used to drill 3 medium holes where my pumpkin’s eyes were placed, then I used the knife to carve out the shape. Because holes were there first, it was easier to cut the thick pumpkin’s shell to create the shape of my pumpkins eyes.

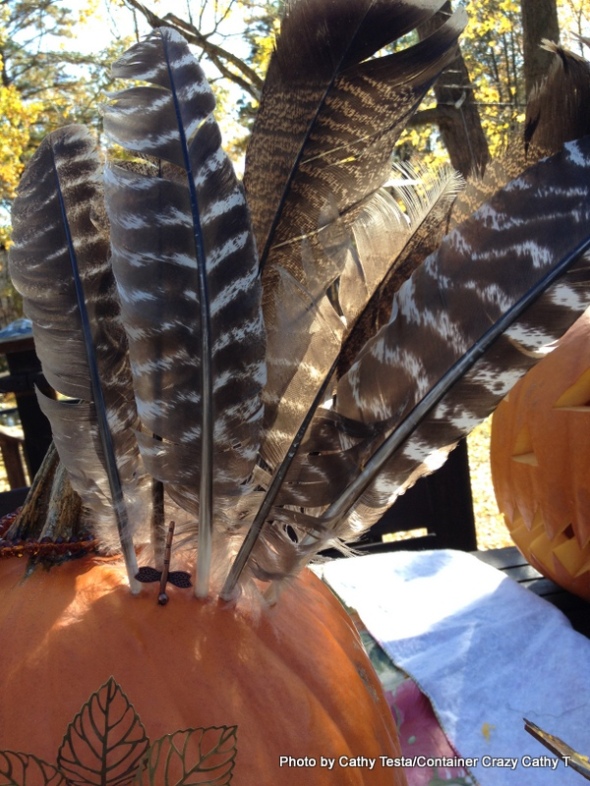
I also use the file to smooth out the edges of the eyes. Once the eyes were done, I stuck in leaf shaped jewelry pieces made of flexible metal. I love how the pieces reflected shadows on the pumpkin in the sun, and the leaves kind of looked like lush eye lashes. My pumpkin was developing a personality.


The power drill is also used to make indents or small pilot like holes for the mouth. Using a sharpie marker, I first drew the line for the smile. Then a small drill bit to make little holes along the line. I inserted little red beads into each hole and used a hammer to tap them in. Then I attached a crystal as the nose with a simple small nail.

Another saved item that popped into my head which I could use were turkey feathers I found in my yard. They were super easy to just insert right into the pumpkin because the tips are so strong. So thus, there was a bit more bling.
After we were done with our craft, we set them into their positions in our yard, then pulled out two cozy chairs, faced the western sky with a bright full sun, and enjoyed the rest of our day relaxing (and admiring our pumpkins).

Even though our pumpkins are not really visible from the road since we have a long driveway, we still light the candles in them every night up to Halloween eve.

And, by the way, the pumpkin ritual is always initiated by my husband, Steve. I love that he is a kid at heart – especially during the holidays.

P.S. He also insists on baking the pumpkin seeds very very slowly, but then I debated turning up the heat – thus the combined result – some with a bit of smoked flavor and some soft and chewy. Each having its own unique twist, just like our pumpkins!

Happy Halloween Everyone. It will be here soon!
Written by Cathy Testa

A Unique Way to Install a Bird House
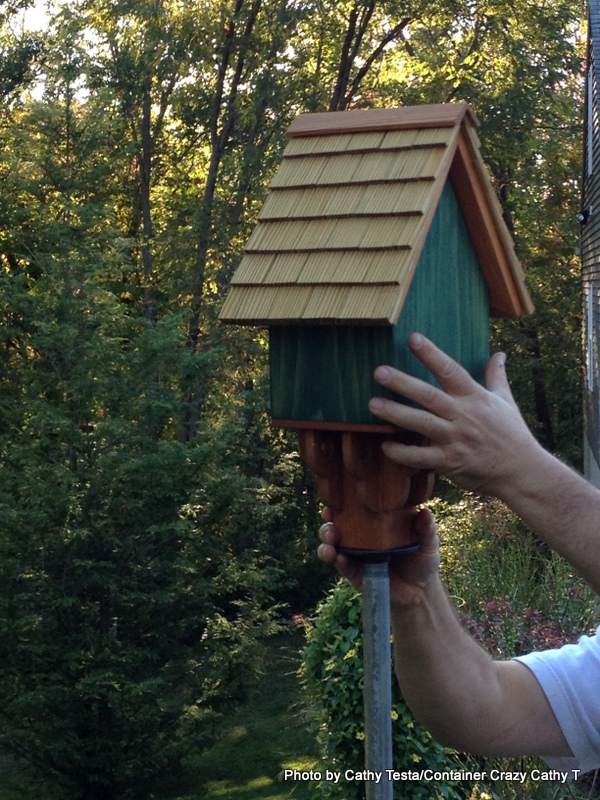
26 Comments At my home, my husband and I have started a unique way of installing bird houses which entails the bird house being at a height of 12 feet. It may take a few hours to get the job done, but the new home is more receptive to the birds because it is at a safe height where they are less vulnerable to potential predators.
So, we wanted to share our process with you. Here are the materials needed, followed by instructions, and photos (note we are showing two types of houses installed), and a list of plants is included with useful links on more bird information below.
Materials Needed:
- 12 ft length of 3/4 inch rigid electrical conduit. These standard lengths can be found in the electrical department at Home Depot. (Note: The rigid conduit should come with pre-threaded ends.)
- 3/4 inch floor flange. This can be found in the plumbing department at Home Depot.
- 12-14″ inches of an 8 inch diameter footing tube. You will need to buy the standard 4 ft length found in the concrete section usually located in the outside area at Home Depot, and cut to 12-14″ long.
- (1) 80 lb. bag of ‘Quick-Crete’ pre-mix concrete found in the concrete section located in the outside area at Home Depot.
- Wood screws ½ inch long and ¼ inch diameter
- Post hole digger tool and power drill
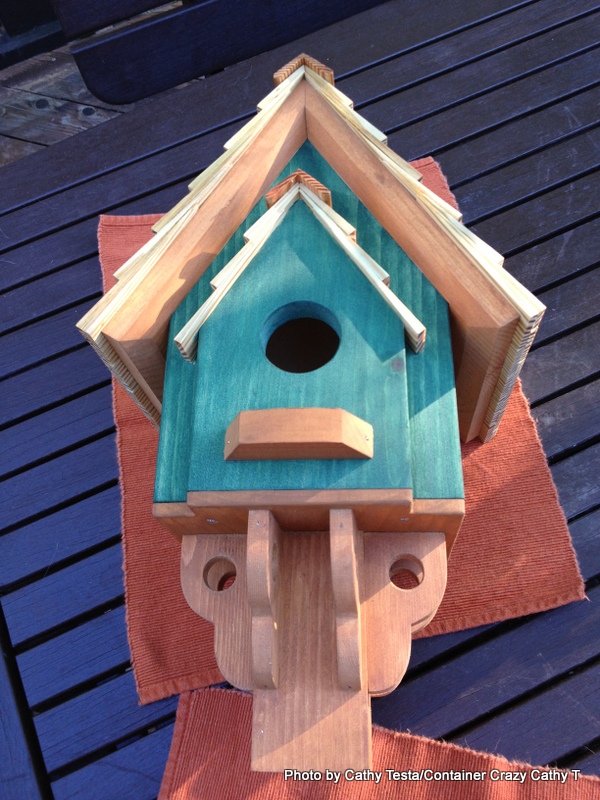
- 1 very pretty and unique bird house!

Floor Flange
Let’s Get Started:
 Select your bird house location or site. Think about the exposure, too much shade can be too cold for the birds. Sunny exposures are great for warmth but if you have a very sunny spot, face the house east or north so it doesn’t get too hot. You may also want to select a site visible from inside your home or from your favorite outdoor sitting place so you can view them. But not too close either because baby birds chirping are very loud. And of course, consider it as a vertical element in your garden bed. The placement is important if you want to use it as a piece of art in your natural landscape along with your beautiful plantings.
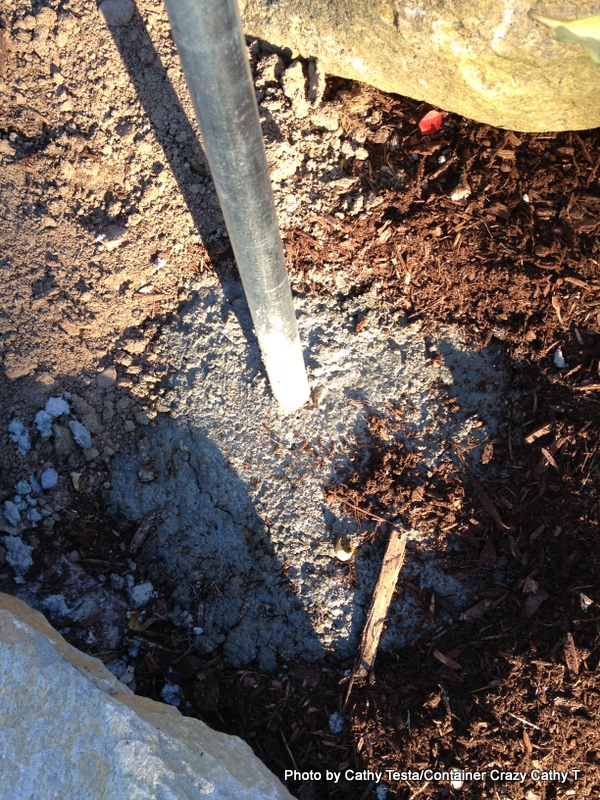
Dig the hole with a post hole digger. Or ask your handsome husband to do so. Insert the footing tube cut to the specified depth (approximately 12 to 14″; see above). Mix the concrete as directed and pour into the footing tube. Get ready to set the pole (rigid conduit).
 Note: My husband says he doesn’t pay attention to the freeze line because it does not matter if there is a little frost heave as it will only move back in place when the ground thaws. But the rule is to dig below the frost depth to prevent frost heaving, approximately 42″ down. If you want to be more cautious, you can dig deeper as per the guidelines for your region.
Set the pole (rigid conduit) in the wet cement. As noted above, the 12 ft length of 3/4 inch rigid conduit works great. It is strong, very tall, cat proof, and useful for twining plants. It does sway just a tad in strong winds, but no more than a thick branch might move on a tree. If needed, use some wood stakes to keep the pole securely in place temporarily until the concrete mix dries completely. The concrete drying process takes about 8 hours (or that is what we do, is wait a day before attaching the bird house to the pole.)
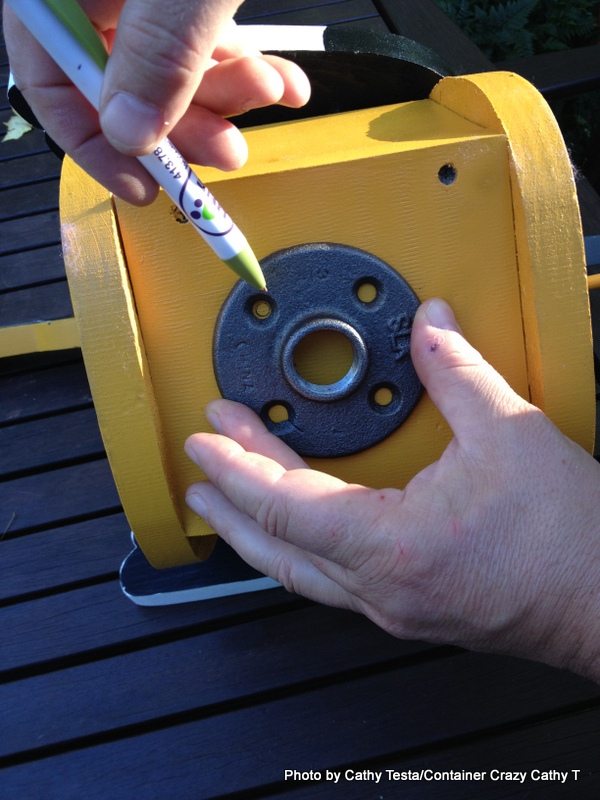
 Attach the floor flange to the base of the birdhouse. Pretty straight forward, mark the holes with a pencil, drill, and screw. Takes a few minutes, and a power drill is handy for this. (Note: Pre-drilling pilot holes is helpful and recommended.)
Attach the house to the pole. Because the rigid conduit used as the pole has pre-threaded ends, just turn the house until it is screwed on firmly. Or turn it to face the direction desired in your landscape.
Watch. In a day, you should have a bird moving in – we always do! It’s great. When we setup the bird house that looks like a Baltimore oriole, we saw a bird move in by the very next day, and this was during October, not in the spring.


Plants Attracting Birds:
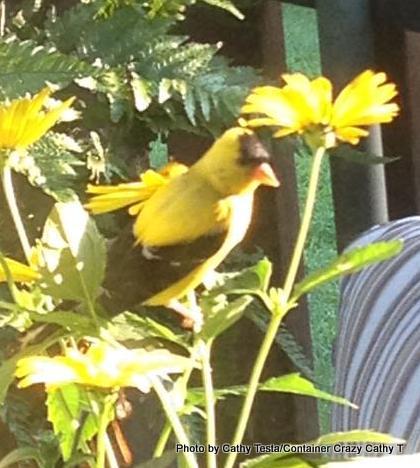
Having a bird house in your yard will definitely entice birds to live there, but other features which help a great deal, are of course, the plants selected to feed or encourage birds. They enjoy plants with edible berries. They also use natural scrubby bushes around your landscape for protection and as hiding places, especially during the winter for those not migrating southward. And having a water source, such as a heated bird bath is very helpful.

Heated Bird Bath or Waterer
They visit our heated birdbath all year round, and it is especially nice to see them take drinks from it during the winter when other water sources may be limited.
- American Beauties offers a website with a bird focus design HERE. You can narrow your search by your region, exposure of the garden, and soil type.
- National Wildlife Federation offers information HERE. You can find out which bird plants are native to your region and see more detailed information about attracting wildlife to your landscape and yard.
- The Bird & Butterfly Garden at Lockwood Farm in Hamden, CT is a way to see an environment suited for birds in person. You can find the map of the grounds here and it also includes a list of plants in the garden on page 2.
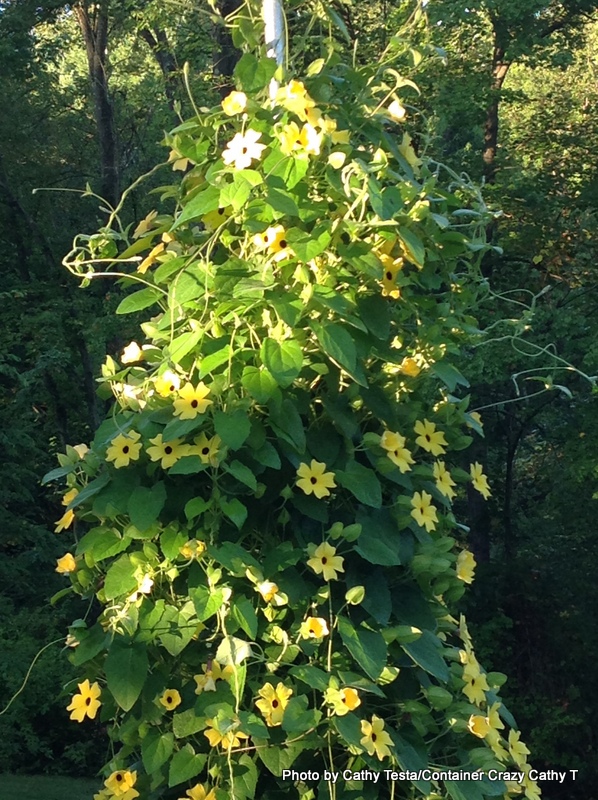
Thunbergia (black-eyed Susan vine)
Twining Plants for the Bird House Pole:
In addition to considering plantings around the base of your new bird house, you may want to include a climber, twiner, or vine like plant to grow up the pole. This will dress up the pole and create a vertical element in your garden, plus I believe the birds like it too. More foliage and flowers, more natural for them.
Here are some recommendations:
Thunbergia starting to climb early in season
Thunbergia (black-eyed Susan vine), as shown. It is an annual, but it climbs very quickly. Mine rose to the top of a bird house pole by mid-summer easily. The repeat blooms are vivid and the sepals are pretty too. It gets wider too and fuller. This plant is tossed by end of season because it is an annual, but it is easy to replace with a starter plant in the spring because they are commonly available in the nurseries.
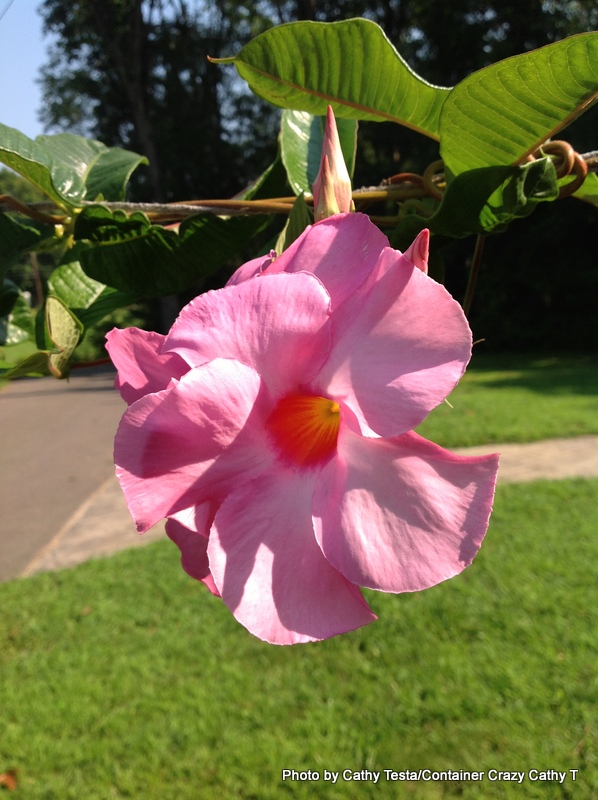
Mandevilla vine flower
Mandevilla vine. A tropical vine used in the summer, but can be overwintered by storage in a above freezing place over the winter months. These vines grow quickly and flowers non-stop with large, tubular flowers. I enjoy watching bees dive into the blooms. This plant enjoys “full sun” for best performance. To store them, wait til the first frost of autumn, cut it back, and put the root system in a container of soil or in the original pot if you didn’t plant it in the ground, move it inside the house, basement, or place where it doesn’t get below freezing, preferably between 35-40 degrees Fahrenheit. By the way, I have a friend who stores their Mandevillas every fall, see the story here at Mandevilla Sightings on my blog. The pink flowers were amazing this season.

Blackberries
Rubus (blackberry). This will grow tall canes, but they won’t automatically twine onto the pole on its own. You may attach the canes to the pole with zip ties (loosely) or garden twine. We have one under a bird house and ironically, the berries don’t all get eaten by birds! I think this is because we have lots of bird feeders too. But I have seen turkeys pecking at the leaves and I think they nibble on the lower berries. To read about the type of blackberry we planted, click HERE to see my former post.
Lonicera (honeysuckle vine). This vine grows any where from 15 to 30 feet, and it may need some assistance to stay attached to a single pole, like the blackberry plant does, but it is a great plant for its flowers and foliage. It may not be as fast growing as the annual Thunbergia noted above, but the tubular scented flowers are wonderful, and also attracts hummingbirds. This plant can sometimes become too aggressive, but it can be cut back and controlled. Because it is perennial, you do not need to replant it every season as you do with the Thunbergia or Mandevilla.
Ipomoea (morning glory) or Tropaeolum (nasturtiums). These are two plants easily grown from seeds. Both grow rather quickly an have showy flowers, so they must be added to the potentials list for the bird house pole natural decor. Just grab a packet of seeds in spring, start some in little pots, and transplant to the base of your pole. The nasturtiums are edible too – by humans I mean. Sometimes morning glories will self-sow to return on their own.
Miscanthus. Ornamental Grasses are a good choice to put at the base of the pole as well. It tends to soften the lines of the upright pole, and sways in the wind. It seems to fill in that empty space below. I also like to add decor to the poles in the fall season such as a garland of fake leaves with the orange and yellow colors. Or you could attach a corn stalk on the pole as we enjoy the pumpkins at that time.

Other Resources for Vine Plant Lists:
- Better Homes and Gardens offers a vine list HERE. Just be careful, some vines are aggressive and trouble-makers in the ground or when directly planted in a garden versus a container garden or patio pot. Refer to my page called Troublemakers Turned Stars for more information.
- Plant Facts by the Ohio State University has a nice list with pronunciations you can hear over your speakers. Geesh, I’ve been mispronouncing Ipomoea for years. LOL. Click HERE to hear them out.
- Birds & Blooms has a top 10 list for backyard vines, click HERE. Remember, be cautious with some vines that become too aggressive and take over. You may want to research more information on a vine before you plant it – think Wisteria or English Ivy as examples. Both grow fast.
- Fine Gardening has a vine list for full sun to part shade conditions, click HERE. This magazine has always been one of my favorites because they do a great job of combining the beautify of botany with technical information about plants.
 And remember to check the rate of growth of the vine you select. You want your vine to climb quickly – especially for our Connecticut season from spring through summer – it can feel short. For woody or perennial vines, this is not as much of a concern since they will be there year round.
Enjoy your new bird house installation.
Whether you do it this year or in the early spring of next, I’m sure you will have more birds to enjoy in your surroundings for years to come.
Written by Cathy Testa (and co-authored by hubby, Steve!)
860-977-9473 (cell)

Bloggers are Here to Stay. Like it or Lump it, Martha.
5 Comments
Image courtesy of FreeDigitalImages.net by Stuart Miles
When I saw a post shared on a private bloggers’ group page regarding how Martha Stewart dissed bloggers with her recent comments on Bloomberg TV, I immediately responded to my fellow blogging friends with an instant reply.
This is what I wrote:
This is their way of “protecting their turf” and not letting others rise to the top. I’m referring to MS and I didn’t have to listen to the video. People who rank themselves as the experts and have all the attention don’t want to let others get to their position, bloggers are people in training in some cases. OK, now I should just write a topic about this – getting wordy! LOL.
After I posted my comment above, many bloggers on this private bloggers’ page began to chime in with their thoughts and replies to my reply and everyone else’s comments.
Basically, we all took some level of offense to Martha’s comment about bloggers because everyone in this group is passionate about their blogs and what they offer to the world, which by the way, in many cases, is voluntary and without much compensation.
After re-tweeting a couple tweets related to this Martha blogger-dissing story, one of which was me tweeting this:
“Bloggers are here to stay. Like it or Lump It.”
I stepped away from my desk and went to the kitchen to make a quick sandwich for lunch. Then I thought, I better get these dishes done before I go back to researching information for my next post on my blog.
As I moved my hands through the soapy dish water, I kept thinking about those words Martha spoke:
“Who are these bloggers?”
Like a rap song, it started to repeat in my head…, “Who-who-who are these (zip-zip noise of a rapper’s album spinning) bloggers? Who are these Bloggers anyways? Who-who are these Bloggers?”
It made me shake my head a bit in disgust thinking about her using the word “gripe” and saying “they are not the experts,” along with her question: “Who are these bloggers?” – which of course, she presented in a pretentious tone. But it also made me think more about the people “like Martha Stewart” than Martha Stewart herself.
What I mean by “people like Martha” is there are people who believe they are the experts and don’t want to allow anyone else to be better than them or reach higher status, because obviously, they would lose their rank as being the best. They hold onto their high status position strongly for either monetary reasons or some kind of elite recognition. But in addition to this, they have a high and mighty attitude about their position.
It doesn’t matter what field you are in or which you are representing. It could be cooking, décor, plants, or aprons – but somehow, someway, this person reached “glory” status and was given a perceived title of expert. And sure, they worked their butts off and knew how to run a business to get there, but that very status got to their heads a little too much at some point. They somewhere along the journey crossed from being a person who inspires to a person whom must be worshiped.
These “people like Martha” believe they are the experts in their field and maybe they are, but they also are the very ones who are or were admired from afar by people who aspire to be like them. Or maybe their fans don’t technically aspire to be like them, but have a passion very similar to theirs. The fans may be beginners at the expert’s similar field, been practicing it for a while, have studied too, learned, and gained experience. Maybe they are close to being an expert themselves. But those “people like Martha” don’t want to let them get there.
Why? Because they fear losing their number one spot.
One of the things I love about blogging, bloggers, and the ability to share across the world with anyone willing to hear about your passion, craft, and expertise – is that you do not need an expert to give you permission to do so. You don’t have to kiss their ring first or sing their praises.
On the flip side of that, it is also very disappointing when you have admired someone considered to be an expert and they don’t see that you would have appreciated their mentor-ship, encouragement, or even praise to acknowledge that you have achieved some level of greatness as well. It may be big or small, comparable to theirs, or not even close – but you have been working hard at it too.
When they, the people like Martha, get to that place where they don’t want to allow anyone else to be as grand as them, this is when they have lost their true gift – The gift which got them to their expert status in the first place.
If you were or are a super football player for example, and you coach students to learn how to be the best player as well, this is admirable and a worthwhile way to live.
If you are a super-star player, and won’t let anyone else on the playing field, what’s the point?
As I continued to click through tweets to find other bloggers’ commentaries on the Martha blogger-dissing story, I felt an even stronger admiration for bloggers and their willingness to share the playing field and not keep it all to themselves. This, again, is what is powerful about blogging. We ‘can’ share, can be seen and heard, and don’t have to meet anyone’s standards to do so. The only people who need to approve are those admiring our offerings.
Does the fact we are not experts diminish the quality of our posts and shared information at times? Perhaps. But you know what, I say it’s worth the risk. I’d rather discover an unknown talent willing to share what they know in a passionate true way than not know they are out there because some expert would rather keep all the glory to themselves.
Written by Cathy Testa
P.S. Yes, I know I have some grammatical errors. I haven’t had ‘my recipe’ tested yet. Now let me get back to my post – about how to build birdhouses. Thank you.

Image courtesy of FreeDigitalImages.net by Kibsri. SHOWING EXPRESSIONS OF PUMPKIN BLOGGERS WHEN THEY READ THE NEWS ABOUT MARTHA.
I like Jen Singer’s MommaSaid.net post about the Martha blogger dissing story as well – FYI: Click HERE.
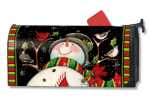
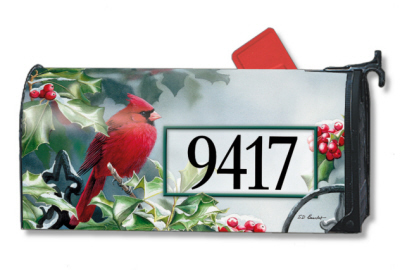
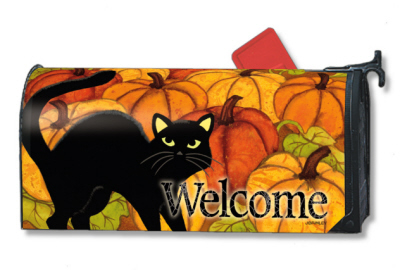
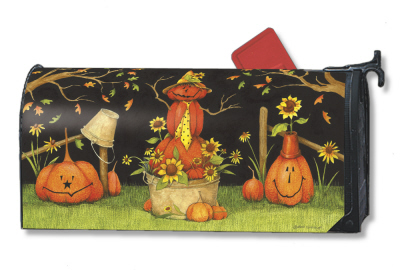
Need a Way to Dress Up your Mailbox for the Holidays?
2 Comments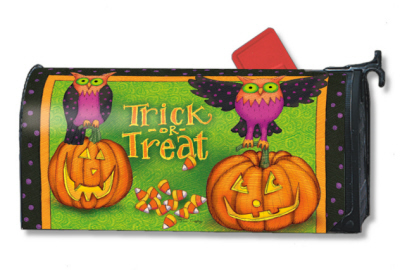
MailWraps by Magnet Works, Ltd.
Try Magnet Works
My mailbox is kind of shoddy looking and we never got around to getting it renovated to new materials, so when I spotted colorful mailbox covers, called “MailWraps” by Magnet Works, Ltd., I was interested in getting one to disguise my not-so-attractive mailbox – plus the ‘MailWraps’ are very cute and colorful. And there is a wide variety of themes to choose from for each season or holiday.
MailWraps by Magnet Works
The first one I purchased has an image of a happy snowman on it with bright red colors and birds. Every winter, I take it out of my supply storage to reapply it to my mailbox. It is super easy to attach because they are magnetic and readily stick to the mailbox. But what also surprised me is the fact they last a long time. They are very durable.
Mine, after a couple years of use, has not torn or faded, so I can attest they are worth the investment. Additionally, they are reusable every year and can be changed out according to the seasons, which I love. The only tip I would offer is to just store it carefully in the original plastic wrapper when you remove it until you take it back out again to display.
Winter Theme MailWraps by Magnet Works, Ltd.
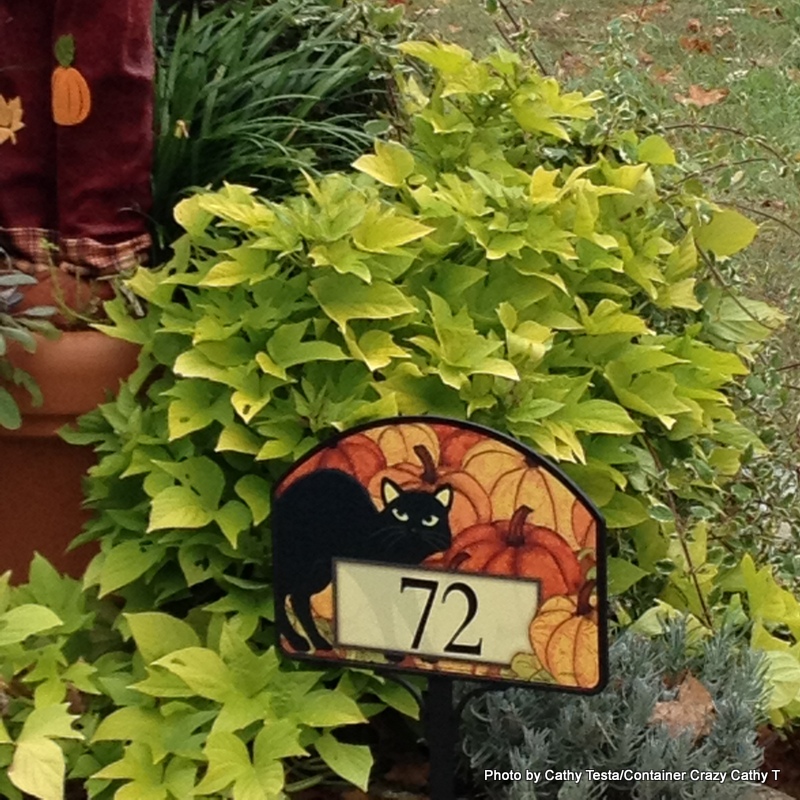
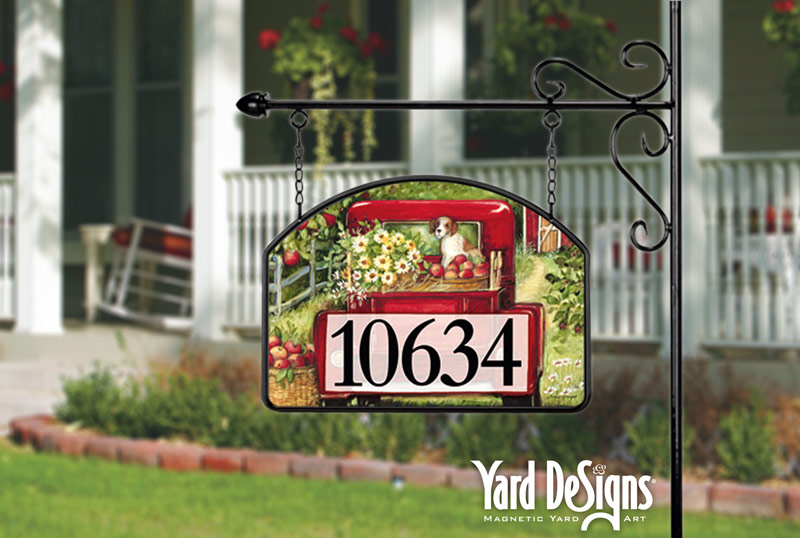
The Big E (Eastern States Exposition in Massachusetts) is where I found them originally, so this year, when I returned to check them out again, I got three more ‘MailWraps’ – one for each season: autumn, winter, and spring. And I discovered they offer matching yard signs where you can apply your house number to the sign, so I got a matching pair for the “Falloween” season.
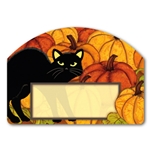
Matching Yard DeSigns by Magnet Works
SIGNS TO MATCH
Called “Yard DeSigns” by Magnet Works, these are an easy way to display house numbers by your mailbox or at the end of your driveway. Just peel the numbers off a sheet provided, wet the letters a bit (as instructed in the packet), apply them to the Yard DeSigns sign, and then place on the metal stand (accessory of your choice). Let it dry! Voila! You have a new item to dress up your mailbox area and in my case, my plantings around my mailbox too. The options for accessories include hanging signs or types which attached to a pole as well, so there are choices.
MagnetWorks MailWraps
Each is removable because they are magnetic, so changing them out for the seasons or holidays is a breeze. When I decided this product is suitable to “combine nature with art,” I visited the Magnet Works website some more to see what else they had to offer. And I was happy to see the theme I purchased this year with a black cat and orange pumpkins at the Big E is a “best seller.” For some reason, this fact made me happy.
By my Mailbox with Plantings
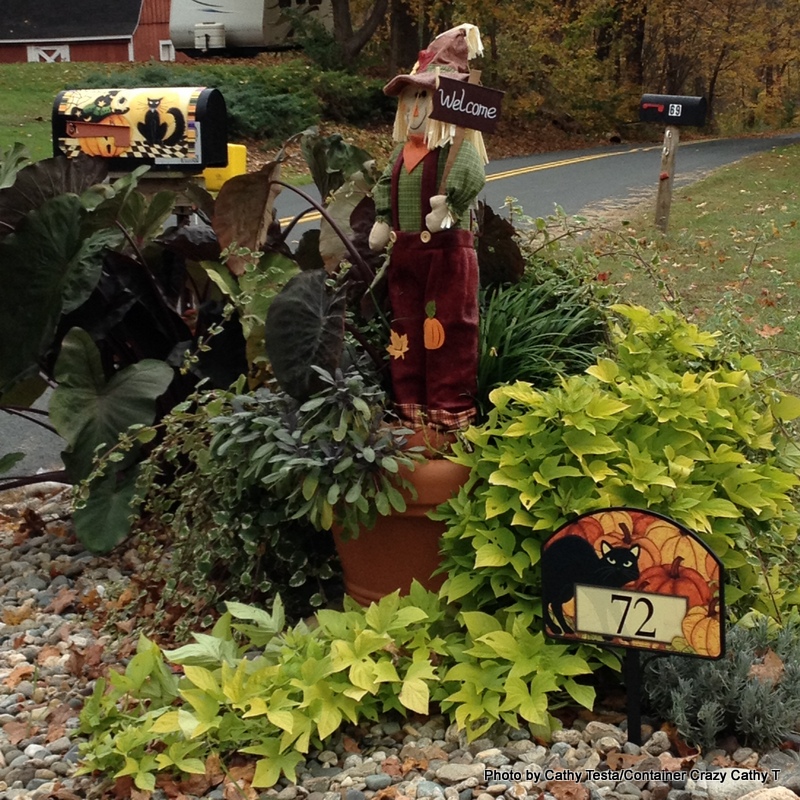
Matching box and sign
CHANGE FOR THE SEASON
In the winter, I will change both the ‘MailWraps’ on the mailbox and the yard sign, called ‘Yard DeSigns,’ to a holiday theme. And in the spring, I selected one themed with colorful flowers (of course!). There is a wide variety of themes to suit every taste, hobby, or style. If you are an animal lover – there are dog themes. Like Birds? They have those too. And there are matching products in addition to the mailbox covers and signs, such as doormats.
Yard DeSign by Magnet Works
HOW IT STARTED
It is always inspiring to hear the story of how a product becomes real and popular, starting with an idea. When you read the “Our Story” page on Magnet Works website, you will see how a husband and wife team created this decorative concept and figured out a method to make it “stick.”
NEW ART POLES
Upon further clicking here and there on the Magnet Works website, I saw beautiful “Art Poles” by Studio M, a division of their company, which is relatively new. These poles are decorated with beautiful colors and images. I could easily see Art Poles used in the garden, with a birdhouse on the top or a flag attached to the side. They are really pretty and colorful. Stephanie Burgess is the artist launching this collection and partnering with Magnet Works. It also includes other artful items such as chalkboards and address plaques.
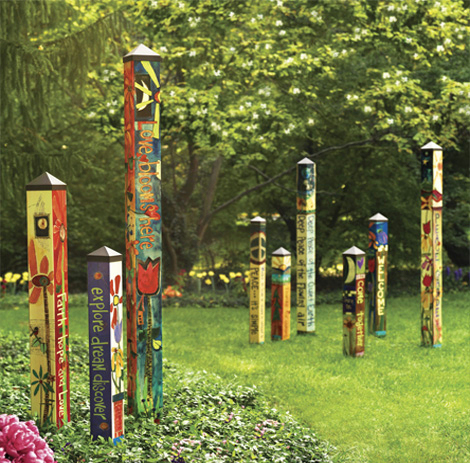
Image courtesy of Magnet Works/Art Poles by Studio M
THE ARTISTS
The artists contributing their talents and designs to Magnet Works products are listed under “Our Community” on the Magnet Works website. Here you can see who created which, and I discovered an artist by the name of Jennifer Brinley is the creator of the autumn “Yard DeSigns” sign which I selected of the cat and pumpkins. I love her use of the vibrant colors which can be seen from a distance. And of course, the cat looks similar to my black cat, Mini, so it’s a little personal touch too.
“Jennifer Brinley has become one of the most sought after artists in the home décor and housewares industries. Her distinctive style, strong sense of color and ability to capture current trends has put her in great demand. Painting mostly in gouache and watercolor, Jennifer enjoys using vibrant warm colors inspired by Italian ceramics and French textiles; finding her inspiration through her travels in Europe and the U.S.” (Source: Magnet Works/OurArtists).
As I thought more about the signs and mailbox covers by Magnet Works, I considered how cool it would be if we could custom order our own by uploading photos to have printed on the magnetic covering. Perhaps that will be next on their creations list. I’ll keep checking.
But in the meantime, there are styles for everyone, just browse to find them at www.magnetworks.com. Or visit their Facebook page HERE.
Some of my favorites were these themes below:
SOME OF MY FAVORITE STYLES
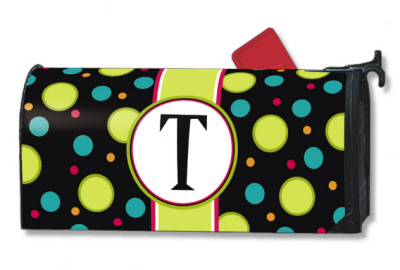
Add your Monogram
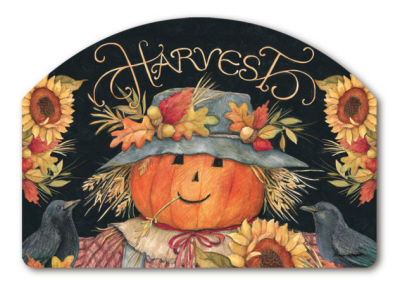
For the Falloween Season
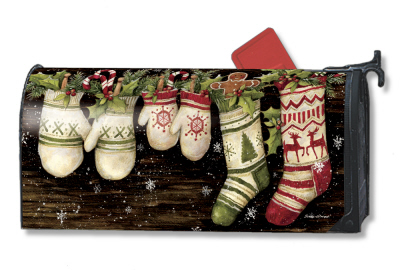
Mittens for the Winter Season
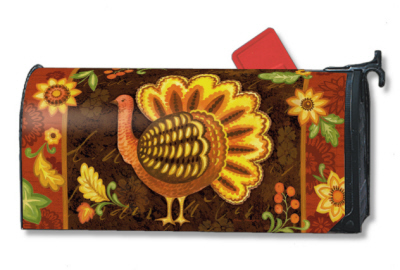
For Turkey Day!

Nice purples for any season
Various ways to display the signs
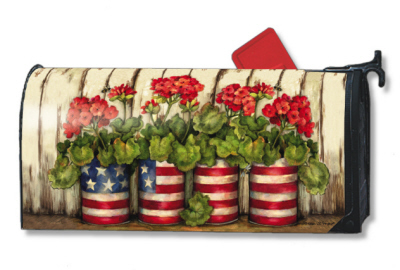
Geraniums for Summer
Another Autumn Theme by Magnet Works, Ltd.
Written by Cathy Testa
