Three Easy Ways to Use Mesh Ribbon for Holiday Decorating

8 Comments

Project No. 1: Grape Vine Wreath with Mesh Ribbon and Decor

This is super easy to do, and no glue gun is required!  Select mesh ribbon (or Ruban en maille in French) with the colors you like and just make sure your decor colors work well with your ribbon choice.  This project can be done in less than an hour easily.

Here is what you will need:

  1. One grape vine wreath (20″ size was used)
  2. 4″ and 8″ green zip ties (a.k.a, cable ties)
  3. Roll of Mesh Ribbon (20.5″ width was used).  Length is dependent on how big you want to make the puffs.
  4. Your choice of matching ornaments (holiday balls, florist picks, etc.)
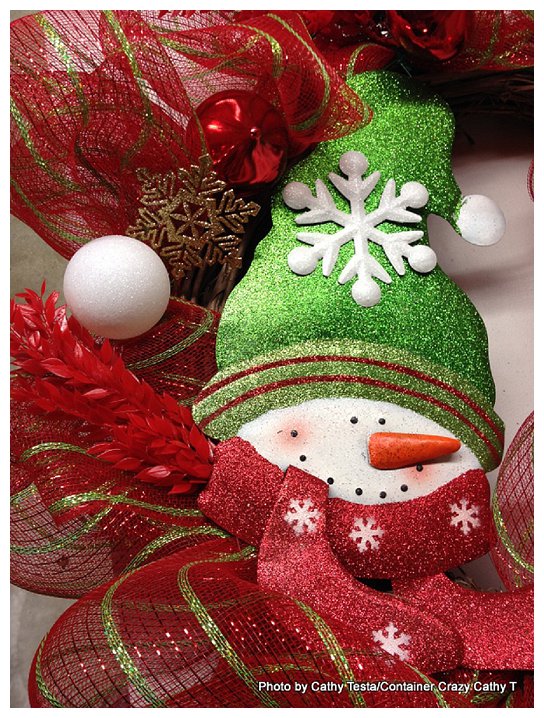
  5. One large tin decor (snowman face with hat used)
  6. Sharp scissors or snips

Mesh Ribbon Projects_0002

First step is gathering the end of your ribbon and attaching it to the wreath.  Zip ties work extremely well for this. They are strong, easy to connect, and durable.

Mesh Ribbon Projects_0001

Once you have your starting end attached to the wreath and secured tightly by pulling the zip tie closed (left above photo), determine how big you want your puffs to be.  You will be gathering the ribbon at the next interval (right above photo), and how much you space each interval is dependent on how big you want that puff to be, or you can place your zip ties at even intervals/spacing first so you can judge before you start attaching the next puff.

Mesh Ribbon Projects_0003

NOTE:  For the interval places you will attach the ribbon, be sure you do not pull the zip ties completely tight at each interval as you pinch and attach.  Leave a little slack because at each interval, you will attach your decor items (so you need some gap or space at the zip tie to attach the decor items after you are done.)

Move to your next gathering location.  Gather and pinch the mesh ribbon at the next spot, and attach with the zip tie (loosely closed).  It helps if you insert the zip tie first at your next position, so it is ready for you.  You may also want insert the zip ties before you start attaching the ribbon at intervals to estimate the spacing so it is at equal intervals for each puff you will make on the wreath.

At the last tie, leave a long strip of the mesh ribbon to serve as your tail ends.  Using the scissors, cut it in half length wise, so you have two tails.  The length of the tails is up to you.

Mesh Ribbon Projects_0005

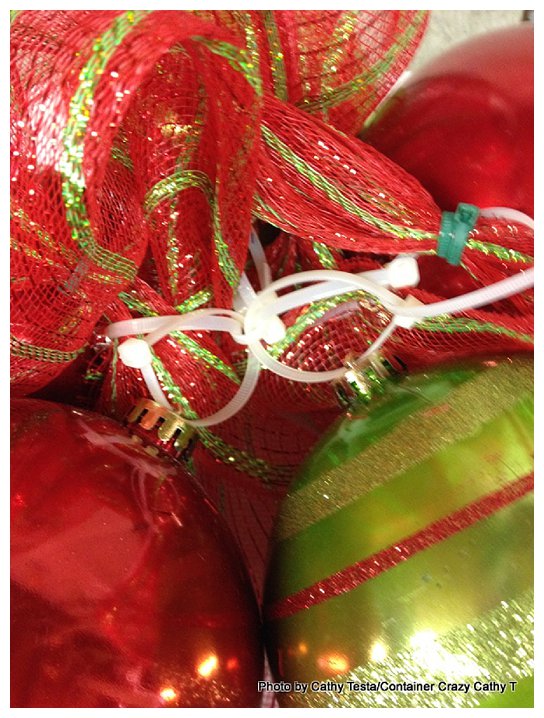
Now it is time to attach your decor.  Florist picks, decor with stick ends, and regular holiday ornaments are easy to secure.  Grab another zip tie, and slide it through the ball hook end, then attach it at the intervals to the zip ties used to secure the ribbon.

Mesh Ribbon Projects_0004

Position a large focal point element where you feel it is well balanced and easily secured.  In this case, a snowman with hat was used.  The hat tip had a hook on it so it was super easy to use the zip tie (my favorite attaching mechanism!) to the top end of the wreath.  At the base of the tin, luckily the back had a little hook too.  (P.S. Holiday tins and decor shown in these projects are available at my December 7th Evergreen Kissing Ball and Holiday Creations class!)

Mesh Ribbon Projects_0008

After you have all the ornaments on and other decor, go around to pull each of the zip ties tightly closed to get everything secured.  Snip off the tail ends of zip ties that are sticking out.

NOTE: The florist picks with a shiny silver gold flakes and the red leaves were very easy to insert because of their wired ends. Just tuck them in and secure with the wired end. Or just stick in the pick end (like on the snowflake) into the grape vine wreath.  

The grape vine wreath base works great for this project, but you could use other types of wreath frames.

Mesh Ribbon Projects_0007

Hang on your door and enjoy!

Mesh Ribbon Projects_0009

Project No. 2: Big Ball Bunch with Mesh Ribbon

This is something I did last year, but this year, I decided to try it out with the mesh ribbon.  I love hanging this ball bunch from an overhead light fixture at my entrance.

Items need:

  1. Large weather resistant holiday balls
  2. 4″ and 8″ zip ties (a.k.a., cable ties)
  3. Mesh ribbon (20.5″ width used)

Mesh Ribbon Projects_0011

The first step is connecting all the balls together.  Zip ties are awesome for this (gotta love those zip ties!!).  Run a tie through each end of the individual balls and then attach them together with a central zip tie.  You may want to hang them somewhere after to access if you like the look of how the balls are positioned before you attach the mesh ribbon.  The balls are gathered together but not super tightly because you need those gaps and wide open areas of the ties to pull through the mesh ribbon in your next step.

Mesh Ribbon Projects_0010

Cut a length the ribbon to get started.  It is difficult to judge how long you want that length to be cause you will be tucking and inserting it into the zip tie between the big balls based on the look and size you desire.  I started with like a 4 ft length, and cut more later as I worked.

Mesh Ribbon Projects_0012

Gather the starting end of the mesh ribbon and tighten the top of one of the zip ties to secure the starting point. Once secured, move a few inches down to the next gathering point.  Again, how many inches is up to you – how big do you want that puff to be. Once you know, pinch and gather, and use a zip tie around that point to secure the pinched area (top right photo). And then from that point, bunch up your next gathering point on the ribbon with a zip tie and pull it through another zip tie that is on a ball.  Repeat the process, and tuck and pull the ribbon around the balls to form the look desired.  Leave a tail end to hang from the base to cut in half length wise when done.

Mesh Ribbon Projects_0013

When all completed, remember to add a zip tie to hang the whole bunch from.  Here it is shown hung on an overhead light structure.  I wish I could have taken a better photo, because the cast of the shade was making the photo dark – but in the sunshine, this big bunch of balls with beautiful mesh ribbon is so sparkly.  I just love it!  And it is so easy to assemble.  This project took only about 30 minutes or so.  Very easy.

Mesh Ribbon Projects_0014

Project No 3: Urns with Big Red Ball and Mesh Ribbon

So since I was on a roll, I thought I would dress up my two urns outside.  Again, super easy with the mesh ribbon.

Items needed:

  1. Container of your choice, filled with soil
  2. Stakes (bamboo pole used)
  3. Loppers to cut bamboo stake
  4. Big Holiday Ball (needs to have an open end or hole)
  5. 4″ and 8″ zip ties (a.k.a., cable ties)
  6. Mesh Ribbon (20.5″ width used)
  7. Wire (ends of coat hanger wire used)

Mesh Ribbon Projects_0017

Step one is cutting the bamboo stake to the desired equal lengths.  Insert the stake into the soil.  Position it in the center.

Mesh Ribbon Projects_0015

Attach the beginning end of the mesh ribbon to the stake with a zip tie tightly closed so it is secured to the bamboo stake.  Then wrap the ribbon around the pole to create another “puff”. Keep repeating attaching each puff to the center stake/pole.  After you have your puffs in place, use the wire to push the mesh down in the center so it is level. You can bend the wire into a U shape to do this.

Mesh Ribbon Projects_0016

Insert the ball to the top of the stake end.  Later, I plan to add live evergreen cuttings and tips.  It’s got a thriller or focal point (the ball), a filler (the mesh ribbon), but it still need something else to spill around it, which will be the live evergreen cuttings later.

Mesh Ribbon Projects_0018

Mesh ribbon is so incredibly easy to use.  It beats struggling with regular ribbon and it creates such a nice large and showy display.  You can make the puffs as large or small as you like.  There are endless uses for mesh ribbon during the holidays.

And if you select a mesh ribbon with a little sparkle, it will shine in the sun too.  My recommendation is you get a roll at least 10 yards long – you will use it – believe me – because it is so much fun meshing around.  For these three projects, I used approximately 15 yards of ribbon total.

Mesh Ribbon Projects_0019

Written by Cathy Testa

Great Hooks to Hang Kissing Balls for the Holidays

Leave a comment

Class Attendees – This one is for you – Just a quick Post.  I saw these plant hanger hooks at Home Depot in Enfield on Friday.  They make wonderful hooks for kissing balls during the holidays if you don’t have a hook already.

Just wanted to share with you because the price was wonderful – they are on sale.

Look in the garden center section for them – only a few were remaining.

Kissing Ball Hooks_0008

Kissing Ball Hooks_0007

Thanks – Cathy Testa

Living with Wild Turkeys in My Connecticut Yard

7 Comments

Eastern wild turkeys (Meleagris gallopavo silvestris) have routines and rituals in my Connecticut yard during every season.

In the spring, summer, and winter, the flock walks up from the woodlands into my open yard behind my house in single file. Their first stop is the bird feeder.  They hit up the fallen seeds near our lower deck by scratching the ground for leftovers.

Last year, around this time of year, I thought about how the lower deck is a great place to position our motion sensor outdoor camera because it would capture images of the flock as they were eating seeds from the ground.

It worked.  The camera captured images of male turkeys puffing out their feathers and strutting their stuff.

November 2012

November 2012

And as you can see from these photos, it is truly astonishing how large they look when fully puffed out.  The male toms can reach 4 feet tall, but they look even larger at this stage.  And you will notice, its blue head and red caruncle at the neck is in full color.  I guess this occurs as another way to “show off” to the female turkeys in the group.  It is just incredible what these guys do for their females.  They put on quite a show.

Side View - Massive!

Side View – Massive!

After they are done snacking on the birdseeds, the flock will slowly and cautiously walk past my side door over the driveway, and then proceed down my long driveway to the road.  As they strut along in single file, it is quite amusing.  I always think to myself, “Well, there they go, off to work again for the day.”

Turkey Testa_0024

They probably have a routine of visiting every feeder or garden on our street, but by late day, you can guarantee, they come right back down my driveway – in single file – to return to our birdfeeder for their last snack before retreating into the woods again for their evening roost.

Once, in the very early morning, I could see several turkeys perched way up high in tall pine trees.  Eventually, they fly down again, and it is something to see a big turkey gliding through the sky to land on our lawn.

There’s been times when the turkeys have stood on a railing of our deck or on the edge of the pool.  Usually there is one turkey “on guard” being careful to look around for potential threats.  The guard turkey won’t eat with the others while on duty, and sends out warnings sounds if something, like me, comes by.

Turkey Testa_0023

But this past summer, there were many times when the turkeys would also sit in the yard and relax.  They are getting comfortable to say the least.  And a few times, in fact, this summer, when I was on my deck sitting in a chair, they would extend their necks up to look at me, but they didn’t run away. Until I got up.  Then they would feel threatened and take off or at least move a distance away until they felt it was safe again.

One year, I witnessed three toms standing side by side and shoulder to shoulder during their mating season.  They were completely puffed out and turned together in unison as if they were locked together.  If you can imagine it like an airplane turning slowly around, it looked like that.  Remarkable.  I wished I caught that one on camera as they turned slowly together to face the females in their surroundings.  I guess they were looking for a threesome. LOL.

Another time, I saw two toms in a serious battle in my front yard.  Their necks were wrapped around each other – and each pushed and tussled the other as they were locked into this position for at least a half hour or so.  At times, I was sure one would have their neck broken by the other.  I felt sorry for them, but best to let nature do their thing as they continued into the woodlands to duke it out.  I didn’t witness the end of their wrestling match.

In early June, the young baby poults arrive.  There are many with the female hens.  It does not take long for them to grow up and look like full sized adult turkeys. And then there are times when I see a solo turkey in the yard.  He wanders the yard by himself.  But, I guess they do this until they find a mate.  Or he thinks I’m his mate, he seems to like hanging around.

Another year, we had an injured turkey visiting – walking with a hobbled leg.  Because he was weak, the other turkeys would be a little aggressive towards him.  However, he wouldn’t give up and continued to stay with the group as much as he could.  The turkey pecking order is strong, and part of the wild scene you have to accept, even though it seems cruel at times. It is wild turkey bullying.

We don’t directly feed the wild turkeys, but allow them to take what they find from our yard.  They have never damaged our gardens, and sometimes will peck at the blackberries, but overall, they have been harmless.

Our cat inspecting the hidden camera, notice her ear moves in second shot!

Our cat inspecting the hidden camera, notice her ear moves in second shot!

And as close as they get to us proximity wise, no real danger has ever come to us ever since we’ve been witnessing them here in our yard.  They only bring us joy because they seem so comfortable here and offer an occasional laugh, like when they chase off our cats.  It doesn’t take long for the cats to realize who is in charge.

When I find turkey feathers left behind in the yard, I collect them to use in decorations, like I did with a pumpkin this year, or I’ll put them in my Thanksgiving Day arrangements or on Christmas wreaths.

Feathers in Pumpkin

Feathers in Pumpkin

The gobble noises and sounds made by the wild turkeys can be quite loud at times, especially during their breeding season in the fall.  I’ve read you can hear it from a mile away.  I’m not surprised. I often hear them in my backyard from the house.  I love the noises they make because it is interesting.  The different tones and cackles represent every action or purpose.  One of these days, I will know them all.

But the most interesting thing I think I saw in regards to wild turkeys was when one was helping an injured turkey across the road.  A large turkey had a small one under its big wing, and was carrying it away.  At first I wasn’t sure what was going on, but as I approached closer, it appeared the mature turkey was carrying away an injured smaller turkey, perhaps hit by a car.

Image courtesy of FreeDigitalImages.net/boulemonademoon

Image courtesy of FreeDigitalImages.net/boulemonademoon

Nature never ceases to amaze me.  And with Thanksgiving approaching, talking about wild turkeys seems a bit appropriate.  Unless you like to eat them.  In that case, I say stick with the store-bought or farm raised types.  I suffer from the Bambi syndrome.  I prefer to watch the wild types, and can’t seem to eat meat from wild deer, turkey, or rabbits.  No matter how many times my hunting relatives tell me it is good.

Images courtesy of FreeDigitalImages.net/nongpimmy

Images courtesy of FreeDigitalImages.net/nongpimmy

It is only 2 weeks until Thanksgiving everyone.  I hope you have a very pleasant holiday and spot some turkeys in your surroundings.  If not in your yard, perhaps on your plate!

Gobble, Gobble,

Cathy Testa

Turkey Links:

http://nwco.net/PDF/turkey.pdf

http://www.nhptv.org/natureworks/wildturkey.htm

http://www.nwtf.org/conservation/bulletins/bulletin_1_9-9-09.pdf

Camera Used:

We purchased our camera from Cabela’s.  It is called RECONYX Hyperfire model, and it has worked very well at capturing motion in the woods or other areas of our surroundings as we have moved it around from place to place. We have also captured photos of deer, a bobcat (Lynx rufus), coyote, fox, racoons, beaver, skunks, our male cat, other stray cats, rabbits, birds, and even a man with a machete.  Turns out it was a neighbor (phew).  One very interesting shot was when a deer bed down to sleep right in front of the camera – very cool.  And moving trees, leaves, even sunshine casting down, showing shadows moving across the ground during the day, is photographed. Snowstorms are fun too as you can see the level of the snow rising over time in sequential shots, so long as it doesn’t bury the camera. Maybe even YOU were snapped – a friend captured when you came by to visit – Bet you didn’t know that, did ya?  LOL!!!

Evergreen Decor Inspiration

6 Comments

Just some more inspiration for the upcoming Evergreen Kissing Ball and Holiday Creations Class on December 7, 2013.  These are examples of items created last year, and samples of decor available at the class to dress up the holiday creation you elect to make as a registered attendee to this event.

Photos by Cathy Testa

Photos by Cathy Testa

Red and white themes are bright and cheerful!  Add the “I believe in Santa” and you have a fun wreath with lots of cheer.

Photos by Cathy Testa

Photos by Cathy Testa

Adding fuzzy little bears or other tiny felted stuffed animals is a perfect embellishment for a wreath or kissing ball you may make in honor of the special little one in your life.  Little felted decor will be available at the class.

Photos by Cathy Testa

Photos by Cathy Testa

Natural decor like shown on this candle centerpiece speaks to me.  I love cones, pods, berries in the brown and natural tones.  And note the lighted Kissing Ball (bottom right) made by an attendee last year – great idea to add the lights.

Photos by Cathy Testa

Photos by Cathy Testa

Little ideas here and there with felted decor, or a wreath made with one type of evergreen can be simple but stunning.

Photos by Cathy Testa

Photos by Cathy Testa

Bundling ornaments and natural elements from raffia to preserved moss is fun, or go with with glitter and glam!  Make it your style.

Many of the embellishments shown here will be available at the class along with glittered florist picks, sticks, cones, ribbons of various styles, berries, and more.

If you have questions, please don’t hesitate to ask.

Thank you,

Cathy Testa

Winter Gardening Fun – From Making Kissing Balls to Evergreen Holiday Creations!

4 Comments

It is only four more weeks until Cathy T’s 4th annual Evergreen Kissing Ball and Holiday Creations Class.

Photo Creation via Bitstrips

Photo Creation via Bitstrips

At this class, you have the option to make either an Evergreen Kissing Ball (hung outdoors during the holidays), wreath, mailbox swag, or candle centerpiece.  The class gets filled with a group of wonderful attendees ready to have some holiday crafting fun before the shopping and other preps begin this year.

This is a great way to dress up your outdoors with some fresh greenery and add some decorating features during the winter! Yes, nothing is prettier than snow on beautiful evergreen creations.  When birds stop by to visit, it is even prettier.  And when you have holiday guests over, and they step outside for some fresh air, they will have something very pretty to admire – made by you.

Photo by Cathy Testa

Photo by Cathy Testa

It may not be Thanksgiving yet, but I’m already excited for the holidays – because of this annual event.  Nothing is nicer than the smell of fresh fragrant evergreens in your surroundings, knowing you created it, and you got it done early so you can enjoy it for the entire month of December and up through after the holidays – evergreens outdoors last well into early February.

There are only a few more seats remaining, so if you are local to my area (East Windsor/Broad Brook, CT), and are interested, please sign up soon.

Evergreen Kissing Balls by C Testa

See more information HERE or contact Cathy Testa at containercathy@gmail.com.

Thank you,

Cathy Testa

Unique Wreaths capture a Native and Organic style

1 Comment

And they are the creations of Mauli McDonald of ‘art and nature’ out of New London, NH.

Art of Nature_0001

A visit to a fine arts festival at Roseland Cottage situated in the heart of Woodstock, Connecticut makes for a pleasant afternoon.  The grounds of this 1846 home, a national historic landmark, is filled from corner to corner with 175 artisans and their wares, from jewelry to pottery and more for two days every October.

As I toured the artisans’ booths this year, on October 19th, I did not bother much to take out my camera as usual.  For some reason, I wasn’t in the picture taking mood, but I was admiring many of the art works showcased and being offered for sale by the participants.  I picked up a few holiday themed ornaments, a really nice pottery piece, and enjoyed a lunch as I chatted with a group at a table filled with visitors from all around New England.

But one artisan that day struck me in particular – and it was the works by Mauli McDonald of ‘art of nature’ from New London, NH.  She had beautiful organic wreaths and center pieces.  Even her business card connected with me.  It was created on torn edged paper with a real feather pasted on the center below her business name.

Images property of Mauli McDonald

Images property of Mauli McDonald

Mauli’s words provide the perfect explanation, as presented on her website, of her art form:

“The materials that I have chosen to work with have in some way enchanted me.  The soft edge of a feather, the curve and cradle of an antler, the green pool moss on a white wintered log—each object speaks.  And as you will discover, many of the designs carry, as well, a native, organic, almost unsophisticated style.”

As I looked over her unique wreaths created with native and organic materials that day, I was in awe of how she assembled the textures, colors, and overall feel.  She definitely has talent – and when you see her pieces in person, you witness her ability to capture materials from the forest floors in well-balanced compositions.

But more importantly, the objects she uses are organic, natural and make one think of things in nature which she so beautifully captured in an art form.  As you look and admire them, many may bring you memories of scenes in nature you have experienced in your own walks through parks, forests, or even in your own backyard.

As I browsed along her website later, I spotted her ‘antique art’ pieces where a violin or snowshoe was used in combination with treasures from nature.  How wonderful these pieces are because they capture a keepsakes and combine it with nature’s treasures.

Images property of Mauli McDonald

Images property of Mauli McDonald

As Mauli McDonald states,

“I am drawn to certain thing simply because I like the object.  A singular piece may have no function, but there is something about it that I find appealing.”

I totally get that statement. Being ‘drawn to something’ because it has a particular connection or appeal.  Like the violin, for example, made me think of my father who plays one.  And the snowshoe is one of my hobbies in winter.  But the way this artist assembles theses treasures with nature is truly beautiful.  It pays homage to both objects – the treasures found in life and given by nature to us every day.

Mauli McDonald’s works are wonderful examples of “combining nature with art” and I wanted to share them with you. Take the time to visit Mauli McDonald’s website at www.natureswildart.com and if you should happen to be traveling in New Hampshire, I suspect a visit to her beautiful shop would be worthwhile.  Just look at the entrance!

Image property of Mauli McDonald

Image property of Mauli McDonald

It is located at 9 Newport Road, New London, NH 03257.  To reach Mauli, email to urth@tds.net or call 603-526-2638.

For more information regarding the Roseland Cottage Fine Arts and Crafts Festival, visit HistoricNewEngland.org/Festivals.

Written by Cathy Testa

P.S. Tips when you visit Roseland Cottage for their next annual show, just enjoy – everything is there for you, parking is in lots across the street, some on lawn areas, lunch is available as there are many choices by the food vendors, live music is playing too.  I would say the only tip is to note this event on your calendar so you don’t miss it next year.

New Page: Color Wheel My World

Leave a comment

The new page has begun to flourish with color tips and links to examples for your container gardening creations.  Need help with color schemes for your container gardens next spring?

Well, visit this new page often.  It will be updated with tips I’ve used over the years.

Photo courtesy of FreeDigitalImages.net/Sailom

Photo courtesy of FreeDigitalImages.net/Sailom

What to learn about ROY-G-BIV?  Never heard of it?

You probably did as a child, but may have forgotten this easy tip to remember color combinations.

What to see examples of amazing complementary colors, visit COLOR WHEEL MY WORLD and click on the links.  I’m putting this information there for YOU.

There will be more – Split Complement, Triads, Monochromatic, Analogous.

More to follow …

Cathy Testa

Repurposed Pots

1 Comment

Here’s just one example of a container garden pot type you can use – Repurposed!  Do you know what this is?  It is the drum to a washing machine, and it makes a great pot for your plants.

photo (92)

See my new page, CONTAINER GARDEN POT TYPES, to learn more about the pots used for container gardening with some tips along the way.

Visit regularly – it gets updated often with new ones.

Cathy Testa

Storing My Big Red Banana Plant

16 Comments

So It Can Return Again Next Spring

Storing Red Ban Plant_0010

Ensete ventricosum ‘Maurelii’ is a return visitor at my home.  I have fallen in love with this tropical red banana plant for so many reasons, but what has impressed me more than anything else, is how large it grew this year in my monster cement planter.

Although I’ve included this type of red banana plant in my container gardens before, I’ve never seen one grow this big so fast.  It reached a height of 8 feet tall with large leaves growing to 7 feet long and 1.5 feet wide.  It was at proportions I didn’t expect, but was very happy to witness.

As each new leaf grew and unrolled from its center throughout the summer, and even into early fall, I was in awe of its massive presence – and ability to stand so tall. By the end of October, the plant had a large fleshy trunk of a 1 foot diameter.

Planted on the eastern side of my home, the morning sun would rise to greet it every day.  By noon, dappled shade cast down upon it from the forest trees nearby.  And by late afternoon, its large showy tropical leaves with red coloring were wonderfully backlit by the afternoon’s setting sun.  I am not sure which part pleased me most, but each stage was worth taking pause in my day to enjoy.

There were so many times I took photos of my big red banana plant in the planter that it became a bit obsessive.  Even though it was difficult to get a good shot because of the glares and shadows – and its sheer size, I still clicked away taking as many as possible throughout the season.

I showed my big red banana plant to my family, visitors and unexpected guests when they were here.  Heck, I even made them pose in-front of it for more photos.

Later in the season, I finally broke down and did what I pondered doing.  I hired a professional photographer to take a few good shots.  The sounds of the camera clicking furiously made me feel as though I gave the ultimate red carpet attention to my plant.

Alas, the plant got hit by our first frost of fall on the evening of October 25th.  The next morning, I knew my guest would be leaving for a long winter’s rest. It was time to take it down and store the root base so it could return to visit again next spring.

Storing Red Ban Plant_0012

STORAGE STEPS FOLLOWED

First, a quick and easy haircut.  All of its gorgeous long leaves, now darkened by the frost and wilted, were cut off with large pruning shears and tossed in a pile.

Storing Red Ban Plant_0002

Second, using a bow saw large enough for the wide stump, I placed the blade about 12” from the base and began to zig-zag across.  “Timber,” I said, as the top portion fell to the ground with a loud thump. (To see a video of the cut, visit my HOW TO VIDEOS page.)

Storing Red Ban Plant_0001

Next was the careful removal of the root base from the soil.  Using a shovel to go around the root mass and cut the roots in the soil, I carefully lifted the large base with a couple of firm tugs.

Hand-pruners were used to trim the long roots as a way to eliminate additional soft fleshy material that may have the potential to rot in the storage box.

Storing Red Ban Plant_0014

With a soft brush and my gloved hands, I cleared away the final soil residue on the root base, making sure it was fairly clean and ready for its next step.  I also re-trimmed the cut end to be level and clean.

Storing Red Ban Plant_0015

In a nice sunny spot, I turned the root base upside down and placed it on a milk crate to drain of excess water for one solid day.

Storing Red Ban Plant_0008

Then was the box selection – a new home.  Inserting a light weight plastic bag into it, filling it with bedding material of peat moss, I then carefully laid the heavy root base in the center on its side.

Finally, covering it almost completely with more peat and loosely closing the bag. I shut the box and labeled the outside with the date, plant type, and a smiley face.

Red Ban Boxed_0001

The last step was moving the box to a cool dark place in above freezing temperatures in my basement.  And then I said a little prayer. (You know, because it doesn’t hurt.)

THE STORAGE PRAYER

Oh Banana Plant – You were so sweet

So now I lay you down to sleep

Please come back or I will weep

Enjoy your restful place of keep

Until I reawaken you in twenty-six weeks

Storing Red Ban Plant_0003

STORAGE PRACTICAL TIPS

Be careful to not dent, cut or nick the root base.  These can create wound places, serving as an invitation for mold to set in.

Take measurements so you will have a record of how large the plant grew and can compare notes in the following years.

Use clean, disinfected tools during the process to avoid transmitting any diseases to the plant.

Try to do the breakdown job before significant rainfall if possible.  It makes it easier to move from the soil.

Don’t wash the root base with water to remove soil. It only makes it wetter.  You want the base to be slightly moist but not soggy because this can rot in the storage box.

Reuse the peat moss every year – it last a long time, and is an excellent material to store root bases.  It holds moisture lightly and helps maintain a balance of air too.

After removing the root base, turn it upside down to allow water to drain out before storing it, but don’t let it get too dry.

Use a cardboard box with vents or spaces to allow some air circulation to set in.  You don’t want a box to seal tightly and leave moisture inside where it will rot the root base.

Select a plastic bag that is very light weight, like those used in grocery stores.  Close the bag lightly.  Do not tie it off – allow some breathing room.

Red Banana on Left with elephant ear corms on Right

Red Banana on Left with elephant ear corms on Right

THE STORAGE LOCATION

You want to find a location where it remains cool, but not below freezing.  Some references indicate a temperature range of 35° to 45° F.  I put mine in the basement by the door where it is coolest, but I also place the box on a bench so it is not in contact with the cold cement floor where condensation can possibly cause the box to get wet and then stay too damp.  If it gets frozen, your root base is going to die.  If it gets too warm, it will start to grow again.  You want to make sure it is just right.  For me, that spot in the basement seems to be the sweet spot.

FINAL NOTE

The storage prayer is optional, but I believe this helps.  And when you open the box next spring, you will hear the angels singing when you see your banana plant made it just fine to be your return visitor in your container gardens every season.

Written by Cathy Testa

P.S. More will be shared about my big red banana plant (highlights, professional photo shoot, guest visitors, companion plants, and more).  This is to be continued…Stay Tuned.