Flat Tire Flowerpots

Leave a comment

Flat Tire Flowerpots.

Checkout this link above! Flowerpots made from recycled tire pieces.  How neat. From the site: flattireflowerpots.com.  For $9.99, you can order up a kit for your kid.  This is a great children’s project and educational, and of course, getting junk rubber off the streets is always a good thing for our environment.

A Cathy T Tip: Make sure to use plants that can tolerate heat and stay relatively small. These containers will absorb heat when placed in full sun due to their black color.  I would use small succulents (like Hens n Chicks) or drought tolerant types (like Sedums or Lavenders).  Something (i.e., chemistry?) tells me edibles shouldn’t be placed in this type of material because of its potential heat absorption power.  I’m not sure of the impact of the material’s core content.  Does anything escape in that heating process, who knows?

Small Succulent

Small Succulent

A Worthwhile Garden Conference in CT

Leave a comment

Heads up, the 2013 Garden and Perennial Plant Conferences held at and by UCONN in Storrs, CT has been officially posted online via the following two sites:

http://www.2013garden.uconn.edu/

http://www.cag.uconn.edu/plsc/conferences/2013perennial/index.html

I’ve been attending these conferences every March for several years now.  Some years I go to both days, others I go to the day specially held for hort pro’s in the business.  I find them both, however, very worthwhile.

The Garden Conference, held on day two, March 22nd this year, is geared for the home gardeners.

The Perennial Conference, held on day one, March 21st, is specific to horticulture pro’s in the business.

To see the list of speakers and topics, just click the appropriate links above.

If you haven’t attended before, arrive a bit early to grab a cup of coffee after signing in, and browse the usual great selection of garden and hort books at the onsite book store adjacent the conference rooms.  Enjoy meeting other hort pro’s or avid gardeners attending while waiting for the talks to begin.

Lunch is included and consists of a buffet of sandwiches, salads, desserts, and beverage.  Everyone files down the stairs from the conference floor to the eating area around 1:30 ish and sits at large tables.  It is a great way to visit friends attending every year, or greet new attendees from the gardening and hort world.  I also like attending because it is at the campus where I took my first hort related courses.  It brings back memories.

The only challenge of the day is picking which presentation you want to see per hour.  There are two every hour, and often I can’t decide which one, but shortly after attending my preference, the person seated next to me in the next session, will give a quick review if they attended the opposite choice.  And handouts to all are provided.

The drive is easy and pleasant via country roads (for me) to Storrs.  There are plenty of parking spaces if you arrive on time, but don’t move your car once you found a spot – because you may not find another open one for the rest of day.  Vacant parking spots get taken quickly on college campuses.

This event is noted on my calendar again this year, and I will fill out the online registration by the early registration deadline which is March 14th.  Otherwise, you pay $10 more for the entrance fee, and risk missing out on limited seating.

Maybe I’ll see you there,

Cathy T

http://www.cathytesta.com (My website)
860-977-9473 (cell)
cathy.testa@aol.com (email address)

INSECTS AND ORNAMENTS

3 Comments

As I was cleaning out some old files, I came across this article written by me in 2005 for a class project.  After I read it to my husband, he said I should post this.  Here it is, unchanged:

TITLED:  INSECT ORNAMENTS

My project is a collection of insects contained in clear glass ornaments hung on a miniature Christmas tree.  Each ornament contains an arthropod collected during the fall months of 2005 from the UCONN campus grounds, around my home in Broad Brook, and from property near the Scantic River in East Windsor.  Natural and synthetic plant materials were added to each ornament to represent the types of plant life found near the insects.  Also hung on the tree are information cards about insects, and some cute little decorations obtained during the Halloween season.

This reason I selected the Christmas tree with ornaments as an art form is two fold.  First, the ornaments serve as a way to showcase the insects’ intricate designs from a container that can be easily viewed.  When we have the opportunity to look at an insect up close through a glass, it is less threatening then when insects are alive and moving quickly, which tends to scare people.  Second, I wanted to use the Christmas tree theme to challenge the way in which insects are traditionally used by various cultures for holidays.  As we know, insects are usually reserved for Halloween decorations or for themes related to death or illness, but insects are not so popular for Christmas decorations.  There are exceptions such as beautiful butterflies and colorful dragonflies as ornaments, but it is very uncommon, and perhaps impossible to imagine a Christmas tree adorned with wasps, bees, stink bugs or centipedes, for most would find this offensive or ugly.  However, I’m sure insects on a tree would capture observers’ attention and they may question why insects adorned this little Christmas tree.

In researching Christmas tree history, I discovered the use of Christmas trees was born from the worship of agriculture.  The early Romans marked summer solstice with a feast called the Saturnalia in honor of Saturn, the God of agriculture.  This was due to the fact that solstice meant good farming would be underway since the days would be longer and warmer.  Also, homes were commonly decorated with evergreen boughs.  In fact, long before the advent of Christianity, plants and trees that remained green all year had a special meaning for people in the winter.  In many countries, it was believed that evergreens would keep away witches, ghosts, evil spirits, and illness.  These beliefs lead to the use of firs, pines, and spruce as symbols.  To me, it seemed like a natural fit to tie these two items together – insects and evergreen trees as a media for my project.

Insects, however, did not adorn the green symbols in ancient history, but they were however, worshiped in their own right for other reasons, such as resurrection as with the cicada beetles placed in the deceased mouths.  The scarab beetle was associated with the generative forces of the rising sun and with the concepts of renewal.  It was regarded in early Egyptian history as a symbol of rebirth and good luck.  Ceramic scarab beetles are attached to the top of my miniature tree for this reason.  Another example is how the Chinese cultures worshiped crickets because they believed they would bring good luck to their homes.  Katydids were used as a symbol of fertility.  It seems fitting to me that insects should bear the right to adorn Christmas trees because the trees symbolizes similar themes – birth, renewal, and good fortune.  By placing them on my tree, I am attempting to connect them and challenge the themes.

While realizing there are many negative effects by harmful insects to human life and food, such as spreading of diseases through parasitic wasps, or the awful swarms of locust that can virtually destroy all valuable food sources for some areas, we also know that without insects many needed activities in our environment would slow or come to a complete halt.  Insects provide many useful services as well.  They serve to decompose organic matter, eat other harmful insects, serve as food for other animals, help solve forensic crimes, and provide pollination of flowers for fruit production.  Not only are they helpful creatures, they have existed much longer than human beings on earth, more than 350 million years on every acre of land, plus they live in almost ever habitable place on earth, thus sharing space with them on this miniature tree, for me, was a way to help us see and understand their roles of insects with trees via a non traditional form.

Many different insects were captured for the insect ornament tree.  A Monarch Butterfly is in one ornament on the top of the tree.  My mother captured the monarch specimen in late August.  She found a flock of Monarchs feeding on clover plants in a large field, and she said she quietly approached and stood still.  She calmly reached down and captured one in her bare hands.  The large Katydid in another ornament was found on the hood of my sister’s car, ironically she was pregnant at the time and has since delivered a baby girl. Perhaps that sign of fertility is not so imagined!  Ladybugs are embedded in an ornament among milkweed seed plumes because I found a ladybug on a milkweed one day.  Also milkweed is eaten by Monarch butterflies, thus a symbol of their food source on this tree.  Spiders are sitting upon a yellow rose petal because I found three garden spiders on flowering plants in the campus floriculture garden.  Wasps are over their paper wasp nest in another ornament.  These wasps were found in a nest under a window’s storm shutters and it was interesting to see the larvae embedded in the individual cells.  Grasshoppers were easy to capture during the warm days earlier in the season, as they were plentiful on campus and in the meadows of my parent’s property.  I found a centipede under a rock and a sow bug under an acorn one day – both fast movers and tried to hide quickly, but captured all the same.  Moths, bees, stink bugs, and other flying insects are displayed.  One moth was found inside a college building near window shades of a similar color as the moth.  My other sister, Rosalie, found a white moth in an office on a windowsill.  If you look closely, you can find some of the captured insects and ants on bark pieces attached to the tree.  And some fake, plastic insects of ladybugs, cockroaches, and houseflies are attached at the base of the tree.

Manipulating the insects as I created the ornaments proved beneficial as I observed so many different traits about the insects.  I discovered that insects are not so scary when they don’t move.  I would look at the intricate jointed appendages of the grasshoppers realizing they can be moved and posed into interesting, and sometimes funny positions.  The exoskeleton of insects is much harder than I first realized, and often times it was difficult to pin the insects.  I observed the spiders abdomen to discover the locations from which it expels its webbing.  When inserting insects into the round glass ornaments, I learned how to move their wings carefully.  It was fun to look at the colors and patterns closely.  I had also collected many soft bodied insects, such as a wooley bear caterpillar, swallow tail butterfly caterpillar, and other small worm like insects, but upon defrosting them, they did not keep their shape and started to rot, so they were not used in this project.

Lastly, family members collected some insects.  It was fun to hear of their stories.  My sister in law collected insects from her pool filter, but discovered that laying them out to dry was not a good idea because they were quickly stolen as food by the birds above.  My sister told me she would never put an insect in the freezer again because she felt guilty for ending its life.  Many people would also approach me when I was outside on campus with a bug net in hand to see what I captured.  When showing my insect ornaments to a friend, she just loved the one with the butterfly but shrieked when she saw the one containing simple wasps.  All of these incidents enabled me to share my experience with insects and enhance my knowledge.

As a result of this project, I learned not to fear insects so much.  I’m amazed by their architecture and ways in which they inhabit their earth, how they react to movements, and how they can manipulate their colors to mimic other insects, or send out chemical pheromones as warnings or to attract mates.  I hope other will enjoy viewing my new insect ornament collection on the tree as much as I did!

By: Cathy F. Testa
Project – PLSC 125
Insects, Food and Culture
Fall 2005 UCONN

Photography by Rene Bechard
http://www.renebechardphotography.com
Copyright 2011-2013.  All Rights Reserved

P.S.:  I don’t have a photo of the “insect tree” written about back then, for if I did, I would share it with readers.

Visit again soon, Cathy T
http://www.cathytesta.com
860-977-9473

HOMEMADE HOLIDAY GIFTS AT THE MARKET

Leave a comment

Greetings Visitors!

Heads-up, if you are in need of an evergreen wreath, candle centerpiece, cute and festive table décor, door swags or other evergreen creations, and live locally to my neck of the woods and nearby towns, please stop by on Friday, December 14th, at the Ellington Winter Market, 11 Pinney Street in the YMCA Building, 4:00 pm to 6:30 pm.

I will be there tucked in the corner surrounded by evergreens.  It is a great opportunity to pick up a hostess gift if you are on your way to a holiday gathering, a festive item to dress up your home, and holiday presents for your family and friends.  We know we all have very busy schedules this time of year, however, it only takes a few seconds to swing on your way to shopping malls or gatherings.  You will find other wonderful homemade and hand-crafted local gifts at the market – it is their Holiday Festival Date this Friday at the Ellington Winter Market.

At the Market

Cathy T at the Market

Yesterday, because I wasn’t exactly sure where the YMCA Building is located, I decided to take a ride after picking up my cat from the vet.  Here was my cat, meowing louder than a hungry baby in the car, and me driving down Windsorville Road.  The cat was becoming so loud, I accidentally took a left onto Pinney Road (instead of Pinney Street).  It didn’t take long for me to discover my error, I should have continued straight down Windsorville Road to the rotary.  Follow the rotary circle and take the 4th exit onto Rt 286/Pinney Street.  The YMCA Building is on your right shortly thereafter.  There is plenty of parking in the front.  http://mapq.st/UBgg6g

You know, I’ve never been inside this building before.  It is amazing how many new places I’m introduced to in town from the markets and my garden presentations, from libraries to churches.  Makes me realize, I need to check out my local offerings more often!  Shame on me!

There are many services, sometimes services which are free, which we overlook.  In fact, this afternoon I plan to go visit the new Vernon Community Arts Center at 709 Hartford Turnpike.  Up to Sunday, December 23, they are showcasing 70 local artists works.  Hours vary, so visit www.vernonarts.org to find the times, but I definitely want to go there to get some unusual holiday gifts.  And support our motivated and talented local artists.

I also have to make it out to the East Windsor Trolley Museum to see Jeannie Pomeroy-Murphy sing.  She is a local friend from my high school class, and I still haven’t made it out there – shame on me!  The CT Trolley Museum is having their Winterfest every weekend until Sunday, December 30th.  Great for kids because of the ride of lights on the antique trolleys.  For hours, visit www.ct-trolley.org.  They took a hit earlier this year, when someone stole items, which I read about in the newspaper.  This is the perfect time of year to help them recoop from the impact, by utilizing their services and seeing Jeannie sing too – support our local venues, they need us.

Maybe we need a tour bus arranged so we can be shuttled to all the local events as it seems they can be easily overlooked or there just doesn’t seem to be enough time in the day.  As for myself, I haven’t even started my Christmas shopping – I might as well have fun while doing it – so going to local events is one great way to do so.  Cathy T

http://www.cathytesta.com
860-977-9473
Cathy T’s Landscape Designs
https://www.facebook.com/pages/Cathy-Ts-Landscape-Designs/214478311912
http://pinterest.com/cathytesta/
Email:  cathy.testa@aol.com

Evergreen How-To Holidays – Open Studio Days

Leave a comment

All of my friends will think I’m an evergreen junkie at the rate I’m making holiday creations and offering hands-on how-to sessions in my classroom in Broad Brook, CT – BUT there are only two weeks until Christmas, so now is the time to make something beautiful to adorn your home during this festive season.

So for the next week, from Tuesday through Thursday, December 11-13th, you still have the opportunity to sign-up for a hands-on making session.  Sessions are available day or evening hours by appointment, so pick a time convenient and call me:  860-977-9473 or email me at cathy.testa@aol.com.

Each beautiful hand-crafted evergreen item, made by you, includes an amazing selection of beautiful fresh evergreens, mechanics to make your item of choice, and instruction.

Sure, you can buy one somewhere, but nothing beats the feeling of making your own to keep at your home or give as a gift during this holiday season.  Plus, the size you result with is very large and an amazing value – so call today if interested.  We can work out a time that meets your schedule during this busy holiday season.

OPTIONS TO MAKE:

Candle Centerpiece

Candle Centerpiece

Candle centerpiece:  Includes mix of evergreens, tapered candle, treated pine cones, mechanics and instruction.  Cost: $25 + tax.

Mixed Wreath

Mixed Wreath

12″ Mixed Greens Wreath:  Includes mix of evergreens, 12″ base ring size, one sided, when finished is approximately 20″ finished size.
Cost: $25 + tax.

Garland container topper (left)

Garland container topper (left)

Door Hanging Swag:  Includes mix of evergreens, bow tie top, and pine cones.
Cost: $22 + tax.

Container Topper or Window Box Topper:  My own creation!  It consists of a garland style mix of evergreens, that can be placed on top of the soil on your outdoor containers or window boxes.  Includes mix of evergreens, mechanics, and pine cones.  Cost is based on length and size of item.

THE EVERGREENS:

Because I’m a evergreen junkie, I just can not resist having some of the usual types of evergreens in my selections.  Besides the balsam and fraser fir, included are blue berried juniper, white pine, Korean fir, cedar with beautiful mini cones attached, noble fir, holly with red berries, and yew.  Yes, yew – which is a beautiful dark green filler in arrangements.

ALSO AVAILABLE FOR SALE:

Undecorated kissing balls are available for sale and 10″ fraser fir wreaths, hand-made by me, Cathy T.  If interested, call me today, supplies are limited.  Bow color based on your preference.  Supplies are limited so don’t hesitate to contact me.  Hope to see you soon.  And Happy Holidays…Cathy T

http://www.cathytesta.com
See my “HOLIDAY” board on Pinterest
Like my Business Page, Cathy T’s Landscape Designs, on Facebook to get a freebie item at your registered hands-on session
860-977-9473
email:  cathy.testa@aol.com

Evergreen Kissing Balls Class 2012

2 Comments
 
Candle Centerpiece

Good Morning, or Afternoon Everyone!

Today is the day I have the pleasure of teaching attendees the how-to’s of making gorgeous evergreen kissing balls for the holidays.  Wreath making is also being offered as well as mailbox swags, button balls, candle center pieces, and more.  This is my third annual class on this topic, and I couldn’t be more thrilled to hold it because is it fun, creative, and everyone leaves with a hand-made evergreen decoration.

For those reading my blog regularly, you know this tradition – at least for me – is partly due to my Canadian heritage, and the other part of the formula is being in the world of horticulture.  It can be dreary looking outside in the winter months, and having evergreens around your home in various décor showcases surely cheers one up.  It adds a nice dark green color against the soft snow of the season.Birdbath with Evergreens

I hang two kissing balls from hooks by my entrance door every year, on hooks used for hanging baskets in the summer.  I also make an evergreen topper for my whiskey barrels and insert a big wicker snowman with lights in the center.  I like putting evergreens on a iron garden bench and on the rim of my hearted birdbath.  And I hang evergreen garlands from various places too.  The list goes on.

Festive SnowyAs shown on my latest guest appearance on the CT Style televisions program (See:  http://www.wtnh.com/dpp/ct_style/holiday-kissing-ball#.ULnhI10o7IU), I mentioned kissing balls don’t just have to be hung from hooks or from the ceiling of your entrance doors or wrap around porches, although they look absolutely gorgeous there.  They can also be placed in a pretty holiday tin as a table centerpiece. Or you can create festive and fun snow man by using a kissing ball as the body. Another new creation I invented is what I call a “button ball” which is almost a full ball that is hung on the base of your windows, outdoors, on the center of the base.  Just think creatively.

Yesterday, my oil delivery guy tapped on my door to hand in my bill, and he said, “Your place looks so nice!”  I told him I was setting up a class and had people attending tomorrow.  He asked for what?…, and of course, I pointed to my kissing balls hanging right there, he said they were beautiful.  You know, I’ve had the mail man complement me on plants in summer, the woman delivering the newspapers mentioning she enjoys my big container garden season change up by the end of my driveway, and even an electrician this summer, working here, bought an item of mine on his way out that I just made for the farmers market.  He said his wife still raves about it still.

Candle CenterpieceThree days after my kissing ball and wreath making class, I’m holding a class at my local East Windsor Senior Center on how to make candle centerpieces with evergreens and decor.  My parents go to this senior center every single day, yes every week day, for lunch.  They love it there.  I never thought they would be so involved in a senior center, only because they spent so much time at home on our farm, and many of their best friends were Canadian relatives, but now he has many town friends from the senior center.

One day I ran into a person who is involved in running the center, and he said, at first my father was very quiet, yet now he talks to everyone non-stop.  I’m so glad the center is here for my parents, I truly appreciate this helpful service at a time when my parents are retired.  The senior center staff invited me to have lunch with them before we begin our hands-on session for candle centerpieces.  This is another class I’m looking forward to doing, especially because the attendees are good friends of my parents, and it is a local venue.

ev on plateThen it is off to decorating some business store fronts with evergreen décor and hopefully, after that is done, I can do a little more at home for myself.  Some of my favorite evergreens to use are boxwood, balsam and fraser firs, blue berried juniper, coned cedar, yew, holly, and white pine.  I went over why during my television segment, and will during classes.

I also love collecting pine cones which I bake in the oven for 15 to 20 minutes at a low temperature to kill any little critters that maybe hanging out in there, and this also opens them up if they are closed tight.  The fragrance emitted, as they slowly warmed up, is interesting, and kind of sets the mood too.

Beautiful, fresh, and textural evergreens dress up your outdoor environment this time of year, and will add a bit of fresh fragrance, and create festive, welcoming environment.  Once decorated, they can’t be beat and I think even the birds enjoy them.

A new trend I’m seeing is the evergreens are showcasing more unique light products, such as solar powered lights that can be tucked in the base, or you can put a string of lights in the base on top of the soil before inserting your greens and painted or natural branches for holiday outdoor containers and pots filled with evergreens.  You can even create an ice globe by filling a balloon with water, putting outdoors during freezing temps, it will freeze into a ball.  Then just peal off the balloon and you have an ice globe.  This globe tucked into the base of the evergreens in a holiday pot with lights can look very cool during the evenings.  And if it melts, oh well, that just gives some moisture to the tips and cuttings.

This year’s class is full, but keep it in mind for next season as it will return and grow each year.  Also, if you are interested in a custom order for evergreen décor, do not hesitate to contact me at cathy.testa@aol.com or 860-977-9473.  Thank you for visiting.  Don’t forget to see more photos on my business Facebook page:  Cathy T’s Landscape Designs, and on Pinterest for my holiday boards for ideas.  Cathy T

From Spark to Tradition

Leave a comment

I have a friend who has a tradition of raising turkeys every year for a butchering in time for Thanksgiving.  Well, it is actually her husband and his friends partaking in the butchering, but because she and I walk together in the mornings, I’ve witnessed the turkeys in the pen and the pile of feathers that follow when their annual event occurs.

One year, her dog sat quietly on their lawn witnessing the slaughter and cut up as the gang of guys did their work, and I said to my friend, “Gee, I wonder what your dog is thinking?”  She responded, “…I’m glad I’m not a turkey.”

I never asked her though, how did this whole thing get started?  They don’t live on a farm per say, but this tradition has grown so much at their home, to the point, soon they will need a bigger turkey pen.

Because I grew up on a farm, and my Dad butchered cows, this whole process is not repulsive to me.  At the age of 8 or 9, somewhere around there, I carried cow hearts and tongues in buckets, yes, buckets from the barn to the basement, where my Mom would be there grinding meat and packaging the butchered treasures for storage in the big basement freezer.

I crave freshly butchered meat now more than ever.  Store bought meat never does it for me.  So last year, I purchased a 1/4 of a cow from a local butcher.  The butcher was introduced to me by way of the turkey butchering friends!  Who would ever figure we’d be doing that, …going in on a cow?  Not surprising, but I would not have thought this would become a tradition with my walking partner.  Ironically, we walk right past the cow candidates on our walking route too.  How funny and ironic is that?  Sometimes, I’ll jokingly point to a big cow in the pasture and say, “You are next on our list!”  LOL.

Of the packages of butchered meat, the one I seem to enjoy the most is the ground beef.  The color is so red and fresh, I think I actually drooled once upon opening it.  I told my friend it is vampire-ish.  It brings me back to the memory of juicy meat, fresh from our family farm, and I feel that tradition of my childhood when carrying pieces of meat from the butchering barn to the processing station returning.  With a large family of eight, I’m sure it was the economical way to go as well.  Eventually my Dad had a butcher do the dirty work but we always had fresh meat on hand.

But how this tradition started for my family, or my friends’ family with the turkeys, is a mystery.  Traditions seem to be created over time, starting with an initial spark and leading to a grander event.

For me, my friends, family and some gardening enthusiasts, a tradition sparked at my home three years ago.  It did not include butchering an animal, but we do cut up quite a few evergreens!  I decided to teach a class on how to make evergreen kissing balls for the holidays.  Kissing balls are popular in Canada where my parents are from, and where many of my French Canadian relatives live today.

When we were kids, we headed up north almost every Christmas or New Years as a holiday tradition.  And when visiting Aunts and Uncles’ homes, I always saw kissing balls hung in-front of their doorways.  They hang them in front of local restaurants and hotels too.  When snow is clinging to them, it adds a special feeling of remembering the cold, festive days of a Canada visit.  In fact, you start seeing the evergreen kissing balls when approaching Vermont on the route up north.

These images of evergreen kissing balls dangling to welcome visitors is part of what sparked a thought that I should offer a class on how to make them, plus one of my favorite cousins had asked me to help her make some, so the combo of the two lead to my class.

KB at Spa Restaurant

KB at Spa Restaurant

My “how to make evergreen kissing balls class” turned out to be a very festive afternoon with the ladies, whom I refer to today, in year three of holding this class, as the “Kissing Ball Makers.”  That name was also a spark upon the suggestion of one of the attendees when she replied to an email about it.

Last year, I exclaimed to the group,”I’m going to hold this class every year for as many years as I can.”  And the group returns here on 12/1 this year to keep the tradition going strong.  It is my #1 favorite event for the holidays.

Holding it right after Thanksgiving subsides and the holiday decorating season begins is just about right.  The Kissing Ball Makers relax, chatter, and create before the hustle and bustle of holiday preparations start.  It is a bit of “me time” for the Kissing Ball Makers, and they take home a beautiful and festive evergreen creation of their own style.

During our creation process, we aren’t holding our iPhones (although we use them to check out our Holiday pin boards for inspiration!)  Here is mine:http://pinterest.com/cathytesta/holiday/, plus our hands are busy stuffing evergreens or sharing our favorite holiday appetizers without anyone having to do the clean up after.

In fact, I even enjoy that tradition of cleaning up the classroom floor the next day, finding tinsel and glitter here and there scattered around, some empty cocktail classes, and the sound in my mind of all the laughter and fun from the prior day’s event.

If you didn’t get a chance to get in on the sign-up list for this year’s class, which includes new items to make such as wreaths and mailbox evergreen swags, your next best alternative is to tune in on November 27th, Tuesday, at 12:30 pm, Channel 8 to see me return as a guest speaker on the CT Style program on WTNH.com, or watch it on the web right after it airs.  See http://www.wtnh.com/subindex/ct_style.

KBs in-front of house in Burke, VT.

In the meantime, I have to ask, “What is your favorite holiday tradition, and how did it spark?”

Happy Thanksgiving Everyone, Cathy T

Taking Down Musa ‘Basjoo’ Banana Plants

2 Comments

Most tropical plants will not survive our freezing outdoor winter temperatures in Connecticut, but they sure are fun to grow from summer to fall.  Because I’ve introduced many tropical plants to clients and gardening friends, I decided to offer my first class on how to overwinter the big three:  Canna, Colocasia (Elephant Ears), and Musa (Banana) plants.  It was held last weekend on October 13th, right after our first early frost the evening prior.

Their Home

I shared a brief overview of the tropics with the attendees so they could get to know where these plants come from.  By learning about their natural habitat, and gaining insight on how they grow and react to environmental conditions, one can connect the dots on how we treat them here in our planting zones as we prepare to overwinter them as dormant plants.  We discussed how tropicals experience winterless climates and have basically one season.  We also discussed characteristics, such as short-day plants, frost sensitivity, wide diversity, types of soils, and climate happenings in the tropics.  Everything from their tropical rainy to monsoon climates were considered.  To me, this paints the picture of who they are and more about their true home as they vacation at our homes during the summer months.

Plant Parts

We looked over a diagram of banana plant parts also.  One banana plant in particular, called Musa ‘Basjoo’, can actually be overwintered in the ground here in CT as long as you provide the correct protection around the base of the plant right after frost.  The diagram depicted how the plants grows as a mother plant, and a daughter plant arises next to it.  The rhizome, roots, and banana blossom and flower components were discussed.  Some off-shoots or suckers of banana plants are also called “pups.”  If banana plants receive enough months of the appropriate warm temperatures and sunlight, they will produce a flower bud and bananas.

Musa ‘Dwarf Cavendish’ Fruit

Banana Surprise

My sister-in-law’s banana plant bloomed and produced fruit this year, but it was not a Musa ‘Basjoo; it was another variety I gave her the previous summer season, called Musa ‘Dwarf Cavendish’.  It fruits at 5-7′ provided it gets enough warmth and light for at least nine months.  She kept it indoors as a houseplant last winter, and transitioned it outdoors this year in early summer.  It received eleven months of non-stop warmth and sunlight to grow, and a eventually a plum colored flower bud appeared.  The bud grew to the size of small football, and then the flowers began to form leading to the banana fruit.  This surprised her whole family.  At first they didn’t know what the bud was.  They observed how the banana fuits grew from it, and are still hanging on her plant today.  So far, they haven’t tasted any of them.  I think they are scared to try.  And now her mother plant is setting off many more pups.

Taking it Down

After sharing this amusing story, and the components of the banana plant’s flower and fruit, we headed outside to chop down a Musa ‘Basjoo’ in my landscape so everyone could see how it is done.  Also I wanted to share how tall the plants grew in one season.  This plant was planted in the early summer of 2011, and did “not” receive the protection steps last winter because of our freak October snowstorm. I ran out of time.  However, we had a very mild winter last year, and the mother plant returned, and a daughter plant right next to it grew as well.  Both reaching seven feet tall this season.  Musa ‘Basjoo’ can grow to 15 feet in ideal conditions per the growers’ references.  It is hardy in Zones 6-11 and can take full sun, or part sun to part shade.

Video of the Take Down

To see the quick video of taking down my Musa ‘Basjoo’ banana plant, go to my VIDEO GALLERY page on this blog, or click here:  https://cathytesta.wordpress.com/videos/.

Musa ‘Basjoo’, common name: Japanese Fiber Banana, can survive in the ground if protected appropriately in the fall season with layers of mulching materials.  Before you protect the base of the plant consisting of the pseudostem, rhizome and roots, you must do some easy lumberjack work after the foliage have been hit by frost and collapse.  I say easy because the trunk of this plant is fleshy and moist, so it doesn’t get hard like it would on an actual tree.  It not a trunk either, it is called a pseudostem made up of overlapping leaf sheaths.  I used a bow-saw to cut it about six inches from the base, and down it went.  As I said, “Timber!”, everyone in class laughed.

Chopped Down Musa ‘Basjoo’

Soil Conditions

Because the soil on the north side where these Musa plants were growing is more organic, maintains good soil moisture, and is somewhat protected by overgrown English Ivy (to be removed this year), it faired better than the ‘Basjoo’ banana plants in a small bed on west side, where the soil stayed dry, unless I watered it.

Banana plants like alot of water and rich soil to grow well, so the north side was the perfect conditions.  The house provided some shelter from the wind so that was also a bonus.  Leaves did not tear and served as a perch for birds visiting a bird feeder nearby.  I was sorry to see it go.  But the good news is it will return next season.

The Other Candidates

After we took down Musa ‘Basjoo’, we headed over to our class stations to learn how to dissemble Canna, Elephant Ear, and some other tropical plants from container gardens.  Attendees also brought along plants they could easily transport to learn how to treat each for winter survival.  It was the perfect day, bright sun and chilly air, with the frost occurring on queue, the evening before.  Class went well, and I plan to hold it again next autumn.  Attendees got the confidence they needed to do this process on their own.  Having a hands-on opportunity allows them to see the tools I like best for this process, and it also provides me with insight on the types of questions they have.

Birds Perch on Banana Leaves

Returning in Spring

Come spring, I will give my attendees the heads-up on the steps to take to reawaken their tropical plants for the next growing season in their container gardens.  As spring temperatures rise and the day light and length changes, the dormant rhizomes will sense the change and it will be time again to reap the rewards of storing your tropicals.  And as I told my class attendees, “If you try and succeed, awesome!  But if you tried and failed, oh well, just come see me again – I’ll have lots of tropicals for sale next spring!” Cathy T

My Parting Kiss with Chelone lyonii ‘Hot Lips’

Leave a comment

Every autumn, I take the time to write a plant review of the plants I enjoyed the most (and why), along with plants which disappointed me for whatever reason.  This season, Chelone lyonii ‘Hot Lips’ is ranked number 1 on my perennials’ list.

Bee Attractor

First Prize Winner

Chelone lyonii ‘Hot Lips’, common name: ‘Hot Lips’ Turtlehead, or pink turtlehead, is a perennial hardy in zones 4-7 with many desirable features and little problems.  It appreciates partial shade to full sun, is deer resistant, and a U.S. Native, but these were not the best of its attributes in my opinion.  My first attraction to it was its lustrous deep green to blue-green leaves, spotted on a stock at a wholesale yard this summer.

Love at First Sight

The moment I spotted the leaves on this plant and saw the tag’s photo of the flowers, it was love at first sight.  I was glad to see this perennial grows two to three feet in height with a spread of eighteen to twenty-four inches.  I wanted plants that grow big for showy container garden designs.  The plants were very healthy with fresh foliage and showing no signs of stress.  So off a few ‘Hot Lips’ plants went to my holding area along with other perennials and some shrubs.  Little did I know, this plant’s additional features would soon lead to a romance of admiration.

Pink Turtlehead

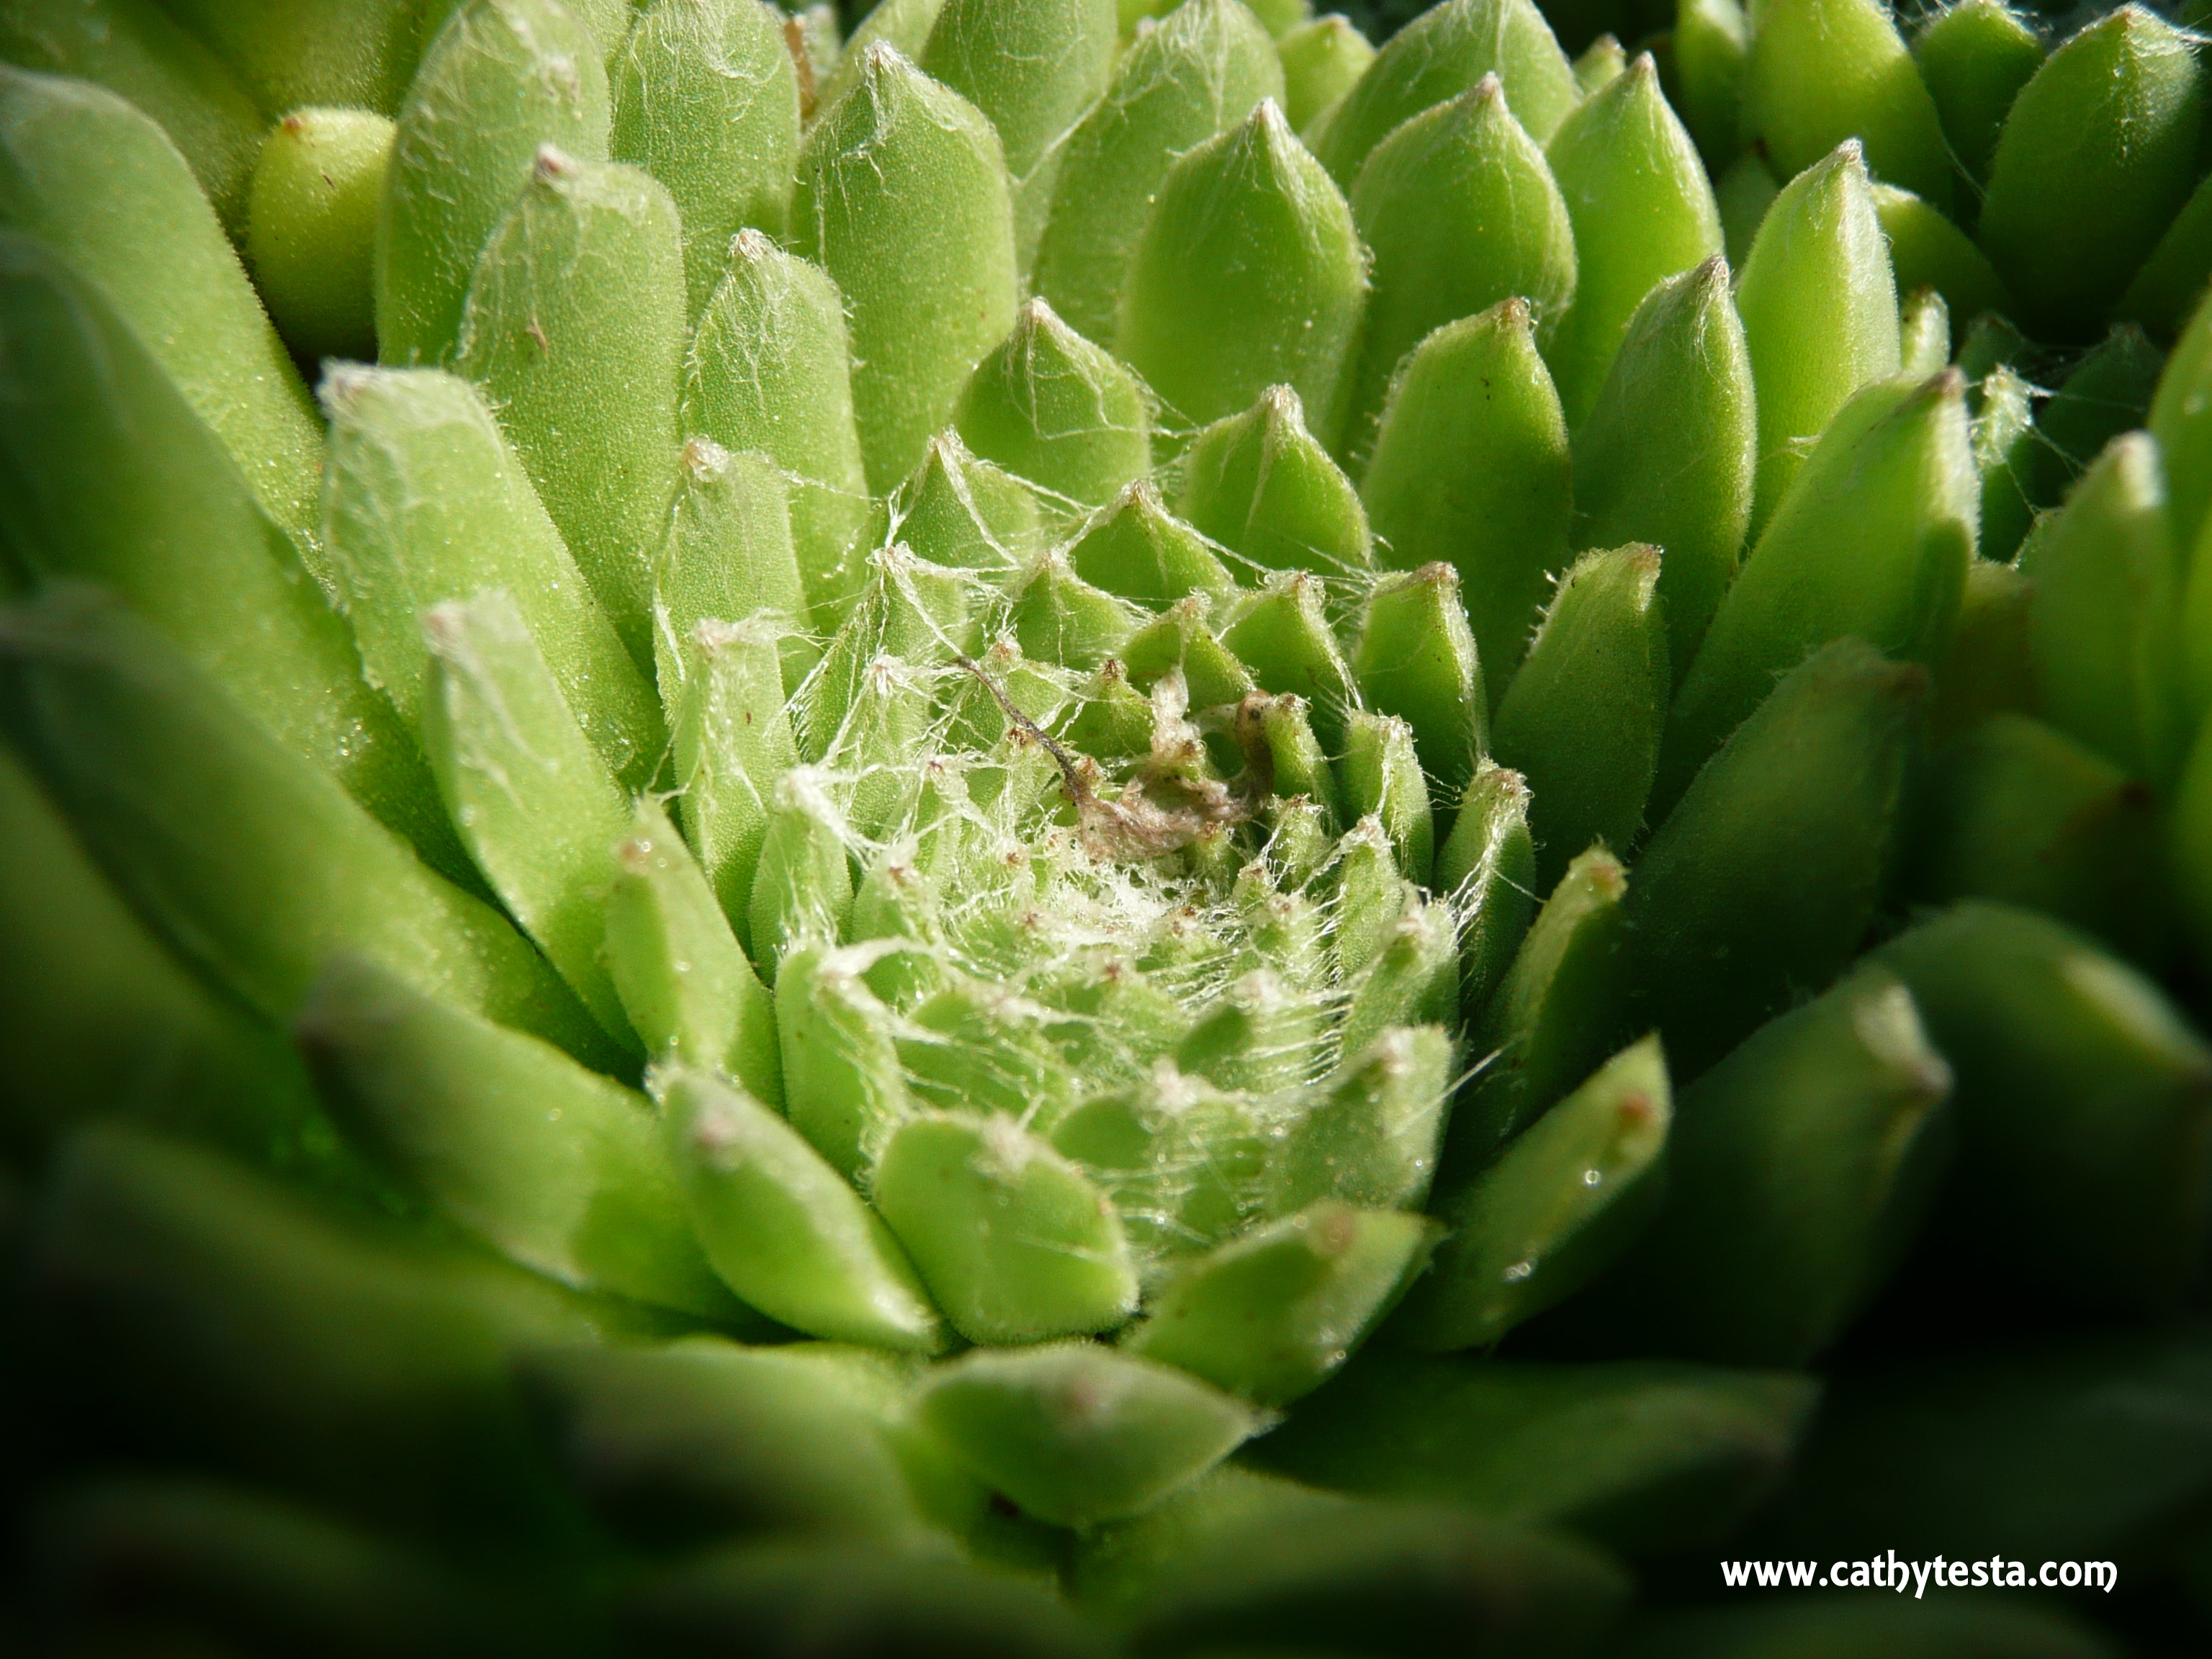
Serrated Blue-Green Leaves

Tags and references for this perennial will say the plant has deep green leaves, but take a look at my photo.  In my opinion, the leaves lean towards a “blue-green” coloring, combining very well with pastel or muted softer tones.  If you were to pull every color from this plant, you would also see some white and soft yellow (when you look closely at its bearded tongue down the throat of the flowers), softer pastel pinks, and deep raspberry like pink on edges of the flower’s hood, as well as some avocado green to the leaves.  It is important to pay attention to all the colors on a plant, some which may go unnoticed until you work with them by selecting companion plants to repeat or echo a color from the focal plant.  For example, I used a Cordyline with soft pink, yellow, and green streaking to repeat the hues in this perennial.  The blue-green leaves of ‘Hot Lips’ are also serrated and thick, offering a bit of texture, and the leaves of the Cordyline are big and coarse.  This helps to create texture comparisons in the design.  To soften the edge of the pot, I tucked in an ornamental grass with a bronzy color which worked well with the color of my container.

Curious Long Lasting Flowers

By early summer, this plant grew from a one gallon pot size to about two feet tall with a nice upright mound shape.  Soon the flower buds started to appear and plump up.  I was anxious to see the flowers open because they have an unusual structure, think “Little Shops of Horrors” plant character.  Tightly clustered on a raceme styled inflorescence, the flower buds open to reveal a hooded form with a bearded tongue within.  The continual elongation of the raceme made me consider if this is where the common name came from because it reminded me of a turtle elongating his head from its shell.  But I’ve read it is actually the flower when open that resembles a turtle’s head.  Either way, the flower is kind of cool and very pretty due to the intense hot pink colors.  And lucky me, they were abundant on this plant in my container from August to September, even into early October.

Turtlehead buds

Bee Attractor

In addition to the flower structure itself being of interest, its nectar and pollen offerings completely enticed bees during its long bloom period from late summer to fall. First to visit were bumblebees, followed by honeybees later in the season.  Many bees were diving into the hooded flowers, squirming and wiggling head first to reach the bounty within.  The flowers’ openings were just large enough to allow entrance with no turn zone available, so they would come out, in reverse, butt end first.  A loud buzzin’ sound amplified as the bee entered and exited.  It was a rather amusing buzz symphony, even my husband started to take notice.  I guess bees do not suffer from the fear of claustrophobia for it was a tight fit.  Now our temps have cooled, almost reaching our first frost point, the bees have silently dissipated.  Their love affair with ‘Hot Lips’ is over.

Butterfly Hummingbird Teaser

One afternoon, when I was admiring the bees up-close and taking photos, a hummingbird swooped near my head and swooshed by the plant’s top.  He was checking me and the flowers out on this now very large ‘Hot Lips’ turtlehead perennial plant.  So large now, it was the size of a small shrub.  So I decided to sit quietly on the ground and wait patiently to see if the hummingbird would return.  He did.  But of course, getting a photo was impossible due to their warp speed.  While this plant teased the hummingbird viewer, I personally never saw the hummingbird sipping from it, but it is certainly a candidate to add to the hummingbird or bee lover’s garden bed, with one catch.  It needs moist soils to perform well, and the right amount of space due to its larger size.  In gardens, it is best used mid section, but in container gardens you can place them wherever you want in a large container.  For me, containers worked well because of observation opportunities.

Bee backing up-See black end?

Consistently Moist Soils

At the time, I didn’t really pay attention to the fact that this perennial is best in moist soils.  Because it was heading to one of my large container gardens, it wasn’t a big concern.  And I like to water my container gardens, so I didn’t think about any issues there.  However, if you plan to use this perennial in a garden, it is best to situated it in an area with moisture for this is what it will thrive in.  And of course, to select companion plants that also appreciate moisture.  I could see a variegated Iris, with “blue-green” and “soft yellow” foliage color, working well.  It has the right coloring to harmonize with ‘Hot Lips’ and likes to sit in standing water, plus it has a spiky form and grows to a fairly big size of about thirty-six inches tall, so it would not get buried by ‘Hot Lips’ and would work well placed in front of it.   To add some drama, one may want to add an elephant ear, such as Colocasia esculenta ‘Maui Magic’ for the dark purple-black tones provide a great contrast.  Also enjoying part-shade and moisture.  While I’m at it, how about the ultra tall Filipendula spp., meadowsweet, with finer-wispy soft or deep pink flowers?  These all would work together in the moist garden bed, or in a big container garden.

Parting with ‘Hot Lips’

Saying goodbye to this perennial is difficult to do, but it will be transplanted and enjoyed next season. Yet to witness are its seedheads, attractive and offering one last moment of pleasure.  Next spring, it will be pruned and admired once again.  The bees will return, and all will be hummin’ along.  However, now, it is time to say goodbye to those hot lips with a parting kiss – well, you know what I mean…Saying goodbye to plants feels like a break-up.  Okay, I said it.  And breaking up is hard to do… Cathy T

The Parting Kiss
Poem 1788
by Robert Burns

Humid seal of soft affections,
Tenderest pledge of future bliss,
Dearest tie of young connections,
Love’s first snowdrop, virgin kiss!

Speaking silence, dumb confession,
Passion’s birth, and infant’s play,
Dove-like fondness, chaste concession,
Glowing dawn of future day!

Sorrowing joy, Adieu’s last action,
(Lingering lips must now disjoin),
What words can ever speak affection
So thrilling and sincere as thine!


Dieffenbachia no Dummy

3 Comments

Brought inside

They call Dieffenbachias Dumb Canes, which I guess is because they are relatively easy to grow, I’m not sure, but when I spotted one this summer, I grabbed it for the large coarse foliage, and the green color that is more like a limey green.  The foliage is speckled in different patterns of darker green.  I divided it immediately into three plants and put them into container garden combinations.

Yet, now as our temperatures start to cool between 45 and 50 during the evenings, I decided it is time to move my now large Dieffenbachia plants from their container gardens into smaller pots to keep as houseplants.

Lifting the plant carefully with roots and soil attached, I repotted it into new fresh soilless mix specifically for containerized plants, and placed it inside.

Last nite, it rained.  And its cool outside today.  But as a result of moving this one inside, I can see it already perking up.  It prefers the warmth.  It still could be “okay” outside, but better to be safe than sorry and risk it getting stressed.  This ultimately leads to damaged leaves, so I’m starting now.

Another bonus, this tender perennial can be increased by cuttings.  There is an air layer technique that is relatively easy to do.  I will discuss this in my upcoming class on October 13th, Saturday, on how to overwinter tropicals.  It is just another way to save money and multiply your plant investment.

Dieffenbachia (also referred to as Leopard lily) is frost tender, so it needs about 59 degrees F to perform well.  It should be grown in fertile, well-drained soils in sun to partial shade.  Some references will indicate partial-shade, but mine performed just as well in sun providing they were adequately watered.  They seemed to handle both conditions.

Now is a good time to move in these types of houseplant candidates, before they get too cold and wet from autumn rainfalls happening right now – and definitely before our first frost upcoming in October.

But bottom line, if you ask me, there is no reason to call this plant a dummy.  This is a rather beautiful foliage plant, wonderful as a specimen or in container garden designs with other plants, and its large tropical like showy foliage with speckled patterns offer color without flowers, plus starting with one plant leads to the potential of propagating even more.  I did not see one insect or disease on this plant all summer.

For those of you in CT, nearby my home town of Broad Brook, if you wish to learn more about how to store tropical plants or frost tender types like Dieffenbachia, now is the time to register for my upcoming class on October 13th, Saturday.  I am sending out pre-instructions with details to registered attendees today.  Just click on DIY and How-To Classes on this blog or email me at cathy.testa@aol.com if interested in participating at this hands-on class.  And …keep your eye out for the dummies out there – sometimes they are much smarter than you think!

Cathy T