Creating a Festive Air-Dry Clay Tree: Step-by-Step Guide

Leave a comment

As mentioned in a prior post on this site, I started playing with air-dry clay to make holiday decorations. It is more about crafting therapy for me. I find working with my hands, even on simple crafts, allows my mind to relax. I suffer from tinnitus (ear ringing) and when I’m focused on something else, it relieves my symptoms at times.

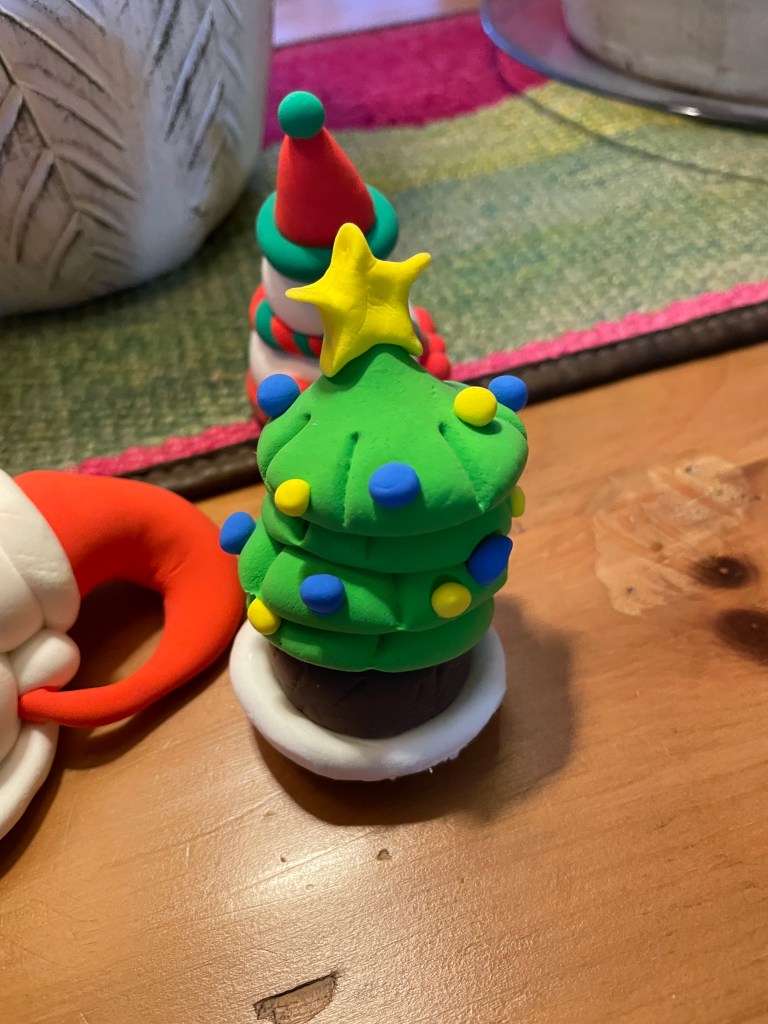
One fun creation was this holiday tree I made which is festive and fun. The colors are bright and vivid. It was an experiment and rather easy yet very fun to make!

Air-dry clay can be found on Amazon of course, like almost everything else! This one is labeled as:

36 Colors Magic Clay Nature Color DIY Air Dry Clay with Tools as Best Present for Children Toy for Kids.

It arrives in little packets of 36 different colors. The packets, more like pouches, are 0.45 oz each. They are plastic packets which seal on the top to help the clay from not drying out. The clay is light and is not baked after making something with it. It naturally dries to what I think feels like a hard foam of sort. It was about $8.99 to get the magic clay, as they called it.

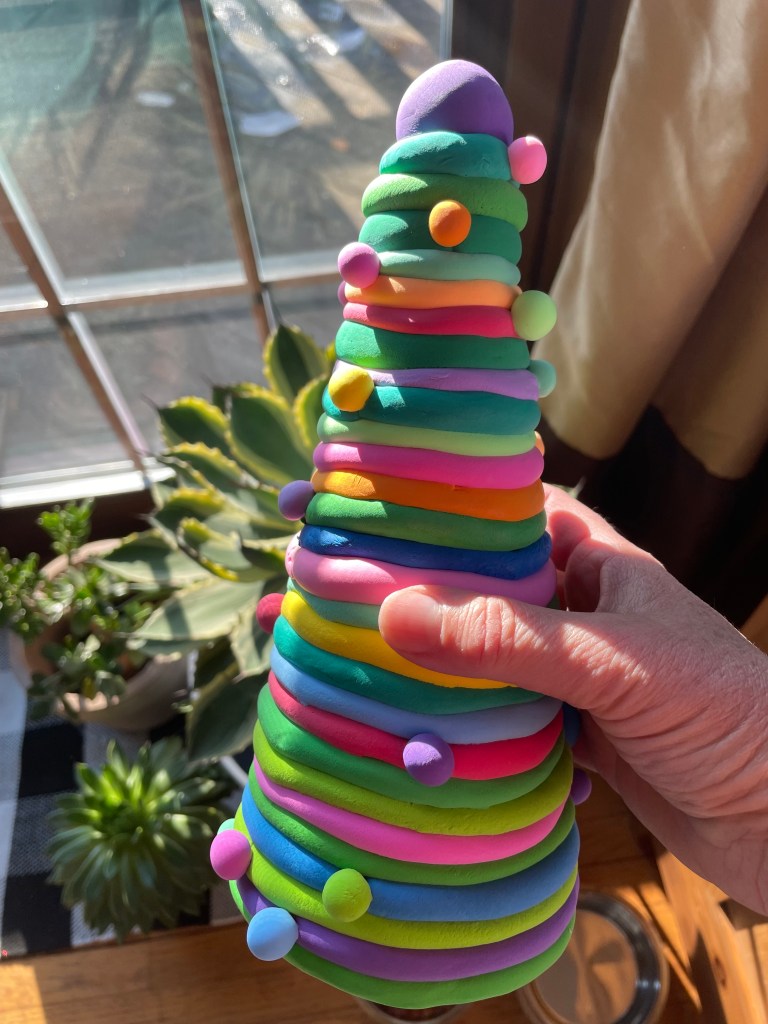
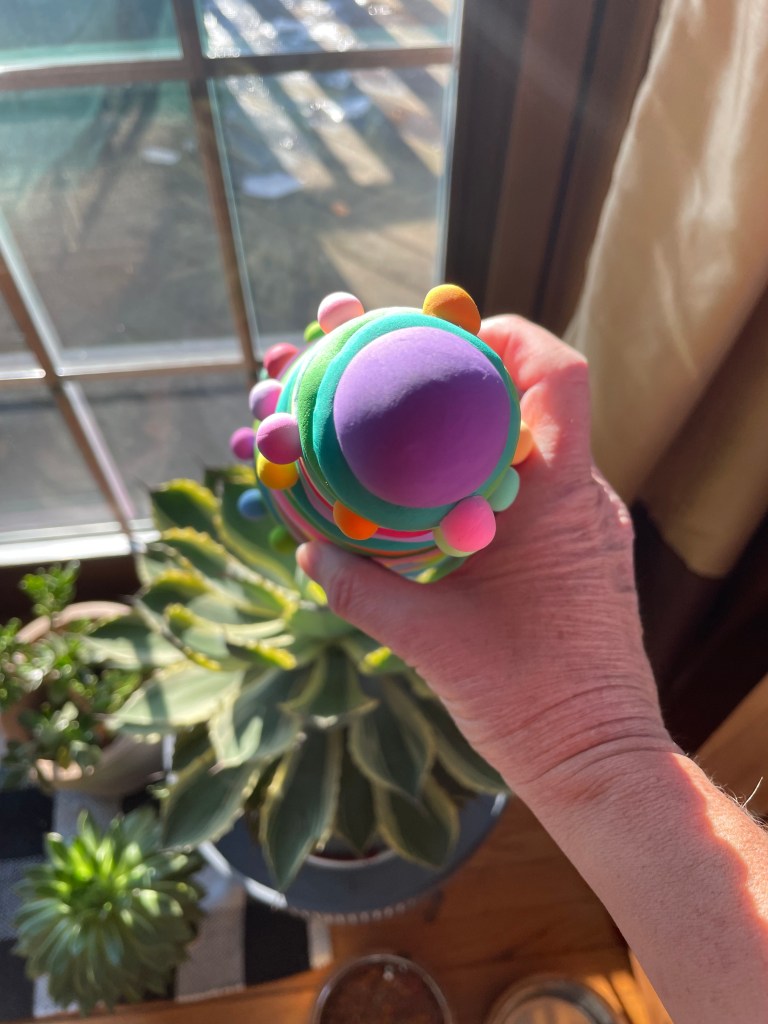
This is what I made with the clay recently. I like the colors. Festive, fun, and “Who-ville” like in my mind! I decided to use a Styrofoam cone center. I wrapped the cone in plastic wrap and began to create.

I selected colors one by one. I thought I should place a type of green color between each vivid color. Working from the bottom up. I would take clay out of the packet. I rolled it into a worm-like shape. Then I wrapped it around the foam. Remember, the foam also was wrapped in plastic wrap.

I connected the worm-like shape to form a ring around the foam for each layer. The ends were going to be attached. This would leave a line at the connection point. I decided to make that line at a different place for each “ring.” This way, I could add a little ball over that line. Hopefully this is making sense. I didn’t want each ring’s connection point to have a line all the way up. They should not be in the same place on the tree.

When I got to the top, I put a ball on top to finish it off. Each ring rolled out on a board before applying it to the cone was therapeutic to me. I put on a holiday movie and just enjoyed the whole process. Again, I worked from the bottom up.

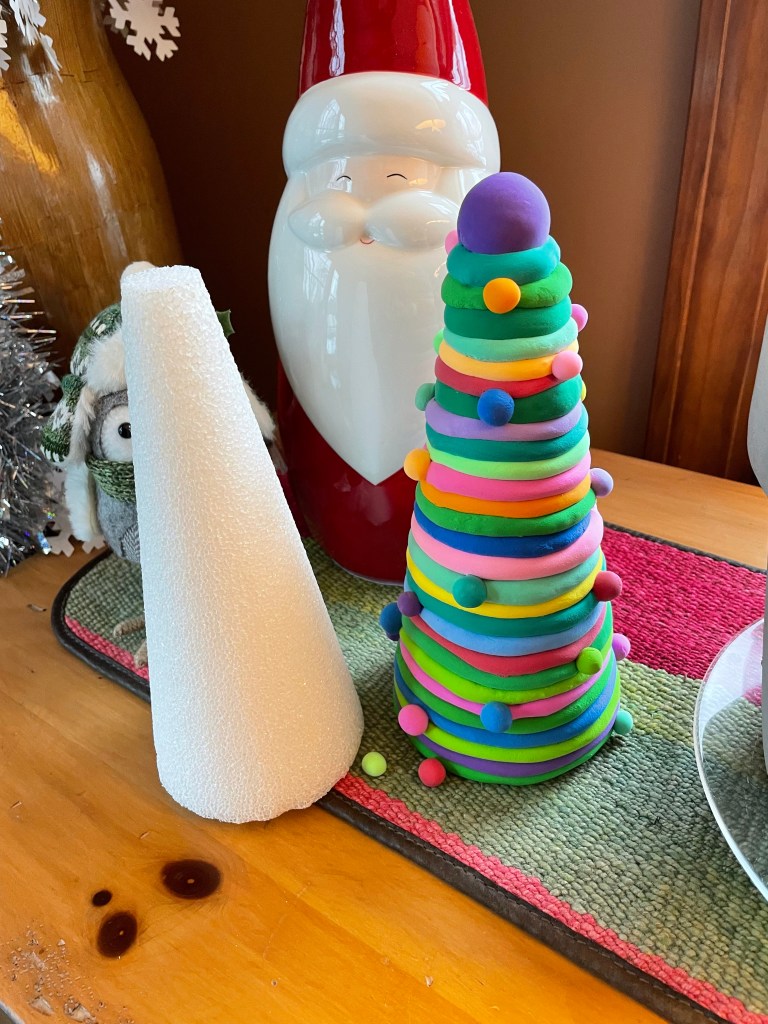
Air dry clay dries slowly. I have found when I made other three-dimensional items, they flop as they dry. The idea of using the foam center as a mold was to keep the tree upright as it dried out.

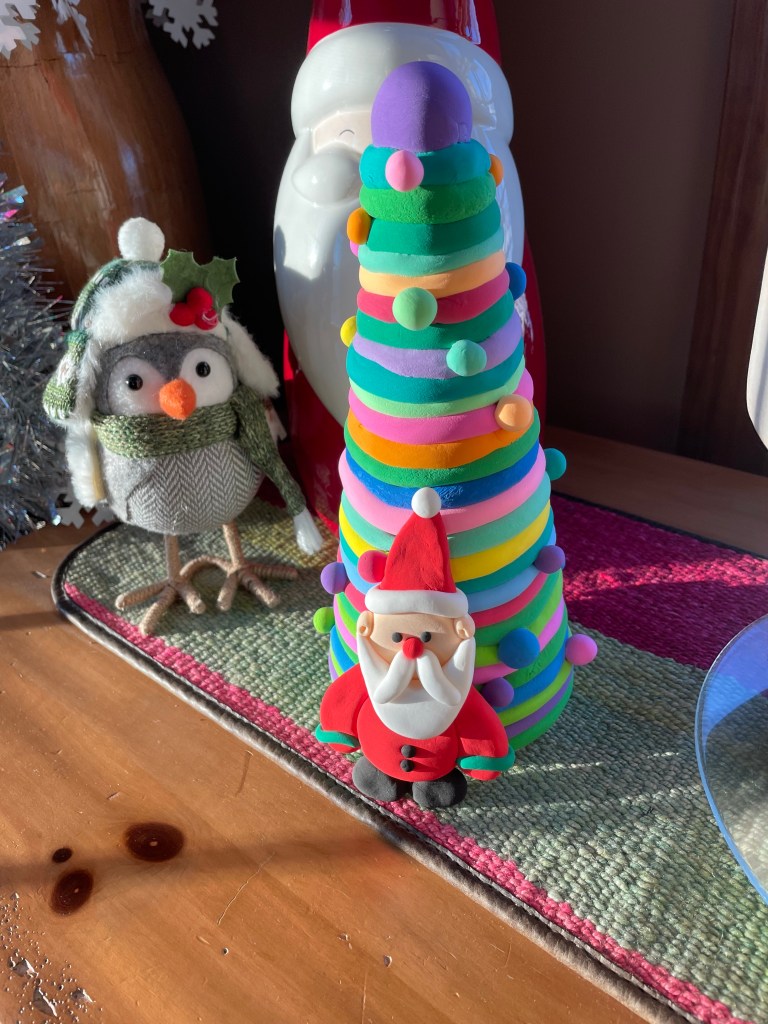
I let the air-dry tree stay on the foam center for about two full days. I started to contemplate adding my other little ornaments I made. These include the Santa. I decided not to add them to the air-dry clay tree.

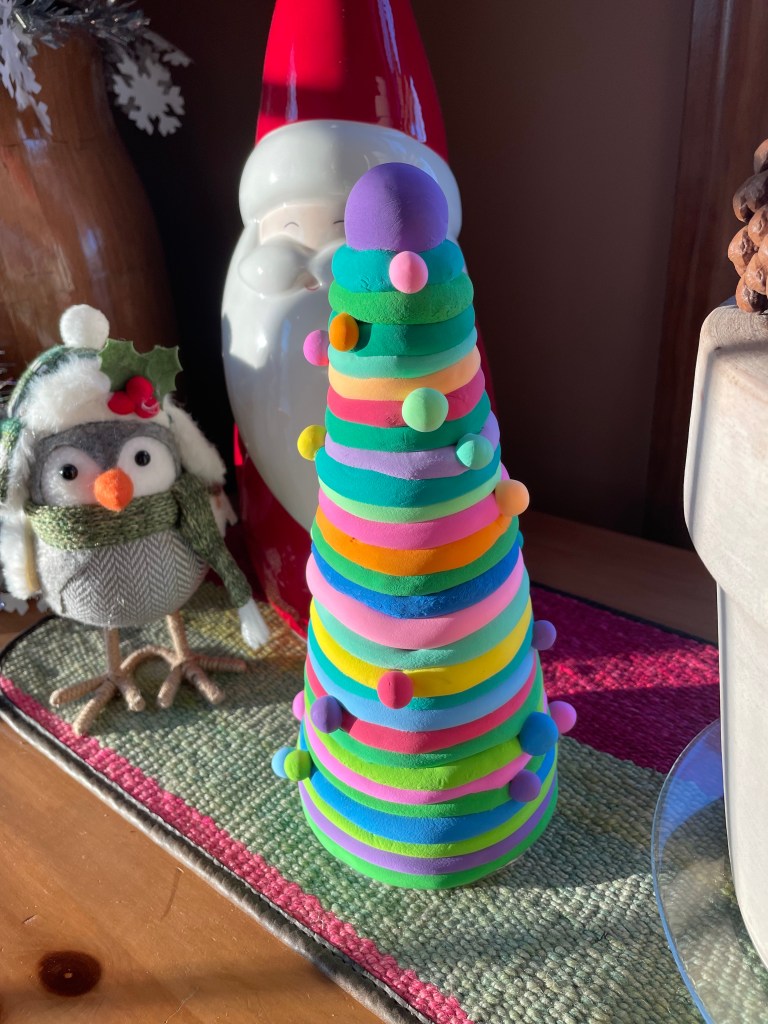
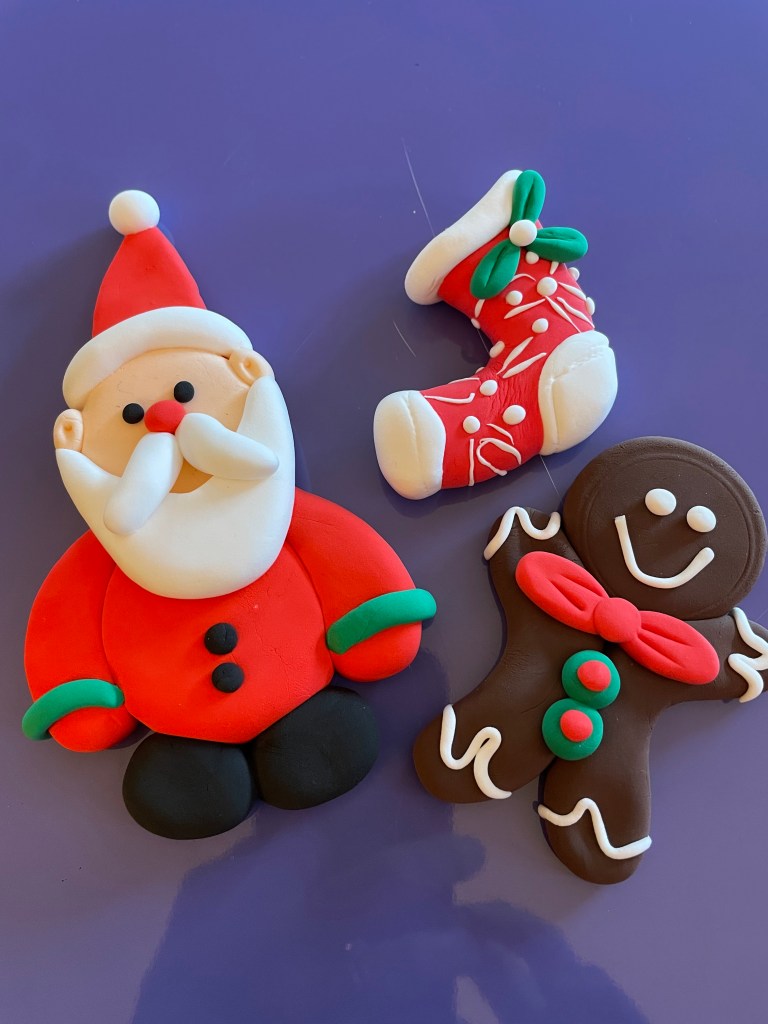
The flat ornaments I made of the Santa, stocking, and gingerbread man were fun to make too. In the end though, I think I loved making the festive funky color tree the best! I ended up making the other items (the Santa, stocking, gingerbread man) into ornaments to hang on my tree.

The last step of the tree was to remove the foam center. I gently tugged on the plastic wrap and eventually it came out. The center inside the tree was still damp. It slowly dried and the tree did not flop. If you put plastic wrap on the foam, leave a tail at the bottom end. This ensures you can grab it by the plastic wrap to pull it out of the air-dry clay tree. If tugging at the plastic wrap does not work. Take a tool to poke up the foam form on the bottom to try to grip it out.

As I worked on the tree, I started to add the balls for each ring. This was done to cover where the worm-like rings connected. Don’t wait too long to add the balls. It is best to add them while the clay is still damp so it sticks.

Here is the underside of the tree. This was another easy craft to make. The key is using colors that work together. And just enjoying the process.

Hope you enjoyed this post!

Cathy Testa

Date of Post: 12/20/2025

Simple Steps to Create Holiday Decor Balls

Leave a comment

I discovered a very simple method to make pretty holiday balls using a Styrofoam ball and holiday ribbon! I wish I had discovered it earlier. I would probably have many of them to put on my Christmas tree.

Supplies needed:

5″ Styrofoam ball or bigger if you wish
Holiday ribbon (I used 2″ wide solid gold ribbon)
A wooden dowel like tool with pointy end (a bamboo skewer would work)
Sharp scissors
1 piece of twine (3″-4″) to make a loop to hang

Video:

At the very end of this post is a video showing how I inserted the ribbon pieces. Scroll down to see.

Steps:

Cut the ribbon into pieces (see below). I went with between 5-6″ lengths. I believe I cut at least 60 pieces from the ribbon roll I had on hand. I wanted to do red, but my red ribbon on hand was shear and shiny. I knew the “white Styrofoam ball” would show through sheer ribbon. Cloth pieces can be used as well, but using ribbon for me was super easy. I grabbed a roll of the solid gold ribbon I had in my craft stock. I used sharp scissors to cut pieces 10 at a time.

Golden Ribbon above on a roll. It was wired ribbon, but I don’t think wired ribbon would be required.

View of the 2″ wide ribbon

View of the ribbon pieces. I cut the pieces on an angle on the ends. Also, I suggest you keep all the ribbon cuttings the same size so make a uniform ball.

Next step is getting the 5″ Styrofoam ball. And having your wooden dowel tool ready. I had some florist like long plant sticks on hand with one end is pointy. Trying to think of tools you already have on hand. For example, I think a bamboo skewer would work. Basically, anything that is somewhat long and has a pointed end. I don’t think anything “metal” would be good, it would poke thru the ribbon.

Take a piece of ribbon and push the center of it into the ball using the wooden tool. The tool does not poke thru the ribbon. Just pull the dowel tool away when you sense the ribbon piece is secure in the ball.

I believe I used at least 60 pieces of ribbon to cover the entire ball. I kept inserting each piece near the next until the ball was completely covered.

When you get to a place where you would want a piece of twine to hang it, make a loop with the twine and tie it together and put it with the ribbon to push it into the ball.

When you completely finish covering the ball, it looks like this.

You could imagine if you made several of these, you could put them in places in your tree to make it a nice design. As I mentioned before, I wanted to make red balls, but I didn’t have the red ribbon on hand.

Nice material can be used. If you had some type of cloth and cut that into pieces. It’s pretty easy to do. A a bit time consuming but I was enjoying it – to me it is Craft Therapy!

I ended up hanging the gold ribbon ball I made and it looks cute. There are possibilities with this craft item. They can be tied together like garland if you made several. They may be hung from a chandelier. Any color can be created.

Hope you give it a try!

Cathy Testa
Container Crazy CT
Date of this post: 12/19/2025

Using the dowel, insert each piece of ribbon by pushing it into the ball.

Fun and Easy Air-Dry Clay Crafts for Christmas

Leave a comment

Last year, I started playing around with air dry clay and making things with it for fun. No stress. Just a way to use my hands and play with clay.

Recently, this year, I made a few items and thought I’d share how it all went. First, I purchased packaged clay on Amazon. (BTW, I get no kickbacks from sharing thoughts on Amazon products, it is just FYI).

It was air dry clay for kids with six molding designs. This basically means a set of different colored clay portions came in six separate envelopes. They were nicely packaged. It had a little card to help you figure out how to design what is shown on the front. Here’s a photo of one to make a little wreath.

I liked the envelopes because if you have any clay left over, you store it in the package/envelope.

The instructions included in the packages were pretty basic. It was just a little card to show steps, but it was easy to understand. It had all the right holiday colors like red, green, white, etc. to make the item depicted on the front of the package.

What I have discovered with air dry clay is that it can flop. It is a little frustrating. I’ll make an item, like a snow man. As it dries, it starts to lean or flop.

In fact, my snowman started to turn into a melting snow man. Not literally melting, but you see below in the first photo how it is all the way over, like Mr. Snowman had a bender the night before.

The snowmen I ended up making were all different. I didn’t follow the package’s formula or design for the snowmen. I was just playing around with it. Adding little embellishments is easy as well, just stick into the clay like the mini trees and berries.

Here’s a tree I made where I did follow the design packet’s instructions. But again, it started to lean as it dried. The clay is soft and when it dries completely, it feels like a hard marshmallow texture.

The clay was leaning all the time. I thought, “Well, let me try to make some flat items instead of three dimensional.”

I really like how the flat creations came out. They look like Christmas cookies or even fondant cookies that would go on a cake. In fact, if a little kid was around, I would need to be careful. They would think it was a real cookie and take a bite!

This is when the fun started to kick in for me. I want to make more and will do so. I’m just trying to think of how to use them. I really don’t want to make ornaments, too traditional. Maybe they would look cute attached to something. Maybe I should make a fake cupcake and put it on the top – like a dessert! Or a fake cake?

Anyhow, that is about it for this post. These types of simple crafts would be fun to do with kids. The instructions are basic. The cleanup is easy.

Tips on the clay – once something is attached, it is not easily removed off. If you wet the clay and rub it, it will smear the color. You don’t want to do that. Any unused clay also needs to stay in an enclosed package to not dry out. It is best to use the clay relatively quickly because eventually it will dry out.

Thank you for visiting,

Cathy Testa

Date of this Post: 12/12/2025

Experience Niagara Falls: A Camping Adventure on the US Side

Leave a comment

Anytime you hear about someone visiting Niagara Falls, the question of which side is better to view the falls comes up. Discuss it with friends who have not yet been there or have been. “Is the US side or the Canada side better?”

Well, when we picked our 2nd camping adventure, we picked the US side, primarily because we had seen the Canada side many years ago on a non-camping trip. We looked for campgrounds not far from the falls and found a place called Branches of Niagara Campground Resort.

We stayed at Branches of Niagara in September of 2022. Since then, the campground’s name has changed to HTR resorts. The address is 2659 Whitehaven Road, Grand Island, NY. It took us about 8 hours to get there from our home location in CT. But the campground is only about 8-10 miles from the falls on the US side which was perfect for us.

It was a rainy trip on the road. It was quite an adventure for us as new travelers. We were pulling our 16-foot travel trailer with our older truck. We were so excited to be going. Nothing was going to stop us.

Because it was September, there were not too many campers at the campground – just a few – maybe like 6. The pool was closed but the pool area looked very nice and is well set-up. There is a fishing pond, and the grounds were very nice with lush green lawns. There are also some cute cabin rentals at this campground. It is a well-maintained place, and nothing looked old or worn out while we were there.

We were new to camping so we had no idea, but they didn’t give us the best site. It was number 71 on the map. My husband recalls it wasn’t completely level. It was good enough for us because we were newbies on the camping scene. It was a smaller site in an odd space. The bathroom was directly across from this site, which was handy. We have a bathroom in our small camper as well.

We couldn’t wait to go see the falls on the US side the day after our arrival. It was about 10 miles from the campsite to the falls park on the US side. We prepared for the day by making sure we wore good shoes and a sweatshirt with rain jackets. It had been mostly cloudy and rainy on our travel up to the campground. However, when we went to go visit the park, it turned out to be a beautiful sunny day. I was so thankful for that.

To be honest, I was sold on the US side of viewing the falls immediately because you can get so close to the water views. There are a couple parking areas on the US side on Goat Island, and I think we were in parking lot 3. We kind of just winged it and parked and then found the trail and followed it. It was so much fun. You can spend the whole day following the trail here. And you can get very close to rushing falls. We loved it. There are many spots to stop and check out various views of the rushing waters.

We came across a seating area and things like that. We did bring a small bag pack of snacks and stopped to eat where there were some tables and I think they sold food there, but we didn’t check that out at that time.

Look how close we were on the US side to the rushing waters. It was a thrill to be that close. While the Canadian side has many benefits, you really can’t get this close to that view shown above in the photo I took.

This was another area you reach while following the paved trails. You can see how lovely it is. It is a spot you want to just gaze for a while.

You can see the observation tower across this water view. However, for me, being so close to the fast-moving waters was bliss. Hearing the rushing sounds of it felt amazing.

I could share lots more photos of our walk on the trail. I’ll save them for when you go visit the falls yourself. There are many points to stop. You can take in the views and feel the misty rainfall from the falls. I’m sure there were things we missed too because we just winged it for the day.

The next day, we did go over to the Canada side. I did think ahead to have our passports handy. It was easy to cross over a bridge to get there thru customs. The Canada side is more hectic. There is a casino and more restaurants, and lots more people.

As I mentioned before, we had been there on the Canada side many years prior. We didn’t do the walk along the falls on the Canada side. Nor did we venture to the wine trail. We are “been there, done that” type of people and like seeing new things. We had explored the whole Canada side of the falls many years ago, doing a boat ride and visiting the casino, and having dinner at the top of a building, stuff like that.

Canada side above photo with the view of the casino and other buildings. When we exited here, we saw a nice view of the falls on the Canada side. But there are walkways below this area to view the Canada side of the falls. The trip happened back in 2022, which was 3 years ago. It is difficult to recall everything. Let’s just say we had a pleasant time.

The campground was a great location for us. We ate at two places nearby. One was called Griffon Gastropub on Military Road. I recall it wasn’t too thrilling. And another place was called the Brickyard Pub and BBQ in Lewiston, NY which we liked.

I would say in regard to the campground, it was a very nice place. We’d go back in warmer weather months. We actually used the heat in our camper because it was very cool at night that visit. We had full hook ups, and it was a clean place with full bathrooms. It was also a quiet place in September.

Hope this helps you visit. You may decide to see Niagara Falls in the US. You could also choose to visit Canada. You can do both like we did!

Cathy Testa
Date of Post: 12/8/2025

Creative Uses for Citrus Peels in Crafts

Leave a comment

I discovered a way to make a cute wreath with citrus peels. I saw a lady do this on a social media feed and thought how cute the wreaths looked, mostly for fall and Thanksgiving season, however. Also, it is kind of neat because using citrus peels is like recycling something that would have ended up in the trash or compost.

Another bonus is my husband really enjoys eating citrus fruits. And this time of year, pomegranates are in the grocery stores, so I used those as well. The darker red peel color worked really well against the colors of the oranges, clementines, even grapefruit. You could use limes or lemons as well.

It is super easy, and I happen to have crimped single wreath rings in my stock of craft supplies, but this could easily be done with a clothing wire hanger cut and formed into a circle. I had my husband cut my crimped wire frame so I could push the peels onto my wreath frame, and I got underway.

Anytime he or I had an orange or other citrus fruits as a snack, I asked him to save the peels. Then I tore them into pieces. It doesn’t matter the shape or size of the torn pieces. Can be random.

Above you can see the pomegranate peels, and I believe next to it is the grapefruit peels. It sure did smell good when I pushed the grapefruit peels onto the wire.

I did like grouping them, so all the peels were facing the same direction as it added more color.

In this photo above, I did some back-to-back and didn’t really like it – I preferred all the same direction to add more color so all the peel-colored sides face the same direction as they were stacked on.

This was when I finished. I just needed to add a bow. I think this is a great wreath to make for Thanksgiving. And they probably would be adorable in an even smaller wreath size. I think this was a 10″ wreath frame size. There are so many decorative options with this – could do some embellishments if you liked for fun.

My husband made this loop at one end and then made a little hook on the other to reattach the frame ends together when done putting all the peels onto it.

There are the pomegranate seeds and a clementine also used. They were yummy together – and pretty colors. It just takes a while to collect all the peels. I would just keep them in a bowl and then try to attach them to the frame rather quickly before they were too dry.

I forgot to take a pic of the bow part and now it is stored away since we are onto Christmas decorations. But this was an easy, affordable, and creative little craft project. I recommend wearing gloves because the wire started to blacken my hands while working on it – due to probably the acid of the citrus – I don’t know.

It dries naturally and smells nice while it does so. I suppose you could add essential oils on it later to add more fragrance to it.

Cathy Testa

Date of post: 12/6/2025

And PS – sorry I didn’t post this sooner. Making this in early November is best timing. Good one to remember for next year.